How to Replace a Door Handle: Complete DIY Installation Guide

Introduction
Replacing a door handle is one of the most satisfying home improvement projects you can tackle on a weekend afternoon. It is fast, affordable, and the results are immediately visible. A new handle can completely transform the look of a door without requiring paint, tools, or carpentry skills.
Old door handles wear out over time. They get loose, corrode, stick, or simply look outdated. Replacing them restores function, improves security, and gives your home a cleaner, more polished appearance. Whether you are updating a bedroom, bathroom, hallway, or front entry door, new hardware makes a noticeable difference.
Most homeowners can complete a standard interior door handle replacement in 30 to 60 minutes. Exterior door handles, handles with integrated locks, and smart locks may take a little longer. But with the right replacement hardware and this step-by-step guide, you can get the job done right the first time.
This guide covers everything: types of handles, how to choose the right replacement, tools you need, step-by-step installation, common problems, and expert tips. By the end, you will feel confident handling this project on your own.
Can You Replace a Door Handle Yourself?
Yes, most homeowners can replace a standard interior door handle without any prior experience. The process is straightforward, and the tools required are minimal. A basic screwdriver is often all you need.
That said, some situations call for a professional. If your door frame is damaged, your lock mechanism is broken or unusual, or you are dealing with a high-security entry door with complex hardware, it is worth calling a licensed locksmith or door hardware installer.
Here is a quick reference to help you decide:
DIY-Friendly Situations:
- Standard interior passage or privacy handles
- Direct handle-for-handle replacements of the same type and size
- Replacing a knob with a lever using a compatible backset
- Basic keyed entry handles on exterior doors
Consider a Professional When:
- The door frame is cracked or warped
- The existing lock mechanism is broken
- You are installing a smart lock with uncertain compatibility
- The door has structural alignment issues
- Extensive drilling or modification is required
Types of Door Handles
Understanding the different types of door handles helps you buy the right replacement and avoid compatibility issues.
Passage Door Handles
Passage handles do not lock. They are used on hallway doors, closets, pantries, and any space where privacy or security is not needed. They simply turn to open and close the door.
Privacy Door Handles
Privacy handles have a push-button or turn-button lock on the interior side. They are designed for bathrooms and bedrooms. They can be unlocked from the outside using a small tool or pin in an emergency.
Dummy Door Handles
Dummy handles are decorative and non-functional. They do not turn or engage a latch. They are typically used on double doors, cabinet doors, or pantries where one side is stationary.
Keyed Entry Door Handles
Keyed entry handles include a keyed lock cylinder. They are used on exterior doors, garages, and any entry point where security is required. These handles are more complex to install than interior types.
Lever Handles
Lever handles use a horizontal bar instead of a round knob. They are easier to operate for people with limited hand strength and are a popular choice for accessibility and modern design. They work in all handle categories above.
Dummy Door Handles
Lever and knob styles are both available for every handle category. The type refers to the locking function, while the style refers to the physical design. Knowing both helps you shop with confidence.
Door Handle Type Comparison Table
| Handle Type | Lock Function | Common Locations | Best For |
|---|---|---|---|
| Passage Handle | No lock | Hallways, closets | General interior doors |
| Privacy Handle | Interior lock | Bathrooms, bedrooms | Privacy without security |
| Dummy Handle | No latch | Double doors, cabinets | Decorative use only |
| Keyed Entry Handle | Keyed exterior lock | Front door, back door | Home security |
| Lever Handle | Varies by category | Any interior or exterior door | Accessibility, modern style |
| Knob Handle | Varies by category | Any interior or exterior door | Traditional style |
How to Choose the Right Replacement Door Handle
Choosing the correct replacement handle before you buy saves time, money, and frustration. Here is what to check.
Check the Door Thickness
Most residential doors are between 1-3/8 inches and 1-3/4 inches thick. Check your door’s thickness before purchasing. Most standard handles fit doors in this range, but always verify the product specifications.
Check the Backset
The backset is the distance from the edge of the door to the center of the borehole where the handle is installed. The two most common backsets in residential doors are 2-3/8 inches and 2-3/4 inches. Measure yours before buying a replacement. Some handles are adjustable; others are fixed.
Match the Existing Door Hardware
If you are only replacing one handle in a room or hallway, consider matching it to the surrounding hardware. Finish, style, and shape all affect how cohesive the result looks.
Choose the Right Handle Type
Replace a passage handle with a passage handle, a privacy handle with a privacy handle, and so on. Switching types usually means purchasing different hardware and sometimes modifying the door.
Consider Security
For exterior doors, check the security rating of the handle or lockset. Look for products that meet ANSI/BHMA Grade 1 security standards. The U.S. Consumer Product Safety Commission provides helpful guidance on door security and home safety.
Choose the Right Finish
Common finishes include satin nickel, oil-rubbed bronze, matte black, polished brass, and chrome. Match the finish to your existing hinges, light fixtures, or other hardware for a clean, consistent look.
Check Compatibility
Not all handles fit all doors. Door brand, bore size, hole spacing, and latch type all affect compatibility. Always read the product specs and, when possible, bring your old handle to the hardware store for reference.
Tools and Materials You Need
You do not need many tools to complete this project. Most of what you need is probably already in your toolbox.
| Tool or Material | Purpose | Recommended Use | Estimated Cost |
|---|---|---|---|
| Phillips Screwdriver | Remove and install mounting screws | All handle replacements | $5 – $15 |
| Flathead Screwdriver | Pop off cover plates or loosen set screws | Most handle types | $5 – $15 |
| Drill with Bits | Enlarge bore holes or drive screws | New holes or tight screws | $30 – $80 |
| Replacement Door Handle | New hardware for your door | All replacements | $15 – $150+ |
| Tape Measure | Measure backset and door thickness | Before purchasing hardware | $8 – $20 |
| Pencil | Mark screw hole positions | New installations | $1 – $3 |
| Utility Knife | Clean edges of latch mortise | Latch plate fitting | $8 – $20 |
| Wood Screws | Secure loose or stripped holes | When original holes are stripped | $3 – $10 |
| Cleaning Cloth | Clean door surface before installation | All replacements | $2 – $8 |
Keeping a well-stocked toolkit ready is something every homeowner benefits from. The home maintenance tools every homeowner needs article covers the essential items worth having on hand for projects like this one.
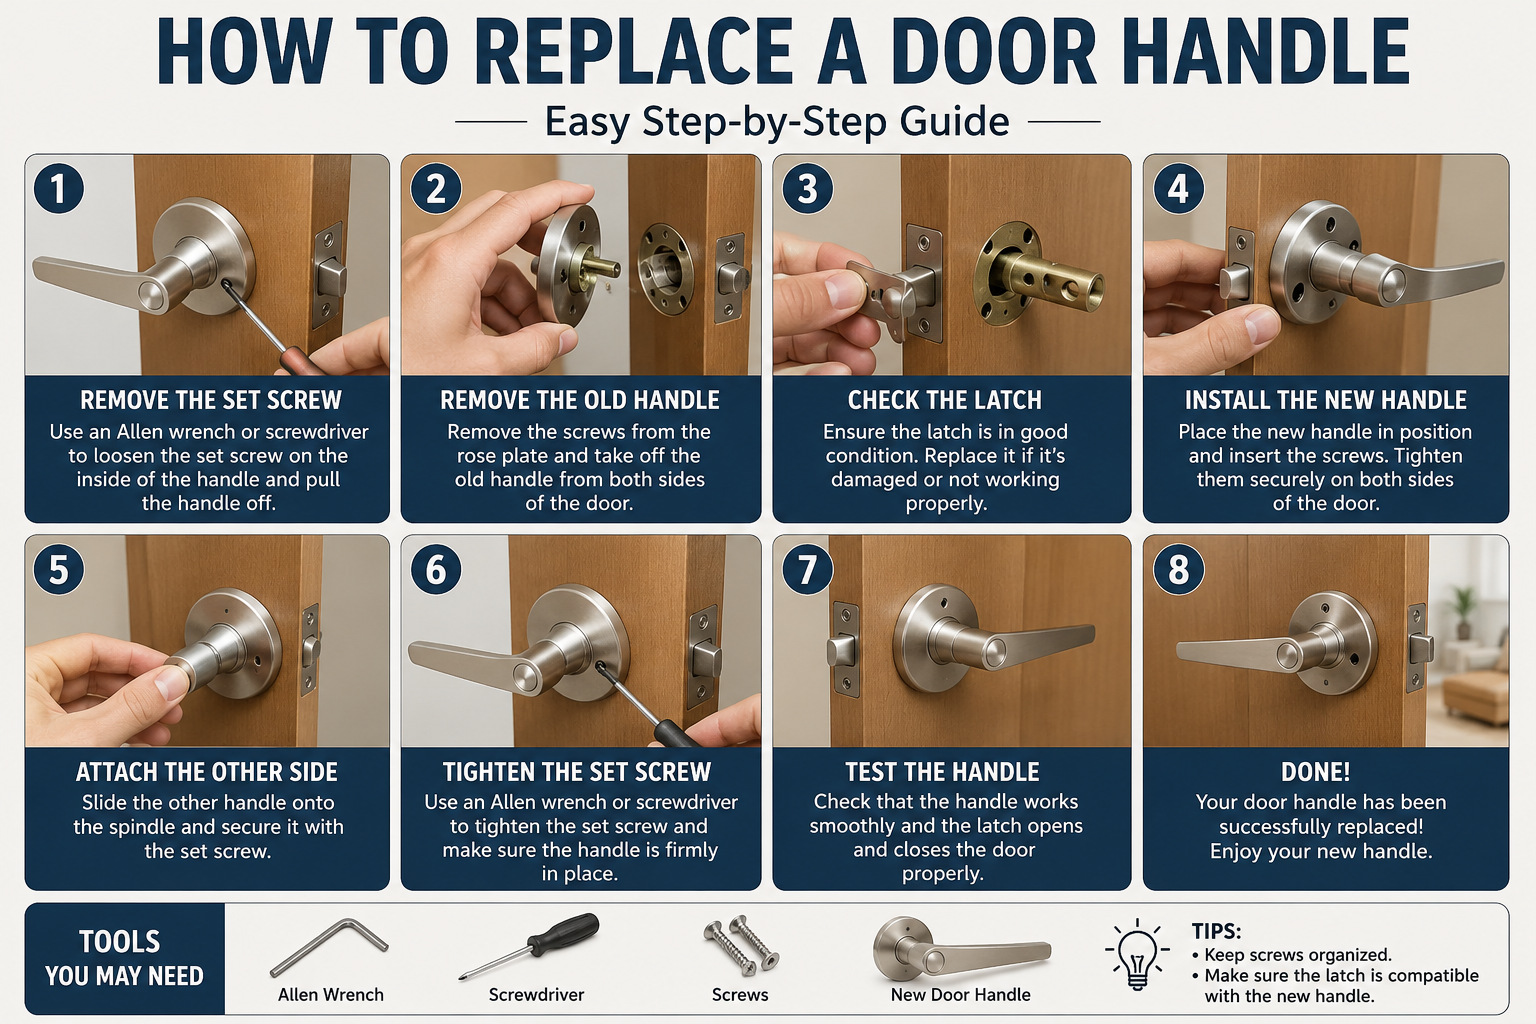
How to Replace a Door Handle Step by Step
Follow these steps carefully. Take your time with each one, especially if this is your first time replacing door hardware.
Step 1: Choose the Correct Replacement Handle
Before you remove anything, confirm that the new handle matches the old one in size, type, and backset. Read the product packaging and compare it to the specs you measured from your existing door. Do not skip this step. Buying the wrong hardware is the most common and most avoidable mistake.
Step 2: Remove the Existing Door Handle
Open the door so you can work comfortably on both sides. Look for screws on the interior side of the handle. Most handles have two visible screws on the interior rose plate or a small cover plate that hides them.
Some handles have a set screw or detent pin on the side of the handle or knob. Use a flathead screwdriver or small pin tool to press the detent and slide the handle off. Once the handle is loose, pull both sides apart and set them aside.
Step 3: Remove the Old Latch
Look at the edge of the door. You will see the latch plate held in place by one or two screws. Unscrew those and pull the latch assembly out of the hole in the door edge.
If the latch plate is recessed into a mortise, use your utility knife to gently clean around the edges if needed. Do not gouge the wood.
Step 4: Inspect the Door and Existing Holes
Look closely at the bore hole and latch hole for any damage. Check for cracks, soft wood, or stripped screw holes. Minor damage is easy to fix. You can fill stripped screw holes with a wooden toothpick and wood glue, let it dry, and then re-drive the screws into solid wood.
If the door itself has significant cracks or structural damage, it is worth consulting a professional before continuing. Learning how to patch holes in drywall is useful if wall damage appears during the process.
Step 5: Install the New Latch
Slide the new latch into the latch hole in the door edge. Make sure the beveled face of the latch points toward the door stop, which is the side the door closes against. This direction allows the latch to spring back automatically when the door closes.
Align the latch plate with the edge of the door. If it sits flush, secure it with the screws provided. If it needs to be mortised in, trace the plate with a pencil and use a chisel or utility knife to create a shallow recess.
Step 6: Install the New Handle
Thread the handle spindle through the latch from the exterior side. Then attach the interior handle by sliding it onto the spindle from the other side. Make sure both sides are properly aligned before tightening anything.
Refer to the manufacturer’s installation instructions at this stage. Handle assembly varies between brands and models. Following the included instructions prevents misalignment and ensures the mechanism works correctly.
Step 7: Tighten the Mounting Screws
Once both handles are aligned and seated properly, tighten the mounting screws. Use a screwdriver, not a drill, for the final tightening. Over-tightening with a drill can strip the holes or crack the rose plates.
The handles should feel firm but the mechanism should move freely. If the handle feels stiff after tightening, loosen the screws slightly.
Step 8: Install the Strike Plate
Close the door slowly and let the latch contact the door frame. You may see a mark where the latch hits. That mark tells you where to position the strike plate.
Align the strike plate over the mark, trace it, and chisel out a shallow mortise if needed. Screw the strike plate into place. The latch should slide smoothly into the strike plate opening without binding or catching.
Step 9: Test the Door Handle
With the door closed, test the handle from both sides. Turn or press the handle and confirm that the latch retracts fully. Let go and confirm that the latch springs back. Close and open the door several times to ensure smooth, consistent operation.
If the handle has a lock, engage and disengage it from both sides to confirm it works correctly.
Step 10: Make Final Adjustments
If the latch does not engage cleanly, adjust the strike plate position slightly. If the handle feels loose, check the screws again. If there is a visible gap between the rose plate and the door, the handle may need to sit a bit deeper on the spindle.
Small adjustments are normal and nothing to worry about. Take your time and make small changes until everything operates perfectly.
How to Replace a Door Knob With a Lever
Replacing a round door knob with a lever handle is a popular upgrade, especially for accessibility. Lever handles are easier to operate and tend to look more modern. Most lever handles are designed to fit the same standard bore hole size as knobs, which is typically 2-1/8 inches in diameter.
Before buying a lever, confirm that the backset of the new lever matches your existing door setup. Most are adjustable to fit both 2-3/8 inch and 2-3/4 inch backsets.
One thing to watch for is the hand orientation of lever handles. A lever designed for a right-hand door will not work correctly on a left-hand door. Check the packaging or product description before purchasing. Many quality levers are reversible, which eliminates this concern.
Installation follows the same steps as a standard handle replacement. The latch, rose plates, and screws work the same way.
How to Replace a Door Handle Without Changing the Lock
This is possible in many cases and a practical option when the existing lock still functions properly. Some handle sets separate the handle from the lock cylinder, allowing you to swap one without affecting the other.
Before buying a replacement, check whether your lock cylinder can be retained. Look at the product description to see if the handle is sold separately from the lock mechanism. If the backset, bore hole size, and spindle design match your existing lock, you can often swap the handle only.
This approach is ideal when the lock is new, keyed to other doors in your home, or recently rekeyed. Replacing just the handle saves money and avoids the hassle of adjusting strike plates and lock cylinders.
If you are unsure whether a new handle will work with your existing lock, bring both pieces to your local hardware store and ask a specialist.
How to Replace an Interior Door Handle
Interior door handles include those on bedrooms, bathrooms, closets, hallways, laundry rooms, and home offices. These handles do not need to withstand weather or provide high-level security, which makes them the easiest to replace.
For bedroom doors, install a privacy handle with a push-button or turn-button lock. For hallways and closets, a passage handle without a lock is the right choice. For linen closets or pantries with bypass doors, a dummy handle is typically used.
Interior handles come in a huge range of styles, finishes, and price points. This is a great opportunity to update your home’s interior design. Swapping dated brass knobs for brushed nickel levers across multiple doors can dramatically change the look of a space, especially after freshening up walls with paint. If you are updating a room at the same time, checking out how to paint a room: beginner’s guide can help you plan a complete refresh.
How to Replace an Exterior Door Handle
Exterior door handles face weather, temperature changes, and greater security demands than interior handles. Choosing the right exterior handle matters more.
Look for handles rated for exterior use with weather-resistant finishes such as stainless steel, oil-rubbed bronze, or powder-coated matte black. These finishes hold up better against rain, humidity, and UV exposure.
For front and back entry doors, keyed entry handles are the standard choice. Many come as a complete lockset that includes both the handle and the deadbolt. Replacing both at the same time is a smart move if either one is old, worn, or compromised.
After installation, confirm that the door closes completely, latches securely, and locks from both sides. Check that the handle does not wobble and that the latch engages the strike plate fully. Exterior doors that do not close or latch properly can create security vulnerabilities and energy loss.
How to Replace a Door Handle With a Lock
Replacing a door handle that includes an integrated lock follows the same general process as a standard handle replacement, but with extra steps for the lock cylinder. The lock cylinder typically sits within the exterior handle and is secured by a small retaining clip or set screw.
When installing a keyed handle or a handle with a privacy lock, always follow the manufacturer’s installation instructions carefully. Lock mechanisms vary significantly between brands. The instructions will walk you through proper cylinder placement, key orientation, and latch direction.
After installation, test the lock thoroughly before declaring the job done. Insert the key, lock and unlock it at least five times, and check that the latch and deadbolt (if applicable) both engage properly. Confirm the lock cannot be turned from the outside without the key.
Common Door Handle Problems
Even well-installed handles can develop problems over time. Here is a quick guide to diagnosing and fixing the most common issues.
Loose Door Handle
A loose handle usually means the mounting screws have worked themselves free. Open the handle cover plate, tighten the screws, and replace any that are stripped. Fill stripped holes with a wooden toothpick and wood glue for a solid anchor.
Door Handle Won’t Turn
This is often caused by a broken spring mechanism inside the latch or handle assembly. If the handle turns but the latch does not retract, the spindle connection may be broken. Replacement is typically the most practical solution.
Door Handle Sticks
A sticking handle can mean the spindle is misaligned or the handle is over-tightened. Loosen the mounting screws slightly, operate the handle a few times, and retighten. If the latch itself sticks, it may need lubrication with a dry graphite lubricant.
Door Does Not Latch
If the door does not latch, the latch and strike plate are likely misaligned. Close the door slowly and look at where the latch contacts the frame. Adjust the strike plate position or extend the mortise slightly to allow the latch to engage.
Door Handle Is Misaligned
Misalignment usually happens when the handle is installed before fully seating the spindle through the latch. Remove the handle, realign the spindle, and reinstall. This is a quick fix in most cases.
Door Handle Keeps Coming Loose
Repeated loosening often means the screw holes in the door are stripped. Remove the screws, fill the holes, allow them to cure fully, and reinstall with the original or slightly longer screws.
Door Won’t Lock Properly
If the lock does not engage fully, the strike plate may be mispositioned, or the lock cylinder may be installed incorrectly. Check the alignment first, then review the manufacturer’s lock installation instructions. A misaligned lock is also a security concern and should be corrected promptly.
Door Handle Problems and Solutions Table
| Problem | Likely Cause | Practical Solution |
|---|---|---|
| Loose Handle | Stripped or loose screws | Tighten screws; fill stripped holes |
| Handle Won’t Turn | Broken spring or spindle | Replace the handle assembly |
| Handle Sticks | Misalignment or over-tightening | Loosen screws; dry lubrication |
| Door Does Not Latch | Misaligned strike plate | Adjust or reposition strike plate |
| Handle Misaligned | Spindle not fully seated | Remove, reseat spindle, reinstall |
| Handle Keeps Loosening | Stripped screw holes | Fill holes; reinstall with longer screws |
| Lock Won’t Engage | Mispositioned strike plate or lock | Realign strike plate; check cylinder install |
Common Mistakes When Replacing a Door Handle
Avoiding these mistakes will save you a second trip to the hardware store and a lot of frustration.
Buying the Wrong Size
Not all door handles fit all doors. Always measure first and check compatibility before purchasing.
Ignoring the Backset
Installing a handle with the wrong backset results in a misaligned latch and a door that does not close properly. Always measure your existing backset before shopping.
Installing the Latch Incorrectly
The beveled side of the latch must face the door stop. Installing it backward means the door will not latch when closed. It is a simple fix, but easy to get wrong on the first try.
Over-Tightening Screws
Cranking screws too tight can crack the rose plate, strip the holes, or cause the handle mechanism to bind. Tighten firmly by hand until snug, then stop.
Forgetting to Test the Latch
Always test the latch before considering the job finished. Close and open the door five to ten times to confirm consistent operation.
Misaligning the Strike Plate
A strike plate that is even a little off will prevent the door from latching. Take time to align it properly, mark it precisely, and test before final installation.
Choosing Incompatible Hardware
Not every handle works with every door or existing lock. Check compatibility for bore size, backset, door thickness, and hand orientation before purchasing.
How to Make a Door Handle Installation Look Professional
A clean installation makes a visible difference. Here are a few tips that experienced installers use every time.
Clean the door surface before installing the new handle. Remove old dirt, oil, and any residue from the previous hardware. A clean cloth and a mild cleaner work well.
Check that the handle rose plate sits completely flush against the door. Even a small gap looks unprofessional and can indicate a misaligned installation.
Make sure all screws are fully seated and the slots are aligned in the same direction. It is a small detail, but it makes the finished installation look intentional and polished.
Use painter’s tape around the latch mortise area if you need to trim the wood with a utility knife. It protects the surrounding finish and keeps your edges sharp.
Do a final inspection with the door in both the open and closed position. Check the handle, the latch, the strike plate, and the finish for any inconsistencies before putting your tools away.
DIY vs Professional Door Handle Replacement
| Factor | DIY | Professional |
|---|---|---|
| Cost | $15 – $150+ (hardware only) | $75 – $250+ (labor + hardware) |
| Time | 30 – 90 minutes | 30 – 60 minutes |
| Skill Level | Beginner-friendly | No experience needed |
| Best For | Standard handle replacement | Damaged doors, complex locks, smart locks |
Estimated Door Handle Replacement Cost
| Item | Estimated Cost Range |
|---|---|
| Basic Interior Passage Handle | $15 – $40 |
| Privacy Door Handle | $20 – $60 |
| Lever Handle (Interior) | $25 – $80 |
| Keyed Exterior Handle | $40 – $150+ |
| Replacement Latch Only | $10 – $30 |
| Strike Plate Replacement | $5 – $20 |
| Professional Installation (Labor) | $50 – $150 per door |
Keep in mind that actual costs vary significantly based on hardware quality, brand, door type, location, and local labor rates. Premium hardware, smart locks, and high-security entry systems can cost considerably more than the estimates above.
Door Handle Maintenance Tips
Taking care of your door handles extends their life and prevents problems before they start.
Wipe handles down regularly with a soft cloth to remove fingerprints, dust, and moisture. Avoid harsh chemical cleaners that can damage the finish. For most finishes, a damp cloth is all you need.
Check the mounting screws every six to twelve months. A quick tightening takes thirty seconds and prevents handles from becoming loose or wobbly. Adding this task to your seasonal home maintenance routine is a smart habit. The ultimate home maintenance checklist for every season covers this and dozens of other easy upkeep tasks.
Lubricate the latch mechanism if it begins to feel sticky or slow. Use a dry graphite lubricant rather than an oil-based product. Oil attracts dust and can cause the mechanism to gum up over time.
Inspect the finish annually for signs of corrosion, peeling, or wear, especially on exterior handles. Catching problems early prevents the need for premature replacement.
Door Handle Safety and Security Tips
Your door handles play a direct role in the safety and security of your home. Here is what to keep in mind.
Always confirm that exterior handles and locks engage fully after installation. A handle that appears locked but does not fully engage the lock cylinder is a security risk.
Check exterior door hardware for signs of wear, damage, or tampering every few months. Damaged or loose exterior handles should be repaired or replaced promptly. Keeping track of these checks is easier with a home maintenance checklist by month.
Avoid using cheap or unrated hardware on entry doors. Look for ANSI/BHMA Grade 1 or Grade 2 ratings for exterior residential locksets.
Keep spare keys in a secure location, not under a mat or in an obvious hiding spot. If you ever lose a key or believe your home security is compromised, rekeying or replacing the lock cylinder is a fast and affordable solution.
Never use a lock that is visibly damaged, worn, or difficult to operate. These are signs that replacement is overdue.
When to Call a Professional
Most door handle replacements are straightforward DIY projects. But some situations genuinely require professional expertise.
Call a licensed locksmith or door hardware installer when:
- The door frame is cracked, warped, or structurally damaged
- The existing lock mechanism is broken and cannot be removed conventionally
- You are installing a smart lock and are unsure about compatibility or wiring
- The door is significantly misaligned and does not close or latch correctly
- Extensive drilling or modification is needed to fit new hardware
- You are dealing with a high-security door or specialized locking system
- Multiple doors need to be rekeyed to a single key system
If you notice larger problems around the door, such as cracked trim, wall damage, or soft framing, those issues may need to be addressed before or alongside the hardware replacement. Knowing how to repair small drywall holes and how to patch holes in drywall can help you address minor surrounding damage yourself.
Expert Tips for Choosing and Installing Door Handles
After years of working with door hardware, here are the insights that make the biggest difference:
- Always buy from a reputable brand with a warranty. Cheap hardware fails faster and often does not meet standard sizing specs.
- Buy your handle from a store that allows returns. If something does not fit after measuring, you need that option.
- When replacing multiple handles in the same home, purchase them all at the same time from the same product line. Finishes can vary between production batches.
- If you strip a screw hole, do not just force a larger screw. Fill the hole properly first. A proper repair lasts for years. A forced repair lasts a few weeks.
- For exterior doors, replace the handle and the deadbolt at the same time if both are worn. Matching hardware from the same brand typically means better finish consistency and easier installation.
- Keep the old handle until the new one is fully installed and tested. You may need it for comparison or as a backup if something does not fit.
- If a door has never latched properly, look at whether the door is sagging or the hinges need attention before assuming the handle or strike plate is the problem.
Tracking all your home repairs and upgrades in one place is a practical habit. A DIY home inspection checklist helps you document what has been replaced, when, and what still needs attention.
Frequently Asked Questions
How long does it take to replace a door handle?
Most standard interior door handle replacements take 30 to 60 minutes when you have the right tools and hardware ready. Exterior keyed handles with lock cylinders may take closer to 60 to 90 minutes. If this is your first time, budget a little extra time to read the instructions and double-check measurements. The process itself is straightforward once you have done it once. Subsequent replacements typically go much faster.
Do I need to replace the door latch when I replace the handle?
Not always. If your existing latch is in good condition, fits the new handle, and operates smoothly, you can often reuse it. However, most replacement handles come with a matching latch included. Using the included latch ensures compatibility and usually looks better. If the old latch is worn, stiff, or slightly bent, replace it along with the handle.
What is the difference between a backset of 2-3/8 inches and 2-3/4 inches?
The backset is the distance from the edge of the door to the center of the handle bore hole. A 2-3/8 inch backset is more common on older doors and hollow-core interior doors. A 2-3/4 inch backset is typical on newer doors and solid exterior doors. Most modern replacement handles are adjustable to fit both. Always measure your existing backset before purchasing a replacement to avoid installation problems.
Can I replace an exterior door handle myself?
Yes, in most cases. Replacing a standard keyed entry handle on an exterior door is within the skill range of most homeowners. The process is similar to interior handle replacement with a few extra steps for the lock cylinder. Follow the manufacturer’s installation instructions carefully, and test the lock thoroughly before finishing. If your exterior door has a damaged frame, a broken lock, or specialized security hardware, a professional locksmith is the better option.
Why does my new door handle feel stiff after installation?
A stiff handle after installation usually means the mounting screws are too tight. The over-tightening creates friction in the handle mechanism. Loosen the screws slightly, operate the handle several times to work the mechanism, and then snug the screws back up without over-tightening. If the handle still feels stiff, confirm that the spindle is fully aligned through the latch and that the latch itself is not binding in the edge hole.
Can I change the finish of my existing door handle?
You can, but it requires a different approach than hardware replacement. Refinishing a door handle involves stripping the existing finish and applying a specialty metal paint or powder coating. This is time-consuming and rarely achieves the same quality as a factory finish. In most cases, it is more practical and cost-effective to simply purchase a new handle in the finish you prefer. Handle sets are available in nearly every finish and are often more affordable than the refinishing process.
How do I know if my door handle needs to be replaced rather than repaired?
If the handle mechanism is broken, the finish is severely corroded or peeling, or the spindle is cracked, replacement is the right call. If the problem is a loose screw, minor sticking, or a slightly misaligned strike plate, repair is usually sufficient. A rule of thumb: if the cost of the repair approaches or exceeds the cost of a comparable replacement handle, replace it. For hardware under $40, replacement almost always makes more sense than investing time in a repair.
Does replacing a door handle improve home security?
Replacing an old, worn, or damaged handle with a high-quality keyed entry handle or lockset can improve security. However, the handle alone does not define door security. The deadbolt, door frame condition, strike plate quality, and door material all contribute equally. A heavy-duty strike plate with long screws anchored into the door frame stud is one of the most effective and affordable security upgrades available. Pair it with a Grade 1 lockset for meaningful improvement.
What tools do I need to replace a door handle?
For most handle replacements, a Phillips screwdriver and a flathead screwdriver are all you need. A tape measure helps you confirm the backset before purchasing. A drill is useful if you are enlarging a bore hole or need to drive screws into a hard surface. A utility knife helps trim a latch mortise for a clean fit. Most of these tools are standard items that homeowners already own, which is one reason door handle replacement is such an accessible DIY project.
Can a door handle be installed on a door that has never had one?
Yes, but it requires more work. You will need to drill the bore hole for the handle, drill the edge hole for the latch, and chisel out mortises for the latch plate and strike plate. This process requires a door lock installation kit, which includes a hole saw and an edge drill bit. The process is more involved than a simple replacement, but it is manageable for a confident DIYer. For fire-rated or specialized doors, consult a professional to confirm that modifications do not violate fire code requirements.
Conclusion
Replacing a door handle is one of the most practical and rewarding home improvement projects available to any homeowner. It improves function, security, and appearance with minimal tools and very little time. Whether you are swapping an old knob for a modern lever, upgrading to a keyed entry handle on an exterior door, or simply replacing a worn-out bathroom handle, the process is well within reach for most people.
Take the time to measure your backset and door thickness before buying. Choose compatible, quality hardware. Follow the manufacturer’s installation instructions. Test everything before putting your tools away.
Small details like clean screw alignment, a flush rose plate, and a properly engaged latch separate a good installation from a great one. Get those details right and the result will look and feel like professional work.
If any part of the project moves beyond a standard replacement into damaged frames, broken locks, or structural door issues, do not hesitate to call a professional. Knowing when to ask for help is just as valuable as knowing how to do the job yourself.