How to Install Floating Shelves: A Complete Beginner-Friendly Guide

Introduction
Floating shelves are one of the most popular DIY home improvement projects for good reason. They add storage and display space without taking up any floor area. They look clean and modern. And with the right preparation, most homeowners can install them in an afternoon.
You can find floating shelves in nearly every room of a home. Living rooms use them to display books, plants, and photos. Kitchens rely on them for spices, cookbooks, and everyday essentials. Bedrooms, bathrooms, home offices, and entryways all benefit from the extra wall space a floating shelf provides.
The key to a successful floating shelf installation is preparation. You need to understand your wall material, choose the right shelf and hardware, and follow the correct steps for your specific situation. A shelf that is properly installed will serve you for years. One that is not may pull away from the wall unexpectedly.
This guide will walk you through everything you need to know, from choosing the right shelf to mounting it safely and styling it beautifully.
What Are Floating Shelves?
Floating shelves look like they are attached directly to the wall with no visible support underneath. This gives them a sleek, built-in appearance that traditional shelves with exposed brackets cannot match.
The basic components of a floating shelf system include the shelf itself, a mounting bracket or wall cleat, screws, and sometimes wall anchors. The bracket or cleat attaches to the wall first. The shelf then slides over or rests on the bracket, hiding it completely.
The result is a clean, minimalist look that works in almost any room style.
Why Install Floating Shelves?
There are many practical reasons to add floating shelves to your home. They create extra storage without requiring floor space, which is especially valuable in smaller rooms or apartments.
They also allow you to personalize your walls. You can display artwork, plants, family photos, and decorative items at eye level without nailing picture hooks into the wall in multiple places.
For small-space organization, floating shelves are hard to beat. A single shelf above a desk can hold everything from books to office supplies. A shelf above a bathroom vanity keeps toiletries within reach but off the counter.
From a design perspective, floating shelves add depth and character to blank walls. They also give homeowners the freedom to customize both size and finish to match their existing decor.
Where Can You Install Floating Shelves?
Living Room
The living room is one of the most common places for floating shelf installation. Shelves work well on either side of a fireplace, above a sofa, or along a full accent wall. Consider the height of your furniture and leave enough clearance so the shelf does not feel cramped.
Bedroom
Floating shelves in a bedroom can serve as a nightstand alternative, a display wall, or additional storage above a dresser. Keep shelf height and depth in proportion to the room so the shelves feel balanced rather than overwhelming.
Kitchen
Kitchen floating shelves work well for storing spices, oils, small appliances, or everyday dishes. Be mindful of moisture and grease near the stove. Sealed or painted wood holds up better in kitchen environments than raw or unfinished materials.
Bathroom
Bathroom shelves need to handle humidity. Look for shelves with moisture-resistant finishes. Keep them positioned where they will not interfere with towel racks, mirrors, or light fixtures. If you plan to install a towel bar nearby, reading about how to install a towel bar can help you plan both projects together.
Home Office
In a home office, floating shelves keep books, binders, and supplies organized without taking up valuable desk space. Installing shelves above a desk or along a side wall creates a functional and professional-looking workspace.
Entryway
Entryway shelves are perfect for keys, mail, small bags, and decorative items. Pair a floating shelf with hooks below it and you have a simple but highly functional entry station. If you are planning a full entryway upgrade, our guide on how to make a DIY entryway organizer offers additional ideas.
How to Choose the Right Floating Shelves
Choosing the right shelf before you buy anything saves time, money, and frustration later.
Start with shelf length. Measure the wall space where you plan to install the shelf. Leave several inches on each side so the shelf does not feel crammed against a corner or window.
Consider shelf depth. Deeper shelves hold more but can feel intrusive in a narrow hallway or small bathroom. A depth of 8 to 10 inches works well for most display purposes. Deeper shelves around 12 inches are better for books and kitchen storage.
Shelf thickness affects both appearance and strength. Thicker shelves look more substantial and generally carry more weight. Thin shelves work for lightweight decorative items.
Think about the material, finish, and room style. A rustic wood shelf suits a farmhouse kitchen. A white painted shelf works well in a modern bathroom. A metal shelf fits an industrial-style office.
Finally, estimate the load. Everything you plan to place on the shelf has weight. Add it up roughly and choose hardware rated above that number.
Types of Floating Shelves
Solid Wood Floating Shelves
Solid wood shelves are durable, attractive, and available in many species and finishes. They handle heavier loads better than hollow-core options and can be sanded and refinished if they get scratched.
Plywood Floating Shelves
Plywood is a strong and affordable alternative to solid wood. It is stable, resists warping better than some solid woods, and can be cut to any size. Plywood shelves are a popular choice for DIY custom builds.
MDF Floating Shelves
MDF (medium-density fiberboard) is smooth, easy to paint, and very affordable. However, it is heavier than plywood and does not handle moisture well. MDF is best for dry indoor spaces where the shelf will carry light to moderate loads.
Hollow-Core Floating Shelves
Hollow-core shelves are the lightest and most affordable option. They are commonly sold in big-box home improvement stores. Their weight capacity is limited, so they are best for lightweight decor items rather than books or heavy storage.
Metal Floating Shelves
Metal shelves are strong, modern-looking, and easy to clean. They work well in kitchens, garages, and industrial-style spaces. Their load capacity depends on both the shelf itself and the mounting system used.
| Shelf Type | Durability | Best Use | Appearance | Estimated Cost | Installation Notes |
|---|---|---|---|---|---|
| Solid Wood | High | Display, books, kitchen | Warm, natural | $30–$150+ | Heavier; needs strong mounting |
| Plywood | High | DIY builds, storage | Varies by finish | $20–$80 | Versatile; requires finishing |
| MDF | Moderate | Light display, painted look | Smooth, uniform | $15–$60 | Avoid moisture exposure |
| Hollow-Core | Low | Lightweight decor only | Modern, basic | $10–$40 | Limited load capacity |
| Metal | High | Industrial, kitchen, garage | Sleek, modern | $25–$120 | Strong; verify bracket compatibility |
What Wall Type Do You Have?
Identifying your wall type before you drill is one of the most important steps in any floating shelf installation.
Drywall is the most common wall material in modern homes. It consists of a gypsum core sandwiched between paper layers. Drywall alone cannot hold heavy loads without the right anchors or stud support.
Plaster walls are common in older homes built before the 1950s. Plaster is harder and more brittle than drywall. Drilling into plaster requires a slower, more careful approach.
Wood paneling or wood-framed walls offer solid mounting points. Screws go directly into the wood without requiring anchors in most cases.
Brick and concrete walls require masonry drill bits and special anchors. They are very strong once properly drilled, but the process takes more time and equipment.
Tile walls require diamond-tipped drill bits and careful technique to avoid cracking or chipping. Planning the screw positions around grout lines is strongly preferred.
Tools and Materials You Need
| Tool or Material | Purpose | Recommended Use | Estimated Cost |
|---|---|---|---|
| Floating Shelf | Main surface for storage | All installations | Varies by type |
| Mounting Bracket or Cleat | Attaches shelf to wall | All installations | $5–$30 |
| Screws | Secures bracket to wall | All installations | $3–$10 |
| Wall Anchors | Supports mounting in drywall or masonry | When studs are not available | $4–$15 |
| Tape Measure | Measures wall space and shelf position | All installations | $5–$20 |
| Pencil | Marks drill points | All installations | Under $2 |
| Level | Ensures shelf is perfectly horizontal | All installations | $5–$25 |
| Drill | Drives screws and creates pilot holes | All installations | $30–$150 |
| Drill Bits | Creates pilot holes in various materials | All installations | $5–$30 |
| Screwdriver | Tightens screws manually | All installations | $5–$15 |
| Stud Finder | Locates wall studs behind drywall | Drywall installations | $10–$40 |
| Safety Glasses | Eye protection while drilling | All installations | $5–$15 |
| Painter’s Tape | Marks positions, reduces surface damage | All installations | $4–$10 |
Always use the specific screws, anchors, and drill bits recommended by your shelf and hardware manufacturer.
How to Install Floating Shelves Step by Step
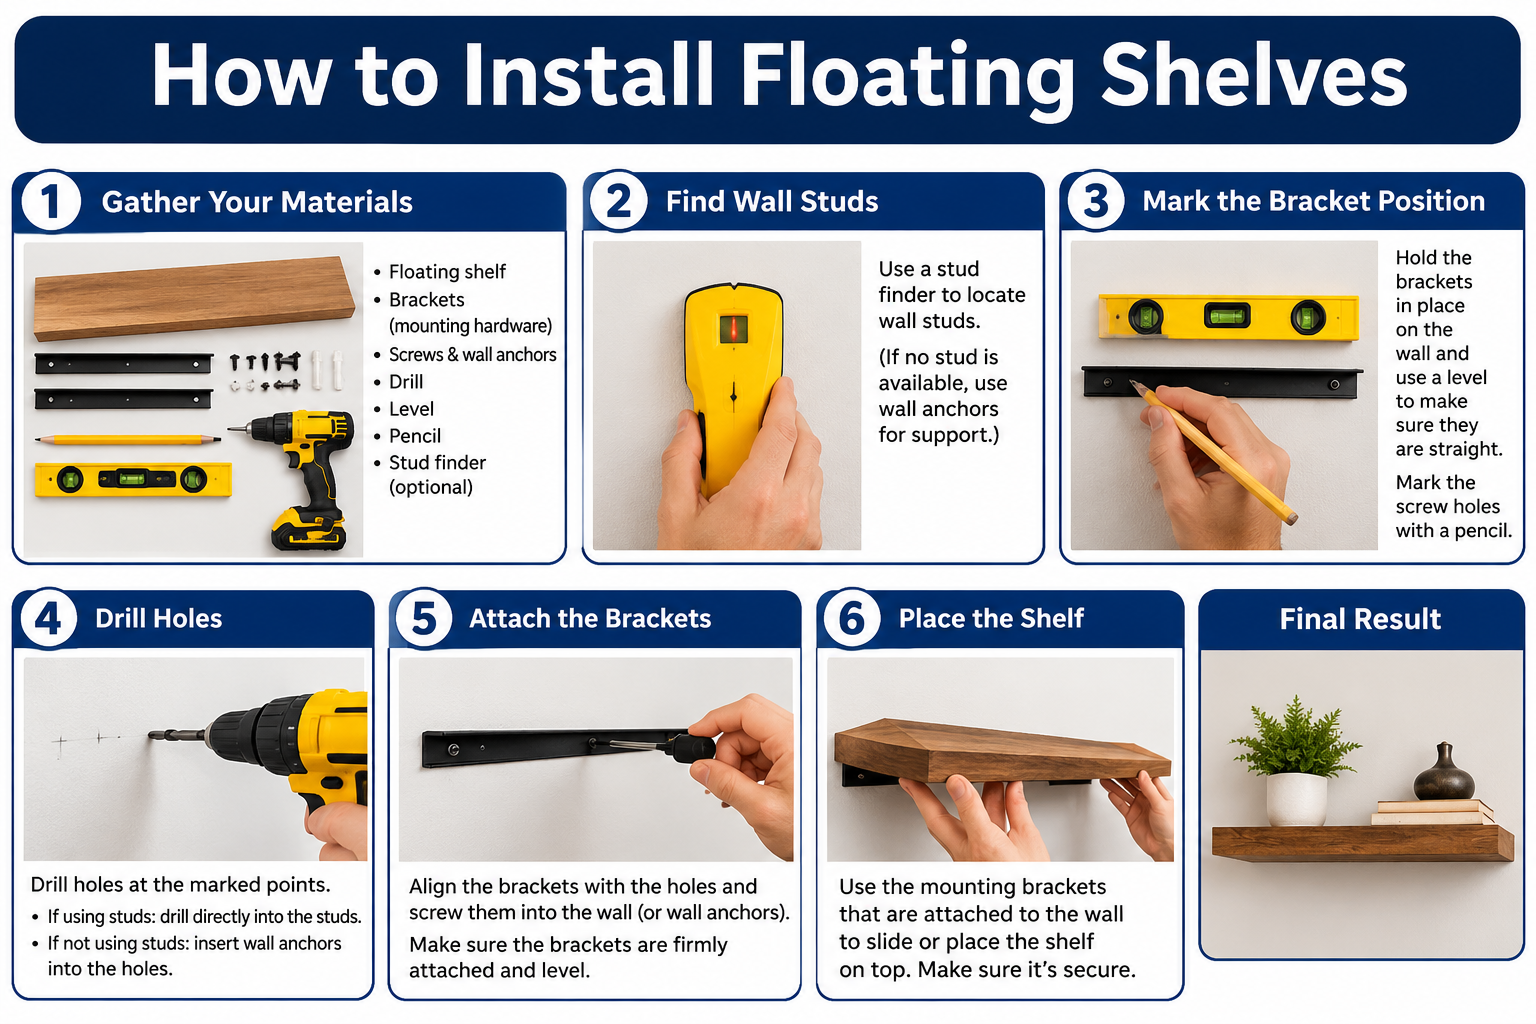
Step 1: Choose the Installation Location
Walk through the room and decide exactly where you want the shelf. Consider nearby furniture, doors, windows, light switches, and outlets.
Step 2: Measure the Available Wall Space
Use a tape measure to check the width of the wall area. Note any obstacles and confirm your chosen shelf will fit comfortably without crowding the space.
Step 3: Determine the Shelf Height
Decide how high you want the shelf based on what it will hold and who will use it. Consider eye-level placement for display items or a height that clears the furniture below.
Step 4: Identify the Wall Material
Tap the wall gently or use a stud finder to get a sense of what you are working with. Confirm whether the wall is drywall, plaster, brick, concrete, tile, or wood paneling.
Step 5: Locate Wall Studs
Use a stud finder to locate the studs behind your drywall. Mark the center of each stud lightly with a pencil. Mounting directly into studs provides the strongest support.
Step 6: Mark the Mounting Position
Hold the mounting bracket or cleat against the wall at the desired height. Mark the screw hole positions using a pencil.
Step 7: Check That the Shelf Will Be Level
Place your level against the bracket or use the level to draw a level line across the wall at the desired height. A shelf that is even slightly off-level will be noticeable once it is installed.
Step 8: Mark the Screw or Anchor Locations
Confirm your pencil marks are accurate and level. Add painter’s tape over the marks on tile or plaster to reduce surface chipping when you drill.
Step 9: Drill the Pilot Holes
Use the correct drill bit for your wall type. Drill slowly and steadily. Do not apply excessive force. Keep the drill perpendicular to the wall.
Step 10: Install the Appropriate Anchors
If you are not drilling into studs, insert the appropriate wall anchors into the pilot holes. Follow the anchor manufacturer’s instructions for size, depth, and installation method.
Step 11: Secure the Mounting Bracket or Cleat
Hold the bracket in position and drive the screws through the bracket holes and into the studs or anchors. Tighten firmly but do not overtighten, which can damage the wall or strip the screw.
Step 12: Check the Bracket for Level
Place your level on the installed bracket. If it is not level, loosen the screws slightly and adjust before tightening again.
Step 13: Attach the Floating Shelf
Slide the shelf onto the bracket or cleat according to the manufacturer’s design. Some shelves slide over a rod-style bracket. Others rest on a cleat and are secured from below or through the top.
Step 14: Secure the Shelf According to the Manufacturer’s Instructions
Some shelves use set screws on the underside. Others use screws through the back or top. Follow the specific instructions that came with your shelf.
Step 15: Test the Shelf Carefully
Apply gentle downward pressure before loading the shelf. The shelf should feel firm and stable. If it moves or feels loose, do not load it. Identify and fix the problem before using the shelf.
How to Install Floating Shelves on Drywall
Drywall is strong enough for moderate loads when you mount into studs. For lighter shelves, quality drywall anchors may provide sufficient support where studs are not conveniently located.
Common drywall anchor types include toggle bolts, snap toggles, and expansion anchors. Each has a different load rating and installation method. Always check the anchor’s rated capacity and match it to your expected shelf load.
Drywall alone cannot support heavy shelves. The U.S. Consumer Product Safety Commission advises that improperly secured wall-mounted furniture and fixtures are a leading cause of tip-over and falling-object injuries. Structural support matters for heavier installations.
Always follow the shelf manufacturer’s stated weight rating and the anchor manufacturer’s installation instructions.
How to Install Floating Shelves Without Studs
Installing floating shelves without studs is possible when you use appropriate wall anchors designed for that purpose. However, anchor-based installations have real limitations.
The final load capacity depends on the anchor type, the condition of the drywall, the shelf depth, and how the weight is distributed. A deep shelf with items pushed to the front edge puts more stress on the mounting point than a shallow shelf with evenly distributed items.
For lightweight shelves holding decorative items, quality anchors often work well. For heavier shelves, finding a stud or using a backing board is always a stronger solution. Never assume one anchor type works for every situation.
How to Install Floating Shelves on Brick or Concrete
Brick and concrete installations require masonry-compatible anchors and a hammer drill fitted with a masonry or carbide-tipped drill bit.
Mark your hole locations carefully. Place painter’s tape over the marks to help prevent the bit from wandering on a smooth surface. Drill at a slow, steady speed with consistent pressure.
After drilling, blow out any dust from the hole. Insert the appropriate masonry anchor and tap it flush with the surface. Attach your bracket and drive the screws into the anchors until the bracket is tight and does not shift.
Follow the anchor manufacturer’s instructions for hole size, anchor depth, and screw diameter.
How to Install Floating Shelves on Plaster Walls
Plaster walls require more care than drywall. Plaster is harder and more brittle, and it can crack if you drill too aggressively or use the wrong bit.
Use a sharp standard drill bit at a slow speed. Apply steady, gentle pressure. Placing painter’s tape over the drill point before you start can help reduce surface cracking.
Try to locate a structural backing such as a lath strip or wall stud behind the plaster whenever possible. When anchors are needed, choose types rated for plaster or hard walls rather than standard drywall anchors.
How to Install Floating Shelves on Tile
Tile installation requires planning and patience. Drilling through tile with the wrong technique can crack the tile or cause chips that are difficult to repair.
Choose a diamond-tipped or carbide drill bit designed for tile. Position screw holes in the grout lines whenever the bracket dimensions allow it. Grout is easier to drill through and less likely to crack than the tile face.
Place painter’s tape over the spot before drilling to help the bit grip rather than slide. Start the drill at low speed without the hammer function. Drill slowly and apply light pressure. Once through the tile, switch to a standard bit if needed to continue into the backing material.
Insert an appropriate anchor and proceed with the bracket installation following manufacturer instructions.
How High Should Floating Shelves Be?
There is no single height that works for every room or every purpose. The right height depends on the room, the furniture below, and how the shelf will be used.
For display shelves in a living room or bedroom, positioning shelves at or slightly above eye level often looks natural. Eye level for most adults is approximately 57 to 65 inches from the floor.
In a kitchen, shelves above a counter should have enough clearance so you can work comfortably beneath them. A minimum of 18 inches above the counter is a common starting point, though your specific appliances and cabinets will influence this.
In a bathroom, shelves work well above the toilet, beside the mirror, or above a towel bar. In an entryway, a shelf at about 48 to 54 inches works well for most adults.
Shelf spacing, furniture height, ceiling height, and the items being stored all factor into the final decision.
How Far Apart Should Floating Shelves Be?
Shelf spacing should be planned around the tallest items you expect to store on each shelf.
For books, 10 to 12 inches between shelves usually provides enough clearance for most paperbacks and standard hardcovers. For kitchen items like small appliances or tall bottles, 12 to 15 inches or more may be needed.
Decorative shelves with plants, photos, and small objects can be spaced based on visual proportion rather than strict measurements. Spacing of 12 inches between shelves often looks balanced in a display setting.
For bathroom products or storage baskets, measure the tallest items first and add 1 to 2 inches of clearance.
Room proportions matter too. In a room with tall ceilings, you have more flexibility. In a room with lower ceilings, keep spacing tighter to avoid making the room feel smaller.
How Much Weight Can a Floating Shelf Hold?
Weight capacity is not a simple number that applies to every floating shelf. It depends on the shelf material, shelf dimensions, mounting system, wall type, stud placement, anchor type, hardware quality, and the quality of the installation itself.
A small hollow-core shelf mounted with basic drywall anchors has a very different capacity than a thick solid wood shelf mounted into two wall studs with heavy-duty brackets.
Always follow the manufacturer’s stated weight capacity for both the shelf and the mounting hardware. When in doubt, mount into studs rather than anchors alone. Heavier items always require stronger structural support.
As part of your overall home safety routine, reviewing a DIY home inspection checklist can help you catch potential wall or mounting issues before they become larger problems.
How to Install Heavy-Duty Floating Shelves
Heavy-duty floating shelves require mounting directly into wall studs whenever possible. Use heavy-duty brackets designed for the load you expect. Choose thick, solid shelves that will not flex under weight.
Longer screws that reach deeper into the stud provide more holding strength than shorter screws. Distribute the weight evenly across the shelf rather than stacking everything in one area.
For very large or very heavy shelf installations, professional assistance is worth considering. A qualified contractor can assess the wall structure, recommend appropriate hardware, and install the shelf safely.
Common Floating Shelf Installation Mistakes
Not Finding Wall Studs
Skipping the stud finder and guessing where the studs are leads to anchors that work too hard and shelves that eventually sag or fall. Always use a stud finder on drywall.
Using the Wrong Wall Anchors
Not all anchors are rated the same. Using a lightweight plastic expansion anchor for a heavy shelf is a common and potentially dangerous mistake. Match the anchor to the wall type and the expected load.
Choosing the Wrong Screws
Using screws that are too short, too thin, or not designed for the wall material reduces holding strength significantly. Follow hardware manufacturer specifications.
Skipping the Level
A shelf that looks level by eye is almost always slightly off. Use a physical or digital level every time.
Overloading the Shelf
Placing more weight on a shelf than it is rated to hold is one of the most common causes of shelf failure. Know the weight limit and stay below it.
Installing Shelves Too Close Together
Shelves that are too close together are difficult to use. You cannot easily place or remove items, and the shelves look cluttered even when empty.
Ignoring Wall Damage
Installing a shelf over cracked, water-damaged, or crumbling wall material is asking for trouble. Repair the wall first. For drywall repairs, our guide on how to patch holes in drywall is a helpful starting point.
Using the Wrong Drill Bit
Using a standard wood drill bit on masonry or tile damages both the bit and the wall. Always match the bit to the material.
Failing to Check the Mounting Hardware
After the bracket is installed, always check it for movement before attaching the shelf. A bracket that shifts slightly under hand pressure is not adequately secured.
Not Testing the Finished Installation
Always apply gentle downward pressure after installing the shelf and before loading it. This simple test can catch installation problems before they lead to a shelf failure.
How to Make Floating Shelves More Secure
The most secure floating shelf installations are mounted directly into wall studs. Use screws long enough to penetrate at least 1 to 1.5 inches into the stud beyond the drywall.
When studs are not an option, choose high-quality toggle-style anchors rated well above your expected load. Use the correct drill bit and follow the anchor instructions carefully.
Strong, properly sized brackets distribute the load more evenly than small or undersized brackets. Keep the shelf level during installation. Uneven shelves put uneven stress on the mounting points.
Distribute weight evenly across the shelf surface and avoid placing all heavy items at the front edge. Inspect the shelf, bracket, and wall connection periodically to catch any changes early.
How to Fix a Floating Shelf That Is Sagging
A sagging floating shelf has one of a few likely causes. The shelf may be overloaded. The mounting hardware may be too weak for the shelf size. The anchors may be pulling out of the wall. The wall material may be damaged. Or the shelf material itself may be flexing under weight.
Start by removing everything from the shelf and checking whether the sag improves. If the shelf returns to level when empty, the problem is likely the load.
Check the bracket and wall connection by gently applying pressure by hand. If there is movement, the anchors or screws are not holding properly. In that case, the shelf needs to come down and be remounted correctly.
Adding more screws to a damaged or overstressed anchor location rarely fixes the problem. Remounting at a better location with stronger hardware is usually the right solution.
How to Remove Floating Shelves Safely
To remove a floating shelf, start by clearing everything off the shelf. Then remove the shelf from the bracket by reversing the installation process. Some shelves simply lift off. Others require removing a set screw first.
Next, remove the bracket screws from the wall. If the screws go into anchors, remove the entire anchor as well. Use a flathead screwdriver or anchor removal tool to back the anchor out carefully.
You will likely have screw holes or anchor holes remaining in the wall. These can be filled with spackling compound or patching material and sanded smooth once dry. Our guide on how to repair small drywall holes covers this process in full detail.
How to Style Floating Shelves
Styling floating shelves well takes a little planning. The goal is a shelf that looks intentional rather than cluttered.
Start with larger anchor pieces such as a book stack, a plant, or a small piece of artwork. Then fill in the gaps with smaller items. Vary the heights of objects to create visual interest.
Leave some empty space. A shelf that is fully packed from end to end looks messy. Negative space gives the eye a place to rest.
In a kitchen, group related items together. Keep oils and vinegars on one shelf and dishes on another. In a bathroom, use small baskets to contain toiletries neatly. In a living room or home office, mix books with plants and a few personal items.
Avoid placing heavy, fragile, or irreplaceable items on shelves that are not fully secured.
DIY Floating Shelves vs Store-Bought Shelves
| Factor | DIY | Store-Bought |
|---|---|---|
| Cost | Lower material cost; varies by wood choice | Fixed price; often mid-range |
| Customization | Fully custom size, depth, finish | Limited to available options |
| Materials | Your choice | Manufacturer’s choice |
| Installation | Requires more skill and time | Usually simpler hardware included |
| Time | Longer; includes building and finishing | Faster; shelf is ready to mount |
| Skill Level | Intermediate to advanced | Beginner-friendly |
| Design Options | Unlimited | Limited to manufacturer’s catalog |
| Best For | Custom spaces, specific dimensions | Standard rooms, quick projects |
Estimated Floating Shelf Installation Cost
| Item | Estimated Cost |
|---|---|
| Floating Shelf | $15–$150+ depending on type and size |
| Mounting Hardware (brackets or cleat) | $5–$30 |
| Wall Anchors | $4–$15 |
| Screws | $3–$10 |
| Basic Tools (level, drill, bits) | $30–$150 if purchasing |
| Finishing Materials (paint, stain, sealer) | $5–$30 |
| DIY Installation | Labor cost: $0 |
| Professional Installation | $50–$200+ per shelf depending on complexity |
| Estimated DIY Total | $30–$250+ depending on materials and tools |
Actual costs vary significantly based on shelf material, size, hardware type, location, and which tools you already own. Keeping track of your tool purchases as part of a broader plan is easier with a reference like the home maintenance tools every homeowner needs guide.
How to Maintain Floating Shelves
Once your shelves are installed, periodic maintenance keeps them looking good and working safely.
Clean shelves regularly with a damp cloth and a mild cleaner appropriate for the shelf material. Avoid soaking wood shelves or leaving puddles of water near the wall connection.
Inspect the mounting hardware every six months. Look for screws that have worked loose, anchors that appear to be pulling away from the wall, or brackets that feel less solid than they did at installation. Catching a small problem early prevents a larger failure later.
Check for any signs of sagging. A shelf that was level at installation and now appears to droop on one end needs attention before it fails completely. Keeping up with this kind of periodic maintenance is exactly the kind of task covered in a solid home maintenance checklist by month.
Avoid exceeding the shelf’s weight rating over time. It is easy to gradually add items without realizing the total load has grown beyond what the hardware can safely support.
Floating Shelf Safety Tips
Always wear safety glasses when drilling. Drywall dust, plaster fragments, and masonry particles can cause serious eye irritation or injury.
Before drilling into any wall, consider what might be hidden inside it. Electrical wiring and plumbing pipes run through walls in many locations. Accidentally drilling into a wire or pipe is a serious hazard. Use a multi-scanner or combination stud and wire detector to check the area before drilling. The Occupational Safety and Health Administration (OSHA) emphasizes that workers should always identify hidden utilities before drilling or cutting into walls; this same principle applies to DIY homeowners.
Keep heavy and breakable objects away from shelves that are not mounted into solid structural support.
Once the shelf is installed, keep the load within the rated weight limit. Never stand on a floating shelf or use it as a climbing surface.
Check shelves periodically, especially after any wall repairs, renovations, or significant temperature and humidity changes.
When to Call a Professional
Most floating shelf installations are straightforward DIY projects. However, some situations call for professional help.
Consider calling a contractor or carpenter if you are installing very large or very heavy shelving, working with an uncertain or damaged wall structure, dealing with a complex masonry installation, or uncomfortable drilling into tile.
If you are not sure whether hidden wiring or plumbing runs through your intended installation area, consult a professional before drilling. If you are planning built-in shelving or multiple heavy shelves across a large wall, a professional assessment can prevent expensive mistakes.
There is no shame in recognizing when a project is beyond the current skill level. A professional installation done right is always safer than a DIY installation done incorrectly.
Expert Tips for Better Floating Shelf Installation
Use painter’s tape to outline the shelf position on the wall before committing to any marks or holes. This lets you visualize exactly how the shelf will look in the space.
When installing multiple shelves on the same wall, measure the spacing from the ceiling down rather than from the floor up. Ceiling heights are more consistent than floor levels.
Pre-drill pilot holes slightly smaller than the screw diameter. This gives the screw something to grip without splitting the wood or cracking the wall surface.
If you are installing a shelf in a bathroom or kitchen, choose hardware with a rust-resistant finish. Standard zinc screws can corrode over time in humid environments.
Take a photo of the wall before patching it after any removal. Knowing where your screws and anchors were located can save you from accidentally drilling into the same spot during a future project.
When in doubt about anchor selection, choose one with a higher load rating than you think you need. The extra margin of safety costs very little.
Frequently Asked Questions
Can floating shelves be installed on drywall if there are no studs nearby?
Yes, floating shelves can be installed on drywall without studs when appropriate anchors are used. Toggle bolts and snap toggles are among the most reliable options for drywall because they expand behind the wall surface for a wider grip. However, anchor-based installations have real weight limitations. Lightweight display shelves are generally a better fit for anchor-only installations. Heavier shelves holding books, kitchenware, or multiple items need stud support or a backing board for reliable, long-term performance. Always check the anchor’s rated capacity before committing to a hardware choice.
What is the best type of wall anchor for floating shelves?
There is no single best anchor for every situation. The right anchor depends on the wall type, the shelf weight, and the installation conditions. For drywall, toggle-style anchors and snap toggles generally offer higher load ratings than standard expansion anchors. For brick or concrete, sleeve anchors or wedge anchors designed for masonry are appropriate. For plaster, look for anchors specifically rated for hard-wall materials. Always match the anchor to both the wall material and the expected load, and follow the manufacturer’s installation instructions precisely.
How do I know if my wall can support a floating shelf?
The best way to evaluate your wall’s capacity is to identify the wall material and locate the structural elements behind it. Drywall with studs behind it can support more weight than drywall alone. Brick and concrete walls are generally very strong once proper masonry anchors are used. Plaster walls vary in condition depending on the age of the home. If the wall is damaged, wet, or shows signs of deterioration, repair it before mounting anything. When genuinely uncertain about your wall’s condition, consulting a contractor for an assessment is worth the cost.
Why does my floating shelf feel wobbly after installation?
A wobbly floating shelf usually means one or more of the mounting screws are not fully secured. This can happen if the screws missed the center of a stud, if the anchors were not installed correctly, or if the pilot holes were drilled too large for the hardware used. Remove the shelf and bracket, inspect each mounting point carefully, and remount using the correct hardware. Simply tightening the existing screws may not fix the problem if the anchor or stud connection has already been compromised. Addressing the root cause is always more effective than adding more fasteners to the same location.
Is it safe to put plants on floating shelves?
Plants can be displayed on floating shelves safely with a few precautions. Use a waterproof saucer under every pot to protect the shelf surface from moisture and water damage. Over time, water seeping into a wood or MDF shelf can weaken the material and accelerate deterioration near the wall. Also consider the total weight of the pot, soil, and plant together, not just the pot itself. A large ceramic pot with wet soil can be surprisingly heavy. Stick within the shelf’s weight rating and inspect the shelf periodically for any signs of moisture-related damage.
Can a complete beginner install floating shelves?
Yes, floating shelf installation is one of the more beginner-friendly home improvement projects available. Most installations require only a few basic tools, and the steps are straightforward when followed carefully. The most important things for a beginner to get right are identifying the wall material, choosing appropriate hardware, using a level throughout the installation, and following the manufacturer’s instructions for both the shelf and the mounting hardware. Starting with a smaller, lighter shelf in a low-risk location such as a bedroom or home office is a smart way to build confidence before tackling a larger installation.
How can I tell where the wall studs are without a stud finder?
A stud finder is the most reliable tool for locating studs in drywall, but there are a few backup methods. Studs in most modern homes are spaced either 16 or 24 inches apart from center to center. Once you find one stud, you can measure to find the next. You can also knock gently along the wall with your knuckle, listening for a dull, solid sound rather than a hollow one. Another method is to look for existing nail or screw dimples in baseboards, which are usually nailed into studs. These methods are less precise than a dedicated stud finder, so verify your findings before drilling.
What should I do if I hit a stud in the wrong location?
If you start drilling and realize the stud is not where you expected, stop immediately and do not enlarge the hole by shifting the drill. Patch the small pilot hole with spackling compound and allow it to dry completely before drilling in the correct location. Remeasure and confirm the new stud location using a stud finder before proceeding. This situation is very common among first-time DIYers and is not difficult to fix. The patch will be barely visible once painted over.
How many brackets does a floating shelf need?
The number of brackets depends on the shelf length, the shelf material, and the expected load. Most standard floating shelves up to 24 inches long can be supported adequately by two mounting points. Longer shelves of 36 inches or more generally benefit from three mounting points to prevent center sagging. Very long or heavily loaded shelves may need additional support points. Always refer to the shelf manufacturer’s installation guide, which will typically specify the minimum number of brackets or mounting points required for safe use.
Can floating shelves be removed and reinstalled in a new location?
Yes, floating shelves can be removed and reinstalled, though the mounting holes in the original location will need to be patched and repainted. The shelf and bracket hardware can usually be reused if they are in good condition. Before reinstalling in a new location, inspect the bracket for any bending or deformation and check all screws and anchors for damage. Replace any hardware that shows wear. A shelf that has been properly maintained during its first installation is typically in good condition for reinstallation elsewhere.
Conclusion
Installing floating shelves is one of the most rewarding DIY home improvement projects you can take on. The result is practical, attractive, and completely customizable to your space. But a shelf is only as good as its installation.
Start by choosing the right shelf for your room and your intended load. Identify your wall material before you pick up a drill. Select mounting hardware that matches the wall type and the weight you plan to put on the shelf. Follow the step-by-step installation process carefully, use a level at every stage, and always follow manufacturer instructions for shelves, brackets, anchors, and screws.
Respect the shelf’s weight rating. Inspect the installation periodically. Address any looseness or sagging before it becomes a safety problem.
When the project falls into heavy-duty, masonry, or complex territory, consider professional help. Most floating shelf installations are manageable for a prepared beginner. A few are better left to an experienced contractor.
With the right preparation and the right hardware, your floating shelves will look great and serve you safely for years to come.