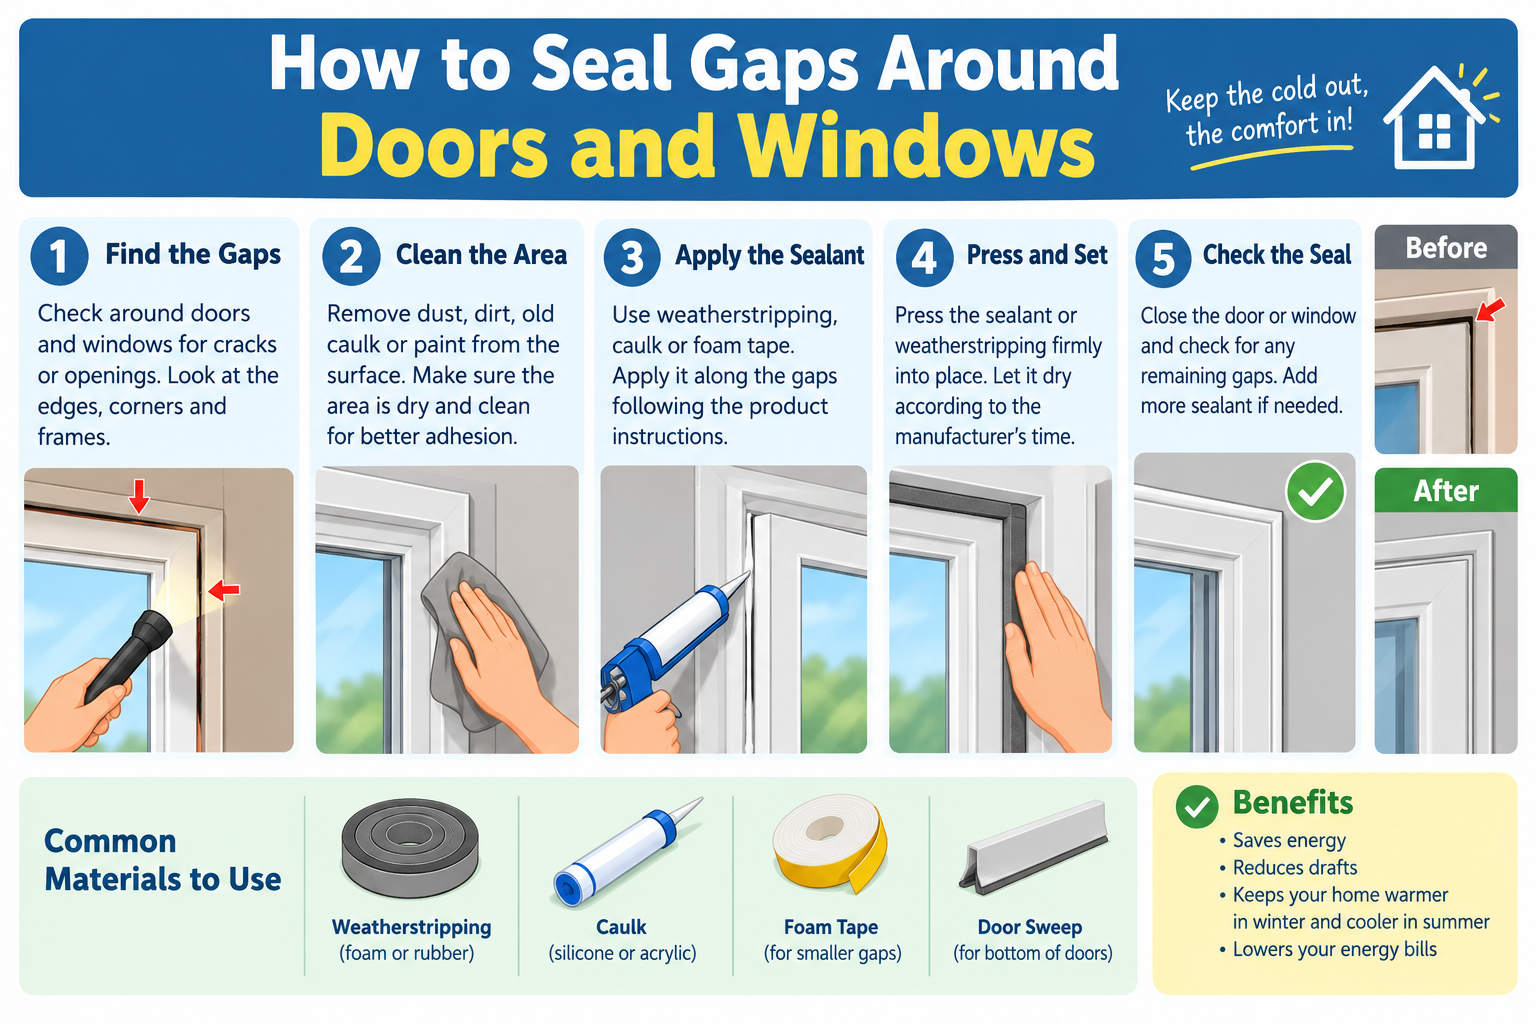
How to Seal Gaps Around Doors and Windows

Introduction: That Tiny Gap Is Costing You More Than You Think
You probably can’t see it clearly.
Maybe you feel a slight chill near your front door on a winter evening. Or perhaps your energy bills keep creeping up no matter what you do. Or you notice a thin sliver of daylight peeking through the edge of your window frame.
That tiny gap — sometimes no wider than a pencil — is quietly draining your wallet every single month.
According to the U.S. Department of Energy, air leaks around doors and windows account for 25%–30% of a home’s total heating and cooling energy loss. For the average American household spending over $2,200 per year on energy, that means $550–$660 lost annually through gaps you could seal yourself in a single afternoon.
And it’s not just about money.
Those gaps let in cold drafts in winter, hot humid air in summer, outside noise, dust, pollen, insects, and even moisture that can lead to mold and wood rot over time.
The best part? Sealing gaps around doors and windows is one of the easiest, cheapest, and most rewarding DIY home improvement projects you can tackle. Most of the work requires zero special skills, basic tools you probably already own, and materials that cost less than $30.
In this complete guide, I’ll show you exactly how to find every gap, choose the right sealing material, and fix it properly — so your home stays comfortable, efficient, and protected year-round.
Let’s get started.
Why Gaps Form Around Doors and Windows
Before we jump into solutions, it helps to understand why these gaps exist in the first place — because knowing the cause helps you choose the right fix.
Common Causes of Gaps:
🏠 Natural Home Settlement
Every home settles over time as the foundation shifts slightly. This movement causes frames to shift, twist, and pull away from surrounding walls — creating gaps that weren’t there when the home was built.
🌡️ Seasonal Expansion and Contraction
Wood, caulk, and other building materials expand in heat and contract in cold. Over years of temperature cycles, this causes materials to crack, shrink, and pull apart — especially in climates with extreme seasonal temperature swings.
💧 Moisture and Water Damage
Water infiltration causes wood to swell, rot, and warp. Once structural wood around frames begins to deteriorate, gaps appear and grow larger over time.
⏳ Aging and Worn Weatherstripping
Weatherstripping has a lifespan of 5–10 years depending on the material and climate. It compresses, cracks, and loses its sealing ability with regular use — and most homeowners never replace it until drafts become obvious.
🔨 Poor Original Installation
In some cases, windows and doors were never properly sealed during initial installation. This is especially common in older homes built before modern energy codes existed.
Step 1: Find All the Gaps First (Don’t Skip This)
The most common mistake homeowners make is grabbing a tube of caulk and randomly sealing areas they can see — while missing the worst offenders they can’t.
Take 20 minutes to do a proper gap inspection first. It will make everything else more effective.
How to Find Gaps Like a Pro:
🕯️ The Candle or Incense Test
On a windy day, slowly move a lit candle or incense stick around the perimeter of each window and door frame — including the corners. If the flame flickers or smoke moves sideways, you’ve found an air leak.
🤚 The Hand Test
On a cold day, slowly run your bare hand around window and door frames, sills, and thresholds. Even small temperature differences are detectable by hand.
💡 The Flashlight Test (for doors)
At night, have someone stand inside with a bright flashlight pointed at the door frame edges while you observe from outside. Anywhere light passes through is an air gap.
📋 Visual Inspection Checklist:
Go through your home and check every door and window for gaps in these specific locations:
- Between the window/door frame and the wall
- Between the sash and the frame (operable windows)
- Along the bottom of exterior doors (threshold gap)
- Corner joints of window and door frames
- Around the window sill where it meets the wall
- Around exterior trim and molding
- Where frames meet brick, siding, or stucco
- Around any pipes or wires entering near windows
💡 Hassan’s Tip: Make a simple map or take photos of every gap you find before you start sealing. This keeps you organized and ensures you don’t miss anything — especially in rooms you seal last.
Step 2: Gather Your Tools and Materials
Good news — you don’t need specialized tools for most of this work. Here’s what to have ready before you start:
Essential Tools:
| Tool | Purpose | Approximate Cost |
|---|---|---|
| Utility knife | Removing old caulk/weatherstripping | $8–$15 |
| Putty knife or scraper | Cleaning surfaces | $5–$10 |
| Caulk gun | Applying caulk smoothly | $8–$20 |
| Scissors | Cutting weatherstripping | Already own |
| Measuring tape | Measuring strip lengths | Already own |
| Wire brush | Cleaning rough surfaces | $5–$10 |
| Clean rags | Wiping surfaces | Already own |
| Rubbing alcohol | Cleaning before application | $3–$5 |
Sealing Materials You’ll Need:
(Detailed explanation of each in the next section)
- Exterior caulk (silicone or latex)
- Interior caulk (paintable latex)
- Weatherstripping (foam, V-strip, or door sweep)
- Expanding spray foam (for larger gaps)
- Backer rod (for very wide gaps before caulking)
Total estimated material cost for an average home: $40–$120
Step 3: Choose the Right Sealing Material
This is where most DIYers make their biggest mistake — using the wrong material for the wrong location. Here’s a complete breakdown:
🔵 Caulk — For Stationary Gaps
Caulk is used to seal gaps between surfaces that don’t move — like between a window frame and the surrounding wall, or between exterior trim and siding.
Types of Caulk:
Silicone Caulk
- ✅ Best for: Exterior use, areas exposed to moisture
- ✅ Extremely durable — lasts 20+ years
- ✅ Flexible — handles temperature changes well
- ❌ Cannot be painted over
- ❌ Harder to apply and clean up
- 💰 Cost: $6–$12 per tube
Latex/Acrylic Caulk
- ✅ Best for: Interior use, paintable surfaces
- ✅ Easy to apply and clean up (water cleanup)
- ✅ Paintable — matches any wall color
- ❌ Less durable than silicone outdoors
- 💰 Cost: $4–$8 per tube
Siliconized Latex Caulk (Best of Both)
- ✅ Best for: General interior AND exterior use
- ✅ Paintable AND more flexible than pure latex
- ✅ Good moisture resistance
- 💰 Cost: $6–$10 per tube
- 🏆 Hassan’s Recommendation for most homeowners
Specialty Options:
- Foam backer rod + caulk — For gaps wider than ¼ inch
- Fire-rated caulk — Around utility penetrations near heating equipment
- Masonry caulk — For gaps in brick, concrete, or stucco
🟢 Weatherstripping — For Moving Parts
Weatherstripping seals the gaps around doors and windows that open and close — where caulk would simply crack and fail because of the constant movement.
Types of Weatherstripping:
Foam Tape (V-Strip / Tension Seal)
- Self-adhesive foam that compresses when door/window closes
- Best for: Double-hung windows, sliding windows
- Durability: 2–5 years
- Cost: $5–$15 per roll
- DIY difficulty: ⭐ (Very Easy)
V-Strip (Tension Seal)
- Plastic or metal strip folded into a “V” shape
- Fits into the channel where window sashes slide
- Best for: Around the sides of double-hung and sliding windows, door frames
- Durability: 7–10 years
- Cost: $10–$20 per pack
- DIY difficulty: ⭐⭐ (Easy)
Door Sweep
- Attached to the bottom of a door to seal the gap at the threshold
- Available in brush, rubber, or vinyl styles
- Best for: Exterior doors, garage doors, basement doors
- Durability: 3–7 years
- Cost: $10–$40
- DIY difficulty: ⭐⭐ (Easy)
Door Threshold Seal
- Replaces or upgrades the threshold at the bottom of the door frame
- Creates a tighter seal than a door sweep alone
- Best for: Exterior doors with significant bottom gaps
- Cost: $30–$80
- DIY difficulty: ⭐⭐⭐ (Moderate)
Rolled Vinyl or Rubber Weatherstripping
- Fits into a groove in the door or window stop
- Creates a tight compression seal when closed
- Best for: Doors, casement windows
- Durability: 5–10 years
- Cost: $10–$25
- DIY difficulty: ⭐⭐ (Easy)
🟡 Expanding Spray Foam — For Large Gaps
For gaps larger than ½ inch — especially around window and door frames where they meet rough framing — expanding spray foam is the most effective solution.
Types of Spray Foam:
Minimal Expanding Foam
- Expands gently — won’t warp window frames
- ✅ Must use this type around doors and windows
- Cost: $8–$15 per can
Maximum Expanding Foam
- Expands aggressively — can warp frames if used incorrectly
- ⚠️ Do NOT use around doors and windows — for wall cavities and large voids only
⚠️ Important Warning: Always use “minimal expanding” or “window and door” spray foam around door and window frames. Standard expanding foam creates too much pressure and can actually bow and warp your frames, making windows and doors difficult or impossible to open and close properly.
Step 4: How to Seal Window Gaps (Step-by-Step)
Sealing Exterior Window Gaps with Caulk:
What You’ll Need:
- Exterior silicone or siliconized latex caulk
- Caulk gun
- Utility knife or oscillating tool
- Putty knife
- Rubbing alcohol and clean rag
Step-by-Step Process:
Step 1: Remove Old Caulk
Use a utility knife or oscillating tool to carefully cut away all old, cracked, or peeling caulk. Use a putty knife to scrape away any remaining residue. This step is critical — new caulk won’t bond properly over old caulk.
Step 2: Clean the Surface Thoroughly
Wipe down the entire area with rubbing alcohol on a clean rag. Remove all dust, dirt, oil, and moisture. Allow to dry completely — at least 30 minutes. Caulk adhesion depends almost entirely on surface cleanliness.
Step 3: Apply Backer Rod if Needed
For gaps wider than ¼ inch, press foam backer rod into the gap first. This gives the caulk something to bond to and prevents it from sinking too deep into the gap.
Step 4: Cut the Caulk Tube
Cut the tip of the caulk tube at a 45-degree angle. Start with a smaller cut — you can always make it bigger. A smaller opening gives you more control.
Step 5: Apply the Caulk
Hold the caulk gun at a 45-degree angle to the gap. Apply steady, consistent pressure as you move smoothly along the gap in one continuous motion. Don’t stop and start — it creates uneven beads that are harder to smooth.
Step 6: Smooth the Bead
Within 5 minutes of application, run a moistened finger or a caulk smoothing tool along the bead to press it firmly into the gap and create a clean, professional finish.
Step 7: Allow to Cure
Most exterior caulks need 24–48 hours to fully cure. Avoid rain and moisture during this period. Check the manufacturer’s instructions for specific cure times.
Adding Weatherstripping to Windows:
For Double-Hung Windows (most common):
- Clean the channels where the sashes slide with a damp cloth — remove all dirt and old adhesive
- Measure the length of each channel carefully
- Cut V-strip weatherstripping to the measured lengths
- Press V-strip into channels with the open end of the “V” facing out toward the exterior
- Test the window — it should still open and close smoothly but feel noticeably tighter
For the Top and Bottom of Window Sashes:
- Apply self-adhesive foam tape along the top of the upper sash and the bottom of the lower sash
- Choose foam thickness based on the size of your gap — compress it slightly when the window closes
Step 5: How to Seal Door Gaps (Step-by-Step)
Doors have more potential leak points than windows because they’re larger, used more frequently, and have more moving parts. Here’s how to tackle every one:
Sealing the Door Frame (Sides and Top):
Step 1: Inspect Existing Weatherstripping
Open the door and examine the weatherstripping around the entire frame. Press it with your finger — if it doesn’t spring back, it’s compressed and needs replacement.
Step 2: Remove Old Weatherstripping
Peel away old adhesive weatherstripping. For stapled or nailed weatherstripping, use pliers and a flathead screwdriver to remove staples and nails. Clean the surface completely.
Step 3: Measure and Cut New Weatherstripping
Measure the height of both side jambs and the width of the top jamb. Cut weatherstripping pieces slightly longer than needed — you can trim for a perfect fit.
Step 4: Install Side Pieces First
Press self-adhesive weatherstripping firmly along both side jambs. For foam tape, ensure it’s positioned so it compresses evenly when the door closes. For V-strip, install with the opening facing the exterior.
Step 5: Install Top Piece
Apply the top piece across the head jamb, ensuring it meets the side pieces at the corners without gaps.
Step 6: Test the Seal
Close the door slowly. You should feel resistance as the weatherstripping compresses. Use the flashlight test from outside to confirm no light passes through.
Installing a Door Sweep:
The bottom of the door is often the biggest source of air infiltration — and a door sweep is the solution.
Step 1: Measure the Door Width
Measure the width of your door at the bottom. Most sweeps come in standard sizes and can be trimmed to fit.
Step 2: Choose Your Sweep Type
- Stick-on sweep — Fastest installation, lower durability
- Screw-on sweep — More permanent, better seal (recommended)
- Automatic door sweep — Rises when door opens, drops when it closes (premium option, ~$40–$80)
Step 3: Mark the Position
Close the door and mark a line across the bottom where the sweep will sit — it should just touch the threshold without dragging heavily.
Step 4: Attach the Sweep
For screw-on sweeps:
- Pre-drill pilot holes to prevent splitting the door
- Align the sweep with your marked line
- Drive screws firmly but don’t overtighten
Step 5: Test and Adjust
Open and close the door several times. The sweep should create a seal against the threshold without making the door difficult to close or dragging on the floor covering.
Caulking Around Exterior Door Frames:
Apply exterior grade caulk between the door trim/casing and the exterior siding or wall surface — following the same caulking steps outlined in the window section above.
Pay special attention to:
- The top of the door frame where water can enter
- Corner joints in the trim where two pieces meet
- Where the threshold meets the siding at the sides
Common Mistakes to Avoid
Learning from other homeowners’ mistakes saves you time, money, and frustration:
❌ Mistake 1: Caulking Over Old Caulk
Old caulk must be fully removed before applying new caulk. Caulking over old, damaged caulk creates a poor bond and the new caulk will fail quickly — often within one season.
❌ Mistake 2: Using the Wrong Caulk Type
Using interior caulk outdoors will result in rapid deterioration. Using non-paintable silicone where you need a painted finish creates an eyesore. Always match the caulk type to the application.
❌ Mistake 3: Using Maximum-Expanding Foam Around Frames
As mentioned earlier — this can bow and warp your frames, causing doors and windows to stick, not close properly, or lose their weatherproofing entirely.
❌ Mistake 4: Applying Caulk to Wet or Dirty Surfaces
Caulk simply won’t bond to dirty, dusty, or wet surfaces. Always clean and dry surfaces thoroughly before application.
❌ Mistake 5: Applying in Extreme Temperatures
Most caulks should not be applied below 40°F or above 90°F. Cold temperatures prevent proper curing; extreme heat causes caulk to sag before it sets. Check the manufacturer’s recommended temperature range.
❌ Mistake 6: Skipping the Backer Rod on Wide Gaps
Trying to fill a wide, deep gap with caulk alone wastes material and results in cracking as the caulk shrinks during curing. Always use backer rod for gaps wider than ¼ inch.
❌ Mistake 7: Replacing Only Visible Weatherstripping
Many homeowners replace only the weatherstripping they can easily see — usually on the door face side — while missing the top jamb and the bottom threshold, which are often the biggest air leaks.
How to Know When to Call a Professional
While sealing gaps is largely a DIY-friendly job, certain situations call for professional help:
Call a professional when:
- Gaps are caused by significant foundation settling or structural issues
- You find rot, mold, or water damage in window or door frames
- Windows or doors are visibly warped, bowing, or difficult to operate
- You suspect lead paint (homes built before 1978) and need to disturb frame areas
- Gaps are larger than 1 inch with no solid surrounding material
- You’re dealing with historic windows that require specialized knowledge
- Multiple windows or doors need full replacement rather than sealing
💡 Hassan’s Tip: When in doubt, get a free estimate from a local contractor. Many window and door specialists offer no-cost assessments that help you understand whether DIY sealing will solve your problem or whether replacement is the better long-term investment.
How Long Will Your Sealing Work Last?
Knowing when to expect to redo this work helps you plan ahead:
| Material | Expected Lifespan | When to Inspect |
|---|---|---|
| Silicone caulk | 20+ years | Every 5 years |
| Siliconized latex caulk | 10–15 years | Every 3 years |
| Latex caulk (exterior) | 5–10 years | Every 2 years |
| Foam tape weatherstripping | 2–5 years | Every spring |
| V-strip weatherstripping | 7–10 years | Every 3 years |
| Door sweep (rubber) | 3–5 years | Every 2 years |
| Expanding foam | 10–15 years | Every 5 years |
Annual Maintenance Tip: Every fall before cold weather arrives, do a quick walk-around inspection of all your sealed areas. Catching early deterioration means a quick re-application instead of a full redo — and another winter of comfortable, energy-efficient living.
The Real Cost vs. Savings Breakdown
Let’s put real numbers to this project so you can see exactly what you’re working with:
Typical Project Cost for an Average Home:
| Task | DIY Cost | Professional Cost |
|---|---|---|
| Caulking all windows (10 windows) | $30–$60 | $150–$400 |
| Weatherstripping all windows | $40–$80 | $100–$250 |
| Door weatherstripping (3 doors) | $30–$60 | $100–$200 |
| Door sweeps (3 exterior doors) | $30–$90 | $80–$200 |
| Spray foam (as needed) | $15–$30 | Included |
| Total | $145–$320 | $430–$1,050 |
Estimated Annual Energy Savings:
- Small home with few gaps: $100–$200/year
- Medium home with moderate gaps: $200–$400/year
- Older home with significant leaks: $400–$700/year
Payback Period:
- DIY approach: Under 1 year in most cases
- Professional approach: 1–3 years
This is genuinely one of the highest-ROI home improvements available to any homeowner — regardless of budget.
Related Articles You’ll Love
If you enjoyed this guide and want to keep improving your home, here are some helpful reads from our team:
🗄️ Best Storage Ideas for a More Organized Home
Once your home is sealed and energy-efficient, it’s time to get organized. Discover the smartest storage solutions for every room in your house.
🚪 How to Create a More Welcoming Entryway
Your front door area is now properly sealed — why not make it beautiful too? Learn how to transform your entryway into a warm, impressive first impression.
🌿 How to Create a Stylish Outdoor Living Space
With your home’s energy efficiency improved, it’s the perfect time to focus on your outdoor spaces. Get inspired with practical ideas for creating a beautiful outdoor living area.
Frequently Asked Questions (FAQ)
❓ How do I know if my windows and doors need to be sealed or fully replaced?
If the frames are structurally sound — no rot, no warping, no broken glass — sealing is almost always the right first step and can be highly effective. Replacement becomes necessary when frames are rotted, severely warped, broken, or more than 25–30 years old with single-pane glass. When in doubt, start with sealing — it’s cheap and the improvement will be immediately noticeable.
❓ Can I seal gaps in winter or does it need to be warm outside?
Most caulks and weatherstripping adhesives require temperatures above 40°F to bond properly. Some specialty “cold weather” caulks can be applied down to 0°F, but they’re less common. For best results, seal on a mild day between 50°F–80°F. Weatherstripping without adhesive backing (like V-strip that’s pressed in) can be installed at any temperature.
❓ My door has a gap at the bottom but the door sweep drags on my floor. What do I do?
This is a common issue. First, try an automatic door sweep — it rises when the door opens and drops when it closes, so there’s no drag. Alternatively, you can adjust the door hinges to raise the door slightly, or plane the bottom of the door to create proper clearance. If the gap is due to a sagging door, the hinges may need tightening or replacement.
❓ Is there a difference between indoor and outdoor caulk?
Yes — significantly. Outdoor/exterior caulk is formulated to handle UV exposure, moisture, and temperature extremes. Indoor caulk is often paintable latex that isn’t designed for weathering. Always use exterior-grade caulk for any outdoor application, and check that your specific caulk is rated for the surfaces you’re sealing (wood, masonry, vinyl, etc.).
❓ How do I seal around a window air conditioning unit?
Window AC units create significant gaps around their edges. Use foam air conditioner side panels (usually included with the unit or available as accessories) for the accordion-style side gaps. Seal any remaining gaps with removable foam weatherstripping tape — not permanent caulk, since you’ll need to remove the unit seasonally.
❓ Can sealing gaps help reduce noise as well as energy loss?
Absolutely. Air gaps that allow energy loss also allow sound transmission. Properly sealing gaps with quality caulk and weatherstripping can noticeably reduce outside noise — especially helpful for homes near busy roads, airports, or noisy neighbors.
❓ How often should I check my seals and weatherstripping?
Do a full inspection every fall before cold weather arrives and a quick check each spring. Pay close attention after severe weather events — storms, extreme heat waves, or hard freezes can accelerate deterioration. Most weatherstripping lasts 2–7 years depending on the material and exposure.
Conclusion: Seal It Once, Save for Years
Sealing gaps around your doors and windows is the kind of home improvement project that delivers results you feel immediately — the day you finish, your home feels noticeably more comfortable, quieter, and protected.
And the financial return? It’s one of the best in all of home improvement.
For an investment of $50–$150 in materials and a single weekend afternoon of work, you can eliminate hundreds of dollars in wasted energy costs every single year — while making your home more comfortable in every season.
Here’s your simple action plan to get started today:
This Weekend:
- Do the candle/flashlight test on every door and window
- Make a list of every gap you find
- Buy appropriate caulk, weatherstripping, and door sweeps
- Remove all old caulk and weatherstripping
- Apply new seals starting with the worst offenders
This Month:
- Check and seal any exterior gaps you may have missed
- Inspect attic hatch and basement windows
- Consider a professional energy audit to find hidden leaks
Every Fall:
- Do a quick inspection of all sealed areas
- Replace any weatherstripping showing wear
- Touch up any caulk that’s cracking or pulling away
Your home works hard to keep you comfortable. A few hours and a small investment in proper sealing makes that job dramatically easier — and puts real money back in your pocket every month of the year.
Have questions about sealing gaps in your specific situation? Leave a comment below — Hassan reads every one and is happy to help with your specific door and window challenges.
📚 Sources & References
- U.S. Department of Energy — energy.gov
- ENERGY STAR Program — energystar.gov
- U.S. Environmental Protection Agency — epa.gov
- Building Performance Institute — bpi.org
DISCLAIMER
Last Updated: June 2025
The information provided in this article is for general informational and educational purposes only. Results vary based on your home’s age, construction type, and local climate conditions. Always consult a licensed contractor before making significant structural changes. Cost estimates are approximate and vary by region and material availability. Some tasks — especially those involving older homes with lead paint or asbestos — require professional assessment first. This post may contain affiliate links — we only recommend products we genuinely trust and believe provide real value to homeowners.
✍️ ABOUT THE AUTHOR
👤 Meet Hassan
Home Improvement & DIY Writer
Hassan is a home improvement and DIY writer sharing practical tips, ideas, and helpful guides for improving, maintaining, and upgrading your home. With years of hands-on experience researching and writing about energy-saving solutions, weatherproofing, and home maintenance, Hassan helps everyday homeowners make smarter, more cost-effective decisions for their living spaces.