How to Install a Bathroom Shelf: A Beginner-Friendly Step-by-Step Guide

A bathroom shelf can transform a cluttered, disorganized space into something that actually works for you. Whether you need a place to store toiletries, keep towels within reach, or free up vanity counter space, a well-placed shelf solves real problems without requiring a full renovation.
The good news is that learning how to install a bathroom shelf is one of the more approachable DIY projects a homeowner can tackle. You do not need specialized training or an extensive tool collection. With the right preparation, a little patience, and a clear process, most people can complete this project in an afternoon.
This guide walks you through everything you need to know — from picking the right shelf and locating the best spot on your wall, to drilling into different wall types and making sure your shelf stays secure for years to come.
Can You Install a Bathroom Shelf Yourself?
For the majority of bathroom shelves, yes — this is a manageable DIY project. Most wall-mounted shelf installations require only basic skills: measuring accurately, drilling a hole, and driving a screw. If you have done any small home repairs before, you are in good shape.
That said, the difficulty level does vary. A lightweight floating shelf on a standard drywall wall is straightforward. Drilling into ceramic tile or masonry requires more care and the right tools. A heavy shelf loaded with accessories demands more attention to anchoring and stud placement.
Beginners who take their time, follow the steps carefully, and use appropriate materials can absolutely handle this on their own. This guide is written with that audience in mind.
What You Need Before Installing a Bathroom Shelf
Gathering your tools and materials before you start saves time and prevents mid-project frustration. Here is what you will typically need:
| Category | Item |
|---|---|
| Measuring Tools | Tape measure, pencil, level |
| Drilling Tools | Power drill, drill bits (standard and tile/masonry if needed) |
| Fastening Tools | Screwdriver (manual or drill attachment), wrench if needed |
| Hardware | Wall anchors appropriate for your wall type, screws, mounting brackets |
| Safety Equipment | Safety glasses, dust mask (especially when drilling tile or masonry) |
| Utility Tools | Stud finder, painter’s tape, voltage/pipe detector |
The specific drill bits and anchors you need depend on your wall type. That is covered in detail later in this guide. Do not skip ahead on those sections — using the wrong anchor in the wrong wall is one of the most common reasons shelves fail.
Choose the Right Bathroom Shelf
Before you buy anything or pick up a drill, spend a few minutes thinking about what kind of shelf actually fits your needs. The bathroom environment is tough on materials — humidity, temperature changes, and splashing water mean that not every shelf is suited for every location.
Shelf Material
Wood shelves add warmth and work well away from direct water exposure, such as above a toilet or on a dry bathroom wall. If you use wood, make sure it is sealed or painted to resist moisture. Solid teak and bamboo are naturally more water-resistant than pine or MDF.
Glass shelves look clean and modern and resist moisture, but they require secure mounting and are not ideal in homes with young children. Metal and stainless steel shelves work well in humid environments as long as they are rated for moisture resistance or are treated to prevent rust. Plastic and resin options are practical and low-maintenance in wet zones.
Size and Weight Capacity
Match the shelf size to its intended use. A small shelf above the toilet needs to hold shampoo and soap, not stacks of towels. Check the manufacturer’s stated weight capacity and stay comfortably within it. Overloading a shelf — especially one mounted with anchors rather than studs — is a safety risk.
Freestanding vs. Wall-Mounted
Freestanding shelves require no drilling and work well in larger bathrooms where floor space allows. Wall-mounted shelves are better for small bathrooms because they keep the floor clear. This guide focuses on wall-mounted installation, which gives you more flexibility in placement and generally a more permanent, secure result.
Moisture Resistance
In a bathroom, moisture resistance is not optional — it is a requirement. Look for materials and finishes specifically rated for wet or humid environments. If you are placing a shelf inside or directly adjacent to a shower, this matters even more.
Choose the Best Location for the Shelf
Where you put the shelf matters as much as how you install it. A shelf in the wrong location creates inconvenience at best, and a safety hazard at worst.
Practical Placement Options
- Above the toilet: One of the most popular locations. It uses space that would otherwise go to waste. Keep the shelf high enough so it does not interfere with the tank lid — typically at least 8 to 10 inches above the top of the tank.
- Above or beside the vanity: Useful for everyday items like hand lotion, cotton pads, and personal care products. Keep items you use daily at a comfortable arm’s reach.
- Inside or near the shower: If you are mounting inside a tile shower enclosure, you will need anchors and bits designed specifically for tile. A corner shelf is a popular and practical choice here.
- Along a blank bathroom wall: Great for towel storage or decorative items.
What to Avoid
Do not mount a shelf where it will interfere with door swings or create a bump hazard in a tight space. Avoid placing shelves directly above light switches or outlets, as wiring typically runs near those locations.
Most importantly, avoid drilling in areas where hidden plumbing or electrical wiring may be present. Pipes often run vertically from floor to ceiling behind walls near fixtures, and electrical wiring runs horizontally from outlets and switches. A stud finder with built-in electrical and pipe detection can help, though it is not foolproof. If you are genuinely unsure about what is inside a wall, consulting a plumber or electrician before drilling is the safer choice. You can find more general guidance in our Best Plumbing Maintenance Tips for Homeowners article.
How to Install a Bathroom Shelf Step by Step
Here is the complete installation process in plain, practical terms.
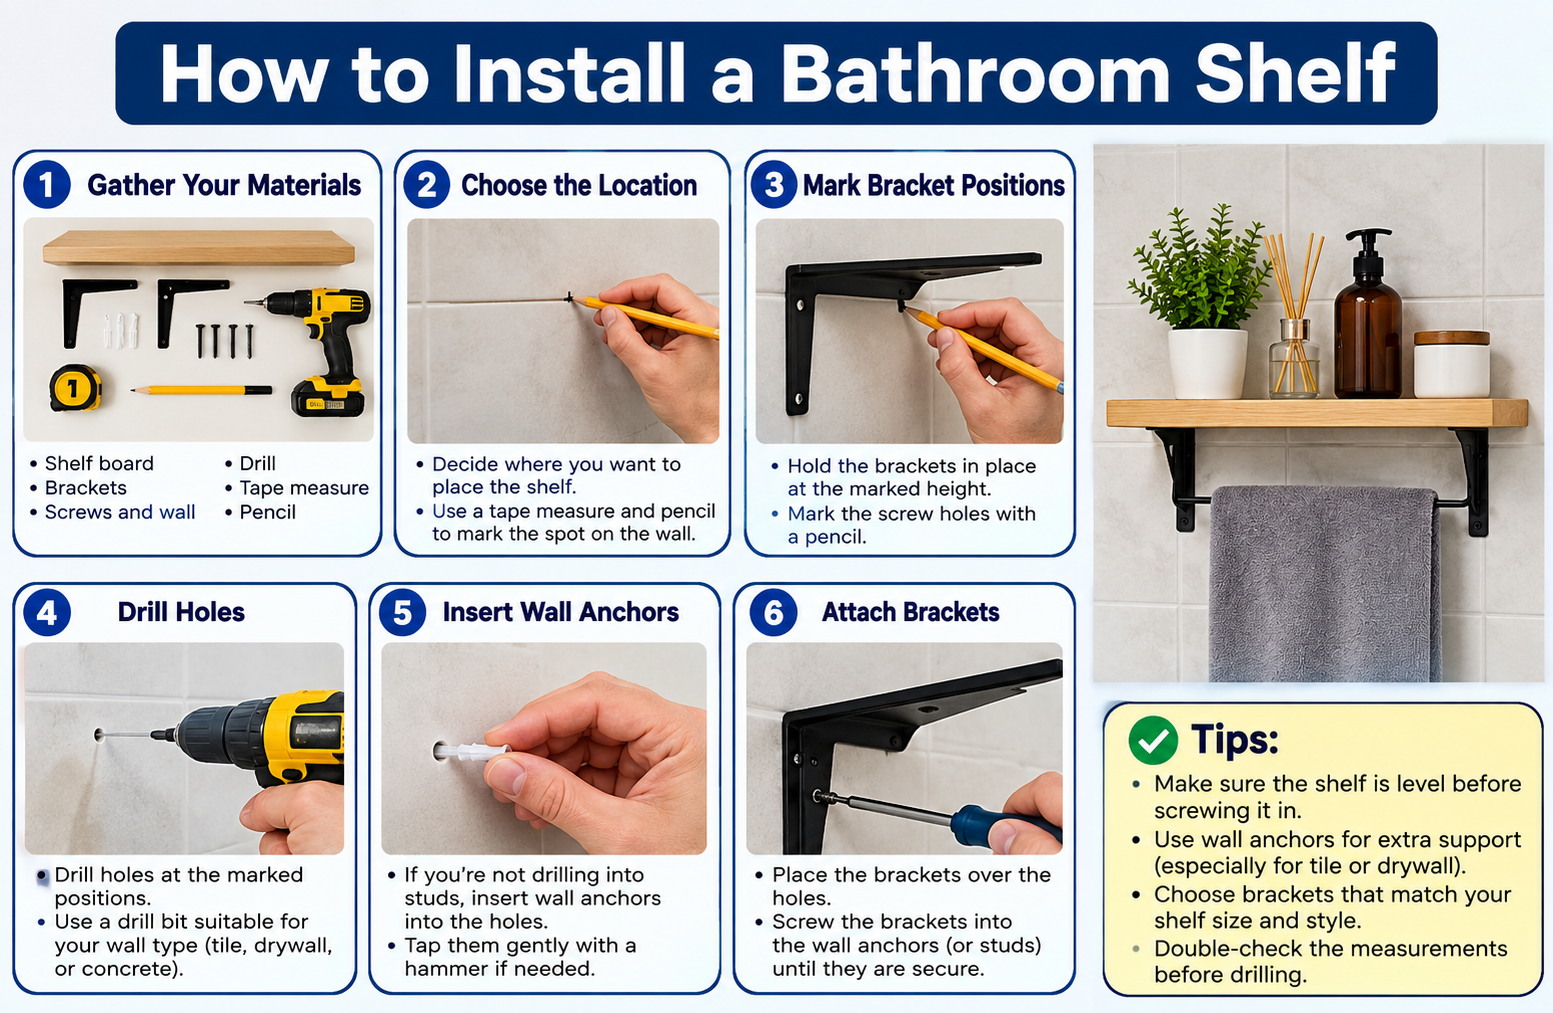
How do you install a bathroom shelf? Mark your shelf height on the wall, locate studs or choose appropriate anchors, drill pilot holes at your bracket locations, secure the brackets, and attach the shelf. Use a level throughout the process to keep everything straight. Test the shelf’s stability before loading it with items.
Step 1: Measure the Wall
Decide on the exact height where you want the shelf. Hold the shelf up against the wall and have a second person look at it with you — this is far more useful than guessing. Consider who will use the shelf, what will go on it, and whether nearby fixtures create any height restrictions.
Mark your desired shelf height with a light pencil mark at the center of where the shelf will sit. Then measure out to where your bracket positions will land on either side, based on the bracket spacing your shelf requires. Most shelves come with brackets and specify the correct spacing.
Step 2: Mark the Mounting Points
Use a level to draw a horizontal reference line across the wall at your bracket height. This line does not need to be permanent — a strip of painter’s tape along this line can help you mark and adjust without leaving marks.
Mark each bracket hole location clearly. Most brackets have two or more holes each. Hold the bracket against the wall, align it with your reference line, and use a pencil to mark through each hole. Repeat for the second bracket.
Double-check that your marks are level before moving on. Correcting a crooked shelf after the holes are drilled is a headache you can avoid with thirty seconds of checking now.
Step 3: Check for Wall Studs
Wall studs are the vertical wooden framing members inside your wall, typically spaced 16 inches apart in most North American homes. Driving screws into studs gives you the strongest possible connection — significantly stronger than any anchor in drywall alone.
Use a stud finder to scan the wall in the area where you plan to mount the shelf. Mark stud locations with painter’s tape. If your bracket holes happen to land over a stud, drive screws directly into the stud without needing an anchor.
In many cases, bracket holes will not align with studs. That is normal. This is when appropriate wall anchors become essential.
Step 4: Use the Correct Wall Anchors
Wall anchors are not one-size-fits-all. Using the wrong type for your wall material is one of the most common — and most avoidable — installation mistakes.
Drywall: Expansion anchors, toggle bolts, or self-drilling drywall anchors work well depending on the load. For heavier shelves, toggle bolts (also called butterfly anchors) provide the most reliable hold in drywall. Follow the weight rating on the anchor packaging.
Plaster walls: Plaster is more brittle than drywall and requires anchors specifically rated for plaster, or toggle bolts that expand behind the plaster surface. Standard self-drilling drywall anchors often do not work well in plaster.
Tile walls: Tile requires special consideration. You will drill through the tile first and then into whatever is behind it — drywall, cement board, or masonry. Use a plastic expansion anchor after drilling. Never use a self-drilling anchor on tile, as it will crack the surface.
Masonry and brick: Masonry anchors, also called concrete anchors or wedge anchors, are required for brick or concrete block walls. These require a hammer drill and a carbide-tipped masonry bit.
Always read the anchor manufacturer’s instructions and match the anchor size to the screw size specified.
Step 5: Drill the Pilot Holes
Select a drill bit appropriate for your wall type. For drywall or wood studs, a standard twist bit matched to your anchor or screw diameter works fine. For tile, use a carbide-tipped tile and glass bit or a diamond-coated bit. For masonry, use a carbide-tipped masonry bit and a hammer drill.
When drilling into tile, start slowly. Apply gentle, consistent pressure and let the bit do the work. Do not press hard — force causes tile to crack. Some installers place a small piece of painter’s tape over the drill mark to help the bit stay positioned before it bites in. Drill at the lowest hammer setting or with no hammer function until you are through the tile, then switch to hammer mode if drilling into masonry behind it.
Drill pilot holes to the depth specified for your anchors. Blow out any dust from the holes with a small puff of air or a squeeze of a rubber bulb.
Step 6: Install the Mounting Brackets
Tap your wall anchors into the pilot holes with a rubber mallet or the handle of a screwdriver. They should sit flush with the wall surface. Do not hammer them in at an angle.
Hold the first bracket against the wall, aligning its holes with the anchors. Drive the screws through the bracket holes and into the anchors until snug. Do not overtighten — you can strip anchors if you apply too much torque. The bracket should sit flat against the wall with no wobble.
Repeat for the second bracket. Before moving on, hold a level across the tops of both brackets to confirm they are aligned. If one sits slightly higher, you may be able to shim it or adjust slightly. If it is significantly off, you may need to reposition and re-anchor that bracket.
Step 7: Attach the Bathroom Shelf
With both brackets secured and level, set the shelf onto the brackets. Most shelves either rest on the brackets and are secured with small screws from below, or they clip into a channel on the bracket. Follow the shelf manufacturer’s method.
Drive the shelf attachment screws snugly but carefully. Overtightening on a glass shelf can crack it. Snug is sufficient.
Step 8: Check the Shelf With a Level
Place your level directly on the shelf surface and check it from multiple angles — front to back and side to side. If the shelf is not level, check whether the issue is the shelf itself or the bracket alignment. Small adjustments to the bracket position at this stage can correct minor variances.
A shelf that looks nearly level but is actually slightly off will be noticeable every time you set something down on it. Taking a moment to confirm this now is worth it.
Step 9: Test the Shelf
Before loading the shelf with your belongings, test its stability. Press down firmly on the center of the shelf with your palm, applying moderate pressure. It should feel solid with no flex or movement at the wall. Check that the brackets have not shifted.
Start with lightweight items first. Give the shelf a day or two before placing your heaviest items on it. This is especially true when using wall anchors rather than stud-mounted screws, as some anchor types set more firmly after the initial load cycle.
How to Install a Bathroom Shelf on Different Wall Types
Wall type changes everything about how you drill, what anchors you use, and how careful you need to be. Here is a practical breakdown.
Drywall
Drywall is the most common wall type in modern bathrooms and the most forgiving to work with. Standard twist drill bits work fine for pilot holes. If you hit a stud, drive directly into it with no anchor needed. If you are between studs, choose a toggle bolt or rated expansion anchor for the expected load. Drywall is soft enough that self-drilling anchors spin in easily, though they are best reserved for lighter loads.
Plaster Walls
Older homes — particularly those built before the 1950s — often have plaster walls. Plaster is harder and more brittle than drywall. Drill slowly and use a sharp bit. Plaster can crack if you apply too much pressure or if the drill bit snags. Toggle bolts work well because they expand behind the plaster without relying on the surface material to grip.
Avoid self-drilling anchors in plaster — they tend to crumble the surrounding plaster rather than grip it cleanly.
Tile Walls
Installing on tile is the trickiest scenario for most DIYers, but it is entirely doable with the right approach. Use a diamond-tip or carbide-tipped tile drill bit. Apply painter’s tape over the drill point to prevent bit slippage on the smooth tile surface. Drill slowly with light, even pressure.
Once through the tile, the drill bit enters whatever material is behind it — typically drywall or cement board. Switch to a standard bit at that point if needed. Insert a plastic expansion anchor into the finished hole and drive your bracket screw into it.
Never use a hammer drill setting while the bit is still in contact with tile — the impact force will crack it. Save hammer mode for masonry behind the tile, if present.
Brick or Masonry Walls
Masonry installation requires a hammer drill and carbide-tipped masonry bits. Mark your hole locations carefully, as corrections are difficult. Drill at a consistent depth using the depth stop on your hammer drill if available.
Use masonry-specific anchors — plastic expansion anchors rated for masonry or sleeve anchors for heavier loads. Do not use standard drywall anchors in masonry; they will not hold.
Brick and masonry walls are extremely durable once the anchors are properly set. A shelf mounted in solid brick with correct anchors can hold significant weight.
How High Should a Bathroom Shelf Be?
There is no single correct height for a bathroom shelf. The right height depends on several factors: who will use it, what will be stored on it, and where in the bathroom it is located.
A practical general range for most adults is between 48 and 60 inches from the floor for a primary-use shelf — roughly at or slightly above eye level. This keeps everyday items visible and easy to reach without requiring stretching.
Shelves above the toilet typically sit 8 to 10 inches above the tank top, which often puts them in the 60 to 72 inch range depending on the toilet height. Shelves above a vanity usually work best at a height that keeps items visible without obstructing the mirror.
In a shared bathroom, aim for a height that works reasonably well for the tallest and shortest regular users. In a child’s bathroom, lower placement — around 36 to 48 inches — is more practical.
If the shelf is purely decorative or for infrequently used items, height is more flexible. The key is that primary-use shelves should be easy to reach safely without a step stool.
Common Bathroom Shelf Installation Mistakes
Even experienced DIYers make installation errors. Here are the ones that show up most often — and how to avoid them.
Skipping measurements. Eyeballing the position leads to crooked shelves and regret. Measure twice, mark carefully, and use a level every time.
Not using a level. A shelf that is even slightly off looks wrong and causes items to slide. Use a bubble level or a digital level app to check both the reference line and the installed shelf.
Using the wrong wall anchors. This is the single most common cause of shelf failure. A drywall anchor rated for 20 pounds will not safely hold a 30-pound load. Match the anchor type and weight rating to your wall type and expected load.
Drilling without checking for hidden utilities. Water pipes and electrical wiring run inside bathroom walls. Drilling into either is dangerous and expensive to repair. Always use a stud finder with AC detection, and if in doubt, do not drill until you have more information.
Overloading the shelf. Every shelf and every anchor has a weight limit. Exceeding it risks sudden failure. If you need to store heavier items, choose a heavier-duty shelf, mount into studs, or consider a different storage solution.
Using unsuitable screws. Standard interior screws rust quickly in bathroom humidity. Use stainless steel, zinc-coated, or other corrosion-resistant screws in all bathroom installations.
Ignoring moisture. Wood shelves left unsealed in a humid bathroom will warp, swell, and deteriorate. Seal or paint wood shelves before installing them.
Installing too close to plumbing fixtures. Shelves placed too close to a showerhead, faucet, or supply line create access problems for repairs and can be damaged by spray.
Failing to secure brackets properly. Snug is not the same as loose, and snug is not the same as overtightened. Brackets should be firmly attached with no play or wobble, but you should not strip the anchor by forcing the screw too hard.
Bathroom Shelf Safety Tips
Taking a few safety precautions makes the installation process much safer for you and everyone in your home.
- Wear safety glasses whenever you are drilling. Tile, plaster, and drywall all produce particles that can injure eyes.
- Use a dust mask when drilling into tile, masonry, or plaster, as fine particles can be harmful to breathe.
- Scan the wall with a stud finder that has electrical detection capability before drilling anywhere in a bathroom. Outlets, switches, exhaust fans, and light fixtures all have wiring that runs through the walls.
- Keep children away from the work area when drilling or handling sharp screws and anchors.
- Follow the manufacturer’s installation instructions for both the shelf and the anchors. Weight ratings printed on packaging are based on proper installation — deviation from those instructions changes the safety equation.
- Never exceed the shelf’s rated weight capacity. The U.S. Consumer Product Safety Commission recommends checking all storage hardware periodically for signs of loosening or wear, particularly in high-humidity environments.
- If you are working at any height, use a stable step stool rather than balancing on the toilet tank or the tub edge.
How to Make a Bathroom Shelf More Secure
Once your shelf is installed, there are several ways to improve its long-term stability.
If you can position at least one bracket over a stud, do so. Even one stud-mounted screw significantly increases the strength of the installation compared to anchors alone.
Use toggle bolts rather than expansion anchors when mounting into drywall for anything but the lightest loads. Toggle bolts spread the load across a larger area behind the wall.
Add a bead of clear, moisture-resistant construction adhesive between the bracket back plate and the wall surface — not as a substitute for proper fasteners, but as an additional measure that reduces bracket movement over time. Make sure the adhesive is compatible with your wall surface.
Check the shelf mounting screws every six months or so and snug them up if they have loosened. This is especially useful in a bathroom where humidity causes minor expansion and contraction in wall materials.
For shelves in a shower or high-humidity zone, use marine-grade stainless steel screws and hardware. Standard plated screws corrode faster than most homeowners expect in those conditions.
How to Maintain a Bathroom Shelf
A bathroom shelf does not require much ongoing maintenance, but a little attention keeps it looking good and functioning safely.
Clean regularly. Wipe down the shelf surface with a damp cloth and mild cleaner suited to the shelf material. Avoid abrasive cleaners on glass or coated metal surfaces. For wood shelves, use a cleaner appropriate for the finish.
Watch for moisture damage. Check the underside of wood shelves periodically for signs of water absorption, swelling, or discoloration. If the protective finish has worn, reapply a coat of sealant.
Prevent rust. Metal shelves and hardware can corrode in bathroom humidity. Apply a thin coat of clear protective spray to exposed metal brackets annually if you notice any early signs of rust or discoloration.
Check for loose screws. Every few months, press lightly on the shelf and check for any wobble or movement at the wall. If the shelf shifts, tighten the mounting screws. If the anchor has pulled loose, you may need to install a larger anchor or reposition the mounting point.
Prevent mold and mildew. The underside of shelves in humid bathrooms can develop mildew, especially where the shelf contacts the bracket. Clean these contact points when you notice any dark spotting, and ensure good ventilation in the room.
For a broader look at keeping your bathroom in good shape, our Bathroom Home Maintenance Tips guide covers regular care routines that work well alongside projects like this one.
DIY Bathroom Shelf Ideas
Not sure what kind of shelf to install? Here are some practical options that work well in real bathrooms.
Floating shelf. A floating shelf has no visible brackets — the mounting hardware is hidden inside the shelf. The result is a clean, minimal look. Floating shelves work well above a vanity or along an open wall. They are a popular choice and are available in a wide range of sizes and materials.
Corner shelf. Corner shelves fit into a 90-degree wall corner and are particularly useful inside a shower enclosure. They maximize otherwise wasted corner space and keep shampoo and soap within easy reach. Many tile-ready corner shelves mount with just two or four anchors.
Over-toilet shelf unit. A freestanding unit that straddles the toilet requires no drilling and is a solid option for renters or anyone who prefers a reversible installation. Wall-mounted over-toilet shelves provide a more permanent and stable solution for homeowners.
Small shelf above the vanity. A single shelf positioned above or beside the bathroom mirror keeps frequently used items within reach without cluttering the counter. Keep the shelf width appropriate for the vanity so it does not feel crowded.
Recessed shelf. A recessed shelf is built into the wall cavity — most commonly inside a shower. It creates a completely flush storage area with no protruding edges. This type of installation is more involved and may require cutting into wall material, making it a more advanced project.
Wooden shelf with brackets. A simple wooden board mounted on decorative metal brackets is a classic option. It is easy to customize in terms of size, stain color, and finish. Using a sealed or painted wood board and rust-resistant brackets, this type of shelf can hold up well even in a humid bathroom environment.
Glass shelf. Glass shelves have a light, open appearance and are easy to clean. They are a good choice if you want the wall behind the shelf to remain visible. Use tempered glass rather than standard glass for safety.
If you enjoy using reclaimed wood or building basic structures yourself, our guide on How to Build a Simple Storage Bench covers some of the same practical woodworking skills used in shelf projects.
When Should You Hire a Professional?
Most bathroom shelf installations are well within DIY reach. However, there are situations where bringing in a professional is the smarter and safer choice.
You are unsure about what is inside the wall. If your bathroom has older plumbing with uncertain routing, or if the wall near your planned shelf location also contains electrical components, it is worth having a plumber or electrician confirm what is in the wall before you drill.
The wall shows signs of structural damage. Soft spots, bulging surfaces, crumbling plaster, or visible water damage in the wall mean the structure behind the surface may be compromised. A damaged wall cannot support a shelf reliably, and drilling into it could make the damage worse.
You need to mount a heavy shelf system. A single lightweight shelf is a DIY project. A large, heavy storage system loaded with tile, books, or significant weight may need to be engineered with proper stud placement or structural fasteners — particularly if the wall is not solid masonry.
The installation requires significant tile modification. If mounting a shelf requires removing or cutting existing tile, this is a specialized skill. Incorrectly cut tile is difficult to repair and can compromise the waterproofing of a shower wall.
You are dealing with a load-bearing wall concern. Standard shelf installation does not affect load-bearing walls structurally, but if your project ever expands to include recessing a shelf or removing a section of wall, those decisions should involve a professional.
You can also find related guidance in our article on How to Install a Towel Bar, which covers a similarly common bathroom hardware project with some overlapping considerations.
Frequently Asked Questions
Can I install a bathroom shelf without studs?
Yes. Wall anchors — toggle bolts, expansion anchors, or masonry anchors depending on your wall type — allow you to mount a shelf securely without hitting a stud. Choose anchors rated for more than your expected load and follow the installation instructions carefully. Mounting into a stud is always stronger, but proper anchors are a reliable alternative for shelves within reasonable weight limits.
What anchors should I use for a bathroom shelf?
It depends on your wall type. Use toggle bolts or rated expansion anchors for drywall. Use toggle bolts for plaster. Use plastic expansion anchors after drilling through tile. Use masonry anchors for brick or concrete. Always match the anchor’s weight rating to your intended load and follow the manufacturer’s instructions.
Can I install a shelf on bathroom tile?
Yes, but it requires care. Use a carbide-tipped or diamond-coated drill bit and drill slowly without heavy pressure. Apply painter’s tape over the mark to prevent the bit from sliding on the smooth tile surface. Once through the tile, use plastic expansion anchors. Avoid hammer drill mode until you are through the tile layer.
How high should a bathroom shelf be?
There is no single universal answer. For most adults, a primary-use shelf at roughly 48 to 60 inches from the floor is comfortable. Shelves above a toilet typically go 8 to 10 inches above the tank. The best height depends on who uses the shelf, what is stored on it, and what fixtures are nearby.
What type of screws are best for bathroom shelves?
Use stainless steel or zinc-coated screws. Bathroom humidity corrodes standard steel screws relatively quickly. Stainless steel provides the best corrosion resistance. Match the screw length and diameter to your anchor specifications.
How much weight can a bathroom shelf hold?
Weight capacity depends on the shelf material, the anchor type, whether screws are mounted into studs, and the bracket design. Always check the manufacturer’s rated weight capacity for both the shelf and the anchors. Staying at 70 to 80 percent of the stated maximum is a safe practice.
Can I install a floating shelf in a bathroom?
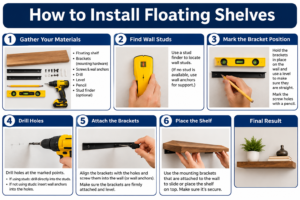
Yes. Floating shelves are a popular choice for bathrooms. The installation process is the same — locating studs or using appropriate anchors, drilling accurately, and securing the hidden mounting hardware. Make sure the shelf material is moisture-resistant if it will be in a humid area.
How do I prevent a bathroom shelf from becoming loose?
Use the correct anchor type for your wall, mount into studs where possible, use corrosion-resistant hardware, and check the shelf every few months for loosening. Tighten screws as needed. Avoid overloading the shelf, as excessive weight accelerates anchor wear.
What drill bit should I use for bathroom tile?
Use a carbide-tipped tile bit or a diamond-coated drill bit. Standard twist bits will not penetrate tile effectively and may damage the surface. Start slowly, keep the bit cool, and do not use hammer mode while drilling through the tile layer.
Is it safe to drill into bathroom walls?
It can be done safely with proper precautions. Wear safety glasses. Use a stud finder with AC detection to scan for wiring. Be aware that plumbing pipes often run vertically behind walls near fixtures. If you are uncertain about what is inside a wall, consult a professional before drilling.
Wrapping Up
Installing a bathroom shelf is one of those home improvement projects that delivers visible, practical results without requiring a contractor or a large investment of time. With the right preparation — choosing a suitable shelf, gathering proper tools, understanding your wall type, and following a step-by-step process — most homeowners can complete this project confidently.
The key is taking the time to do it right: measuring carefully, using appropriate anchors, checking for level, and confirming that the finished shelf is stable before loading it up. A shelf that is installed well will serve you reliably for years.
If this project sparked your interest in other bathroom and home organization upgrades, our Home Maintenance Checklist is a useful resource for staying on top of routine repairs and improvements throughout the year.
Disclaimer
The information in this article is intended for general guidance and educational purposes. Always follow the manufacturer’s instructions for your specific shelf, brackets, and anchors. Building codes, wall constructions, and installation requirements vary by location. If you are uncertain about the presence of hidden plumbing, electrical wiring, or structural issues in your walls, consult a licensed plumber, electrician, or contractor before proceeding. The author and publisher accept no liability for damage, injury, or loss resulting from the use or misuse of information provided in this article.