How to Paint a Room: A Complete Beginner’s Guide

Introduction
Fresh paint is one of the fastest and most affordable ways to completely transform a room. A new color on the walls changes the mood, makes a space feel larger or cozier, and gives a tired room an entirely new personality. Best of all, painting is one of the few home improvement projects where a complete beginner can achieve results that look genuinely professional.
The secret is not talent or experience. It is preparation, patience, and using the right techniques in the right order.
Most people who end up with a messy paint job rushed through the preparation stage. They skipped taping, painted over dirty walls, or tried to cover everything in one thick coat. The good news is that these are all avoidable mistakes once you understand why each step matters.
This guide walks you through the entire room painting process from start to finish. You will learn how to choose the right paint and finish, gather the tools you need, prepare the room properly, and apply paint using techniques that produce smooth, even coverage with clean edges. Whether you are painting a bedroom, a living room, or any other interior space, the process is the same.
Take your time, follow the steps in order, and you will end up with a room you are genuinely proud of.
Is Painting a Room a Good DIY Project for Beginners?
Absolutely. Room painting consistently ranks as one of the best first DIY projects for beginners, and for good reason.
You do not need specialized training or expensive equipment. The tools are affordable and available at any hardware store. The techniques are learnable in a single afternoon. And the consequences of minor mistakes, such as an uneven patch or a small drip, are almost always fixable with a little touch-up work.
The most important quality for a beginner painter is not skill. It is thoroughness. Homeowners who take the preparation stage seriously and work methodically through each step almost always produce results that look clean and professional. Those who rush almost always end up with visible problems that require extra work to correct.
If you can follow instructions, work carefully, and allow adequate drying time between steps, you can paint a room successfully on your first attempt.
How Much Does It Cost to Paint a Room?
The cost of painting a room yourself varies based on room size, the paint brand and quality you choose, whether you need primer, and which tools you already own.
For a standard bedroom or medium-sized room, a DIY paint job typically costs between $100 and $300 for materials. A living room or larger space may cost $200 to $400 or more depending on how much paint is needed and whether you purchase new tools.
Hiring a professional painter costs significantly more. Professional labor for a single room commonly ranges from $300 to $800 or higher, depending on location, room size, wall condition, and the number of coats required.
Doing the work yourself saves the majority of that cost. Your main expenses are paint, primer if needed, and the initial tool investment. Many of those tools, like rollers, brushes, and a quality drop cloth, last for multiple projects if you clean and store them properly.
How Long Does It Take to Paint a Room?
For a beginner painting a standard-sized room, the complete process typically takes one full day or across two days spread over a weekend.
Here is a realistic time breakdown:
- Preparation (moving furniture, cleaning walls, taping, patching): 1 to 3 hours
- Priming (if needed) and drying time: 2 to 4 hours
- First coat of paint plus drying time: 3 to 5 hours
- Second coat of paint plus drying time: 2 to 4 hours
- Cleanup and reassembly: 1 hour
The largest variable is drying time, which depends on the paint type, room temperature, and humidity. Always follow the manufacturer’s instructions on the paint can for recommended dry time between coats. Never rush this stage. Applying a second coat before the first is fully dry causes lifting, streaking, and uneven texture.
Planning across two days is often more manageable for beginners. Use the first day for preparation and the first coat, and the second day for the final coat and cleanup.
Tools and Materials You Need
| Tool or Material | Purpose | Estimated Cost | Beginner Tip |
|---|---|---|---|
| Interior paint | Primary color for walls | $30 – $75 per gallon | Buy a little more than calculated to avoid running short |
| Primer | Seals walls before painting | $20 – $50 per gallon | Essential for new drywall, dark colors, or stained walls |
| Paint roller (9-inch) | Covering large wall areas quickly | $8 – $20 | Use 3/8-inch nap for smooth walls, 1/2-inch for textured |
| Roller covers | Replaceable sleeve for roller frame | $5 – $15 each | Have at least two on hand |
| Angled paint brush (2.5 inch) | Cutting in edges and corners | $8 – $20 | Quality bristles give cleaner lines |
| Paint tray | Holds paint for roller loading | $5 – $15 | Use a liner for easy cleanup |
| Painter’s tape | Masking trim, outlets, and fixtures | $5 – $12 per roll | Buy extra, you will use more than expected |
| Drop cloth | Protecting floors and furniture | $10 – $30 | Canvas cloths are more durable than plastic |
| Paint scraper | Removing loose or peeling paint | $5 – $15 | Flexible blade works well for most situations |
| Sandpaper (120 and 220 grit) | Smoothing patches and rough areas | $5 – $15 | Finish with finer grit for the smoothest surface |
| Putty or spackle | Filling nail holes and small cracks | $5 – $15 | Lightweight spackle dries faster |
| Caulk | Sealing gaps along trim and baseboards | $5 – $10 | Paintable caulk only for interior use |
| Stepladder | Reaching ceiling edges safely | $30 – $100 | A sturdy 6-foot ladder handles most room heights |
| Extension pole | Attaching to roller for ceiling and high walls | $10 – $25 | Makes rolling large areas much faster |
| Cleaning supplies | Washing walls before painting | $5 – $15 | Mild soap and water works for most surfaces |
How to Choose the Right Paint
Choosing the Paint Color
Color selection is personal, but there are practical considerations that help beginners make good decisions.
Test paint colors before committing to a full gallon. Most paint stores sell small sample pots that let you apply test swatches directly on the wall. Paint a twelve-inch square section and observe it at different times of day under both natural light and artificial light. Colors look dramatically different depending on the light source and surrounding room elements.
Lighter colors make rooms feel larger and more open. Darker colors create a cozier, more defined atmosphere. Consider the existing flooring, furniture colors, and trim color when making your selection.
Choosing the Right Paint Finish
The finish, also called the sheen, affects both the appearance and the practicality of your paint choice.
| Finish | Sheen Level | Best For | Notes |
|---|---|---|---|
| Flat / Matte | No sheen | Ceilings, low-traffic areas | Hides imperfections well, not washable |
| Eggshell | Very low sheen | Living rooms, bedrooms | Slightly washable, good all-around choice |
| Satin | Soft sheen | Hallways, family rooms, children’s rooms | More durable, easier to clean |
| Semi-gloss | Medium sheen | Trim, doors, bathrooms, kitchens | Very washable, highlights surface imperfections |
| High-gloss | High sheen | Trim and cabinets only | Very durable but shows every flaw |
For most beginner room painting projects, eggshell or satin finish is the most practical choice for walls. These finishes hide minor surface imperfections better than higher-gloss options while still being cleanable.
Choosing Interior Paint Type
Most interior paints are either latex (water-based) or oil-based. For beginners and most residential applications, latex paint is strongly recommended. It dries faster, cleans up with soap and water, produces lower fumes, and is more flexible on walls over time. Oil-based paint is occasionally used for trim and cabinets but requires mineral spirits for cleanup and produces stronger fumes requiring excellent ventilation.
How Much Paint Do You Need?
A standard gallon of interior paint covers approximately 350 to 400 square feet with one coat under ideal conditions. Calculate your room’s square footage by measuring the total width of all four walls and multiplying by the ceiling height. Subtract roughly 20 square feet for each window and 21 square feet for each door.
For most standard bedrooms, one gallon covers one coat. A second coat typically requires another gallon. Buy slightly more than your calculated amount. Running out mid-wall and needing to mix from a different can can cause color variations. Always buy paint from the same batch number when possible.
How to Prepare a Room for Painting
Preparation is where professional-looking paint jobs are won or lost. Do not rush this stage.
Remove Furniture
Move all furniture out of the room if possible. For large pieces you cannot move, push them to the center of the room and cover them completely with drop cloths or plastic sheeting. Furniture near walls gets paint splattered on it no matter how careful you are.
Protect the Floor
Lay drop cloths across the entire floor area you are working in. Canvas drop cloths are the best choice because they stay in place, absorb paint drips, and will not slip underfoot the way plastic sheeting does. For hardwood or tile floors, tape the edges of the drop cloth to the baseboard to prevent it from shifting while you work.
Remove Wall Decorations
Take down every picture frame, mirror, wall shelf, and decoration. Remove outlet cover plates and switch plates using a screwdriver. Removing these items now means you do not have to tape around them or risk getting paint on them.
Store the small hardware, including screws and wall anchors, in a labeled bag so you know exactly what goes where when you reinstall everything after the paint is completely dry.
Clean the Walls
Paint does not adhere well to dusty, greasy, or dirty surfaces. Wash the walls with a mild soap solution and a clean sponge before doing anything else. Pay particular attention to kitchen walls where grease accumulates, bathroom walls with moisture and soap residue, and areas near light switches where skin oils transfer to the surface.
Rinse with clean water and allow the walls to dry completely before proceeding. Painting over wet or damp walls causes adhesion problems and can lead to peeling later.
Repair Holes and Cracks
Every nail hole, screw hole, dent, and small crack needs to be filled before painting. Use lightweight spackle for small holes and a flexible patching compound for larger cracks. Apply with a putty knife, pressing the material firmly into the hole and smoothing it flush with the surrounding wall surface.
Overfill slightly and allow it to dry completely. Spackle shrinks a little as it dries, and you may need a second application for deeper holes. The surface must be completely level with the surrounding wall before you sand and paint over it.
Sand Rough Areas
Once any repairs are fully dry, sand them smooth using 120-grit sandpaper followed by 220-grit for the final smoothing pass. Also sand any rough or bumpy areas on the existing wall surface that would show through the new paint.
After sanding, wipe down all surfaces with a barely damp cloth or a tack cloth to remove all sanding dust. Dust left on the wall mixes into the paint and creates a gritty texture in the finished surface.
Remove Loose Paint
If any existing paint is peeling, bubbling, or flaking, it must be removed before painting over it. Use a paint scraper to lift loose sections. Sand the edges of any scraped areas smooth so the transition between the old paint and the bare wall is gradual rather than a sharp step.
Painting over loose paint only delays the problem. The new paint will pull away along with the failing paint beneath it.
Caulk Gaps and Seams
Gaps between the wall and the trim, baseboards, window frames, and door frames are common in older homes and even in newer ones after normal settling. These gaps look particularly obvious after fresh paint because they create visible shadow lines.
Fill gaps with paintable acrylic caulk. Apply a thin, steady bead of caulk into the gap using a caulk gun. Smooth it with a damp finger or caulk tool and wipe away any excess before it dries. Allow the caulk to cure fully according to the package instructions before painting over it.
Protect Trim and Fixtures
Apply painter’s tape carefully along all areas you want to protect from wall paint: the top edge of baseboards, the edges of door trim and window trim, the ceiling line if you are painting the walls but not the ceiling, and around any electrical outlets or fixtures you could not remove.
Press the tape edge down firmly with your fingernail or a putty knife edge to prevent paint from bleeding under it. Loose tape edges are the primary cause of paint bleeding.
How to Paint a Room Step by Step
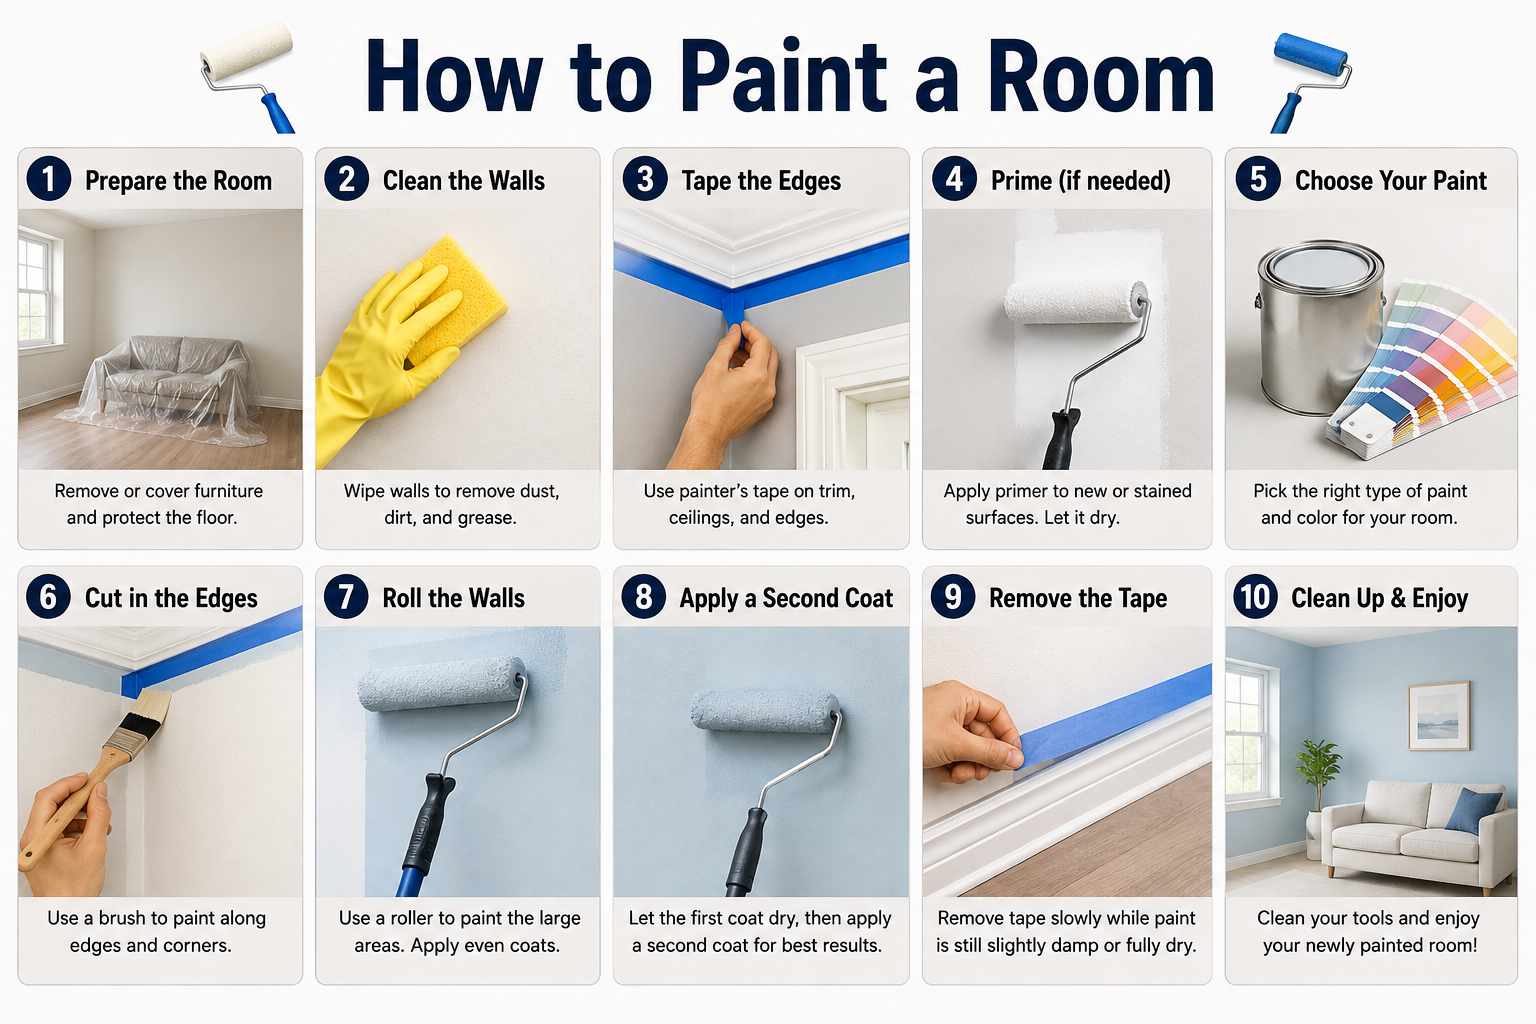
Step 1: Prepare the Walls
Confirm all repairs are fully dry and sanded smooth. All gaps are caulked. All dust has been wiped away. The room is taped and protected. Your drop cloths are in place.
Do a final walkthrough with a flashlight held at a low angle to the wall surface. Raking light reveals bumps, missed holes, and areas where the surface is not as smooth as it looks under normal lighting.
Step 2: Apply Painter’s Tape
Go around the entire room and apply tape wherever you need a clean boundary. Press every edge down firmly and consistently. Take your time with this step. Sloppy taping produces sloppy edges even if your brushwork is flawless.
At ceiling corners, use a flexible putty knife to press the tape edge into the corner rather than trying to cut in without tape. This is especially helpful for beginners who are still developing their brush control.
Step 3: Prime the Walls When Needed
Priming is necessary when painting over new drywall, covering a dark color with a lighter one, painting over stains or repaired areas, or when switching to a significantly different paint color than what is currently on the wall.
For a room that just needs a color refresh with a similar or darker color over existing paint in good condition, you can often skip primer. When in doubt, prime. Primer improves adhesion, evens out surface porosity, and helps your finish coat look uniform.
Apply primer using the same cutting-in and rolling technique described below. Allow it to dry fully according to the manufacturer’s instructions before applying paint.
Step 4: Cut In Around the Edges
Cutting in means using a brush to paint a band of color around all the edges where a roller cannot reach: along the ceiling line, in corners, around door and window trim, above the baseboards, and around outlet boxes.
Load your angled brush by dipping about one-third of the bristle length into the paint and tapping, not wiping, the brush gently against the inside of the can to remove excess. Paint a band approximately two to three inches wide along all edges.
Use long, smooth brush strokes. Keep the brush at a slight angle and use the tip of the brush to create a clean line. Do not rush. If you get paint on the ceiling or trim, wipe it immediately with a slightly damp cloth.
Step 5: Paint the Walls With a Roller
Load the roller by rolling it through the paint tray reservoir until evenly coated, then rolling back and forth on the tray’s textured ramp to distribute the paint evenly and remove excess. An overloaded roller creates drips and runs.
Start in an upper corner of the room and work in sections approximately three to four feet wide. Apply paint in a W or M pattern to distribute it quickly across the section, then fill in the pattern with overlapping strokes without lifting the roller. This blending technique is what produces smooth, even coverage.
Work from top to bottom on each section. Overlap slightly into the already cut-in edge to blend the brush and roller textures together. The rolled area should connect seamlessly with the cut-in band.
Step 6: Maintain a Wet Edge
Maintaining a wet edge is one of the most important techniques for avoiding lap marks. A lap mark occurs when you roll over paint that has already begun to dry. The dried paint creates a visible ridge where the new wet paint overlaps it.
Work continuously around the room without stopping for extended breaks until one full coat is complete. Overlap each new section into the still-wet edge of the previous section before the paint starts to dry.
In warm, dry conditions, paint dries faster. Work more quickly or work in slightly larger sections to stay ahead of the drying edge.
Step 7: Apply the Second Coat
Allow the first coat to dry completely according to the paint manufacturer’s instructions before applying the second coat. For most latex paints, this is typically two to four hours under normal temperature and humidity conditions, but always check the specific product’s label.
Do not try to judge readiness by touch alone. The surface may feel dry to the touch but still be too soft for a second coat without causing lifting or dragging.
Apply the second coat using the same sequence: cut in first, then roll. The second coat typically goes on faster because you are working over a more uniform base surface.
Step 8: Remove Painter’s Tape
Remove the painter’s tape while the final coat is still slightly soft, not completely wet but not fully hard. Pulling tape from dry paint frequently causes the paint film to crack and peel along the tape edge, taking paint from the wall or ceiling with it.
Pull the tape back at a 45-degree angle slowly and steadily. Do not jerk it. If you feel resistance or see paint beginning to pull, score along the tape edge very lightly with a sharp utility knife before continuing.
Step 9: Touch Up Small Imperfections
Once the tape is removed and the paint has fully dried, inspect the room carefully under good lighting. Look for any thin spots, areas where paint got on the trim, uneven coverage near edges, or small drips that dried unnoticed.
Use a small brush and the original paint to touch up any imperfections. Feather the edges of touch-up areas by applying very little paint and blending it into the surrounding surface rather than applying a solid patch.
Step 10: Clean Up the Room
Before anything else, clean your brushes and rollers thoroughly. For latex paint, wash with warm water and soap until the water runs completely clear. Store brushes with their bristles protected by the original packaging or wrapped in a paper bag.
Remove drop cloths carefully and fold them inward so any dried paint flakes stay contained. Replace outlet covers and switch plates. Allow the paint to cure fully, which typically takes several days to two weeks for latex paint to reach full hardness, before pushing furniture back against the walls.
How to Paint Around Windows and Doors
Windows and doors require careful brush work along the casing and surrounding trim. The goal is a clean line between the wall color and the trim color.
Apply painter’s tape along the trim edge before painting the walls. Cut in carefully along the tape with an angled brush, working the paint up to the tape edge without pressing so hard that paint forces itself under the tape.
For the glass panes in windows, apply tape along the glass edge leaving the wood or metal frame exposed if you are painting the frame. Remove any tape from glass before it fully cures to prevent residue.
How to Paint Trim and Baseboards
Trim is typically painted after walls are complete. Apply painter’s tape along the wall adjacent to the trim to protect the fresh wall paint.
Use a semi-gloss or high-gloss paint on trim for durability and easy cleaning. Apply with a quality angled brush using long, smooth strokes in the direction of the wood grain. Two thin coats produce a far better result than one thick coat.
For baseboards, protect the floor edge with painter’s tape pressed firmly against the floor surface.
How to Paint a Ceiling
Painting a ceiling before the walls is the professional approach. Any ceiling paint that drips or rolls onto the walls gets painted over when you do the walls afterward.
Use a flat or matte ceiling paint, which is specifically formulated to minimize visible roller marks and hide surface imperfections on overhead surfaces. Roll in one consistent direction using slow, steady strokes. Work in overlapping sections to maintain a wet edge.
An extension pole makes ceiling rolling much less physically demanding and produces more even coverage than trying to reach from a ladder.
How to Paint Different Types of Walls
Drywall
New unpainted drywall must be primed before painting. Unprimed drywall absorbs paint unevenly because the paper facing and joint compound absorb at different rates, producing a blotchy finish called flashing. A PVA primer seals the surface and creates a uniform base.
Plaster Walls
Older homes with plaster walls may have surface irregularities, hairline cracks, and patches from previous repairs. Fill cracks carefully and sand smooth before painting. Plaster walls may require an oil-based or shellac primer over any previously repaired or stained areas.
Previously Painted Walls
Walls in good condition with existing paint in similar color can often accept new paint without priming. Clean thoroughly, repair any damage, sand glossy areas lightly to improve adhesion, and paint directly. For a significant color change, primer improves the final result.
Textured Walls
Textured walls require a roller with a thicker nap, typically 3/4 inch or thicker, to push paint into the texture valleys and achieve complete coverage. Expect to use more paint per square foot than on smooth walls. Two full coats are almost always necessary on textured surfaces.
Common Room Painting Mistakes
Skipping Wall Preparation
Painting over holes, cracks, dust, and grease produces a finish that reveals every flaw. No amount of quality paint compensates for inadequate surface preparation.
Using the Wrong Paint Finish
Flat paint in a kitchen or bathroom collects moisture and cannot be cleaned without damaging the finish. Matte paint on a hallway wall shows every fingerprint and scuff. Match the finish to the room’s actual use.
Applying Too Much Paint
Thick coats create drips, runs, and uneven drying that leaves a bumpy, uneven texture. Two thin coats always produce a better result than one thick one.
Applying Too Little Paint
A stingy coat that does not fully cover the previous color requires extra coats and can produce a streaky, thin appearance. Load the roller adequately and work in overlapping sections.
Painting Over Dirty Walls
Grease and grime prevent paint adhesion. Wash walls thoroughly before painting and allow them to dry completely.
Removing Tape Too Late
Tape left on until the paint is fully hard frequently pulls paint from the surface. Remove tape while the paint is still slightly soft.
Not Allowing Enough Drying Time
Applying a second coat too soon causes the first coat to lift, peel, or drag under the roller. Read and follow the manufacturer’s drying time instructions.
Using Cheap or Damaged Tools
A poor-quality brush leaves bristle marks. A worn roller cover leaves texture inconsistencies. Invest in decent quality tools. They make the job easier and the results better.
How to Get Smooth and Even Paint Coverage
- Start every roller section with a W or M pattern before filling in to distribute paint evenly
- Keep roller pressure consistent throughout each stroke
- Overlap each new section by two to three inches into the previous wet section
- Work at a steady pace without stopping mid-wall for extended breaks
- Keep a wet edge at all times
- Apply two thin coats rather than one thick one
How to Avoid Roller Marks and Brush Strokes
Roller marks most often come from overloaded rollers, stopping mid-stroke, or letting sections dry before blending. Load the roller evenly, work in sections, and always maintain a wet edge.
Brush marks from cutting in become visible when the brush texture is not blended into the rolled area. Roll up to the cut-in band while both are still wet to blend the two textures together.
For the final roller pass on each section, use very light pressure and long, slow strokes in one consistent direction to smooth the surface before moving on.
How to Fix Common Painting Problems
Drips and Runs
Catch drips while wet by rolling lightly over them with a lightly loaded roller. Dried drips must be sanded smooth with fine-grit sandpaper and touched up with fresh paint.
Uneven Coverage
Thin or patchy areas need an additional coat once the current coat is fully dry. Do not try to fix them while the paint is wet by over-rolling, which creates texture problems.
Visible Brush Marks
Dried brush marks can be sanded lightly with 220-grit sandpaper and touched up. Use longer, smoother strokes and a quality brush when applying touch-up paint.
Paint Bleeding Under Tape
This happens when tape edges are not pressed firmly. For dried bleed-through, use a small artist’s brush and the trim color to paint over the bleed line once the wall paint has dried.
Peeling Paint
Peeling occurs over improperly prepared surfaces, previously painted surfaces with poor adhesion, or surfaces with moisture problems. Scrape all loose paint, repair the surface, prime, and repaint. Address any underlying moisture issue before repainting.
Blistering or Bubbling Paint
Bubbling is caused by painting over a wet surface, painting in very high humidity, or excessive heat. Allow paint to dry and flatten naturally. Sand the area smooth and repaint under better temperature and humidity conditions.
DIY Painting Safety Tips
Good ventilation is essential when painting indoors. The U.S. Environmental Protection Agency notes that volatile organic compounds (VOCs) released by paint can affect indoor air quality and should be minimized through adequate airflow. Open windows and doors during painting and keep them open for several hours after finishing to allow fumes to dissipate.
Choose low-VOC or zero-VOC paint formulations when possible, especially for enclosed spaces or rooms used by children, the elderly, or anyone with respiratory sensitivities.
When using a ladder:
- Always confirm the ladder is on a stable, level surface before climbing
- Never stand on the top rung
- Keep your body centered between the rails at all times
- Never lean or reach beyond arm’s length from the ladder sides
- Have a second person hold the ladder when possible
Wear safety glasses when sanding overhead to protect your eyes from falling particles. Use a dust mask rated for fine particles when sanding any area, particularly if the existing paint may be older and could potentially contain lead. If your home was built before 1978, consult EPA guidelines on lead paint testing before sanding or scraping existing paint.
Dispose of paint and solvents according to your local municipality’s guidelines. Never pour paint or mineral spirits down a drain.
How to Clean and Store Painting Tools
Quality tools last for years when cleaned and stored properly.
For latex paint, wash brushes and rollers under warm running water immediately after use. Work the bristles or nap against your palm to release paint from deep inside. Continue washing until the water runs completely clear.
Reshape brush bristles before storing and hang brushes vertically or store them flat. Never store a brush resting on its bristles.
For oil-based paint, clean brushes with mineral spirits or paint thinner following the product instructions. Dispose of used solvents according to local regulations.
Store remaining paint with the can sealed tightly. Place the lid on the can and tap it closed with a rubber mallet rather than a hammer. Store paint at room temperature away from freezing conditions. Label each can with the room name and paint color so you can find it easily for future touch-ups.
DIY vs Professional Room Painting
| Factor | DIY | Professional |
|---|---|---|
| Cost | $100 – $400 (materials) | $300 – $800+ (labor plus materials) |
| Time | 1 to 2 days for most rooms | 4 to 8 hours per room |
| Skill Level | Beginner to intermediate | Trained professional |
| Tool Investment | Required for first project | Included in service |
| Quality | Excellent with proper preparation | Consistently high quality |
| Flexibility | Work at your own pace | Scheduled appointment |
| Satisfaction | High personal satisfaction | Convenience and speed |
| Best For | Budget-conscious homeowners, straightforward rooms | Complex spaces, time constraints, high ceilings |
Estimated Room Painting Cost
| Item | DIY Cost | Professional Cost |
|---|---|---|
| Interior paint (2 gallons) | $60 – $150 | Included in quote |
| Primer (1 gallon if needed) | $20 – $50 | Included in quote |
| Roller, brushes, tray | $25 – $55 | Not applicable |
| Painter’s tape (2 rolls) | $10 – $25 | Not applicable |
| Drop cloth | $10 – $30 | Not applicable |
| Spackle, caulk, sandpaper | $15 – $35 | Included in quote |
| Professional labor | Not applicable | $200 – $600+ |
| Total estimated cost | $140 – $345 | $400 – $900+ |
Actual costs vary based on room size, ceiling height, wall condition, paint quality selected, number of coats required, geographic location, and the professional’s experience level. These figures are estimates for planning purposes only. Always obtain written quotes from at least two professional painters before hiring.
Expert Tips for a Professional-Looking Paint Job
- Roll slowly. A slow roller produces far fewer spatters than a fast one.
- Always cut in the ceiling line and corners before rolling adjacent wall sections, while the cut-in paint is still wet so the two blend together.
- Use a paint grid instead of a tray for roller work on large walls. It holds more paint and loads rollers more efficiently.
- Start the roller against the wall rather than lifting it away from the surface mid-stroke. Starting strokes off the wall creates splatter.
- Keep a slightly damp rag in your pocket for immediate cleanup of small drips on trim or the ceiling.
- Paint in good lighting. Turn on every light in the room. Shadows hide missed spots until the paint dries and you see them in normal light.
- Do not paint in extreme temperatures. Most interior latex paints perform best between 50 and 85 degrees Fahrenheit. Check the paint can label for the manufacturer’s specific temperature recommendations.
- Step back periodically and view your work from across the room. It is easier to spot thin spots and uneven coverage from a distance.
- If you are not confident about cutting in freehand, use tape every time. The extra thirty minutes of taping is faster than fixing uneven lines afterward.
Frequently Asked Questions
Do I always need to prime before painting a room?
Priming is not always required but is often worth doing. You should prime before painting over new drywall, which absorbs paint unevenly without a primer coat. You should also prime when covering a dark color with a lighter one, when painting over stains or water marks, when switching to a dramatically different color, or when repainting previously damaged or repaired wall areas. If you are refreshing a room with a similar color over existing paint that is in good condition, you can often skip the primer. When in doubt, a coat of primer improves adhesion, coverage, and the overall quality of your finished result.
How do I get perfectly straight lines along the ceiling without painter’s tape?
Getting clean freehand lines, called cutting in, takes practice. For beginners, painter’s tape is the reliable solution. Apply the tape carefully to the ceiling edge, press the entire tape edge down firmly with a putty knife, and cut in with a quality angled brush. To cut in freehand, load the brush lightly, hold it like a pencil near the ferrule (the metal band), and use the tip of the bristles to guide a thin line along the ceiling. Move your arm smoothly from the shoulder rather than using short wrist movements. Most experienced painters can achieve clean freehand lines, but quality tape remains the most consistent method for beginners.
How many coats of paint does a room need?
Most rooms need two coats of paint for complete, even coverage. One coat is rarely sufficient, even with premium paint, because the first coat is absorbed unevenly and the underlying surface color often shows through in places. Two coats produce a solid, uniform finish that looks professional and lasts longer. In some situations, such as painting over a very dark color with a lighter shade, you may need three coats or a coat of primer plus two coats of paint. Always allow the manufacturer’s recommended drying time between coats. Never try to compensate for skipping a coat by applying the remaining coats thicker.
What is the best order to paint a room?
The professional sequence minimizes rework and keeps paint from getting on surfaces you already finished. Paint the ceiling first to catch any drips on walls you have not done yet. Next, paint the walls, which is the main project. Finally, paint the trim, baseboards, and doors last. Within each surface, cut in all the edges with a brush first, then use a roller to fill in the large areas while the cut-in paint is still wet so they blend together seamlessly. Working in this sequence means any splatter or drips from higher surfaces fall onto lower surfaces that have not yet been painted.
How do I avoid lap marks on walls?
Lap marks happen when you roll over paint that has already started to dry. The dried edge creates a ridge that shows through the finished surface. To avoid them, maintain a wet edge throughout each wall section. Work continuously around the room at a steady pace without stopping mid-wall for extended breaks. Overlap each new roller section into the wet edge of the previous one before the paint begins to dry. In warm or dry conditions, paint dries faster, so work more efficiently. Some painters work the full ceiling line first, then complete one wall at a time from corner to corner rather than starting a second wall before finishing the first.
Is it worth buying expensive paint?
Higher-quality interior paints generally provide better coverage, more consistent color, better durability, and easier application than budget options. Premium paint often covers in fewer coats, which can save you time and reduce the total amount of paint you use. For a room you are going to see every day, the difference between a mid-range and premium paint is genuinely noticeable over time in terms of how well it holds up to cleaning and wear. That said, you do not necessarily need the most expensive option on the shelf. A mid-range paint from a reputable brand strikes a good balance between quality and cost for most interior room painting projects.
Can I paint over wallpaper?
Painting over wallpaper is generally not recommended, even though it seems like a simpler approach than removing it. Wallpaper seams are almost impossible to hide completely under paint. Moisture from the paint can cause the wallpaper to bubble, lift, or separate from the wall. If the wallpaper ever needs to be removed later, it becomes much harder when there are multiple layers of paint trapping it to the wall. The best approach is to remove the wallpaper before painting. If removal is truly not possible due to the wallpaper being directly applied to unprimed drywall, consult a painting professional about the best approach for your specific situation.
How long should I wait before hanging pictures on newly painted walls?
You can typically hang pictures after paint has dried to the touch, usually within a few hours for latex paint. However, fresh paint continues to cure and harden for a much longer period, often one to four weeks depending on the paint type and room conditions. During this curing period, the paint surface is softer and more vulnerable to damage. Adhesive hooks and picture hangers that press firmly against the wall can leave marks or pull paint from a surface that has not fully cured. For best results, wait at least a week before hanging anything that presses against the wall surface, and longer before using adhesive mounting strips.
How do I paint a small room without it feeling dark?
Color strategy makes a significant difference in smaller rooms. Lighter colors reflect more light and make spaces feel larger and more open. Cool undertones in light colors tend to recede visually, enhancing the sense of space. Using the same color on walls and trim eliminates the visual boundary between surfaces, making the room feel more expansive. High-gloss or satin finishes reflect more light than flat finishes and can brighten a space. If you want to use a darker or bolder color in a small room, consider using it on a single accent wall and keeping the remaining walls lighter. Good artificial lighting also works with your paint color to make small rooms feel more spacious.
What temperature and humidity conditions are best for painting indoors?
Most interior latex paints perform best when applied between 50 and 85 degrees Fahrenheit with relative humidity below 70 percent. These conditions allow the paint to dry at the proper rate for good adhesion and film formation. Painting in very cold conditions causes the paint to thicken, flow poorly, and dry slowly with potential adhesion problems. Painting in high humidity extends drying time significantly and can cause the paint to dry unevenly or develop a dull finish. Check the specific paint product’s label for the manufacturer’s recommended application conditions, which may differ from general guidelines. Avoid painting on very humid days or in rooms where moisture is actively present.
Conclusion
Painting a room is one of the most satisfying home improvement projects you can take on as a beginner. The materials are affordable, the process is learnable, and the results are immediately visible. A well-painted room looks completely different from the moment you remove the tape and fold up the drop cloth.
The key points to remember are simple. Prepare the walls thoroughly before you open the paint can. Choose the right finish for the room’s actual use. Work in order: ceiling first, walls second, trim last. Maintain a wet edge to avoid lap marks. Apply two thin coats rather than one thick one. Remove tape at the right moment. And allow adequate drying time between every step.
If you follow the process described in this guide, you will end up with a result that looks professional and lasts for years.
As you build confidence with basic room painting, you will naturally start noticing other areas of your home that could benefit from attention. Staying on top of home maintenance across all systems, not just the cosmetic ones, protects your investment and keeps everything working as it should. The DIY Home Inspection Checklist is an excellent resource for homeowners who want to develop a systematic approach to understanding the full condition of their home beyond just the painted surfaces.
Good preparation, good tools, and a methodical approach are all you need. Get started, take your time, and enjoy the process.