How to Patch Holes in Drywall: A Complete Beginner’s Guide

Introduction
Holes in drywall are one of the most common problems homeowners and renters face. They appear when you remove a picture hook that was in the wrong spot, when a door handle punches through the wall, when furniture gets moved carelessly, or simply after years of normal living in a home.
Left unaddressed, even small holes can collect dirt, become more noticeable over time, and create a poor surface if you decide to repaint. Larger holes can become entry points for moisture, pests, or drafts if they are near an exterior wall.
The good news is that most drywall holes are surprisingly easy to repair. Small nail holes and screw holes take only a few minutes. Medium holes can be patched in an afternoon. Even large holes, while requiring a bit more effort and a few additional materials, are within the capability of most motivated beginners.
This guide covers everything you need to know to patch drywall holes of any size, from the tools and materials required to step-by-step instructions, texture matching, painting, and knowing when a problem is beyond DIY territory.
Before we get into the process, one important safety point. Before cutting into any wall for a repair, always check whether there are electrical wires, plumbing pipes, or other utilities behind that section of drywall. Use a stud finder with live-wire detection or a dedicated wire detector. If you have any uncertainty about what is behind the wall, stop and consult a professional. This is a non-negotiable safety step.
What Is Drywall?
Drywall, also called gypsum board, wallboard, or sheetrock, is the standard wall and ceiling material used in virtually all modern residential construction in North America.
It consists of a gypsum plaster core pressed between two layers of thick paper. Drywall sheets are available in several thicknesses. The most common for interior walls is half-inch, while five-eighths-inch is used for ceilings, fire-rated assemblies, and some exterior applications.
Drywall is easy to cut, install, and repair, which is one of the reasons it became the dominant interior wall material. When damaged, sections can be patched or replaced without affecting the surrounding structure. For homeowners, this means most cosmetic repairs are genuinely manageable as DIY projects with basic tools and materials.
What Causes Holes in Drywall?
Nail and Screw Holes
These are the most common type of wall damage in any occupied home. Every picture frame, shelf bracket, and wall decoration leaves a hole behind when it comes down. These are typically small, between one and four millimeters in diameter, and are the easiest repairs to make.
Door Handle Damage
When a door swings too far open without a door stop, the door handle or knob punches directly into the drywall behind it. This typically creates a round hole ranging from one to three inches in diameter depending on the handle shape.
Furniture Damage
Moving furniture through hallways and tight doorways, or pushing furniture against walls, creates various types of damage from small dents and scuffs to actual holes where a corner or edge breaks through the drywall surface.
Accidental Impact
Dropped items, enthusiastic children, and general household activity create impacts that dent, crack, or punch through the drywall surface in unexpected places.
Water Damage
Water leaks from plumbing, roof damage, or appliance failures can soften and weaken drywall, causing it to crumble, sag, or develop a deteriorated surface that must be replaced rather than simply patched. Water-damaged drywall requires professional assessment to address both the damage and the underlying cause of the moisture.
Cracks and Dents
Hairline cracks appear as homes settle over time. They also develop near door and window corners where stress concentrates. Dents, without a full puncture through the paper face, are common and straightforward to repair.
Can You Patch Drywall Yourself?
For the majority of common drywall damage, the answer is yes. Small holes from nails, screws, and minor impacts are genuinely beginner-level repairs that require no special training, minimal tools, and very little time.
Medium holes, roughly the size of a fist or smaller, require a basic patch kit and slightly more patience but remain well within homeowner capability.
Large holes, structural damage, water damage, mold growth, or any damage near electrical or plumbing lines should be assessed and repaired by a qualified professional. Attempting to patch water-damaged drywall without addressing the moisture source will result in the damage recurring. Mold behind or within drywall requires professional remediation to protect indoor air quality and structural integrity.
If you find issues during a drywall repair that suggest broader home problems, the DIY Home Inspection Checklist provides a systematic framework for evaluating the condition of your home and deciding when professional help is needed.
Tools and Materials You Need
| Tool or Material | Purpose | Recommended Use | Estimated Cost |
|---|---|---|---|
| Spackle or lightweight joint compound | Filling small holes and finishing patches | All repair sizes | $5 – $15 per container |
| All-purpose joint compound | Bedding tape, coating patches, feathering | Medium and large holes | $10 – $20 per bucket |
| Putty knife (3 to 6 inch) | Applying and smoothing compound | All repair sizes | $5 – $20 |
| Wide taping knife (10 to 12 inch) | Feathering and blending compound over larger areas | Medium and large holes | $15 – $35 |
| Drywall sandpaper (120 and 220 grit) | Smoothing dried compound | All repair sizes | $5 – $15 |
| Sanding sponge | Sanding contoured or tight areas | All repair sizes | $5 – $10 |
| Self-adhesive drywall patch | Covering medium holes without backing | Holes 2 to 6 inches | $8 – $20 |
| Drywall piece and backing strips | Supporting large hole patches | Holes over 6 inches | $10 – $30 |
| Utility knife | Cutting drywall and trimming patches | Medium and large repairs | $8 – $20 |
| Drywall tape (paper or mesh) | Reinforcing joints and cracks | Cracks and large patches | $5 – $15 per roll |
| Primer | Sealing repaired areas before painting | All repair sizes | $15 – $40 per quart |
| Paint | Matching existing wall color | After every repair | $20 – $60 per quart |
| Paint roller and brush | Applying primer and paint | After every repair | $10 – $30 |
| Drop cloth | Protecting floors during repair | Every repair session | $10 – $30 |
| Stud finder with wire detection | Locating studs and checking for wires | Before cutting into walls | $20 – $60 |
How to Choose the Right Drywall Repair Method
Not every hole needs the same approach. Matching your repair method to the size and type of damage saves time and produces better results.
| Hole Size | Repair Method | Skill Level |
|---|---|---|
| Nail or screw hole (under 1/4 inch) | Spackle or lightweight compound, one coat | Beginner |
| Small dent or ding | Lightweight compound, feathered smooth | Beginner |
| Small hole (1/4 inch to 2 inches) | Self-adhesive patch or compound buildup | Beginner |
| Medium hole (2 to 6 inches) | Self-adhesive mesh patch plus joint compound | Beginner to intermediate |
| Large hole (6 inches or more) | Cut-and-replace section with backing support | Intermediate |
| Hairline crack | Joint compound and paper tape | Beginner |
| Corner damage | Corner bead or compound buildup | Beginner to intermediate |
| Water-damaged drywall | Professional assessment and replacement | Professional recommended |
How to Patch Small Holes in Drywall
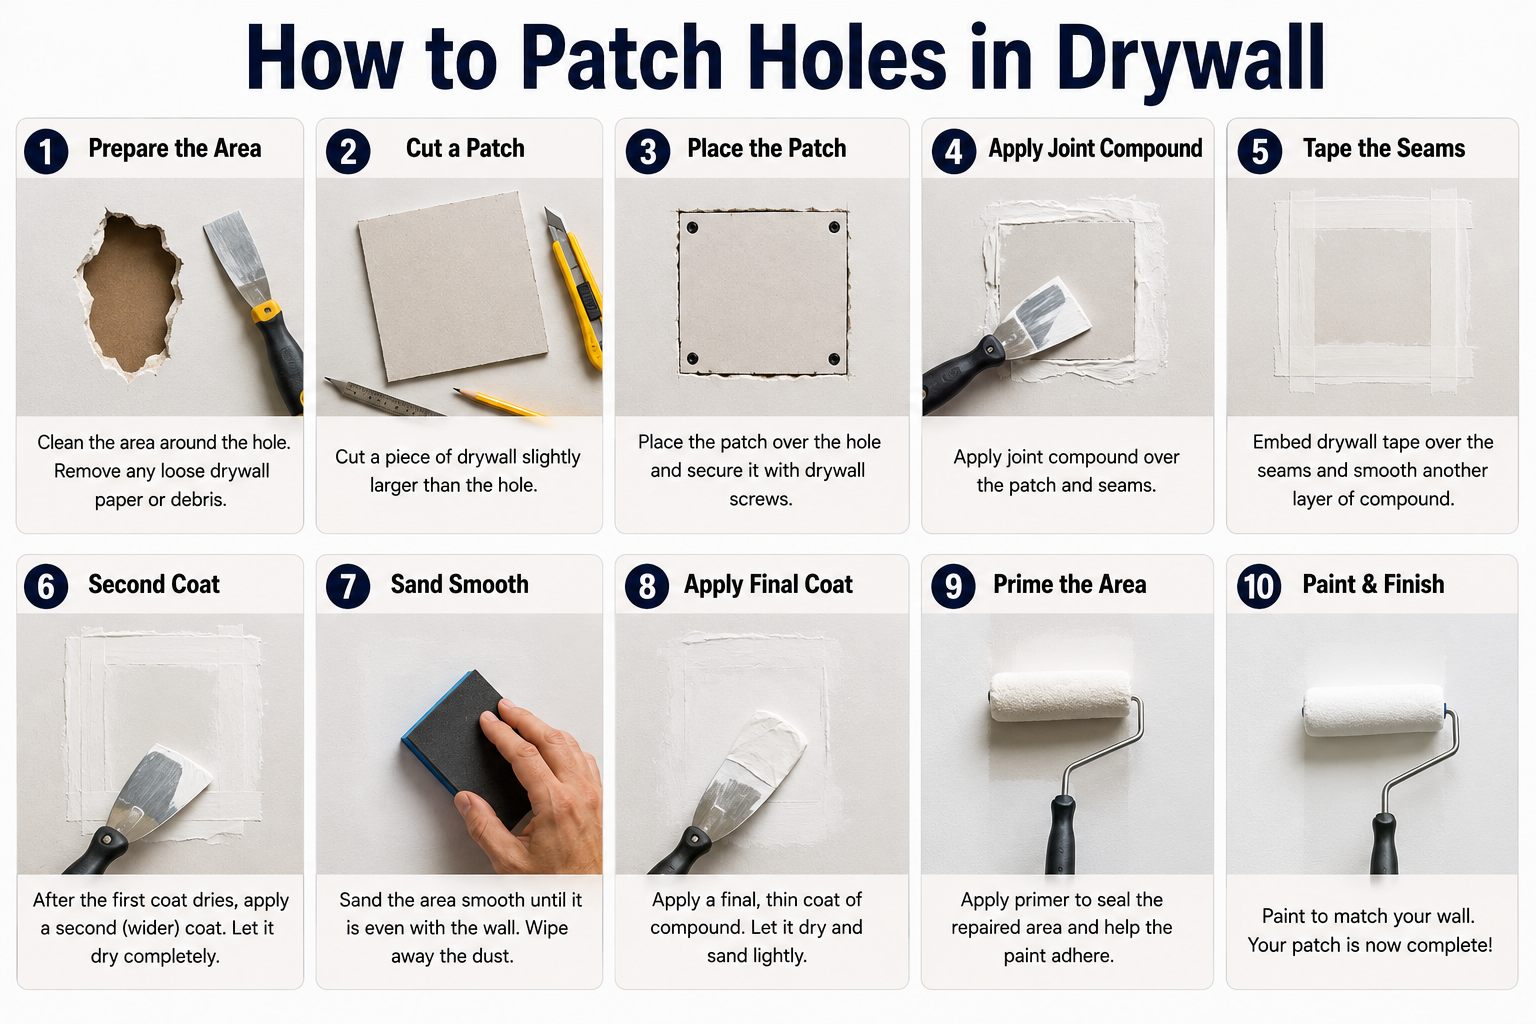
Small holes, including nail holes, screw holes, small dents, and damage up to about two inches in diameter, are the most common and most beginner-friendly repairs. Here is the complete process from start to finish.
Step 1: Clean the Damaged Area
Before applying anything to the wall, clean the area around the hole. Remove any loose paper, crumbling gypsum, or protruding material from inside or around the hole. A utility knife or putty knife can trim away ragged edges and any paper that is lifting away from the surface.
Wipe the surrounding wall area with a lightly damp cloth to remove dust and grease. Allow it to dry completely before proceeding. Compound will not adhere properly to a dusty or greasy surface.
Step 2: Apply Spackle or Joint Compound
For nail and screw holes, use a lightweight spackling compound or pre-mixed joint compound. Load a small amount onto your putty knife and press it firmly into the hole using a diagonal sweeping motion. The goal is to force the compound into the hole while keeping as little excess as possible on the surrounding wall surface.
For tiny holes like nail holes, a single application often fills the void completely. For slightly larger holes, you may need to build up the fill in two thin layers rather than one thick one.
Step 3: Smooth the Surface
Immediately after applying the compound, draw the putty knife flat across the surface to smooth the fill level with the surrounding wall. Apply firm, even pressure and use a single clean stroke rather than repeatedly going back over the same spot.
The fill should sit just barely above flush with the wall. It will shrink slightly as it dries, and you will sand it smooth afterward.
Step 4: Let the Compound Dry
Allow the compound to dry completely according to the manufacturer’s instructions on the product packaging. Drying time varies significantly based on the product type, the thickness of application, room temperature, and humidity. Do not try to judge readiness by touch alone. The surface can feel dry while the interior is still soft.
Most lightweight spackle products dry within one to four hours under normal conditions. Joint compound typically requires longer drying time. In humid conditions or when applied in thicker coats, drying can take considerably longer. Follow the product instructions rather than guessing.
Step 5: Sand the Repair
Once the compound is completely dry, sand the repaired area smooth. Begin with 120-grit sandpaper to level any high spots, then follow with 220-grit to create a smooth surface ready for primer.
Sand in circular motions and then with light, even strokes in the direction of the wall surface. The repaired area should feel completely smooth and flush with the surrounding wall when you run your hand across it. Use a sanding sponge for easier control in tight areas.
Wear a dust mask and eye protection during sanding. Fine drywall dust is a significant respiratory irritant, and sanding creates a great deal of it even on small repairs.
Step 6: Apply a Second Coat if Needed
After sanding, examine the repaired area under a raking light from a lamp or flashlight held at a low angle to the wall. This lighting technique reveals any depressions, uneven areas, or visible edges that need a second coat.
If needed, apply a thin second coat of compound, feathering it out beyond the edges of the first coat. Allow it to dry fully and sand again with 220-grit sandpaper.
Step 7: Prime the Repaired Area
Priming the repaired area before painting is a step that beginners frequently skip and almost always regret. Unprimed compound absorbs paint at a different rate than the surrounding painted wall surface, creating a dull spot called a “hot spot” or “flashing” that remains visible even through multiple coats of paint.
Apply a coat of drywall primer or an all-purpose primer to the repaired area and the surrounding two to three inches of wall using a small roller or brush. Allow it to dry completely before painting.
Step 8: Paint the Wall
Once the primer is dry, apply the matching wall paint using a small roller for larger repairs or a brush for tiny repairs. Feather the paint out into the surrounding wall to blend the edges.
For guidance on achieving smooth, even paint coverage and matching existing wall color, the How to Paint a Room: Beginner’s Guide covers everything from choosing the right finish to applying professional-quality coats.
How to Repair a Medium Drywall Hole
Medium holes, roughly two to six inches in diameter, need a physical patch to bridge the gap before compound can be applied. Self-adhesive metal or fiberglass mesh patch kits are the most beginner-friendly solution for this size.
What you need: Self-adhesive mesh drywall patch, all-purpose joint compound, wide putty knife or taping knife, sandpaper, primer, paint.
Process:
Clean and trim any loose material from around the hole. Peel the backing from the self-adhesive patch and center it over the hole, pressing it firmly to the wall surface so it adheres completely.
Apply all-purpose joint compound over the patch using a wide taping knife. Work from the center outward, pressing compound through the mesh and building a thin, even layer over the entire patch surface. Extend the compound several inches beyond the patch edges to begin feathering.
Allow the first coat to dry completely. Apply a second coat that extends further beyond the patch than the first. Feather the edges as thinly as possible. For larger patches within this size range, a third coat may be needed.
Sand between coats using 220-grit sandpaper once each coat is fully dry. After the final coat and final sanding, prime and paint as described above.
How to Patch a Large Hole in Drywall
Large holes, six inches or more across, require a different approach because there is no surface for a self-adhesive patch to grip and the gap is too large for compound alone to bridge without support.
The standard method for large holes is to cut the damaged area into a clean rectangle and install backing supports before applying a patch piece.
Process overview:
Use a stud finder to locate any studs near the damage. Using a drywall saw or utility knife, cut the damaged area into a neat rectangle. If you can position the cuts to land on the centers of studs on each side, you have built-in support for the patch.
If the cuts cannot reach studs, cut two pieces of wood, typically one-by-three or one-by-four furring strips, slightly longer than the height of the opening. Slip them behind the opening and secure them to the existing drywall on either side using drywall screws, creating a backing ledger on each side.
Cut a piece of new drywall to fit the opening precisely. Attach it to the backing strips or studs with drywall screws.
Apply paper drywall tape over all four joints using a thin coat of joint compound to bed the tape. Apply two to three additional coats of compound, feathering each coat progressively wider than the last. Sand between coats. Prime and paint when complete.
Large hole repair typically involves three to five days of work spread across multiple sessions to allow for proper drying time between coats.
How to Repair Drywall Cracks
Cracks in drywall walls fall into two categories. Hairline cracks from normal settling are a cosmetic issue. Wider, recurring, or diagonal cracks near door and window corners may indicate structural movement that warrants professional assessment before you repair.
For standard hairline and stress cracks, the best repair uses paper drywall tape embedded in joint compound.
Widen the crack slightly by running a utility knife or putty knife along its length to open it just enough to accept compound. Apply a thin coat of all-purpose joint compound into and over the crack. Cut a piece of paper tape to length and press it into the wet compound. Smooth it firmly with a putty knife and apply a thin skim coat over the tape surface.
Allow to dry, sand lightly, and apply a second coat that feathers out several inches to either side. Sand smooth, prime, and paint.
How to Repair Drywall Corner Damage
Outside corners, where two walls meet and form an exposed angle, are the most vulnerable points in any drywall installation. They take impact damage easily and the paper or metal corner bead can be dented, cracked, or separated from the wall.
For minor corner dents where the bead is intact, apply joint compound directly over the damaged area, building it up in thin coats to restore the corner profile. Sand carefully to maintain the crisp angle.
For significant corner damage where the metal bead is bent or the corner has crumbled, the damaged section of corner bead must be cut out and replaced with a new piece before finishing with compound.
How to Fix Drywall After Removing Wall Anchors
Wall anchors leave larger holes than standard nails or screws. The method depends on the anchor type.
Plastic expansion anchors typically leave a hole of roughly one quarter to half an inch. Remove the anchor completely with a flathead screwdriver or pliers. If it will not pull out, drive it into the wall with a hammer. Fill with lightweight spackle in thin coats.
Larger toggle bolts or molly bolts may leave holes up to three quarters of an inch. Once the hardware is removed, fill the hole in layers, allowing each application to dry before adding the next. Build up gradually rather than trying to fill the full depth in one application, which causes the compound to crack as it dries and shrinks.
How to Make a Drywall Repair Invisible
Getting a repair to truly disappear into the surrounding wall is the part beginners struggle with most. Here are the key techniques that make the difference.
Feather the edges. Apply compound in progressively wider and thinner coats. The final coat should taper so gradually into the surrounding surface that there is no visible edge or ridge where the repair meets the wall.
Sand thoroughly. Never skip the final 220-grit sanding pass. This step is what creates the smooth surface that looks identical to an undamaged wall.
Prime without fail. Unprimed repairs always show through paint. Prime the repaired area and the surrounding few inches before applying any paint.
Match the texture. If your walls have texture, the repaired area must be textured to match before painting. See the dedicated section on texture matching below.
Use the right paint. Apply the same sheen level as the surrounding wall. Using a different sheen creates a patch that is invisible in normal light but obvious in certain angles and lighting conditions.
How Long Does Drywall Patch Take to Dry?
There is no universal answer to this question because drying time varies considerably based on the product type, the thickness of each application, the room temperature, ambient humidity, and air circulation.
Lightweight spackle used for nail holes may feel surface-dry within thirty minutes to an hour under warm, dry conditions. Heavier applications of all-purpose joint compound may require overnight drying or longer, particularly in cooler or more humid environments.
As a general principle, thin coats dry faster than thick ones. Never try to accelerate drying by applying heat directly from a heat gun, as this can cause cracking. Good room ventilation and moderate warmth help.
Always follow the drying time instructions on the product packaging for the specific product you are using. When in doubt, give it more time. Applying a second coat or sanding too soon ruins the repair and forces you to start over.
Common Drywall Repair Mistakes
Applying Too Much Joint Compound
Thick applications crack as the compound shrinks during drying. Apply thin coats and build up the surface gradually. Three thin coats always produce a better result than one thick one.
Skipping Surface Preparation
Compound applied over dust, grease, or loose paper does not adhere properly and will eventually crack or separate. Always clean and prepare the surface before applying any material.
Not Allowing Enough Drying Time
Rushing the drying process is one of the most common beginner mistakes. Sanding wet compound tears the surface and creates gouges. Applying a second coat before the first is fully dry traps moisture and causes cracking. Patience produces better results.
Over-Sanding the Repair
Sanding too aggressively can cut through the paper face of the surrounding drywall, creating a fuzzy texture that absorbs paint differently and creates a noticeable patch. Use light, controlled pressure with fine-grit sandpaper.
Skipping Primer
Painting directly over unprimed compound creates a dull spot that shows through finished paint. Prime the repaired area without exception.
Using the Wrong Patch Size
A patch that does not fully cover the damaged area leaves the repair incomplete. A patch that is too large makes the feathering and finishing process unnecessarily difficult. Match the patch size to the hole size.
Painting Before the Repair Is Ready
Paint applied over compound that is not fully cured can cause the compound to soften, bubble, or develop an uneven surface. Confirm the repair is completely dry and primed before applying any paint.
How to Match Wall Texture After a Drywall Repair
Most homes have some form of texture on their walls, even if it appears subtle. Smooth repairs on textured walls create obvious patches. Matching texture requires a bit of practice and observation.
First, identify your wall’s existing texture type. The most common residential textures include:
- Flat or smooth: No texture visible. Sand and paint directly.
- Orange peel: Fine, bumpy texture resembling the skin of an orange. Applied with a spray can or hopper.
- Knockdown: Irregular flattened texture created by knocking down a splattered surface while it is still wet.
- Skip trowel: Similar to knockdown but applied manually with a trowel.
- Popcorn or acoustic: Heavy, bumpy ceiling texture. Requires specific spray products.
For most homeowners, aerosol texture spray cans available at hardware stores produce acceptable results for orange peel and knockdown textures on small repairs. Apply light test coats on cardboard first to get the feel for the spray pattern before applying to the wall.
After the texture is dry, prime and paint as usual.
How to Paint Over a Drywall Patch
Painting over a drywall repair is not simply about applying color. Done incorrectly, the patched area will remain visible indefinitely.
Apply a coat of drywall-specific primer or shellac-based primer to the repaired area and slightly beyond. This seals the compound and prevents it from absorbing paint differently than the surrounding wall.
After the primer is dry, apply the matching wall paint using the same application method as the surrounding wall. If the surrounding wall was rolled, roll the paint. If it was brushed, brush it.
Feather the paint edges out from the repair area gradually rather than painting a solid patch with hard edges. Matching sheen level precisely is critical. A flat patch in a satin-finish room will show regardless of how well the color matches.
DIY vs Professional Drywall Repair
| Factor | DIY | Professional |
|---|---|---|
| Cost | $15 – $60 (materials) | $100 – $500+ (labor and materials) |
| Time | 1 to 3 days (includes drying) | 2 to 8 hours for most repairs |
| Skill Level | Beginner to intermediate | Trained professional |
| Best For | Small to medium holes, cosmetic repairs | Large damage, water damage, mold, structural issues |
| Quality | Excellent with proper technique | Consistently high quality |
| Convenience | Work at your own pace | One scheduled visit |
| Texture Matching | Challenging for beginners | Professional results |
Estimated Drywall Repair Costs
| Repair Type | DIY Material Cost | Professional Cost |
|---|---|---|
| Nail or screw hole (per hole) | $5 – $10 | $50 – $100 minimum call fee |
| Small hole (up to 2 inches) | $10 – $20 | $75 – $150 |
| Medium hole (2 to 6 inches) | $20 – $40 | $100 – $250 |
| Large hole (6 inches or more) | $30 – $60 | $150 – $400+ |
| Drywall patch kit | $8 – $25 | Included in service |
| Joint compound (bucket) | $10 – $20 | Included in service |
| Primer and paint (quart) | $35 – $100 | Additional if required |
| Texture matching | $10 – $25 (aerosol) | $75 – $200 additional |
| Total DIY estimated cost | $15 – $80 per repair | $100 – $500+ per repair |
All cost estimates are approximate and provided for planning purposes only. Actual costs vary based on your location, the extent of the damage, wall condition, texture complexity, paint quality, and professional labor rates in your area. Always obtain written quotes before hiring a contractor for significant repairs.
Drywall Repair Safety Tips
Safe practices make drywall repair cleaner, more comfortable, and genuinely accident-free.
Dust protection: Drywall sanding creates fine dust that is a significant respiratory irritant. Wear an N95 dust mask rated for fine particles whenever sanding. The Occupational Safety and Health Administration recommends appropriate respiratory protection when working with materials that generate airborne dust.
Eye protection: Wear safety glasses during sanding, cutting, and any overhead work. Fine particles and debris can cause serious eye irritation or injury.
Ventilation: Open windows and doors when working with paint, primer, and aerosol texture products. Good airflow protects you from fume accumulation in enclosed spaces.
Utility knife safety: Always cut away from your body. Keep fingers clear of the blade path. Retract the blade when not actively cutting. Utility knife blades are extremely sharp and cause serious cuts when handled carelessly.
Ladder safety: For repairs near the ceiling or on high walls, use a proper stepladder rated for your weight. Never stand on the top rung or a step not designed for standing. Keep three points of contact on the ladder at all times.
Electrical and plumbing awareness: Before cutting into any wall for a medium or large repair, use a stud finder with electrical detection capability to confirm there are no wires or pipes in the area. If there is any uncertainty, stop and consult a professional. Cutting through an electrical wire is a serious safety hazard. This safety step cannot be skipped.
When to Call a Professional
Some drywall situations look like straightforward repairs but are actually symptoms of larger problems. Knowing when to call a professional protects your home and your safety.
Call a professional when:
- The damaged drywall is wet, soft, or shows signs of water damage. Patch the drywall is only useful if the moisture source is fixed first.
- Mold or dark staining is visible on or around the damaged area. The EPA recommends professional mold assessment for any significant mold presence in the home.
- Cracks are recurring or growing despite previous repairs, which can indicate foundation movement or structural issues.
- The damage is near electrical boxes, outlets, or plumbing lines.
- The hole is in a ceiling and involves multiple large sections.
- The original drywall is abnormally thick, has unusual layers, or you suspect asbestos-containing materials in older homes.
- The extent of the damage is large enough that full section replacement is needed.
Building your awareness of these conditions is part of being a proactive homeowner. The Home Maintenance Tools Every Homeowner Needs covers the basic diagnostic tools that help you assess conditions throughout your home before problems escalate.
Expert Tips for Better Drywall Repairs
These practical tips separate mediocre repairs from ones that truly disappear into the wall.
- Apply compound in thin coats. The most common beginner error is applying too much at once, which causes cracking and takes forever to dry.
- Feather every coat wider than the previous one. By the final coat, you should be blending compound six to twelve inches beyond the actual repair area.
- Sand between every coat using 220-grit for the smoothest possible base. Do not skip intermediate sanding.
- Use a bright work light held at a low angle to the wall surface while evaluating your repair. This raking light reveals flaws that are invisible under normal room lighting.
- If you are not happy with the surface after priming, it is perfectly acceptable to apply one more skim coat of compound, allow it to dry, sand, and re-prime. Getting it right takes precedence over getting it done fast.
- Test texture spray products on cardboard before applying to the wall. Each product behaves differently depending on nozzle distance and spray duration.
- Keep the leftover paint from the original wall painting job. Stored properly in a sealed can, it remains usable for touch-ups for months or years and guarantees a perfect color match.
- When painting touch-ups, use the smallest amount of paint possible and feather the edges. A small patch painted with solid, hard edges will show under angled light even if the color is a perfect match.
Including drywall inspection and touch-up repair in your seasonal home care routine helps maintain your walls in consistently good condition. The Spring Home Maintenance Checklist and the Home Maintenance Checklist by Month both provide structured frameworks for including interior wall assessments in your regular home care schedule.
Frequently Asked Questions
What is the difference between spackle and joint compound for drywall repair?
Spackle is a premixed, lightweight patching material specifically designed for small holes and minor surface repairs. It dries faster than joint compound and is easy to use for nail holes and minor dings. Joint compound, also called mud, is more versatile and is used for taping seams, coating large patches, and building up repairs over multiple coats. It dries slower but sands more smoothly and feathers better over larger areas. For tiny repairs, spackle is the convenient choice. For medium to large repairs or any repair requiring multiple coats, all-purpose joint compound produces better results and greater control over the finished surface.
How do I fix a drywall hole without a patch kit?
Small holes under two inches can often be filled using only joint compound applied in thin layers. Each coat fills the hole gradually as the compound dries and is built up. For holes around two to four inches where a patch kit is not available, you can create a backing by cutting two small strips of wood or stiff cardboard slightly longer than the hole diameter, inserting them through the hole, holding them against the back of the drywall, and securing them in place while you apply compound over a piece of self-cut drywall or fiberglass tape spanning the opening. Improvised repairs work but dedicated patch kits are easier and more reliable for medium-sized holes.
How do I know if drywall damage needs professional repair?
Several signs suggest the repair is beyond straightforward DIY work. Soft, crumbling, or discolored drywall indicates moisture damage and requires finding and fixing the water source before any repair. Mold or musty odors suggest biological contamination that needs professional assessment. Cracks that reappear after being repaired may indicate structural movement. Damage that is extensive, located near electrical boxes or plumbing, or involves ceiling sections may present safety concerns that make professional involvement the right choice. When in doubt, a single consultation call with a drywall contractor costs little and gives you informed guidance on whether the repair is DIY-appropriate.
Can I paint directly over spackle without priming?
You can, but the result will almost certainly be visible. Unpainted spackle and joint compound are highly porous and absorb paint at a faster rate than the surrounding sealed wall surface. This differential absorption creates a dull, flat-looking patch called flashing that remains noticeable even through multiple coats of paint. Priming seals the compound’s porosity so paint absorbs uniformly across the repair and the surrounding wall. A coat of primer takes just a few minutes to apply and completely eliminates this problem. It is one of the smallest steps in the process with one of the biggest impacts on the final result.
Why does my drywall patch keep cracking?
Cracking after a drywall repair most commonly results from one of three causes. Applying compound too thick in a single coat is the most frequent culprit. As compound dries and shrinks, thick applications develop cracks through the center. The solution is always thin coats built up gradually. The second common cause is applying a second coat before the first is fully dry. Trapped moisture causes internal stress that produces cracking. The third cause is insufficient surface preparation, where compound applied over a dusty or improperly cleaned surface does not adhere well and cracks at the bond line. Recurring cracks that appear across the same area repeatedly despite proper repair technique may indicate structural movement and warrant professional evaluation.
How do I repair a drywall hole that is near an electrical outlet?
Exercise extreme caution when repairing drywall near electrical outlets or switch boxes. Before doing anything, confirm the circuit is turned off at the breaker panel and verify with a non-contact voltage tester that there is no live current in the area. Avoid cutting into the wall within six inches of any electrical box without consulting an electrician first. For small cosmetic repairs on the wall surface near but not adjacent to an outlet, standard compound and patching techniques apply after confirming the area is safe. Anything that requires cutting into the wall near wiring should involve a licensed electrician to assess the wire locations before drywall work begins.
How can I tell if my drywall repair is smooth enough before painting?
The raking light test is the most reliable method. Hold a flashlight or work lamp close to the wall surface at a very low angle, almost parallel to the wall, and direct the beam across the surface. This extreme side-lighting reveals bumps, ridges, depressions, and any visible edges from the repair that are completely invisible under normal room lighting. If you can see any irregularity under the raking light, sand the area further and check again. A repair that passes the raking light test will look genuinely smooth and even after painting. Do this check after every sanding pass, not just before the final coat.
What grit sandpaper should I use for drywall repairs?
Use two grits in sequence for the best results. Start with 120-grit to knock down any high spots, ridges, or texture from the compound application. This coarser grit removes material efficiently. Then switch to 220-grit for the final smoothing pass. The finer grit refines the surface and creates the smooth texture that looks like an undamaged wall after painting. Using only coarse grit leaves a slightly scratched texture that shows through paint. Using only fine grit on significant high spots takes too long to level them. The two-stage approach produces the most efficient and smooth result for repairs of any size.
How do I repair drywall damage in a bathroom or kitchen?
Repairs in bathrooms and kitchens require moisture-resistant products. Use moisture-resistant joint compound rather than standard all-purpose compound in these environments. If replacing drywall in wet areas like shower surrounds, use cement board or moisture-resistant greenboard rather than standard drywall. In kitchens and bathrooms, primer selection also matters more than in dry living spaces. Use a moisture-resistant primer that provides a more durable seal for environments with humidity and temperature variations. Standard drywall compound and primer in high-moisture areas will deteriorate more quickly than moisture-resistant products and may develop mold over time.
How long does a drywall repair last?
A properly completed drywall repair is essentially permanent for cosmetic damage. Filled nail holes, patched medium holes, and taped cracks do not return on their own. The compound and tape become part of the wall structure and remain stable indefinitely under normal conditions. The only reasons a repair fails are improper technique that was never fully corrected, inadequate adhesion from poor surface preparation, or an underlying problem such as ongoing moisture or structural movement that continues to stress the repaired area. Repairs done correctly with proper preparation, thin coats, appropriate drying time, and good primer and paint last as long as the original wall installation.
Conclusion
Patching holes in drywall is one of the most genuinely accessible DIY home repairs available to any homeowner. The materials are inexpensive, the tools are simple, and the techniques are learnable by anyone willing to work carefully and follow the steps in the right order.
The key principles apply regardless of the hole size. Prepare the surface properly before applying anything. Apply compound in thin coats rather than one thick application. Allow every coat to dry completely before sanding or applying the next. Feather the edges wider with each coat. Sand smooth. Prime without fail. Then paint.
Small cosmetic repairs take less than an afternoon from start to finish. Medium repairs spread comfortably across a weekend. Large repairs require patience and a few days of work spread across multiple sessions to allow for proper drying between coats.
Knowing the boundary between what you can handle and when to call a professional is equally important. Water damage, mold, recurring structural cracks, and any damage near electrical or plumbing lines deserve professional attention. For everything else, the process described in this guide gives you everything you need to make repairs that genuinely disappear into the wall.
Once your repairs are complete and primed, you are ready to paint. If you are tackling a full room refresh alongside your drywall work, the How to Paint a Room: Beginner’s Guide walks through every step of interior painting from choosing the right finish to achieving smooth, professional-looking coverage.