How to Build a Home Climbing Wall: A Complete DIY Guide

Introduction
Building a home climbing wall is one of the most rewarding DIY home improvement projects you can take on. For families with young climbers, fitness enthusiasts looking to train at home, or anyone who wants a creative and physically engaging activity in their own space, a well-designed home wall delivers real value.
But this project requires a level of planning, structural awareness, and safety consideration that separates it from painting a room or patching a wall. A climbing wall puts genuine physical loads on the structure it is attached to. The people using it are depending on every connection, every fastener, and every piece of lumber to perform reliably under dynamic movement and repeated stress.
Done correctly, with appropriate planning, proper materials, sound structural attachment, and good safety practices, a home climbing wall can provide years of enjoyment. Done incorrectly, it can cause serious injury.
This guide covers the complete process from planning through construction, installation, inspection, and ongoing maintenance. It also explains honestly when professional structural assessment is the right call, and when certain attachments or configurations are simply not appropriate as DIY projects without expert evaluation.
What Is a Home Climbing Wall?
A home climbing wall is a custom-built wooden structure covered with plywood panels and fitted with commercial climbing holds. Users grip and step on the holds to climb across, up, or around the panel surface, simulating the movement patterns of outdoor rock climbing or bouldering.
Home climbing walls range from simple vertical panels attached to a garage wall to complex angled structures in dedicated basement climbing gyms. The scale and complexity can vary enormously, but the fundamental structure is consistent: a sturdy timber frame, a plywood climbing surface, T-nut hardware that accepts bolt-on holds, and appropriate fall zone protection below.
Is a Home Climbing Wall a Good DIY Project?
For many homeowners, yes, within clear parameters. A basic vertical or slightly angled climbing wall in a suitable garage or basement is a realistic and achievable project for a competent DIYer with basic carpentry skills and access to appropriate tools.
However, this is not a simple weekend build that works in any home without evaluation. Before construction begins, you must understand the structural capability of the wall, floor, or ceiling you plan to anchor to. You must plan a proper fall zone. You must use appropriate materials. And you must be willing to step back and consult a structural professional if anything about the building’s framing, anchor points, or load capacity is unclear.
A home climbing wall that is poorly designed or inadequately anchored can fail under the loads of active climbing. The consequences of structural failure at height are serious. Treat this project with the same respect you would any structural modification to your home.
Benefits of Building a Home Climbing Wall
- Provides a year-round, weather-independent climbing training environment
- Builds upper body strength, coordination, balance, and problem-solving skills
- Highly engaging for children and teenagers as a healthy physical activity
- Allows route setting at any difficulty level, from beginner to advanced
- Saves the ongoing cost of gym membership and travel
- Can be built progressively, starting small and expanding over time
- Increases motivation to train when access is immediate and convenient
Types of Home Climbing Walls
| Wall Type | Angle | Difficulty Level | Space Required | Safety Considerations |
|---|---|---|---|---|
| Vertical | 90 degrees | Beginner to intermediate | Moderate | Simpler structural loads |
| Slightly angled | 95 to 110 degrees | Intermediate | Moderate to large | Increased leverage on frame |
| Bouldering wall | Varies | All levels | Moderate | Low height, crash mats critical |
| Freestanding | Variable | Beginner | Large open floor | Free-standing stability critical |
| Garage wall | Variable | All levels | Depends on garage | Temperature, moisture, anchor |
| Basement wall | Variable | All levels | Depends on ceiling | Moisture, ceiling height, ventilation |
Vertical Climbing Wall
A vertical wall mounted at exactly 90 degrees is the most structurally conservative option. The loads it places on the attachment points are relatively predictable and primarily horizontal. This is a good starting choice for beginners both in terms of the climbing experience and the construction complexity.
Slightly Angled Climbing Wall
An angled wall, typically between 95 and 115 degrees past vertical, creates an overhang that makes climbing more physically demanding. The angle increases the leverage load on the frame and attachment points. Every degree of overhang beyond vertical increases the demand on the structural connections.
Angled walls require more careful structural planning than vertical walls. Do not assume your existing wall framing can handle the increased loads of a significantly overhanging panel without evaluation.
Home Bouldering Wall
Bouldering walls are designed for climbing at low heights without ropes, typically reaching no higher than eight to twelve feet at the highest point. The low height makes them more manageable from a fall risk perspective, but adequate crash mat coverage below is still critical.
Bouldering walls are the most common home climbing wall type for good reason. They are achievable in typical residential spaces and appropriate for a wide range of skill levels.
Freestanding Climbing Wall
Freestanding structures do not attach to the building at all. They rely entirely on their own geometry and counterbalancing weight to remain stable. This removes the structural attachment question but introduces new stability requirements. A freestanding wall must be designed with sufficient base width and bracing to resist tipping forces from climbing loads. This design requires careful engineering consideration.
Garage Climbing Wall
Garages are one of the most popular locations for home climbing walls. They typically offer higher ceilings, concrete floors, and more flexibility for construction without affecting finished living spaces. The specific challenges of garage walls include temperature extremes, potential moisture from concrete slab floors, limited insulation, and vehicle clearance requirements.
Basement Climbing Wall
Basements offer a consistently cool, protected environment. The primary limitations are ceiling height and moisture management. Many residential basements have ceiling heights of seven to eight feet, which significantly limits the usable climbing height. Foundation walls present anchoring challenges that require specific fasteners and assessment of the foundation type and condition.
Where Can You Build a Home Climbing Wall?
| Location | Typical Ceiling Height | Floor Type | Key Challenges |
|---|---|---|---|
| Garage | 8 to 14 feet | Concrete | Temperature, moisture, vehicle clearance |
| Basement | 7 to 10 feet | Concrete | Moisture, height limits, ventilation |
| Dedicated home gym | Variable | Variable | Structural attachment, clearance |
| Large indoor room | 8 to 10 feet | Wood subfloor | Framing attachment, noise, dust |
| Outdoor area | N/A | Variable | Weather, UV exposure, treated materials |
The location you choose affects every aspect of the project, from the materials you use to the structural considerations and the long-term maintenance requirements.
Planning Your Home Climbing Wall
Determine the Available Space
Measure the full available footprint carefully, including width, height from floor to ceiling or rafters, and depth into the room. Do not forget to account for the thickness of the frame and plywood panel when calculating usable climbing surface.
Decide the Wall Height
Wall height directly affects fall risk. A wall that reaches ten feet or higher requires thorough crash mat coverage and careful consideration of who will use it. For beginner and family walls, keeping the maximum reach height lower reduces risk.
Choose the Wall Angle
Start with a vertical or very slightly overhanging angle for your first build. Every degree of overhang increases the structural load and the physical demand of the climbing. There is no advantage to building an extreme overhang if the users are beginners or children.
Determine the Climbing Style
Are you building primarily for bouldering, for traversing along a wall, for vertical movement, or for training specific techniques? The intended use affects hold placement, panel dimensions, and how you design the available routes.
Plan the Fall Zone
The fall zone is the area on the floor directly below and slightly outward from the climbing surface. Every part of this zone must be covered with appropriate impact-absorbing material. Do not plan a wall where the fall zone overlaps with hard furniture, concrete without padding, walls, or other hazards. The fall zone must be clear before any climbing occurs.
Check Structural Support
This is the most critical planning step. The wall frame must anchor to structural members capable of carrying the intended loads. In wood-framed buildings, that means attaching to studs or adding appropriate blocking between studs. In concrete or masonry buildings, it means using appropriate anchors rated for the application. If you are uncertain about what lies behind a surface or whether the framing can handle the loads, consult a qualified contractor or structural engineer before proceeding.
Plan Hold Placement
Sketch a basic hold layout for your initial route before drilling T-nut holes. Consider a variety of hold positions at different heights and orientations. Leave space for holds to be rotated or repositioned as you change routes over time.
Consider Lighting and Ventilation
Adequate lighting makes the climbing surface easier to see and reduces the risk of missed holds or misjudged movements. Ventilation matters for comfort, particularly in garages and basements where air circulation can be limited.
Check Local Building Requirements
Some jurisdictions require permits for structural modifications or additions to residential buildings. Check with your local building authority before starting construction. This is not a formality to skip. Building without required permits can create complications when selling a home and may affect insurance.
Materials You Need
| Material | Purpose | Recommended Use | Estimated Cost |
|---|---|---|---|
| Structural lumber (2×4, 2×6, 2×8 as required) | Building the supporting frame | All wall types | $150 – $500+ |
| Plywood (3/4 inch, sanded or cabinet grade) | Climbing surface panels | All wall types | $100 – $400+ |
| Climbing holds (commercial bolt-on) | Creating climbing routes | All wall types | $100 – $600+ |
| T-nuts (10mm, appropriate count) | Hold mounting hardware in plywood | All wall types | $40 – $150 |
| Climbing wall bolts | Securing holds to T-nuts | All wall types | Included or $20 – $50 |
| Structural screws and hardware | Frame connections and anchoring | All wall types | $30 – $100 |
| Appropriate brackets and joist hangers | Reinforcing frame connections | All wall types | $20 – $80 |
| Crash mats (purpose-made bouldering mats) | Fall zone protection | All wall types | $150 – $600+ |
| Additional padding (foam mat rolls) | Extended fall zone coverage | All wall types | $50 – $200 |
| Primer and paint or sealant | Surface preparation and finish | Optional but recommended | $30 – $80 |
| Safety equipment (glasses, dust mask) | Personal protection during build | Construction phase | $20 – $50 |
Material quantities and specifications depend entirely on your wall dimensions and design. Do not use these figures as precise structural specifications. The correct lumber dimensions, screw grades, and anchor hardware for your specific project depend on your building structure, wall design, and intended loads.
Tools You Need
| Tool | Purpose | Recommended Use | Estimated Cost |
|---|---|---|---|
| Tape measure | Accurate measurement | All phases | $10 – $25 |
| Level (24 inch or longer) | Ensuring plumb and level frame | Frame construction | $15 – $60 |
| Stud finder with wire detection | Locating framing members | Before anchoring | $20 – $60 |
| Cordless drill / impact driver | Driving screws and bolts | All phases | $80 – $200 |
| Circular saw | Cutting lumber and plywood | Frame and panel construction | $60 – $200 |
| Socket set | Installing T-nut hardware | T-nut installation | $20 – $60 |
| Wrenches | Tightening hold bolts | Hold installation | $15 – $40 |
| Pencil and chalk line | Marking layout lines | All phases | $5 – $20 |
| Safety glasses | Eye protection during construction | Always during power tool use | $5 – $20 |
| Hearing protection | Protecting hearing during sawing and drilling | Power tool use | $5 – $25 |
| Dust mask or respirator | Protection from wood dust and sanding particles | Sawing, sanding, and finishing | $10 – $30 |
How to Build a Home Climbing Wall Step by Step
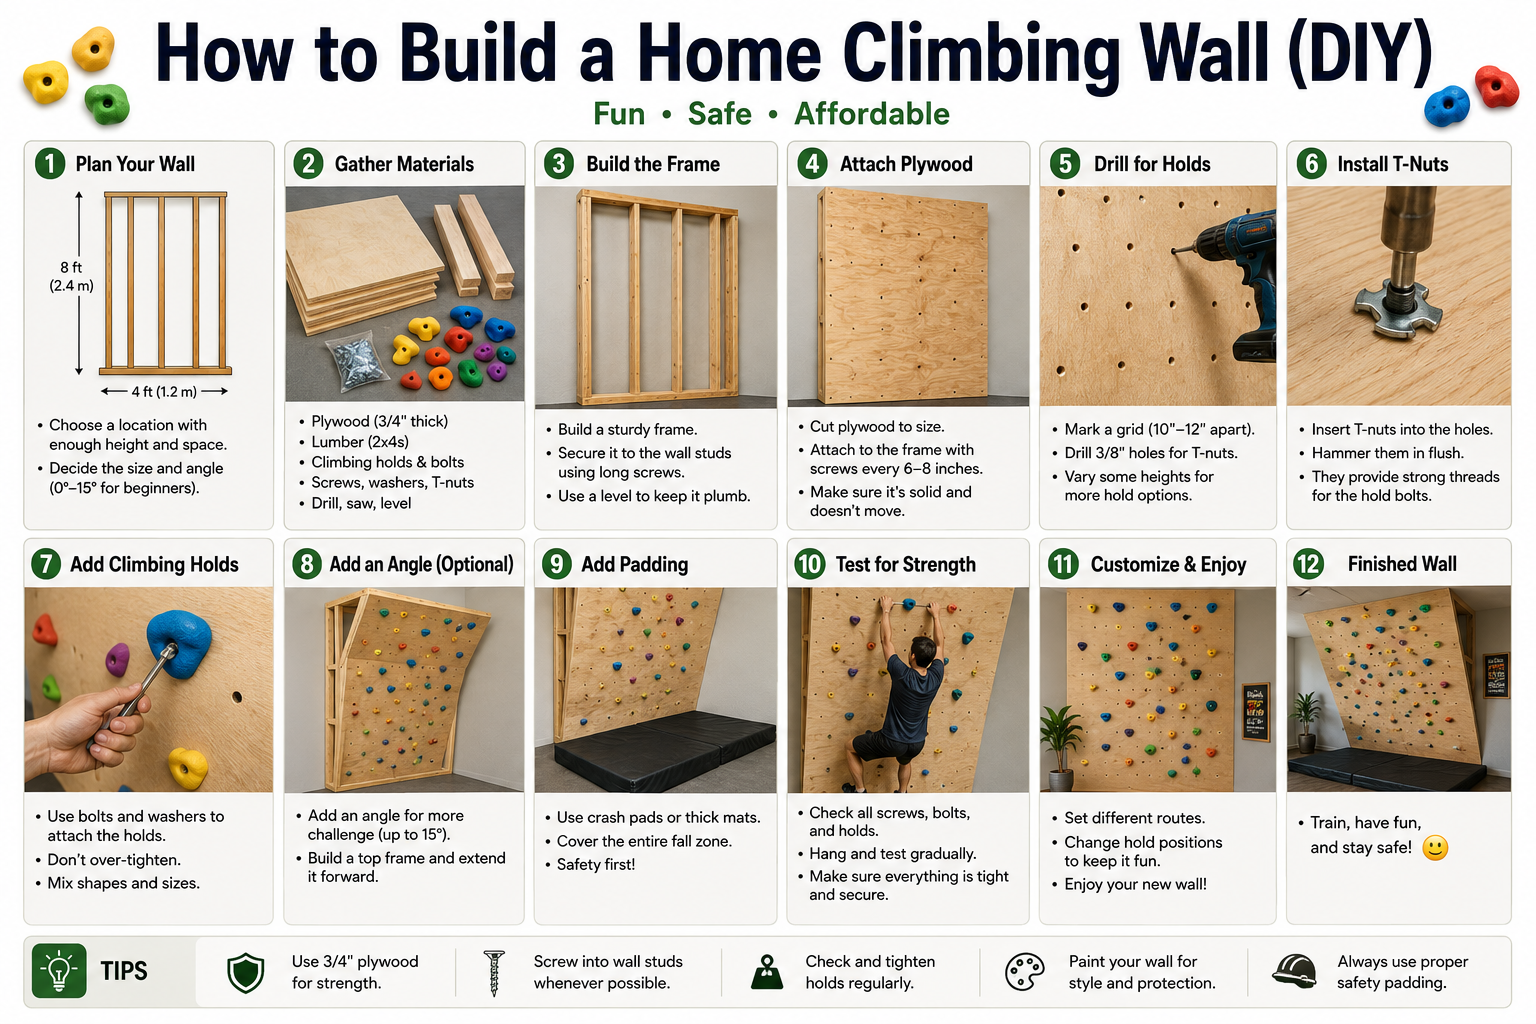
Step 1: Measure the Space
Take precise measurements of the wall area you plan to use. Measure width, height, and any obstructions such as windows, pipes, conduits, or electrical panels. Document these carefully. Your design must work within the actual dimensions of the space, not the dimensions you wish it had.
Step 2: Inspect the Existing Structure
Before cutting a single piece of lumber, understand what you are anchoring to. Use a stud finder to locate wall studs, ceiling joists, or floor joists as appropriate for your design. Identify the framing member spacing, which is typically sixteen or twenty-four inches on center in residential construction.
If your planned attachment points fall between studs or on drywall alone, you must add structural blocking before the frame can be safely anchored. Attaching a climbing wall frame to drywall or plaster without backing framing members is not acceptable. Do not proceed past this step if the existing structure is unclear or uncertain.
Step 3: Create a Basic Design
Sketch your wall design on paper or using a simple diagram tool. Include overall dimensions, frame member positions, plywood panel layout, hold positions, and the planned fall zone below. This drawing does not need to be architectural quality, but it must clearly show how the structure will be supported and anchored.
Step 4: Plan the Framing
Design the frame to transfer loads from the climbing surface to the structural attachment points efficiently. Frame members should be sized appropriately for the spans involved. Do not assume standard residential lumber sizes are always adequate without considering your specific span lengths, loads, and attachment conditions.
If you have any uncertainty about whether your frame design is structurally appropriate, consult a contractor or structural engineer. This is one of those situations where the cost of a professional consultation is genuinely worth the peace of mind.
Step 5: Build the Supporting Frame
Cut lumber to your planned dimensions and assemble the frame on the floor before standing it in position. This allows you to check that all connections are square and correctly positioned before the assembly goes vertical and becomes harder to work on.
Use appropriate structural fasteners for every connection. Follow fastener manufacturer specifications for fastener size, spacing, and installation method. Do not substitute smaller or weaker fasteners to save cost.
Step 6: Secure the Frame Properly
This is the most structurally critical step. Attach the frame to building structure, not to drywall or finishes. Every lag screw or structural connector that holds the frame to the building must engage structural framing behind the finished surface.
For wood-framed walls, this means lag screws or structural screws of appropriate length and diameter driven into studs or added blocking. For concrete or masonry, this means appropriate concrete anchors rated for the tensile and shear loads involved. If you are working with masonry, get professional input on anchor selection and installation.
Step 7: Install the Plywood Surface
Use three-quarter-inch plywood for the climbing surface. This thickness provides the material depth needed for T-nuts to seat properly and the rigidity to resist flexing under climbing loads. Attach the plywood to the frame with appropriate screws at regular intervals around the panel edges and across intermediate frame members.
Sand the plywood surface lightly to remove splinters and rough areas before finishing. For tips on finishing wood surfaces and working in spaces that will later be painted or finished, the How to Paint a Room: Beginner’s Guide covers surface preparation and paint application that can apply to interior spaces around your climbing wall project.
Step 8: Install T-Nuts or Appropriate Hold Mounting Hardware
T-nuts are the hardware inserts in the plywood that accept the bolt-on climbing holds. They are installed from the back of the plywood panel before the panel is attached to the frame, in most cases. Plan the T-nut grid before drilling.
A standard T-nut spacing of eight inches across and vertical creates a usable grid density. Drill holes of the correct diameter for your T-nut size through the plywood, insert the T-nuts from the back, and tap them firmly into place. Once panels are installed, the T-nut flanges are against the frame side of the panel and the threaded sockets face outward through the climbing surface.
Step 9: Sand and Finish the Surface
Sand the climbing surface thoroughly to remove all sharp edges, rough patches, and splinters. Rough wood edges around T-nut holes cause hand injuries. Take the time to sand properly.
Apply a suitable primer and paint or sealant to the climbing surface if desired. Paint provides a protective layer and makes the surface easier to clean. Allow any finish to cure fully before installing holds or allowing any climbing.
Step 10: Install Climbing Holds
Install holds according to the manufacturer’s instructions for that specific hold set. Use the correct bolt diameter and thread type for your T-nuts. Tighten hold bolts firmly, but do not over-tighten to the point of stripping the T-nut threads.
Set initial routes that are appropriate for the skill level of the intended users. Space holds generously for beginner routes and close them up for more challenging problems as users progress.
Step 11: Install Crash Mats and Padding
Cover the entire fall zone under the climbing surface with purpose-made crash mats or bouldering pads. The fall zone extends horizontally beyond the climbing surface in all directions that a falling climber might reach.
Place mats edge to edge with no significant gaps. Gaps between mats create impact points where the flooring beneath is unprotected. Weight the mat edges if they tend to slide or separate during use.
Step 12: Inspect the Entire Wall
Before any climbing occurs, perform a complete inspection of every element of the wall. Check every structural connection. Confirm every hold bolt is tight. Verify that the fall zone is fully covered. Check that there are no sharp edges anywhere on the structure. Confirm that the clearance around the wall is free of hazards.
Step 13: Perform a Controlled Test Before Use
Before the intended users climb, perform a conservative load test. Apply your own body weight progressively to various points on the structure. Move slowly and watch for any signs of movement, creaking, or deflection that seems excessive. If anything feels wrong, stop and investigate before allowing others to use the wall.
How to Install Climbing Holds
Install every hold according to the manufacturer’s installation instructions. Holds are designed to be used at specific orientations and within specific load ratings.
Key installation principles:
- Orient holds to match the intended movement direction for your planned route
- Space holds appropriately for the intended difficulty level
- Tighten each bolt until the hold is firmly seated and cannot rotate under hand pressure during climbing
- Check each hold for cracks, chips, or damage before installation
- Re-inspect all holds whenever you change routes
- Replace any damaged hold immediately
Changing routes regularly keeps the wall interesting for users of all levels and distributes wear across different areas of the plywood surface.
How to Choose Climbing Holds
| Hold Type | Climbing Style | Difficulty | Best For |
|---|---|---|---|
| Jugs (large positive holds) | All | Beginner | First routes, children |
| Edges | Face climbing | Intermediate | Strength training |
| Slopers | Balance, compression | Advanced | Technique development |
| Pinches | Pinch strength | Intermediate to advanced | Training |
| Foot holds | Footwork | All | Route variety |
| Training holds (campus rungs) | Specific training | Advanced | Targeted training |
For a beginner home wall, prioritize large positive holds that are comfortable to grip. As users develop confidence and skill, gradually introduce smaller and more challenging hold types.
How to Choose the Right Crash Mats
Crash mats for home bouldering walls should be purpose-made impact-absorbing mats rather than general-purpose exercise foam. The landing surface must absorb the energy of a fall from the maximum height of the wall without transmitting harmful impact forces to the user.
Important mat considerations:
- Minimum four inches of foam thickness for low-height bouldering walls
- Thicker mats for walls approaching ten feet or higher
- Full coverage of the fall zone with no gaps
- Non-slip base that prevents the mat from sliding on the floor
- Regular inspection for compression, tears, or deterioration
- Replacement when the foam has compacted significantly from repeated use
No crash mat, regardless of thickness or quality, provides a guarantee against injury from a fall. Appropriate climbing behavior, controlled movements, and awareness of the fall zone all contribute to safer climbing practice. The Consumer Product Safety Commission provides guidance on safety standards for impact-absorbing surfaces that may be useful reference material when selecting appropriate padding.
Home Climbing Wall Safety Checklist
| Inspection Item | Check Frequency | Condition Required |
|---|---|---|
| Frame-to-building structural connections | Monthly | No movement, no loosening |
| Frame-to-frame connections | Monthly | All fasteners tight, no gaps |
| Plywood condition | Monthly | No delamination, cracks, or rot |
| T-nut condition | After every route change | All seated, no spinning |
| Hold bolt tightness | Before each climbing session | All holds firm, none rotating |
| Visible cracks or splits in lumber | Monthly | None acceptable in load-bearing members |
| Sharp edges anywhere on structure | Before each session | None present |
| Fall zone coverage | Before each session | Full coverage, no gaps |
| Crash mat condition | Monthly | No significant compression or damage |
| Lighting adequacy | Before each session | All areas clearly visible |
| Clearance around wall | Before each session | No hazards in fall zone |
| Overall structural stability | Monthly | No movement, noise, or deflection |
Common Home Climbing Wall Mistakes
Building on an Unsuitable Wall
Attaching a climbing wall frame to drywall, plaster, or paneling without backing structure is one of the most serious construction errors possible. The frame must be anchored to structural framing. Period.
Using Weak Materials
Undersized lumber, low-grade plywood, or inappropriate fasteners reduce the structural integrity of the wall. Do not substitute materials to reduce cost.
Poor Structural Anchoring
Lag screws that miss studs, anchors that are undersized for the loads, or connections made to non-structural surfaces all create failure risk under climbing loads.
Skipping the Fall Zone
A climbing wall without adequate fall zone protection is not safe for use. Plan the fall zone before building, not as an afterthought.
Using Inadequate Padding
Thin exercise mats, folded blankets, or minimal foam coverage do not provide adequate impact protection under a fall from climbing height.
Installing Holds Incorrectly
Under-tightened holds rotate or detach during climbing. Over-tightened bolts strip T-nut threads. Follow manufacturer instructions for every hold.
Ignoring Loose Hardware
A hold bolt that has loosened since the last inspection needs immediate attention before the next climb. Regular inspection before each session catches this.
Making the Wall Too Difficult for Beginners
An overhanging wall covered in tiny holds is discouraging and potentially dangerous for new climbers. Start beginner-friendly and add challenge progressively.
Failing to Inspect the Wall
Regular inspection is what separates a climbing wall that stays safe over time from one that develops undetected problems.
Ignoring Moisture or Wood Damage
Wood that is exposed to persistent moisture, particularly in basements and garages, can develop rot that compromises structural integrity. Inspect wood components regularly and address moisture issues promptly. The DIY Home Inspection Checklist covers moisture assessment throughout the home and is a useful complement to your climbing wall inspection routine.
DIY Home Climbing Wall Cost
| Item | Estimated Cost Range |
|---|---|
| Structural lumber | $150 – $500+ |
| Plywood (3/4 inch) | $100 – $400+ |
| Commercial climbing holds | $100 – $600+ |
| T-nuts and hardware | $50 – $150 |
| Crash mats and padding | $200 – $800+ |
| Tools (if purchased new) | $200 – $500 |
| Paint and finishing materials | $30 – $100 |
| Professional structural assessment (if needed) | $150 – $500+ |
| Estimated total | $800 – $3,000+ |
These figures represent approximate ranges only. Actual costs vary significantly based on wall size, the number and quality of climbing holds, the crash mat coverage required, whether you already own tools, and whether professional structural consultation is necessary. Larger, more complex walls with extensive hold sets and high-quality crash mats can cost considerably more.
DIY vs Professional Installation
| Factor | DIY | Professional |
|---|---|---|
| Cost | Lower (materials only) | Higher (labor plus materials) |
| Time | Multiple weekends | 1 to 3 days typically |
| Carpentry skill needed | Intermediate | Professional level |
| Structural knowledge required | Significant | Comprehensive |
| Safety assessment | Self-performed | Professional |
| Best for | Simple vertical walls in suitable spaces | Complex designs, uncertain structures, large walls |
| Flexibility | High | Depends on contractor |
| Accountability | Self-directed | Professional liability |
How to Maintain a Home Climbing Wall
Consistent maintenance keeps your climbing wall safe and extends its usable life significantly.
Monthly tasks:
- Inspect all structural connections for any loosening or movement
- Check plywood panels for delamination, cracks, or surface damage
- Confirm all T-nuts are still seated and not spinning
- Inspect crash mats for compression loss or damage
Before each climbing session:
- Check that all holds are firmly tightened and none have rotated
- Confirm the fall zone is fully covered and clear of obstacles
- Check for any new sharp edges or visible damage
- Confirm adequate lighting in all climbing areas
Seasonally:
- Inspect all lumber for moisture damage, particularly in garages and basements
- Clean the climbing surface to remove chalk and dust buildup
- Check and tighten all frame-to-building connections
- Assess crash mat thickness and replace if significantly compressed
Incorporating climbing wall inspection into your broader home maintenance routine keeps it from being overlooked. The Home Maintenance Checklist by Month provides a practical framework for scheduling regular maintenance tasks like this alongside all other home care priorities.
How Often Should You Inspect a Home Climbing Wall?
A basic safety check should happen before every climbing session. This takes only a few minutes and covers hold tightness, fall zone coverage, and visible damage.
A more thorough structural inspection should happen monthly for walls in regular use. This includes checking every frame connection, all plywood fastenings, and the condition of all anchoring into the building structure.
Increase inspection frequency whenever:
- Routes have recently been changed, requiring hold removal and reinstallation
- The wall has seen unusually heavy use
- Any user reports unusual movement, sounds, or concerns
- The space has experienced moisture, temperature extremes, or other environmental stress
- Any impact damage has occurred to the structure
How to Make a Home Climbing Wall Beginner-Friendly
- Start with large, positive holds spaced generously so every move feels achievable
- Keep initial routes close to vertical rather than overhanging
- Mark beginner routes clearly with colored tape on the holds
- Avoid placing holds that require dynamic jumping movements for beginners
- Gradually introduce smaller holds as users build confidence
- Create a dedicated beginner route that traverses the wall horizontally at low height
- Encourage new users to practice falling safely before attempting higher moves
Can You Build a Home Climbing Wall in a Garage?
Garages work well for home climbing walls when certain conditions are met. The structural framing of the garage must be appropriate for the anchor loads, which varies considerably between attached and detached garages, wood-framed and metal garages, and different construction styles.
Concrete garage floors require crash mats with non-slip backing and sufficient thickness to protect against falls. Temperature extremes can cause wood to expand and contract seasonally, so check connections more frequently in garages with significant temperature variation. Vehicle clearance must be considered, both for driving in and out and for the fall zone around the climbing area.
Lighting and ventilation are often inadequate in garages for climbing use. Plan for additional lighting and ensure the space has sufficient airflow for comfortable training.
Can You Build a Home Climbing Wall in a Basement?
Basements offer a stable temperature environment and protection from weather. The primary limitations are ceiling height and moisture management.
Most residential basements have ceiling heights between seven and ten feet. At seven feet, a practical vertical climbing height of five to six feet leaves minimal clearance. At ten feet, you have more options.
Foundation walls present anchoring challenges. Poured concrete and concrete block foundations require appropriate concrete anchors, and the condition of older foundation walls should be assessed before attachment. Do not anchor climbing wall frames to deteriorated or cracked foundation walls without professional evaluation.
Basement moisture is a significant concern. Any basement that experiences water intrusion is an unsuitable location for a wood-framed climbing wall without addressing the moisture problem first. The Home Maintenance Checklist by Month includes basement moisture monitoring as a recurring task and provides a framework for addressing these issues as part of ongoing home care.
When to Hire a Professional
Hire or consult a qualified professional when:
- You are uncertain whether the existing wall, ceiling, or floor framing can handle the intended loads
- You plan to attach to masonry, concrete, or an unusual structure
- Your design involves a significantly overhanging wall with high loads on attachment points
- The climbing wall will be ceiling-mounted or overhead in any way
- The space has any signs of structural movement, cracking, or damage
- You discover unknown framing configurations during the build
- The wall will be used by many users, by heavier users, or for more aggressive climbing than casual bouldering
- Any part of the project involves modifying the building’s structural framing
The investment in a professional structural assessment is always worthwhile when the consequences of failure involve people falling from height. This is not a place to save money by guessing.
Expert Recommendations
After working on countless home improvement projects, a few lessons stand out specifically for climbing wall builds.
Start smaller than you think you need. A first-time builder who constructs a complex overhanging wall on the first attempt takes on a lot of risk, in terms of structural complexity, cost, and the potential for design errors. A well-executed vertical wall teaches you the construction process while delivering a genuinely useful training tool.
Invest in proper crash mats first. Before you spend money on an extensive hold set, ensure your fall zone protection is adequate. The mats are not optional equipment that you add later. They are part of the safety system that makes climbing possible.
Get a structural assessment if any doubt exists. This point cannot be overstated. A consultation with a qualified contractor or structural engineer costs a fraction of what a climbing wall project costs overall, and it gives you real confidence rather than assumptions about whether your anchor points are appropriate.
Build in the ability to change routes. One of the best features of a home climbing wall is route variety. Drill more T-nut holes than you think you need, distributed across the panel. Future-you will appreciate the flexibility.
Keep documentation of the build. Photograph the frame construction, the anchor connections, and the T-nut installation before covering everything with panels. These photos are invaluable if you ever need to assess the structure, repair something, or explain the build to a professional.
For homeowners integrating this project into a broader home improvement program, the Ultimate Home Maintenance Checklist for Every Season provides a comprehensive seasonal maintenance framework that includes structural assessments, outdoor project preparation, and the kind of systematic home care that keeps every DIY project in good condition long term.
Frequently Asked Questions
How thick should the plywood be for a home climbing wall?
Three-quarter-inch plywood is the standard minimum thickness for climbing wall panels. This thickness provides adequate depth for T-nuts to seat and function properly, and sufficient panel rigidity to resist flexing under climbing loads. Some builders use seven-eighths-inch or one-inch plywood for additional rigidity on wider spans. Thinner plywood, such as half-inch, does not provide adequate T-nut holding depth and flexes more noticeably underfoot or under hand pressure. Use sanded or cabinet-grade plywood for a smoother climbing surface that requires less finishing work and poses lower risk of splinters during use.
What type of lumber is appropriate for the climbing wall frame?
Standard dimensional lumber such as two-by-four, two-by-six, or two-by-eight construction lumber is commonly used for climbing wall frames in residential settings. The specific size required depends on your wall design, the spans involved, and the loads the frame must carry. Do not assume that two-by-four lumber is always adequate simply because it is common. Wider or longer spans, heavier overhangs, and greater anticipated loads may require larger members. If you have any uncertainty about appropriate lumber sizing for your specific design and location, this is a question to raise with a contractor or structural engineer before building.
How many T-nuts do I need for a home climbing wall?
A standard T-nut grid spacing of approximately eight inches in both directions across the panel surface is a common starting point. For a typical eight-by-eight-foot climbing panel, this spacing produces approximately one hundred and forty-four T-nut positions, though actual count varies with your exact spacing and panel dimensions. More T-nuts provide more flexibility for route setting. It is generally worth drilling more than you think you currently need, because adding T-nuts after the panel is installed and painted is significantly more difficult than installing them before panel attachment. Buy a surplus and install them while access is easy.
Can I use a freestanding climbing wall without attaching it to the building?
Freestanding climbing walls avoid the structural attachment question entirely, but they introduce their own design requirements. A freestanding structure must be stable enough to resist the overturning and racking forces that climbing loads produce. This requires a sufficiently wide base, appropriate diagonal bracing, and a design that accounts for the worst-case loading scenario from a climber on the outermost part of the wall. A freestanding wall that has not been designed with adequate stability can tip. If you are considering a freestanding design, sketch the geometry carefully and consider consulting a professional to review the stability before building.
What crash mat thickness is adequate for a home bouldering wall?
The appropriate crash mat thickness depends on the maximum fall height from your wall. As a general starting point, a minimum of four inches of dense impact-absorbing foam is often cited for low bouldering walls reaching up to eight feet. For walls approaching ten feet or higher, thicker mats or stacked mat systems are warranted. Commercial bouldering gym mats are typically four to twelve inches thick depending on the application. Keep in mind that foam compresses with repeated use over time, reducing its effective thickness. Inspect mats regularly for compression and replace them when they have lost significant thickness or feel significantly firmer than when new.
Is it safe to build a home climbing wall on an exterior wall?
Exterior walls are often suitable anchor points for climbing wall frames, but they present some specific considerations. Exterior walls in wood-framed homes typically have stud spacing of sixteen or twenty-four inches on center and standard stud dimensions that are appropriate for frame attachment when properly engaged. However, exterior walls also contain insulation, vapor barriers, and sometimes electrical or plumbing runs that affect where you can anchor. Use a stud finder with wire detection before drilling into any exterior wall. Also consider that exterior walls experience greater temperature and moisture variation than interior walls, which can affect the behavior of anchor connections over time.
How do I prevent my climbing holds from loosening over time?
Hold bolts loosen through the vibration and movement of repeated climbing. The most reliable prevention is a consistent inspection and tightening routine before each climbing session. Check every hold by attempting to rotate it by hand. Any hold that moves needs its bolt tightened immediately. Some climbers apply a small amount of thread-locking compound to hold bolts, but this makes future hold changes more difficult. The more practical approach is simply to inspect and tighten regularly. T-nut spinning is a related issue. If a T-nut spins rather than allowing the bolt to tighten, the T-nut has become dislodged and requires repair from behind the panel.
How long does it take to build a home climbing wall?
A straightforward vertical bouldering wall of moderate size, roughly eight to twelve feet wide and eight to ten feet tall, typically takes two to four weekends for a competent DIYer working at a careful pace. This estimate includes planning, material gathering, framing, panel installation, T-nut installation, finishing, and hold installation. More complex designs with significant overhang, custom framing, or challenging anchor conditions take longer. Do not rush any phase of this project, particularly the structural anchoring and T-nut installation phases where errors are difficult to correct after the fact.
What is the best angle for a beginner home climbing wall?
A vertical wall at exactly ninety degrees is the most accessible starting angle for beginner climbers and the least structurally demanding to build and anchor. Slightly past vertical, perhaps five to ten degrees of overhang, adds a modest physical challenge without making the climbing excessively difficult or placing dramatically increased loads on the frame connections. A wall angled significantly past vertical, such as thirty to forty-five degrees of overhang, creates a physically demanding surface that is appropriate for intermediate to advanced climbers but discouraging for beginners. Start with the angle that matches the skill level of your primary users and resist the temptation to build a more aggressive angle simply because you have seen impressive walls online.
Can children safely use a home climbing wall?
A properly designed and maintained home climbing wall can be a wonderful activity for children, but several specific considerations apply to young users. Keep the maximum climbing height appropriate for the child’s age and skill level. Ensure crash mat coverage is complete with no gaps. Supervise young children at all times during climbing. Start children on routes that are well within their comfortable capability so they develop confidence gradually. Check all holds before children climb, as children often pull on holds with unpredictable movements that can reveal loosened hardware that adult climbers might not have noticed. Never leave children to climb unsupervised on any wall, regardless of how well it has been built.
Conclusion
Building a home climbing wall is a genuinely rewarding project for the right home, the right builder, and the right conditions. When it is done with careful planning, appropriate structural anchoring, quality materials, and genuine attention to safety at every step, it becomes a long-term asset that families and fitness enthusiasts can enjoy for years.
The process demands respect. Structural anchoring is not something to improvise. Fall zone protection is not something to minimize. Hold installation is not something to rush. And ongoing inspection is not something to skip between sessions.
Plan thoroughly. Build carefully. Inspect consistently. Get professional input whenever structural uncertainty exists. Follow that approach and your home climbing wall will be something genuinely worth building.
For homeowners who want to integrate this project into a broader program of home improvement and maintenance, connecting your climbing wall care with the regular inspection tasks in the DIY Home Inspection Checklist ensures the structure gets the systematic attention it deserves alongside every other part of your home.