Sump Pump Maintenance Guide: Keep Your Basement Dry Year-Round

Introduction
When the rain comes down hard and the ground cannot absorb any more water, your sump pump is the only thing standing between your basement and a flood.
Most homeowners never think about their sump pump until water is already rising. That is exactly the wrong moment to discover the pump has not been tested in two years, the float switch is stuck, or the battery backup died months ago without anyone noticing.
Basement flooding is one of the most destructive and expensive events a homeowner can face. Water damage affects flooring, drywall, insulation, stored belongings, and the structural integrity of the foundation itself. According to the Federal Emergency Management Agency, flooding is the most common and costly natural disaster in the United States, and many cases of basement flooding result not from extraordinary events but from failing sump pumps that were not properly maintained.
The good news is that sump pump maintenance is genuinely within homeowner capability for most routine tasks. Inspecting the pit, cleaning the pump, testing the float switch, running a manual test, and checking the discharge line are all things most homeowners can handle safely and confidently. Electrical problems, damaged wiring, pump motor failures, and complex discharge system repairs require a licensed plumber or pump specialist.
This guide gives you a complete framework for maintaining your sump pump system throughout the year. Whether you are performing your first inspection or building a more disciplined maintenance routine, everything you need is here.
What Is a Sump Pump?
A sump pump is a mechanically powered device installed in a pit, called the sump pit or sump basin, at the lowest point of a basement or crawl space. Its purpose is to collect groundwater and surface water that accumulates around the foundation and pump it away from the home through a discharge pipe to a safe drainage location.
Most residential sump pumps are submersible pumps that sit inside the sump pit and operate underwater. Pedestal pumps are an older design where the motor sits above the pit on a pedestal with only the pump intake submerged. Submersible pumps are quieter, more efficient, and more common in modern homes.
A standard sump pump system consists of the pump itself, the sump pit that collects water, a float switch that activates the pump when water reaches a set level, a discharge pipe that carries water away from the home, and a check valve that prevents discharged water from flowing back into the pit when the pump stops.
How Does a Sump Pump Work?
Understanding how the system works makes maintenance more intuitive and helps you recognize when something is not right.
Groundwater and surface water naturally migrate toward the lowest point around the foundation. In homes with sump systems, a network of perforated drain tile around the foundation perimeter collects this water and directs it to the sump pit. As water flows into the pit, it rises until it reaches the float switch’s activation level.
The float switch, which works similarly to the float in a toilet tank, rises with the water level. When it reaches the trigger point, it activates the pump motor. The pump draws water through an intake screen at the base of the unit and forces it up through the discharge pipe, through the check valve, and out of the home to a safe drainage location such as a storm drain, dry well, or discharge point in the yard.
When the water level drops below the float’s lower threshold, the pump shuts off. The check valve closes to prevent water in the discharge pipe from draining back into the pit. The system then waits for the next activation cycle.
Why Sump Pump Maintenance Is Important
A sump pump that has not been maintained is a sump pump you cannot rely on when you need it most.
Heavy rain and storm events are exactly when sump pumps work hardest. They are also the worst time to discover that the float switch is stuck, the intake screen is clogged with debris, or the discharge pipe is blocked. A pump that fails during a significant rain event can allow hundreds or thousands of gallons of water to enter the basement before you can respond.
Beyond flood risk, a neglected sump pump accumulates debris that causes the motor to work harder than necessary, generating heat and wearing components faster than rated. A pit that is never cleaned develops sediment that can clog the intake. A float switch that is never tested may be stuck in position without your knowledge.
Regular maintenance catches all of these conditions early, when correction is simple and inexpensive, rather than when they produce a basement flooding event that requires remediation, structural repair, and replacement of damaged belongings.
Benefits of Regular Sump Pump Maintenance
Consistent sump pump maintenance delivers benefits that protect both the pump and your home throughout its service life.
- Confirms the pump activates reliably before heavy rain or storms arrive
- Extends pump motor life by keeping the intake clear and reducing unnecessary strain
- Identifies float switch problems while they are still correctable
- Ensures the discharge system is clear and functioning so pumped water actually leaves the home
- Confirms backup systems are operational before the primary pump is needed
- Creates a maintenance record that supports insurance claims if flooding occurs
- Reduces the risk of catastrophic basement flooding from an undetected pump failure
- Prevents sediment accumulation in the pit that progressively degrades pump performance
- Keeps the check valve functioning properly to prevent backflow
How Often Should You Maintain a Sump Pump?
Most manufacturers and plumbing professionals recommend a thorough sump pump inspection at least once per year. Spring is the most critical timing for this annual inspection, as it prepares the system for the highest-demand period of rain and snowmelt before summer.
Beyond the annual inspection, certain tasks warrant more frequent attention. Testing the float switch and running a basic operational test quarterly keeps you informed about system function throughout the year. Checking the pit for debris and inspecting the discharge outlet seasonally takes only a few minutes and provides early warning of developing problems.
Always perform a sump pump check before any significant storm event in your area and again after a major storm to confirm the system performed correctly and is ready for the next event.
Consult your pump’s owner’s manual for any manufacturer-specific maintenance intervals or testing procedures that apply to your model. Manufacturer recommendations take precedence over general guidelines for any specific maintenance task.
Best Time to Inspect a Sump Pump
The single most important inspection window is early spring, typically March or April in most climates, before the season’s heaviest rainfall arrives and before snowmelt begins adding significant water pressure to the soil around the foundation.
Inspecting in early spring gives you time to identify and correct any issues before the pump is called upon during actual rain events. If the pump needs service or replacement, spring inspection timing gives you the opportunity to schedule professional work before contractors become busy with peak-season demand.
A secondary inspection in early fall, before winter arrives and ground conditions change, catches any issues that developed over the summer and prepares the system for winter moisture management. Building both windows into your annual home care routine connects sump pump care with other seasonal maintenance priorities. The Spring Home Maintenance Checklist and the Fall Home Maintenance Checklist both provide comprehensive seasonal frameworks that pair well with sump pump inspection scheduling.
Sump Pump Maintenance Checklist
Inspect the Sump Pit
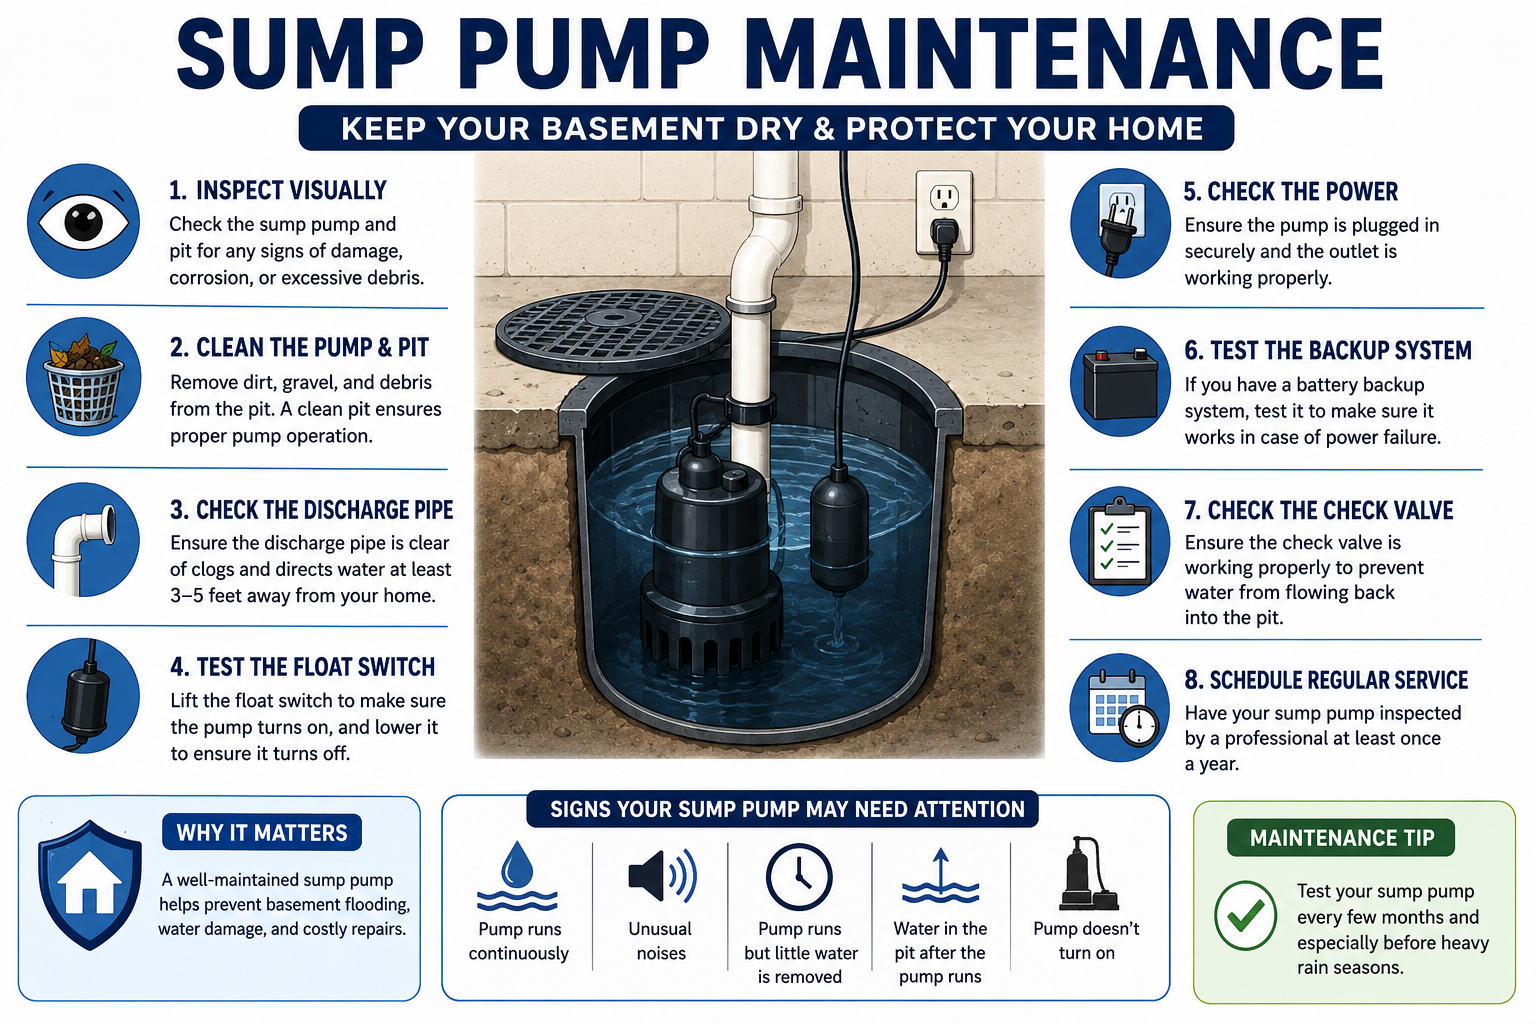
Begin every maintenance session with a visual inspection of the sump pit itself. Remove the cover and look into the pit with a flashlight. The pit should be clear of excessive sediment, gravel accumulation, and visible debris.
Note the water level in the pit. A small amount of water at the bottom is normal and keeps the pump seals from drying out. A pit that is completely bone dry may allow the pump seals to deteriorate. A pit that is unusually full between rain events may indicate an elevated water table or a drainage tile issue.
Clean the Sump Pit
Sediment, sand, and debris accumulate in the pit over time and can be drawn into the pump intake, clog the intake screen, and reduce pump performance. Plan to clean the pit annually as part of your spring inspection.
To clean the pit, first disconnect the power to the pump at the outlet or circuit breaker. Remove the pump from the pit according to your manual’s instructions. Use a wet-dry vacuum to remove standing water and loose debris from the pit. Wipe down the pit walls with a clean damp cloth if significant sediment is present. Allow the pit to dry briefly before reinstalling the pump.
Check the Pump for Debris
With the pump removed from the pit, inspect the pump body for debris wrapped around the intake, damage to the pump housing, and any obvious signs of corrosion or deterioration.
Remove any debris from around the pump casing by hand or with a soft brush. Check that the pump housing has no cracks, and look for any unusual mineral deposits or corrosion that suggests chemical exposure or excessive wear.
Inspect the Pump Inlet Screen
The inlet screen covers the pump intake and prevents large debris from entering the pump impeller. A partially or fully clogged inlet screen forces the pump to work harder, generates heat, and reduces the volume of water the pump can move per cycle.
Inspect the screen for debris, buildup, or physical damage. Clean the screen by rinsing it gently under running water or by using a soft brush to dislodge trapped material. If the screen shows physical damage such as cracks or holes, replace it before reinstalling the pump.
Test the Float Switch
The float switch is one of the most critical components in the entire system. If it fails to activate at the correct water level, the pump will not run when it should. If it fails in the activated position, the pump will run continuously.
Manually lift the float by hand to confirm it moves freely through its full range without binding or sticking. On submersible pumps, you can often observe the float inside the pit with a flashlight. With the pump connected to power, lifting the float to its trigger position should activate the pump. Releasing it should cause the pump to shut off as the float drops.
If the float is bound by debris, gently clear the obstruction. If it is physically damaged or does not trigger the pump reliably, the switch or float assembly needs replacement, which is typically a straightforward task that most homeowners can accomplish with basic tools and a replacement part from a plumbing supply store.
Test the Sump Pump
Testing the pump under actual operating conditions is the most direct way to confirm it is ready to perform when needed. To test, slowly pour a five-gallon bucket of water into the sump pit. Pour at a rate that simulates natural water inflow rather than dumping it all at once.
Watch for the float to rise and trigger the pump activation. Confirm the pump starts promptly, moves water effectively, and shuts off cleanly when the water level drops. Time the pump’s response to confirm it activates before the water level reaches an overflow point.
Detailed step-by-step testing instructions are covered in the dedicated section below. Always consult your pump’s manual for any model-specific testing procedures before conducting a test.
Check the Discharge Pipe
The discharge pipe carries pumped water from the pump to the exterior discharge point. It must be clear, properly sloped, and free of any blockages that prevent water from exiting the system.
Trace the discharge pipe from the pump to where it exits the home. Look for any visible kinks, loose connections, or sections that sag in a way that could trap water. Confirm that all pipe connections are secure and show no signs of leaking.
Inspect the Check Valve
The check valve is a one-way valve in the discharge line that prevents water from flowing back down the pipe into the pit when the pump stops. Without a functioning check valve, water returns to the pit after each pump cycle, causing the pump to run more frequently than necessary and wearing it out prematurely.
Listen for water returning to the pit in the seconds after the pump shuts off during your test. A small amount of settling is normal. Significant water flowing back audibly or the pump reactivating very quickly after shutting off suggests a check valve that is failing to close properly. A leaking or stuck-open check valve needs replacement. This repair is within homeowner capability for accessible valve locations using basic plumbing tools.
Check the Discharge Outlet
Go outside and locate the point where the discharge pipe exits the home. It should be visible at the foundation wall or emerging from the ground several feet from the foundation. Confirm it is not blocked by overgrown vegetation, compacted soil, frozen material in winter, or nesting pests.
During your pump test, watch for water to emerge from the discharge outlet promptly after the pump activates. Water that does not appear at the outlet despite the pump running suggests a blockage or disconnection somewhere in the discharge line that must be located and corrected.
Inspect the Power Cord
Visually inspect the entire length of the pump’s power cord from the pump to the outlet. Look for any damage to the cord insulation including cracks, cuts, fraying, or areas where the cord shows burn marks or discoloration.
Never use a pump with a damaged power cord. Damaged electrical cords in a wet basement environment present a serious shock hazard. If the cord is damaged, the pump needs professional repair or replacement. Do not attempt to splice or repair electrical cords yourself.
Check the Electrical Connection
The pump should be plugged into a dedicated, ground fault circuit interrupter (GFCI) protected outlet. Confirm the outlet is a GFCI type, which has test and reset buttons visible on the outlet face. Test the GFCI function by pressing the test button and confirming the outlet loses power, then pressing reset to restore it.
The pump should never be plugged into an extension cord for regular operation. Extension cords in basement environments can create fire and shock hazards, particularly when exposed to moisture. If the pump’s cord does not reach a properly positioned outlet, have an electrician install an appropriate outlet closer to the pump location.
Test the Backup Power System
A sump pump that lacks a backup power source is vulnerable during exactly the type of severe storm that is most likely to cause flooding. Power outages frequently accompany the heavy rain events that drive the most significant basement flooding risk.
Test your backup system during your annual inspection and again before any predicted major storm. For battery backup systems, verify the backup pump activates when the primary pump is unplugged or when the battery backup is triggered manually according to the manufacturer’s instructions.
Inspect the Battery Backup
Battery backup systems typically use deep-cycle marine batteries or sealed absorbed glass mat batteries. These batteries have a finite service life and must be replaced on a schedule recommended by the backup system manufacturer, commonly every three to five years depending on the battery type and usage.
Check the battery terminals for corrosion, which appears as white or blue-gray crystalline buildup. Clean minor corrosion with a battery terminal cleaner or a solution of baking soda and water applied carefully with a brush, followed by thorough rinsing and drying. Significant corrosion or a battery that will not hold a charge needs replacement.
Check the battery’s charge indicator if the backup system includes one. Confirm the backup system’s charger is connected and functioning, keeping the battery topped up between uses.
Check the Sump Pump Cover
Many sump pits are covered with a plastic or plywood lid that prevents debris from falling in, reduces humidity transfer from the pit to the basement air, and helps prevent children and pets from accessing the open pit.
Inspect the cover for cracks, warping, or damage. Confirm it fits securely over the pit opening. A properly fitting cover also reduces radon migration if radon is a concern in your area, since the pit is a potential pathway for soil gases.
Listen for Unusual Noises
Run the pump through a complete test cycle and listen carefully to its operational sound. A healthy pump runs with a consistent, smooth motor sound and water flow noise that stops cleanly when the pump shuts off.
Grinding, rattling, or clanking sounds suggest debris in the impeller or a worn impeller. A humming sound without water movement suggests the pump is receiving power but not moving water, which may indicate a seized impeller or motor. Gurgling sounds after the pump shuts off are typically the check valve closing, which is normal.
Check for Excessive Vibration
Some vibration during pump operation is normal. Excessive vibration that causes the pump to move in the pit, shake the discharge pipe connections, or produce unusual vibration-related noise suggests an imbalanced or damaged impeller.
A pump vibrating excessively can gradually work connections loose, which creates leak points in the discharge line. If excessive vibration is present after clearing any obvious debris from the intake, have a plumber evaluate the pump’s impeller condition.
Inspect for Water Leaks
After testing, inspect the discharge pipe connections, the check valve connections, and the area around the pump for any water that has escaped the system during operation. Small drips at pipe joints often indicate fittings that have loosened over time or thread seals that have deteriorated.
Address any leak points in the discharge piping before the next operational event. Even small leaks indicate connection failure that will worsen under the higher flow conditions of a real flooding event.
Record the Maintenance Date
After completing every maintenance session, write down the date, the tasks performed, any observations about the pump’s condition, and the planned date for the next inspection. Affix this record to the pump or store it with your home maintenance documentation.
This log serves multiple purposes. It confirms the pump has been maintained if you ever need to support an insurance claim. It tracks battery replacement history. And it provides the baseline information a plumber needs if the system ever requires professional service.
How to Test a Sump Pump
Testing your sump pump is one of the most important things you can do as a homeowner and takes less than ten minutes.
Step 1: Confirm the pump is plugged into a functioning GFCI-protected outlet and the circuit breaker for the outlet is on.
Step 2: Locate the pump discharge outlet outside the home so you can observe water emerging during the test.
Step 3: Fill a five-gallon bucket with water and carry it to the sump pit.
Step 4: Slowly pour the water into the pit, watching the float rise as the water level increases.
Step 5: Continue pouring until the float reaches its activation trigger point and the pump turns on.
Step 6: Confirm water is emerging from the exterior discharge outlet.
Step 7: Allow the pump to run until the water level drops and the pump shuts off automatically.
Step 8: Confirm the pump stops cleanly and does not restart repeatedly within a short period, which would suggest backflow from a failing check valve.
Step 9: Document the test results in your maintenance log.
Always consult your specific pump’s manual before testing. Some manufacturers have model-specific testing procedures or cautions that apply to their equipment.
How to Clean a Sump Pump
Cleaning the sump pump system annually removes the accumulated sediment and debris that reduces performance and accelerates wear.
Before you begin: Disconnect the pump from its power source at the outlet or turn off the circuit breaker. Never work on or around the pump with power connected.
Cleaning the pit: Use a wet-dry vacuum to remove standing water and loose debris from the bottom of the pit. A garden trowel can help loosen compacted sediment for vacuum removal. Wipe down the pit walls with a damp cloth if significant grime is present.
Cleaning the pump: Lift the pump out of the pit according to your manual’s instructions. Rinse the pump exterior and intake screen with a garden hose using low pressure. Use a soft brush to dislodge any debris from the intake area. Never submerge the pump motor housing in water or use high-pressure spray near electrical connections.
Reinstalling: Return the pump to its correct position in the pit. Ensure the float switch has adequate clearance to move freely. Reconnect the discharge pipe if it was disconnected during cleaning. Restore power and run a test cycle to confirm the system is functioning correctly after cleaning.
If you notice the pump motor housing is damaged, the electrical connections show burn marks, or the pump impeller appears damaged during cleaning, stop and call a plumber. These conditions require professional evaluation before the pump is returned to service.
Sump Pump Maintenance Before Heavy Rain
When a significant rain event is predicted for your area, take thirty minutes to confirm your system is ready before it is needed.
- Run a bucket test to confirm the pump activates and discharges correctly
- Check that the discharge outlet is clear and unobstructed
- Confirm the backup battery charge level is adequate
- Ensure the pit cover is in place to prevent debris from entering during heavy rain
- Check that the power outlet is functioning and the GFCI is active
- Confirm there are no kinks or blockages in the discharge line visible from inside
- If you have a battery backup pump, verify it is ready for activation
These pre-storm checks take very little time and provide meaningful confidence that the system will perform when the rain arrives.
Sump Pump Maintenance Before Winter
Winter creates specific challenges for sump pump systems that warrant attention before temperatures drop.
The primary winter risk is the discharge line freezing. If the discharge pipe freezes, pumped water has nowhere to go and will back up into the pit, eventually overflowing into the basement. Discharge pipes that exit the foundation near grade level are particularly vulnerable to freezing.
Before winter, confirm the discharge pipe is properly sloped away from the house so any remaining water drains out by gravity rather than sitting in the pipe where it can freeze. In very cold climates, insulating the portion of the discharge pipe nearest the exterior wall reduces freezing risk.
If your home has a seasonal high water table that makes the pump dormant during winter, confirm the pump remains plugged in and functional throughout the season. Snowmelt creates significant water infiltration risk in late winter and early spring. Refer to the Winter Home Maintenance Checklist for a comprehensive framework of winter preparation tasks that includes sump pump readiness alongside other cold-weather priorities.
Sump Pump Maintenance After a Storm
After any significant rain event, particularly one that required heavy pump activity, perform a post-storm check to assess system condition.
- Inspect the pit for unusual debris that entered during the storm
- Check that the discharge outlet is clear and has not become blocked by storm debris
- Run a brief test to confirm the pump is still functioning correctly
- Check the discharge piping for any connections that loosened under the high-volume flow conditions of the storm
- Inspect the battery backup charge level if the system was used during the event
- Note any unusual behavior observed during the storm for follow-up evaluation
Sump Pump Backup Options
Battery Backup Sump Pump
A battery backup sump pump is the most common and most reliable backup option for residential applications. It consists of a separate pump installed in the sump pit alongside the primary pump, connected to a deep-cycle battery that the system keeps continuously charged.
When the primary pump fails or when power is lost, the battery backup pump activates automatically and continues moving water as long as the battery holds charge. Battery life during active pumping depends on battery capacity and how hard the pump is working, but most systems provide several hours to a full day of backup pumping capacity under typical conditions.
Battery backup systems require their own maintenance schedule including annual battery charge testing and battery replacement every three to five years as recommended by the manufacturer.
Water-Powered Backup Pump
A water-powered backup pump uses your home’s incoming water pressure to drive a venturi effect that draws water from the sump pit and ejects it through the discharge system. It requires no electricity and no battery, making it completely immune to power outages.
The tradeoff is that water-powered backup pumps consume fresh municipal water during operation and are not suitable for homes on well water systems where pumping requires electricity. They also require adequate incoming water pressure to function effectively. Check local water utility regulations before installing a water-powered backup, as some utilities restrict their use.
Portable Backup Pump
A portable submersible pump can serve as an emergency backup option if installed manually during a flooding event. While not an automatic system, a portable pump provides a low-cost option for homeowners who want a last resort backup without the expense of a dedicated backup system.
Portable pumps require that someone be present to deploy them during an event, which limits their effectiveness during unexpected off-hours flooding.
DIY vs Professional Sump Pump Maintenance
| Task | DIY Appropriate | Professional Required | Notes |
|---|---|---|---|
| Annual pit inspection and cleaning | Yes | No | Disconnect power first |
| Float switch testing | Yes | No | Lift float manually |
| Bucket test (pump activation test) | Yes | No | Consult pump manual |
| Intake screen cleaning | Yes | No | Disconnect power first |
| Check valve inspection | Yes | No | Visual and listen for backflow |
| Check valve replacement (accessible) | Experienced DIY | Recommended | Basic plumbing skills required |
| Discharge pipe inspection | Yes | No | Trace full length |
| Discharge pipe blockage clearing (accessible) | Yes | Optional | Professional for internal blockages |
| Battery backup charge test | Yes | No | Follow manufacturer instructions |
| Battery terminal cleaning | Yes | No | Safety glasses and gloves |
| Battery replacement | Yes | No | Match battery specification |
| GFCI outlet testing | Yes | No | Test and reset button procedure |
| Power cord visual inspection | Yes | No | Do not touch damaged cords |
| Power cord repair or replacement | No | Yes | Licensed electrician |
| Electrical outlet installation | No | Yes | Licensed electrician |
| Pump motor replacement or repair | No | Yes | Licensed plumber or pump specialist |
| Impeller repair or replacement | No | Yes | Internal pump component |
| Float switch replacement | Experienced DIY | Recommended | Disconnect power first |
| Discharge pipe re-routing | Experienced DIY | Recommended | Plumbing knowledge required |
| Full pump replacement | No | Yes | Licensed plumber |
Essential Sump Pump Maintenance Tools
| Tool | Purpose | Recommended Use | Estimated Cost |
|---|---|---|---|
| Wet-dry vacuum | Removing water and debris from sump pit | Annual cleaning | $30 – $150 |
| Five-gallon bucket | Delivering water for pump activation test | Quarterly test | $5 – $10 |
| Flashlight or headlamp | Inspecting pit and pit components | Every inspection | $15 – $60 |
| Soft bristle brush | Cleaning intake screen and pump exterior | Annual cleaning | $5 – $15 |
| Garden hose with low-pressure nozzle | Rinsing pump exterior during cleaning | Annual cleaning | $20 – $60 |
| Battery terminal cleaner | Removing corrosion from backup battery terminals | Annually or as needed | $5 – $15 |
| Multimeter | Testing battery charge level | Annual backup inspection | $15 – $60 |
| Safety glasses and rubber gloves | Hand and eye protection during cleaning | Every maintenance session | $10 – $25 |
| Pliers and screwdrivers | Accessing pit cover, adjusting float, minor fittings | As needed | $10 – $30 |
| Pipe wrench | Check valve or discharge pipe fitting work | As needed | $15 – $40 |
| Notebook or maintenance log | Recording inspection dates and findings | Every maintenance session | $3 – $10 |
| Backup pump test kit | Testing backup pump activation | Per manufacturer instructions | Included with system |
For a complete guide to building your home maintenance tool collection, the Home Maintenance Tools Every Homeowner Needs article covers everything from basic hand tools to specialty plumbing and inspection equipment.
Sump Pump Maintenance Schedule
| Task | Monthly | Quarterly | Seasonally | Annually |
|---|---|---|---|---|
| Visual pit inspection | Recommended | Required | Required | Required |
| Bucket activation test | Optional | Required | Required | Required |
| Float switch manual test | Optional | Required | Required | Required |
| Discharge outlet check | Optional | Required | Required | Required |
| Check valve function test | Optional | Required | Required | Required |
| GFCI outlet test | Required | Required | Required | Required |
| Power cord visual inspection | Optional | Required | Required | Required |
| Pit cleaning (vacuum and wipe) | N/A | N/A | N/A | Required |
| Intake screen cleaning | N/A | Optional | Required | Required |
| Pump exterior cleaning | N/A | N/A | N/A | Required |
| Battery charge level check | N/A | Required | Required | Required |
| Battery terminal inspection | N/A | N/A | Required | Required |
| Full backup system test | N/A | Required | Required | Required |
| Discharge pipe full trace | N/A | N/A | Required | Required |
| Pre-storm system check | Before significant rain events | – | – | – |
| Post-storm system check | After significant rain events | – | – | – |
| Battery replacement | Per manufacturer schedule (typically every 3 to 5 years) | – | – | – |
Common Sump Pump Problems
| Problem | Common Causes | DIY Solution | Call Professional |
|---|---|---|---|
| Pump won’t turn on | Power loss, stuck float, failed switch | Check outlet, free float | If motor is faulty |
| Pump runs continuously | Stuck float, high water table, failed switch | Free float, check drainage | If switch replacement needed |
| Loud grinding noise | Debris in impeller, worn impeller | Clear intake debris | If impeller is damaged |
| Excessive vibration | Imbalanced or damaged impeller | Clear intake debris | If vibration persists |
| Slow water removal | Clogged intake, failing motor | Clean intake screen | If motor output is reduced |
| Discharge pipe blocked | Ice, debris, collapsed section | Clear accessible blockage | If pipe is collapsed or internal |
| Pit fills rapidly | High water table, drain tile issue | Monitor frequency | If water table is the cause |
| No power to pump | Tripped breaker, failed GFCI, cord damage | Reset breaker or GFCI | If wiring is damaged |
| Backup pump does not work | Dead battery, failed backup unit | Replace battery | If backup unit is faulty |
Sump Pump Won’t Turn On
When the pump fails to activate despite rising water in the pit, start with the simplest checks before assuming motor failure. Confirm the pump is plugged in. Check that the outlet GFCI has not tripped. Reset the circuit breaker if needed.
If power is confirmed and the pump still does not run, test the float switch manually. A float stuck in the down position by debris or a kinked float arm will prevent activation even when the water level is high. If float adjustment does not resolve the problem, the pump motor or switch may have failed and requires professional assessment.
Sump Pump Runs Continuously
A pump that never shuts off is almost always a float switch problem. The float may be stuck in the up position due to binding against the pit wall, a kinked float arm, or debris preventing it from dropping when the water level recedes.
Check the float’s position and free it from any obstruction. If the float is functioning correctly but the pump continues running, the water table in your area may currently be unusually high, causing the pit to refill as fast as the pump evacuates it. In that case, continuous operation is the expected response. If the pump runs continuously with no water in the pit, the switch has failed and needs replacement.
Sump Pump Makes Loud Noises
Grinding, rattling, or clanking during operation points to debris in the impeller or a damaged impeller. Disconnect power to the pump and remove it from the pit. Check the intake and impeller housing for debris that can be removed carefully by hand.
If the noise returns after clearing debris, the impeller may be physically damaged and the pump needs professional repair or replacement.
Sump Pump Vibrates Excessively
Some vibration is inherent in pump operation. Vibration severe enough to shake the discharge pipe connections or move the pump out of position indicates an impeller that is imbalanced due to debris accumulation or physical damage.
After clearing the intake screen and testing again, if excessive vibration persists, the impeller condition needs professional evaluation.
Sump Pump Removes Water Slowly
Reduced flow rate is typically caused by a partially clogged intake screen, a failing motor that is losing efficiency, or a partial blockage in the discharge line. Clean the intake screen and trace the discharge pipe for any partial blockage points.
If cleaning does not restore normal flow, and the pump is several years old, declining motor performance may indicate the unit is approaching end of service life.
Sump Pump Discharge Pipe Is Blocked
A fully blocked discharge pipe means pumped water has nowhere to go and backs up into the pit, potentially overflowing into the basement. The most common blockage causes are ice in winter, debris at the exterior outlet, or debris that has entered the pipe from outside.
Clear the exterior outlet by removing any visible obstruction. If the blockage cannot be reached from the exterior and is inside the pipe, a plumber with appropriate tools needs to locate and clear it.
Sump Pit Fills With Water
A sump pit that fills unusually quickly during rain events may reflect a seasonal high water table rather than a pump problem. However, if the pit fills rapidly even during dry periods, there may be a drainage tile issue directing groundwater into the pit at an abnormal rate.
Monitor the fill rate over several weeks across different weather conditions. If abnormal filling persists regardless of weather, consult a basement waterproofing specialist to evaluate the drainage tile system.
Sump Pump Has No Power
If the pump is unresponsive and has no apparent power, check the outlet first. Test the GFCI by pressing the reset button. Check the circuit breaker panel for a tripped breaker. Plug another device into the outlet to confirm it has power.
If the outlet has power and the pump still does not respond, and the power cord appears undamaged, the pump motor may have failed. Do not attempt to open or repair electrical components inside the pump. Call a plumber or pump specialist.
Backup Pump Does Not Work
When the backup pump fails to activate during testing, check the battery charge level with a multimeter. A battery that reads below twelve volts under load has insufficient charge or has failed and needs replacement.
If the battery tests adequately charged but the backup pump still does not activate, the backup system’s sensing mechanism or pump itself may have failed. Replace the battery first, as this resolves the majority of backup system failures. If the problem persists after battery replacement, call a professional.
Common Sump Pump Maintenance Mistakes
Even homeowners with the best intentions make maintenance errors that leave the system less reliable than it should be.
Not testing the pump before storm season. The time to discover the pump does not work is during a dry inspection, not during a basement flood event. Test every spring without exception.
Forgetting the backup system. Many homeowners maintain the primary pump and completely overlook the backup. A primary pump failure during a power outage, which is exactly when severe storms knock out electricity, leaves you entirely dependent on the backup. Test and maintain the backup system with the same discipline as the primary pump.
Allowing debris to accumulate in the pit indefinitely. An uncleaned pit develops sediment layers that progressively clog the intake and make the pump work harder. Annual pit cleaning is simple and takes less than an hour.
Ignoring the discharge outlet. A pump that is running perfectly but discharging into a blocked outlet is not protecting the basement. Check the exterior discharge point seasonally.
Using an extension cord for permanent pump power. Extension cords in basement environments with moisture present create real fire and electrical shock hazards. If the pump outlet placement requires an extension cord, have an electrician install a properly positioned outlet.
Skipping battery replacement on the scheduled interval. Backup batteries degrade with age regardless of how often they are used. A battery that passes a voltage test at year two may fail under the load of actual pump operation at year five. Replace batteries on the manufacturer’s recommended schedule.
How to Extend the Life of a Sump Pump
Consistent habits significantly extend the service life of pump components and reduce total cost of ownership over time.
- Clean the pit and pump intake annually without exception
- Test the pump quarterly to confirm it activates and shuts off correctly
- Keep the discharge pipe clear and properly sloped away from the home
- Maintain the check valve to prevent backflow that causes unnecessary pump cycling
- Ensure the pump is always connected to a functioning GFCI-protected dedicated outlet
- Address unusual noises, vibration, or performance changes at the first occurrence
- Maintain the battery backup system on the manufacturer’s replacement schedule
- Install a pump alarm that sounds if the water level rises above normal operating range without the pump activating
How to Prevent Basement Flooding
A sump pump is your last line of defense, not your only defense. A comprehensive approach to basement flood prevention reduces the demand on the pump and protects the basement even if the pump experiences a problem.
- Maintain gutters and downspouts to direct roof water away from the foundation
- Ensure the soil grade around the home slopes away from the foundation on all sides
- Extend downspout discharge at least four to six feet from the foundation
- Seal any visible foundation cracks before the wet season
- Consider installing window well covers over basement window wells in areas with heavy rainfall
- Keep the sump pit covered to prevent debris entry and reduce humidity migration
- Install a water alarm in the basement that alerts you to rising water before it reaches floor level
The EPA emphasizes that proper grading, drainage management, and foundation sealing are essential components of any effective basement moisture control strategy, working together with mechanical systems like sump pumps rather than serving as replacements for them.
For a comprehensive view of home maintenance practices that protect against water damage across all systems, the Home Plumbing Maintenance: Complete Guide for Homeowners provides a thorough framework for managing every aspect of residential water management.
Sump Pump Maintenance Costs
All cost estimates below represent general ranges for planning purposes. Actual costs vary significantly based on location, pump type, system complexity, labor rates, and the specific parts and repairs involved. Always obtain written quotes from licensed professionals before authorizing service.
| Service or Task | DIY Cost | Professional Cost | Notes |
|---|---|---|---|
| Annual inspection and cleaning | $0 – $20 (supplies) | $100 – $250 | Professional annual service |
| Float switch replacement | $15 – $40 (parts) | $100 – $200 | DIY accessible with power disconnected |
| Check valve replacement | $10 – $30 (parts) | $75 – $175 | Accessible location DIY possible |
| Battery backup replacement | $60 – $200 (battery) | $100 – $300 (installed) | Match manufacturer specification |
| Discharge pipe repair or rerouting | $20 – $60 (materials) | $150 – $400 | Professional for complex rerouting |
| Sump pit cleaning | $0 (wet-dry vacuum) | $100 – $200 | Part of professional annual service |
| Submersible pump replacement | $80 – $250 (pump) | $250 – $600 (installed) | Installed cost varies by pump type |
| Battery backup system installation | $200 – $500 (system) | $400 – $800 (installed) | Full backup system with battery |
| Water-powered backup installation | $100 – $300 (unit) | $200 – $500 (installed) | Requires adequate water pressure |
| GFCI outlet installation | N/A | $150 – $300 | Licensed electrician |
| Drainage tile inspection | N/A | $200 – $500 | Specialized basement waterproofing |
| Full basement waterproofing system | N/A | $3,000 – $15,000+ | Major waterproofing project |
When to Replace a Sump Pump
Sump pumps do not last indefinitely. Most residential submersible pumps have a service life that varies based on pump quality, usage intensity, maintenance history, and operating conditions. There is no universal lifespan that applies to all pumps, so rather than relying on a fixed age threshold, watch for these indicators that replacement is the right decision.
- The pump is activating more frequently than in previous seasons without a corresponding increase in rainfall
- Performance has noticeably declined and cleaning does not restore flow rate
- The pump motor makes sounds it did not produce when newer, including grinding, humming without water flow, or rattling that persists after intake cleaning
- The pump requires increasingly frequent repairs with escalating costs
- The pump repeatedly fails to activate despite float switch function being confirmed
- The pump has no backup capability and is approaching an age where reliability concerns are warranted
When replacement is indicated, consult a licensed plumber to select a pump with appropriate capacity for your pit size, drainage tile volume, and local water table conditions. Do not simply purchase the least expensive available replacement. Proper pump sizing is critical to system performance.
When to Call a Professional
Contact a licensed plumber or sump pump specialist when:
- The pump motor appears to have failed despite power being confirmed at the outlet
- Any electrical component, wiring, or cord shows damage
- The discharge pipe requires modification, rerouting, or has an inaccessible internal blockage
- The check valve replacement is in a location requiring pipe disassembly beyond your comfort level
- The backup system fails testing and battery replacement does not resolve the problem
- Water is actively entering the basement above the sump pit level
- The pump is making noises that suggest internal impeller or motor damage
- You are not confident about any aspect of the maintenance work you have begun
- The system requires a new pump selected and sized for your specific conditions
Connecting sump pump maintenance to your complete home care routine ensures it receives consistent attention throughout the year. The Annual Home Maintenance Checklist and the DIY Home Inspection Checklist both provide comprehensive frameworks that integrate sump pump care with whole-home maintenance planning.
Expert Recommendations
After working with basement water management systems in a wide range of climates, soil conditions, and home designs, a few recommendations consistently produce the best outcomes for homeowners.
Test the pump at least quarterly, not just annually. An annual test tells you the pump worked once per year. Quarterly testing gives you four data points and dramatically increases the chance of catching a developing problem before a storm event reveals it through a basement flood.
Take the backup system as seriously as the primary pump. The entire value of a backup system is realized only when the primary fails or power goes out. A backup system with a dead battery or a failed unit provides exactly zero protection at that moment. Test and maintain it with the same discipline as the primary pump.
Clean the pit annually without fail. Sediment accumulation is invisible until it clogs the intake and the pump starts struggling. Annual cleaning is simple, takes less than an hour, and prevents a category of pump problems that are entirely avoidable.
Keep a maintenance log from the day you move in. Document every test, every cleaning, every battery replacement, and every service call. This record tells you how often the pump runs, whether frequency is changing over time, and when components are due for replacement. It is also valuable documentation if you ever need to support a water damage insurance claim.
Invest in a quality battery backup system before you need it. Installing a backup system during a calm dry season is infinitely more straightforward than trying to source and install one when a major storm is predicted for tomorrow. Plan ahead.
Building sump pump maintenance into your complete home care calendar alongside other seasonal priorities ensures consistent attention year after year. The Ultimate Home Maintenance Checklist for Every Season provides the comprehensive framework that integrates sump pump care with every other system your home depends on.
Frequently Asked Questions
How do I know if my sump pump is working correctly?
The most reliable confirmation is a successful bucket test where you pour water into the pit, the float rises and activates the pump, water discharges properly from the exterior outlet, and the pump shuts off cleanly when the water level drops. Beyond the test, indicators of correct operation include the pump activating during rain events and shutting off after they pass, the pit not reaching overflow level during normal rain, and the backup system showing an adequate battery charge. Unusual sounds, slow water removal, the pump running continuously, or finding water in the basement after rain events all suggest the system needs attention.
What causes a sump pump to fail during a storm?
The most common causes of storm-time pump failure are power outages that cut electricity to the pump, float switches stuck by debris that prevent automatic activation, intake screens clogged with sediment that prevent adequate water intake, check valves stuck open that allow constant backflow causing excessive cycling, and pump motors that have reached end of life and fail under the sustained load of a storm event. Discharge pipe freezing in winter is another common failure mode. Each of these failure modes is addressable through regular maintenance, which is why pre-season testing is so important for storm preparedness.
How long can a battery backup sump pump run during a power outage?
Battery backup run time depends on the backup system’s battery capacity and how hard the pump is working during the outage. Under light to moderate pumping conditions, most residential battery backup systems can operate for several hours to a full day on a fully charged battery. Under heavy pumping conditions in severe flooding events, run time may be shorter. Battery capacity declines with age, so a battery that provided six hours of backup at installation may provide significantly less at year four or five. Follow the manufacturer’s replacement schedule to maintain rated backup capacity throughout the battery’s intended service period.
Can I install a sump pump myself?
Basic sump pump replacement, swapping a failed pump for a properly matched new unit in an existing pit with an existing discharge line and outlet, is within the capability of an experienced DIYer comfortable with basic plumbing connections. However, new sump pit excavation, new discharge line routing through the foundation, drainage tile installation, and electrical outlet installation all require professional expertise and in most areas, licensed tradespeople and permits. Improper discharge line installation that routes water to an inappropriate location can create drainage problems for neighboring properties and may violate local codes. For anything beyond a straightforward pump swap in a complete existing system, professional installation is the right approach.
Should I use a pedestal or submersible sump pump?
Submersible pumps are the current standard for most residential applications and are generally preferred over pedestal pumps. Submersible pumps sit inside the pit completely enclosed and operate quieter than pedestal designs. They are designed to handle water and some solid particles without damage. They also make it easier to cover the pit completely, which reduces moisture evaporation and improves pit hygiene. Pedestal pumps have the motor above the pit, making the motor more accessible for maintenance, which was a greater advantage in older designs. Most plumbing professionals recommend submersible pumps for new installations and replacements in existing systems.
What should the discharge pipe slope be for my sump pump?
The discharge pipe should slope continuously downward from the pump outlet to the exterior discharge point with no low spots or horizontal runs that can trap water. Standing water in the discharge pipe is a freeze risk in winter and can promote backflow when the pump shuts off if the check valve is not perfectly sealed. The pipe should also be properly supported along its length to prevent sagging that creates trapped water sections over time. At the exterior, the discharge outlet should be positioned to direct water away from the foundation, away from neighboring properties, and away from any location where standing water creates a problem.
How far from the house should the sump pump discharge?
The discharge outlet should direct water far enough from the foundation that it cannot percolate back into the soil near the foundation and re-enter the drainage tile system. Most recommendations suggest a minimum of ten feet from the foundation, though local codes may specify different requirements. The discharge point should be on a slope that carries water further away naturally after it exits the pipe. Discharging directly against a fence, neighboring property, or downslope toward a neighbor’s drainage can create problems that extend beyond your property. Check local regulations and consult a plumber if you are unsure about appropriate discharge placement for your specific property layout.
What is the difference between a primary sump pump and a backup sump pump?
The primary sump pump is the main electric pump that handles normal water management under all typical conditions. It is powered by household current and activates automatically through its float switch whenever water rises to the trigger level. A backup sump pump is a secondary system that activates only when the primary fails or when power is lost. Backup pumps are powered by battery or by municipal water pressure rather than household electricity, making them functional during power outages. Together they create a redundant system where the backup provides continued protection during exactly the conditions when the primary is most likely to be challenged.
Why does my sump pump smell bad?
Odors from the sump pit typically result from stagnant water, sediment decomposition, or bacterial growth in the pit. A pit that maintains a small amount of standing water permanently can develop odors over time, particularly during warm weather when bacterial activity is higher. Annual pit cleaning removes the accumulated organic matter that produces odors. Keeping the pit covered reduces the transfer of odors to the basement air. In some cases, a small amount of household bleach diluted in water and poured into the pit can address bacterial odors temporarily, but thorough cleaning is the more effective long-term solution. If the odor is a sulfur or sewage smell, consult a plumber to rule out any sewage system connection.
How do I know if my sump pit is the right size for my home?
Sump pit size affects how much time the pump has to respond to rising water and how frequently the pump must cycle to maintain the water level. A pit that is too small for the drainage tile volume it serves will fill very rapidly, causing frequent short pump cycles that accelerate motor wear. Standard residential sump pits are typically eighteen to twenty-four inches in diameter and twenty-four to thirty-six inches deep. If your pump cycles very frequently, the pit fills almost immediately during rain events, or the pump cannot keep up with inflow during moderate rain, consult a basement waterproofing specialist about whether the pit size is adequate for your home’s drainage system.
Conclusion
Your sump pump is a quiet, unassuming piece of equipment that most homeowners never think about until something goes wrong. That is exactly the pattern that leads to flooded basements, damaged belongings, and expensive remediation work.
The maintenance practices in this guide are straightforward and genuinely within homeowner capability for most of the key tasks. Testing quarterly, cleaning annually, maintaining the backup system, and checking the discharge line seasonally represent a modest investment of time that produces significant protection for your home and peace of mind before every storm.
Know the boundary between owner maintenance and professional work. Electrical problems, motor failures, and significant discharge system modifications require a licensed professional. Respecting that boundary keeps you safe and ensures the repairs are done correctly.
Build sump pump maintenance into your broader home care routine so it receives consistent attention alongside every other system your home depends on. The Home Maintenance Checklist by Month provides the practical monthly scheduling framework that keeps sump pump tasks from being overlooked between the bigger seasonal maintenance windows.
Your basement, your foundation, and your belongings are worth a few hours of maintenance each year. Give your sump pump the attention it needs, and it will give you the protection you depend on every time the rain comes.