How to Repair a Loose Cabinet Door (DIY Fix)

How to Repair a Loose Cabinet Door
Cabinet doors take a lot of daily punishment. Every time you open and close a cabinet in your kitchen or bathroom, the hinges, screws, and wood around them absorb a small amount of stress. Over months and years, that repeated motion adds up.
A loose cabinet door is one of the most common home repair issues homeowners deal with, and the good news is that most cases have a straightforward fix. In many situations, the problem comes down to a few loose screws, a hinge that needs adjustment, or a screw hole that has worn out over time.
That said, not every loose cabinet door is a quick five-minute fix. Severely stripped wood, broken hinges, damaged cabinet frames, or MDF cabinets that have swollen from moisture require a more careful approach, and sometimes professional help.
This guide walks you through how to diagnose the problem accurately, choose the right repair method, and fix your cabinet door properly so it stays secure. Whether you are dealing with a kitchen cabinet that sags or a bathroom cabinet door that refuses to close, the steps here will help you understand what is happening and what to do about it.
Why Do Cabinet Doors Become Loose?
Understanding why a cabinet door becomes loose helps you choose the right repair the first time rather than applying a temporary fix that fails again in a few weeks.
Loose hinge screws are the most common cause. Over time, screws gradually back out of the wood as the door is opened and closed repeatedly. Even quality installations loosen with enough use.
Stripped screw holes happen when screws spin without gripping. This often develops gradually, as slightly loose screws work the wood fibers around the hole until the hole becomes too large for the screw to bite.
Worn or damaged hinges lose their structural integrity through regular use. Hinges that are bent, cracked, or corroded no longer hold the door in proper alignment.
Misaligned hinges can develop when one screw loosens more than the others or when the cabinet frame itself shifts slightly. Misalignment puts uneven stress on the door and the remaining fasteners.
Heavy cabinet doors made from solid wood or fitted with heavy glass panels place more constant downward stress on hinges than lighter doors do. This accelerates loosening over time.
Cabinet wood damage from moisture, age, or impact can cause the wood around the hinge mounting points to soften, compress, or crack, reducing the holding power of every screw in that area.
Signs of a Loose Cabinet Door
A loose cabinet door usually makes itself known in several ways before it becomes a serious problem. Recognizing the early signs allows you to make a simple repair before more damage develops.
A door that sags visibly or sits crooked when closed is one of the clearest signs. You may notice an uneven gap along one edge of the door, or the door may rub against an adjacent cabinet door when you try to open or close it.
A door that will not close fully, or that springs open on its own after you push it shut, often points to a hinge alignment issue. A door that catches or sticks on the cabinet frame while opening or closing suggests the same.
Screws that spin without tightening when you try to drive them in are a sign of a stripped screw hole. This is worth addressing promptly, because continuing to drive a stripping screw causes further damage to the surrounding wood.
Tools and Materials You Need
| Tool or Material | Purpose | Recommended Use | Estimated Cost |
|---|---|---|---|
| Screwdriver (flathead and Phillips) | Tightening and removing screws | All repairs | $5 – $20 |
| Drill | Driving screws, drilling repair holes | All repairs | $30 – $120 |
| Drill Bits | Pilot holes and repair work | All repairs | $5 – $25 |
| Wood Screws (various sizes) | Replacing stripped or short screws | Stripped hole repairs | $3 – $10 |
| Cabinet Hinge Screws | Replacement fasteners for hinges | Hinge repairs | $3 – $10 |
| Wood Glue | Reinforcing wood fiber repairs | Stripped hole repairs | $5 – $10 |
| Wood Filler | Filling damaged wood before re-drilling | Minor wood damage | $5 – $10 |
| Toothpicks or Wood Slivers | Adding wood material to stripped holes | Minor stripped holes | Under $2 |
| Wood Dowels | Substantial stripped hole repairs | Larger stripped holes | $3 – $8 |
| Level | Checking door and hinge alignment | Alignment checks | $5 – $30 |
| Tape Measure | Measuring hinge placement | Hinge replacement | $5 – $20 |
| Pencil | Marking hinge positions | Hinge replacement | Under $1 |
| Clamps | Holding wood repairs while glue sets | Wood repairs | $10 – $30 |
| Cleaning Cloth | Cleaning hinge and wood surfaces | All repairs | Under $2 |
The tools and materials you actually need will depend on the specific problem you are dealing with. A simple tightening job requires only a screwdriver. A stripped screw hole repair requires additional materials. Always assess the problem before gathering supplies.
Types of Cabinet Hinges
Identifying the type of hinge on your cabinet door before attempting any repair saves time and prevents mistakes. Different hinge types have different adjustment mechanisms, different screw configurations, and different replacement options.
Concealed hinges, also called cup hinges or European hinges, are the most common type on modern cabinets. The hinge mechanism sits inside a round cup drilled into the back of the cabinet door, making it invisible from the front. Most concealed hinges have built-in adjustment screws for side-to-side, up-and-down, and in-and-out positioning.
Overlay hinges are a specific category of concealed hinge designed for doors that sit on the outside of the cabinet frame rather than inside it. The overlay measurement determines which hinge is compatible with your door.
Inset hinges are used on doors that sit flush inside the cabinet frame opening. They require precise installation and adjustment because even a small misalignment is visible from the front.
Surface-mount hinges are visible on both the door and the cabinet frame. They are common on older cabinets and some traditional-style kitchens. They are generally easier to replace because they do not require drilling into the door itself.
Knowing which type you have tells you whether your hinge has adjustment screws, what replacement hardware to purchase, and what tools the repair will require.
How to Repair a Loose Cabinet Door Step by Step
Step 1: Inspect the Cabinet Door
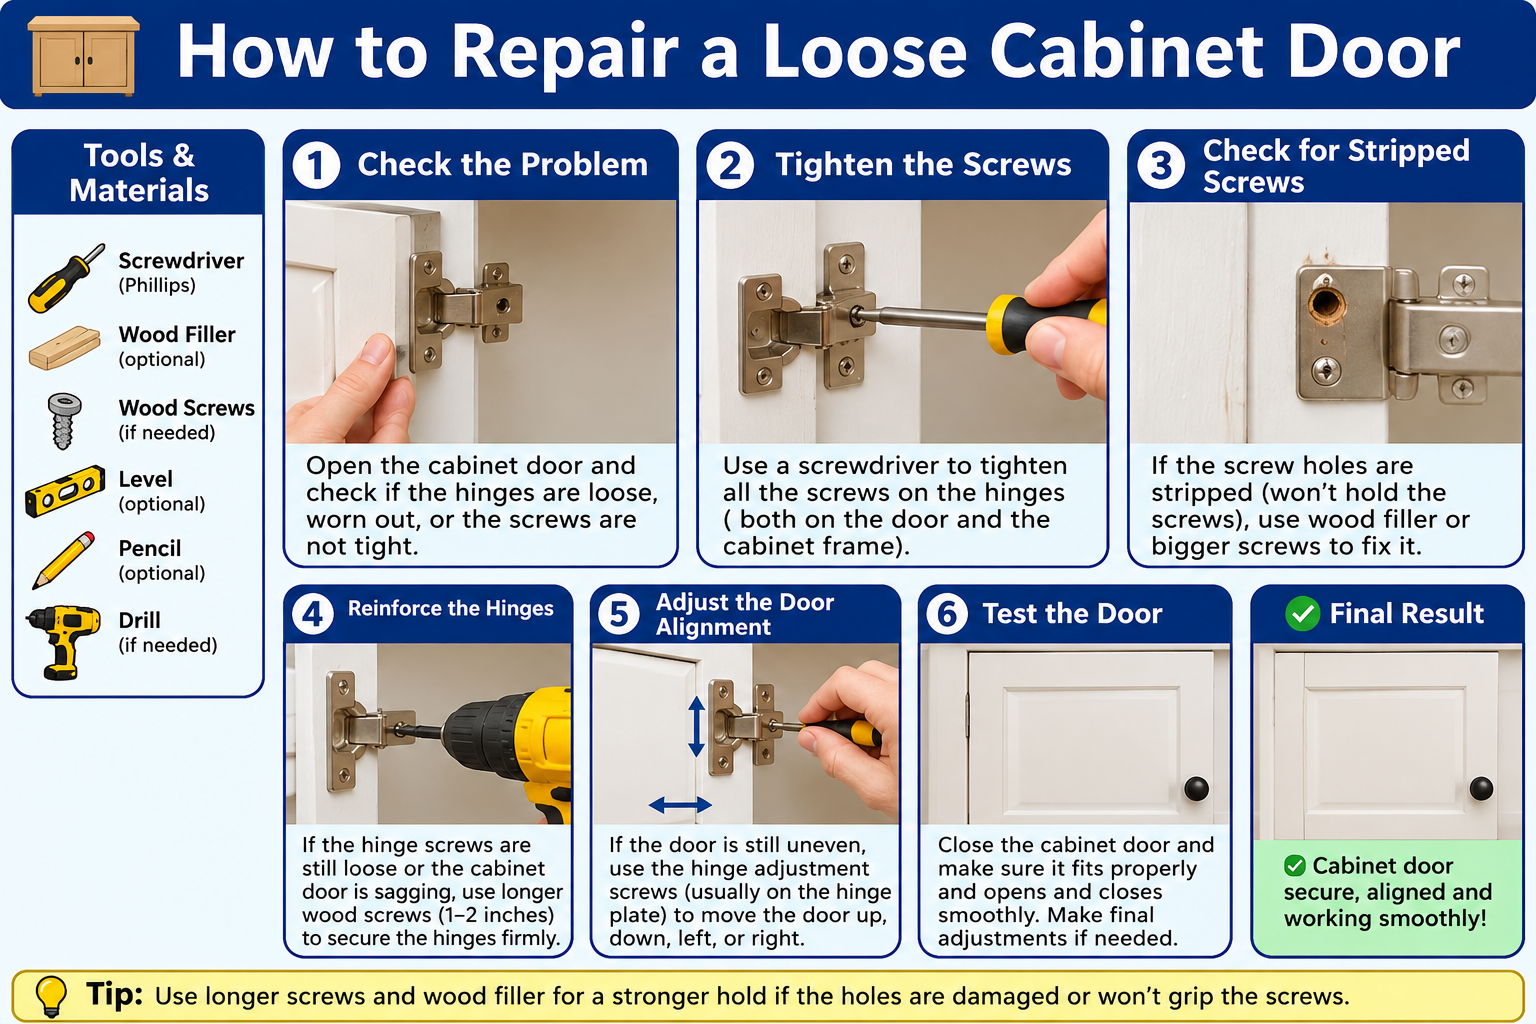
Start by opening and closing the door slowly while watching the hinges closely. Look for movement at the hinge plates, gaps between the hinge and the cabinet frame, or visible wobble in the door. Identify whether the problem appears to be at the door-side of the hinge, the frame-side, or both.
Step 2: Check the Hinges
Look at the hinges themselves. Check whether any hinge is visibly bent, cracked, or corroded. Check whether the hinge mounting plates sit flat against the wood or whether they lift away from the surface slightly when the door moves. Any lifting or visible damage in the hinge hardware tells you whether a replacement is needed.
Step 3: Tighten the Existing Screws
Using the appropriate screwdriver, try tightening every screw at both the door-side and the frame-side of each hinge. Turn each screw clockwise slowly and with steady pressure. If a screw tightens firmly and the door feels more stable immediately, you may not need any further repair. If any screw spins without catching, you have a stripped screw hole and need to move to a more involved repair.
Step 4: Check the Door Alignment
After tightening the screws, close the door and examine the gaps around all four edges. The gap should be even and consistent. A door that still sits crooked or uneven after tightening likely needs hinge adjustment, even if the screws are now secure.
Step 5: Adjust the Cabinet Hinges
If your cabinet uses concealed European-style hinges, use a screwdriver to make small adjustments using the hinge adjustment screws. These allow you to move the door slightly in each direction without removing and reinstalling the hinge. Make one small adjustment at a time, close the door to check the result, and continue until the gaps are even.
Step 6: Inspect for Stripped Screw Holes
If any screw continued to spin during Step 3, examine the hole closely. Remove the screw entirely and look into the hole. A stripped hole will appear wider than the screw shank and may show torn or compressed wood fibers inside. This hole will not hold a screw without repair.
Step 7: Repair a Stripped Screw Hole
For minor stripping in solid wood, a straightforward approach is to coat two or three wooden toothpicks with wood glue, insert them into the hole, allow the glue to dry completely, then snap off the excess flush with the surface. The wood material fills the hole and gives the screw new fiber to grip.
For more significant damage, a wood dowel of appropriate diameter can be glued into the hole, allowed to cure, then trimmed flush and re-drilled to the correct pilot hole size for the screw. Always allow wood glue to cure fully before reinstalling the screw. The specific approach depends on the cabinet material and the severity of the damage.
Step 8: Replace Damaged Screws
Screws that are visibly bent, corroded, or have damaged heads should be replaced rather than reused. Match the replacement screw to the original in diameter and length. Using a longer screw than the original can sometimes provide better grip in slightly worn wood, but only if the length does not cause the screw to penetrate through to the visible face of the cabinet or door panel.
Step 9: Replace a Damaged Hinge
If the hinge itself is bent, cracked, or mechanically worn, replacing it is more reliable than attempting to repair the existing hardware. Bring the old hinge to the hardware store to match the size, the mounting hole spacing, and the overlay dimension. Remove the damaged hinge by unscrewing it from both the door and the frame. Position the new hinge carefully and mark the screw hole positions before drilling. Follow the manufacturer’s installation instructions for the specific hinge.
Step 10: Reattach and Align the Door
With the repaired or replaced hinges in place, reattach the door and use the adjustment screws to bring it into proper alignment. Check all four edges for even gaps. Confirm the door opens and closes smoothly without rubbing the frame or adjacent doors.
Step 11: Test the Door
Open and close the door several times with normal force, not gently. Confirm that nothing shifts, that the door stays aligned, and that all screws remain tight. If everything feels solid and the door operates properly, the repair is complete. If any movement returns, recheck each screw and each hinge for the source of the problem.
How to Tighten a Loose Cabinet Door Hinge
Tightening a loose hinge is the simplest form of cabinet door repair. The key is to apply enough torque to seat the screw firmly without overtightening it.
Drive each screw slowly and stop as soon as it seats firmly against the hinge plate. Continuing to turn a screw after it has tightened does not make the connection stronger. It strips the screw hole, which creates a new and more difficult problem.
If a screw tightens fully but the hinge still feels slightly loose, the issue may be that the screw head is not seating properly against the hinge plate. Confirm the screw head matches the countersink in the hinge. An undersized head may tighten without actually securing the hinge plate.
How to Fix a Cabinet Door With Stripped Screw Holes
A stripped screw hole is the most common reason a cabinet door repair fails repeatedly. If the hole cannot grip the screw, tightening the screw achieves nothing.
The toothpick-and-glue method works well for minor stripping in solid wood cabinets. It is inexpensive, does not require special tools, and produces a reliable result when done correctly. Allow the glue to cure fully before reinstalling the screw, as a partially cured repair will fail quickly.
For larger stripped areas, a wood dowel plug provides more material and a more durable repair. This method requires drilling out the damaged area to a clean, consistent diameter, gluing in the dowel, allowing a full cure, then trimming and re-drilling a correct pilot hole.
Wood filler alone is generally not the most reliable approach for a hinge screw hole, because the screw’s insertion and removal forces can cause some fillers to crack or compress over time. If you use wood filler for this purpose, follow the product manufacturer’s instructions carefully and allow a full cure before stressing the repair.
In MDF or particleboard cabinets, stripped screw holes are more challenging. These materials do not have the wood fiber structure that allows toothpick-and-glue repairs to work as effectively. Larger screws or specialty fasteners designed for MDF and particleboard may provide a better solution, but severely damaged areas in these materials can be difficult to repair reliably without replacing the damaged section or the cabinet component.
How to Fix a Cabinet Door That Won’t Close Properly
A cabinet door that will not close fully almost always has a hinge alignment issue at its root. The door is sitting in a position where it contacts the frame or an adjacent door before it reaches the fully closed position.
Start by checking whether all hinge screws are tight. A single loose hinge screw can shift the door enough to prevent proper closing. Tighten all screws before attempting any adjustment.
If the door still does not close after tightening, use the adjustment screws on your concealed hinges to move the door in the direction that gives it clearance. Make small adjustments, test the door after each one, and work progressively rather than making large adjustments all at once.
If the cabinet frame itself has shifted or if the wall behind it has moved, even perfectly adjusted hinges may not solve the problem completely. In those cases, a professional assessment of the cabinet structure is the next appropriate step.
How to Adjust Cabinet Door Hinges
Modern concealed hinges typically offer three directions of adjustment, which makes them very practical for fine-tuning door position without removing and reinstalling the entire hinge.
Side-to-side adjustment moves the door left or right relative to the cabinet opening. This is typically controlled by a screw on the mounting plate that, when turned, shifts the entire hinge assembly horizontally.
Up-and-down adjustment moves the door higher or lower. Some hinge models offer this through a slot in the mounting plate that allows the plate to slide before being locked in position.
In-and-out adjustment controls how far the door sits from the face of the cabinet frame. This affects the gap between the door face and the frame edge and is usually adjusted through a screw at the hinge arm pivot point.
Always make small adjustments, one direction at a time. Test the door after each adjustment before proceeding. Large adjustments made all at once are harder to control and make it difficult to identify which change had which effect on the door position.
Exact screw positions and adjustment directions vary between hinge manufacturers and models. If you are unsure which screw controls which direction on your specific hinge, check the manufacturer’s documentation or look up the hinge model number online.
How to Replace a Cabinet Door Hinge
Before purchasing a replacement hinge, remove the damaged hinge and bring it with you or compare its specifications carefully. Match the cup diameter if it is a concealed hinge, the mounting hole spacing, the overlay dimension, and the overall hinge arm length.
Installing a hinge that is close but not identical to the original often results in alignment problems that are difficult to correct after installation.
To install the new hinge, position it carefully at the existing mounting locations. If the original holes are in good condition, drive the new screws gently to avoid stripping the existing holes. If the original cup hole or mounting plate holes have been damaged, address that damage before installing the new hinge.
Once the hinge is secured, attach the door and use the adjustment screws to bring it into alignment. Test the door through its full range of motion before considering the repair complete.
How to Repair a Sagging Cabinet Door
A sagging cabinet door usually has more than one contributing factor. Loose screws at the lower hinge are a common starting point, because the weight of the door creates more downward pull at the bottom than the top.
Tighten all hinge screws and then check whether the sag improves. If it does not, use the up-and-down hinge adjustment to bring the door back into level position. Check the alignment with a level placed along the top edge of the door.
If the lower hinge mounting area has significant wood damage, the hinge may need to be repositioned slightly or the damaged wood repaired before reinstalling the hinge. A sagging door that cannot be corrected by screw tightening and hinge adjustment alone deserves a closer look at the condition of the wood around the mounting points.
Incorporating a periodic cabinet inspection into your regular home care routine can help catch sagging early before it develops into a more involved repair. Our home maintenance checklist by month includes cabinet and door hardware checks that take only a few minutes but prevent larger problems from developing.
How to Fix a Cabinet Door That Keeps Coming Loose
A cabinet door that is repaired and then becomes loose again within a short time is telling you that the underlying problem has not been fully resolved.
The most common reason is a stripped screw hole that was not repaired properly before reinstalling the hinge. If the hole cannot grip the screw, even a firm tightening will not last long under daily use.
Another common cause is using the original screws in an already-worn hole without adding any fill material. The slightly enlarged hole allows the screw to loosen more quickly than it did originally.
Check whether the hinge itself is worn. A hinge with a loose pivot or bent arm will allow the door to shift regardless of how tight the mounting screws are. If the hinge has any visible mechanical play, replacing it is the correct solution.
Overloaded cabinet doors are also worth considering. If the door holds heavy items on the back or if oversized pulls place excessive leverage on the hinges, reducing that load can help the repair hold longer.
How to Fix a Loose Cabinet Door Without Replacing the Hinges
If the hinges are in good mechanical condition, there is often no need to replace them. The repair focuses instead on the fasteners and the wood they mount into.
Tighten all screws fully. Repair any stripped holes using the toothpick method or a suitable wood repair approach for the cabinet material. Install the screws back into solid, repaired wood and confirm everything is tight before testing.
If the hinges have adjustment screws, use them to fine-tune the door position after securing the mounting points. A hinge in good condition that is properly mounted and adjusted will perform as well as a new hinge in most cases.
How to Repair a Loose Cabinet Door on Particleboard or MDF
Particleboard and MDF cabinets are common in many kitchens and bathrooms, particularly in homes built or renovated in the last few decades. These materials behave very differently from solid wood when it comes to screw repairs.
MDF and particleboard do not have the wood fiber grain that allows a toothpick-and-glue repair to work reliably. The material around a stripped hole often compresses further rather than accepting new filler material the way solid wood does.
For minor damage in these materials, specialty fasteners designed specifically for particleboard and MDF can provide better grip than standard wood screws. Some products use larger thread patterns to engage more material. Follow the fastener manufacturer’s instructions for pilot hole sizing.
For more significant damage, such as large stripped areas or sections where the material has crumbled or swollen from moisture, professional repair or replacement of the damaged component may be the most practical solution. Attempting to force a standard wood repair in badly damaged MDF often produces a result that fails again quickly.
Common Cabinet Door Repair Mistakes
Over-Tightening Screws
Applying too much force when driving screws into wood, particularly softer wood and sheet materials, strips the hole immediately. Stop as soon as the screw seats firmly against the hinge plate.
Using the Wrong Screw Size
A screw that is too short does not engage enough wood fiber to hold reliably. A screw that is too long may puncture through to the visible face of the door or frame. Match the replacement screw to the original specification.
Ignoring Hinge Alignment
Tightening screws in a misaligned hinge leaves the door crooked even after the repair. Always check alignment after tightening and adjust as needed.
Using Weak Repair Materials
Some temporary repair solutions, such as paper or cardboard stuffed into a stripped hole, do not provide durable holding power and fail quickly under daily cabinet use.
Reusing Damaged Screws
A screw with a stripped head, a bent shaft, or corroded threads should be replaced rather than reinstalled. Damaged screws do not tighten properly and cause further damage to the hinge or the wood.
Failing to Support the Door
When removing a hinge from a heavy door, the unsupported weight can stress the remaining hinge and damage the mounting points. Support the door from below while working on the hinges.
Adjusting Hinges Too Much at Once
Large adjustments make it very difficult to achieve precise alignment. Small, incremental adjustments followed by testing allow you to find the correct position without overshooting it.
Ignoring Damaged Cabinet Material
A repair that does not address underlying wood or material damage will fail again. Identify the full extent of the damage before beginning any repair work.
How to Prevent Cabinet Doors From Becoming Loose
Prevention is simpler and less time-consuming than repeated repairs. A few minutes of maintenance a couple of times a year can keep cabinet doors functioning properly for a long time.
Check all visible hinge screws periodically. Give each one a quarter turn with a screwdriver to confirm it is still tight. A screw that accepts a small amount of additional tightening should be attended to immediately before it loosens further.
Clean the hinges occasionally to remove grease, dust, and moisture that can accelerate wear. A clean hinge operates more smoothly and lasts longer than one clogged with kitchen residue.
Avoid slamming cabinet doors. The impact forces that come from repeated slamming accelerate screw loosening and hinge wear significantly more than gentle closing does.
Check the alignment of doors periodically. An early alignment adjustment is far quicker than a full repair after the hardware has been working in a stressed position for months.
Adding cabinet maintenance to a seasonal routine keeps the task manageable. Our ultimate home maintenance checklist for every season includes practical inspection tasks that cover cabinet hardware alongside other common household maintenance items.
DIY vs Professional Cabinet Door Repair
| Factor | DIY | Professional |
|---|---|---|
| Cost | Low (materials only) | Higher (labor plus materials) |
| Time | 15 minutes to 2 hours | Usually under 1 hour |
| Skill Level | Beginner to intermediate | Any cabinet type or damage |
| Tools Required | Screwdriver, drill, basic materials | Full professional toolkit |
| Best For | Loose screws, minor stripped holes, hinge adjustment | Structural damage, MDF failure, custom cabinetry |
Most loose cabinet door repairs are well within reach for a homeowner with basic tools and patience. The situations where professional help makes more sense include severely damaged cabinet material, large stripped areas that cannot be repaired reliably, broken cabinet frames, custom or high-value cabinetry where a mistake would be costly, or any situation where the cause of the loosening is unclear.
Estimated Cabinet Door Repair Cost
| Repair Type | Estimated Cost Range |
|---|---|
| Basic Screw Tightening | $0 (your time only) |
| Replacement Screws | $3 – $10 |
| Single Hinge Replacement | $5 – $25 |
| Minor Stripped Hole Repair | $2 – $10 in materials |
| Multiple Hinge Replacement | $20 – $80 |
| Professional Cabinet Repair | $75 – $200 depending on damage and location |
These figures are general estimates. Actual costs vary based on the cabinet type, the hardware involved, the severity of the damage, your geographic location, and current labor rates in your area. Simple repairs using tools and materials you already own cost very little. More complex repairs involving damaged cabinet material or multiple door problems will cost more.
Cabinet Door Maintenance Tips
Keeping your cabinet doors in good condition does not require much effort. A consistent approach to basic maintenance prevents most common problems before they develop into repairs.
Wipe hinges clean whenever you clean the surrounding cabinet surfaces. In kitchens especially, cooking grease and moisture accumulate on hinges and around screw heads, which accelerates both wear and corrosion.
Check for moisture around cabinet bases and under sinks. Persistent moisture exposure causes wood and sheet materials to swell, which can push hinges out of position and weaken the wood around screw holes. Addressing a leak or ventilation problem early protects the cabinets from far more significant damage. Our DIY home inspection checklist covers under-sink inspections and moisture checks as part of a thorough home assessment.
Inspect door alignment seasonally. Wood and composite materials expand and contract with changes in humidity and temperature, which can cause doors to shift slightly over the course of a year. A small adjustment in autumn or spring can prevent an alignment issue from becoming a structural one.
When to Call a Professional
Most loose cabinet door repairs are straightforward DIY tasks. However, several situations warrant professional assessment rather than a DIY attempt.
If the cabinet frame itself is cracked, warped, or structurally compromised, repairing just the hinge will not solve the underlying problem. A professional can assess whether the frame can be repaired or whether the cabinet section needs replacement.
If multiple doors across the kitchen or bathroom are becoming loose simultaneously, this may indicate a larger issue such as cabinet base movement, wall shifting, or widespread moisture damage. These causes require a professional evaluation to diagnose and address correctly.
If repeated repairs fail within a short period despite correct execution, something about the cabinet structure, the material condition, or the load on the doors is preventing the repair from holding. Professional input can identify the root cause and provide a lasting solution.
Custom cabinetry, antique furniture, or high-value built-ins are situations where the cost of a repair mistake is high enough to justify professional involvement from the start.
Expert Tips for Keeping Cabinet Doors Secure
Always pre-drill pilot holes before driving screws into wood, especially near the edges of panels. Driving screws without pilot holes splits the wood and creates stripped holes from the first installation.
When replacing a hinge, use the same screw hole positions if the wood is in good condition. Drilling new holes adjacent to old ones removes material that was already holding the previous screws and often produces a weaker result.
After any cabinet repair, give the door a firm test by opening and closing it with normal household force ten or fifteen times. Problems that are going to recur often show themselves within the first few uses rather than weeks later.
Match hardware finishes when replacing hinges or screws. Mismatched hardware on visible hinges stands out immediately and affects the overall appearance of the kitchen or bathroom. This same attention to hardware consistency applies to other fixtures throughout the home. If you are updating multiple hardware pieces, our guide on how to replace a door handle covers finish matching and hardware selection for interior doors as well.
Keep a small collection of spare cabinet hinge screws in the size used throughout your kitchen or bathroom. Having the correct replacement screw immediately available means a loose hinge gets tightened the moment it is noticed rather than weeks later when the damage has worsened.
If your cabinets have soft-close mechanisms that are no longer functioning properly, the soft-close damper clip is often a separate replaceable component within the hinge. Many concealed hinge manufacturers sell replacement dampers separately, which is far more economical than replacing the entire hinge.
Frequently Asked Questions
Why does my cabinet door keep getting loose even after I tighten the screws?
A cabinet door that loosens again shortly after being tightened almost always has a stripped screw hole at the root of the problem. When a screw hole is stripped, the screw has no solid wood fiber to grip, so it tightens temporarily but backs out again under daily use. Tightening the screw without repairing the hole only compresses the remaining damaged material further. The correct solution is to fill the stripped hole with appropriate material, allow it to cure fully, and then reinstall the screw into solid, repaired wood. Skipping the repair step and simply retightening the existing screw will produce the same result repeatedly.
What is the easiest way to fix a stripped cabinet hinge screw hole at home?
The toothpick method is one of the most practical approaches for solid wood cabinets. Coat two or three wooden toothpicks with wood glue, insert them into the stripped hole, allow the glue to cure completely according to the product instructions, then snap the excess flush with the surface. This provides new wood material for the screw to grip. Once the glue has fully cured, drive the original screw back in slowly. For a larger stripped area, a wood dowel of appropriate diameter provides more material and a more durable result. Always allow the repair material to cure fully before reinstalling the screw.
Can I adjust a cabinet door without removing it from the cabinet?
Yes, and this is one of the primary advantages of modern concealed European-style hinges. Most of these hinges have built-in adjustment screws that allow you to move the door side to side, up and down, and in and out without removing the door from the hinges at all. This makes fine-tuning alignment a matter of minutes rather than a full reinstallation. Use a screwdriver to make small adjustments, test the door after each change, and work in one direction at a time. If your cabinet uses older surface-mount hinges without adjustment screws, repositioning the hinge requires removing it and remarking the mounting holes.
How do I know if my cabinet hinge needs to be adjusted or replaced?
A hinge that is mechanically sound but simply out of position needs adjustment, not replacement. If the hinge arm moves smoothly, the pivot point is tight, and the mounting plates sit flat against the wood, an adjustment will likely solve the problem. A hinge that needs replacement shows visible damage such as a bent arm, a cracked body, a loose pivot that has worn out, or corrosion that prevents smooth operation. A hinge with broken soft-close clips or damaged mounting posts may be repairable with replacement components depending on the manufacturer, but a hinge with structural damage is best replaced entirely.
What type of screw should I use when replacing a cabinet hinge screw?
Match the replacement screw to the original in both diameter and length whenever possible. Standard cabinet hinge screws are typically small-diameter coarse-thread screws sized for wood. Using a screw with a coarser thread than the original can provide slightly better grip in worn wood, but only if the screw diameter is not significantly larger than the original hole. Using a longer screw than the original may give better penetration into the wood, but confirm that the additional length does not cause the screw to punch through the visible face of the door or frame panel. When in doubt, bring the original screw to the hardware store for a direct comparison.
My cabinet door sags on one side. What is the most likely cause?
A door that sags on one side typically has a problem at the lower hinge. The weight of the door exerts more downward pull at the bottom, so the lower hinge experiences more stress than the upper one. Start by checking and tightening all screws at the lower hinge specifically. If the screws tighten firmly and the sag improves, the loose hardware was the cause. If the screws spin without gripping, the lower hinge has a stripped hole that needs repair before the hinge can hold the door properly. After repairing the mounting point, use the hinge adjustment screws to bring the door back into level position.
Can I repair a cabinet door made of MDF that has a stripped hinge hole?
MDF cabinet doors present a more difficult repair challenge than solid wood because MDF does not have the grain structure that allows wood-fiber repairs to work reliably. Standard toothpick repairs are generally not effective in MDF. Specialty fasteners designed for MDF use larger thread patterns to engage more of the compressed wood fiber material, and these can provide better results than standard wood screws in mildly damaged areas. For significantly damaged areas where the MDF has crumbled or swollen from moisture exposure, reliable repair becomes difficult. In those cases, replacing the damaged door panel is often more practical than attempting repeated repairs that are unlikely to hold long-term.
How do I fix a cabinet door that rubs against the adjacent door when I open it?
Cabinet doors that rub against each other have an alignment problem. The two doors are not sitting in exactly the positions needed to give them adequate clearance. Start by checking whether all hinge screws on both doors are fully tight. Loose hardware is often the primary cause. If the screws are tight and the doors still rub, use the side-to-side adjustment screw on the hinge of the problem door to move it slightly away from the adjacent door. Make small adjustments and test the clearance after each one. If adjusting one door causes it to rub on the other side, the other door may also need adjustment to distribute the gap evenly.
Is it normal for cabinet hinges to need adjustment over time?
Yes, this is entirely normal and not a sign of poor quality cabinets or faulty installation. Wood expands and contracts with seasonal changes in humidity and temperature, which causes small shifts in door position over time. Repeated opening and closing adds gradual wear to hinge pivot points and can allow screws to loosen incrementally. Most well-built kitchens benefit from a quick hinge check and minor adjustment every year or two. Catching small misalignments early prevents them from progressing into stripped holes or hinge damage. Treating cabinet hinge maintenance as a routine task rather than an emergency repair makes it much less time-consuming overall.
When should I stop attempting DIY repairs and call a professional for a loose cabinet door?
You have reached the limit of practical DIY repair when the underlying cabinet material is too damaged to hold fasteners reliably, when the cabinet frame itself has structural damage, or when the same repair fails repeatedly without a clear explanation. If you are working with custom or high-value cabinetry where a mistake would be costly, starting with professional help is a reasonable choice. Similarly, if multiple doors across the kitchen are loosening simultaneously and the cause is not obvious, a professional can assess whether the issue involves cabinet settling, wall movement, or widespread material deterioration that requires a more comprehensive solution than individual hinge repairs.
Conclusion
A loose cabinet door is one of the most common and manageable home repair issues a homeowner will encounter. In most cases, the fix is straightforward: tighten loose screws, repair stripped holes, adjust misaligned hinges, or replace worn hardware.
The key to a lasting repair is diagnosing the actual cause before attempting any fix. A screw that spins without gripping tells you the hole needs repair, not just retightening. A door that sags after tightening tells you the hinge alignment needs adjustment. A door that keeps coming loose despite correct repairs tells you there may be an underlying structural or material problem that needs proper attention.
Choose your repair method based on your specific cabinet material, hinge type, and the extent of the damage. Solid wood and plywood cabinets generally respond well to standard wood repair techniques. MDF and particleboard require a different approach and have clearer limits on what is repairable without professional help.
Maintain your cabinet hinges with periodic screw checks, occasional cleaning, and alignment inspections. A few minutes of maintenance twice a year prevents most loose cabinet door problems before they develop into anything more serious.
When the repair is simple, do it yourself with confidence. When the damage is significant, the material is compromised, or the cause is unclear, professional help is the practical and cost-effective choice.