Water Filtration System Maintenance: A Complete Homeowner’s Guide

Introduction
Most homeowners install a water filtration system and then largely forget about it. The water comes out clear, it tastes fine, and nothing is visibly wrong. So why bother?
Because filtration systems do not maintain themselves. Every filter has a finite capacity. Every housing develops sediment buildup. Every seal ages and eventually loses integrity. A system that is not maintained stops performing as designed, and in many cases, it begins making your water quality worse than it would be without a filter at all.
A neglected water filter can harbor bacterial growth, allow contaminants to pass through at levels higher than your tap water, reduce water pressure throughout your home, and shorten the lifespan of expensive system components. These are not theoretical risks. They are documented outcomes of deferred filter maintenance.
Regular water filtration system maintenance protects your family’s health by ensuring the water you drink, cook with, and use daily is actually being filtered effectively. It also protects your investment in the system itself, extends filter and component lifespan, and keeps water pressure and flow rates consistent throughout your home.
This guide covers everything you need to know about maintaining every type of home water filtration system. From replacement schedules to step-by-step maintenance procedures, troubleshooting common problems, and knowing when to call a professional, you will have a complete framework for keeping your water clean and your system running at peak performance.
What Is a Water Filtration System?
A home water filtration system is a device or series of devices designed to remove contaminants, sediment, chemicals, and biological impurities from your household water supply.
Systems range from simple single-stage filters that attach to a faucet to complex whole-house multi-stage setups that treat every drop of water entering the home. The right system for any home depends on the specific contaminants present in the local water supply, water pressure and flow requirements, household size, and budget.
All filtration systems share one fundamental characteristic: they use a filtering medium that must be periodically replaced or cleaned to remain effective. Whether that medium is a sediment cartridge, an activated carbon block, a reverse osmosis membrane, or an ion exchange resin, its capacity to remove contaminants is finite. Maintenance is not optional. It is built into the design of every system.
Why Water Filtration System Maintenance Is Important
The health implications of neglected water filtration are the most compelling reason to maintain your system consistently.
The U.S. Environmental Protection Agency notes that while public water systems are regulated for safety, treatment does not eliminate all potential contaminants, and household filtration provides an important additional layer of protection. That protection only exists if the filtration system is functioning as designed.
A saturated filter no longer captures the contaminants it was rated to remove. In some cases, a heavily loaded carbon filter can actually release previously captured contaminants back into the water. Biofilm can develop inside filter housings that are infrequently serviced. Both scenarios create water quality that is actively worse than unfiltered tap water.
Beyond health, maintenance matters for system performance and longevity. A clogged sediment pre-filter dramatically reduces water pressure throughout the system. Deteriorated O-rings cause leaks. An unmaintained reverse osmosis membrane produces less purified water at reduced flow rates. These performance issues compound over time and can require expensive component replacement that proper maintenance would have prevented.
Benefits of Regular Water Filter Maintenance
Consistent maintenance delivers benefits across every dimension of your water filtration system’s performance.
- Ensures your water is actually being filtered to the level your system is rated to achieve
- Maintains consistent water pressure and flow rate throughout the system
- Prevents bacterial and biofilm growth inside filter housings and lines
- Extends the operational lifespan of expensive components like RO membranes
- Prevents leaks caused by deteriorated seals and O-rings
- Reduces long-term costs by catching small issues before they become expensive failures
- Protects downstream appliances from sediment and mineral buildup
- Gives you documented maintenance records valuable for warranty claims and resale
Types of Home Water Filtration Systems
Whole House Water Filters
Whole house systems, also called point-of-entry filters, treat all water entering the home at the main supply line. They typically include multiple filtration stages: a sediment pre-filter to capture large particles, followed by carbon or specialty filters for chemical and contaminant removal.
These systems protect appliances, plumbing fixtures, and all water outlets throughout the home. They require the most systematic maintenance because a failure affects the entire household water supply. Pre-filter cartridges in high-sediment water supplies may need replacement as often as every month.
Under-Sink Water Filters
Under-sink systems install directly to the cold water supply line beneath a kitchen sink and provide filtered water through a dedicated faucet. They are among the most popular residential filtration solutions because they deliver high-quality filtered water at the point of use without affecting overall home water pressure.
Multi-stage under-sink systems commonly include sediment, carbon block, and polishing filter stages. Each stage uses a separate cartridge with its own replacement interval and lifespan.
Countertop Water Filters
Countertop filters connect to the existing faucet aerator and divert water through a filtration unit sitting on the counter. They require no installation beyond the connection fitting and are easily moved.
These systems use replaceable filter cartridges rated for a specific number of gallons or a defined time period. Because they are compact, their cartridge capacity is smaller than whole-house or under-sink systems, which means more frequent replacement intervals.
Reverse Osmosis Systems
Reverse osmosis systems are the most comprehensive filtration technology available for residential use. They force water under pressure through a semipermeable membrane that removes dissolved solids, heavy metals, fluoride, nitrates, and a wide range of other contaminants that other filter types cannot capture.
RO systems typically include four to five stages: sediment pre-filtration, carbon pre-filtration, the RO membrane itself, carbon post-filtration, and often a final polishing stage. A pressurized storage tank holds filtered water ready for use. Each stage requires its own maintenance schedule.
Refrigerator Water Filters
Most modern refrigerators with built-in ice makers and water dispensers include an internal carbon block filter. These filters remove chlorine, taste, and odor from ice and drinking water dispensed through the door.
Refrigerator filters are among the most frequently neglected filtration components in homes. Manufacturers typically recommend replacement every six months, but many homeowners leave them in place for years, long after the carbon media has been saturated and the filter is providing no meaningful protection.
Faucet Water Filters
Faucet-mounted filters attach directly to the aerator port of a standard kitchen faucet. They include a diverter valve that switches between filtered and unfiltered flow. They are the most accessible entry point to home water filtration and the simplest to maintain.
Filter cartridge replacement is the primary maintenance task, typically required every two to three months depending on water quality and usage volume.
Signs Your Water Filtration System Needs Maintenance
Reduced Water Pressure
A noticeable drop in water pressure at filtered outlets is almost always the first symptom of a clogged filter cartridge. As filter media accumulates captured particles over time, flow restriction increases progressively. Many homeowners adapt to gradually reduced pressure without realizing it until they replace the filter and experience the dramatic difference in flow rate.
Bad Taste or Odor
If filtered water develops a chlorine taste, musty odor, or any off-flavor, the filter media has been exhausted. Carbon filters lose their adsorption capacity when saturated and can no longer remove the taste and odor compounds they were installed to address. This is one of the clearest signals that filter replacement is overdue.
Cloudy Water
Cloudy or turbid filtered water indicates that the sediment filter is failing to capture fine particles, or that the filter media itself is degrading and shedding particles into the water stream. Either situation requires immediate inspection and cartridge replacement.
Filter Change Indicator
Many modern filtration systems include electronic filter change indicators or physical time-based reminder mechanisms. These indicators are set based on the filter’s rated capacity and should be taken seriously, not dismissed as a general suggestion. When the indicator activates, the filter has reached the usage threshold its manufacturer determined affects performance.
Unusual Noises
Gurgling, vibrating, or hissing sounds from a filtration system often indicate air in the lines, a failing pressure regulator, or a developing leak at a connection point. These sounds warrant immediate inspection before they develop into active water damage.
Water Leaks
Any visible moisture around the filter housing, connection fittings, or water lines requires immediate attention. Water filtration systems are under continuous line pressure. What begins as a drip at a fitting can become a significant leak if the underlying cause, commonly a deteriorated O-ring or loose connection, is not addressed promptly.
How Often Should You Maintain Your Water Filtration System?
Maintenance frequency depends on the system type, the number of filtration stages, your household water consumption, and the quality of your incoming water supply.
As a practical framework:
- Monthly: Visually inspect the entire system for leaks, moisture, or damage. Check filter change indicators.
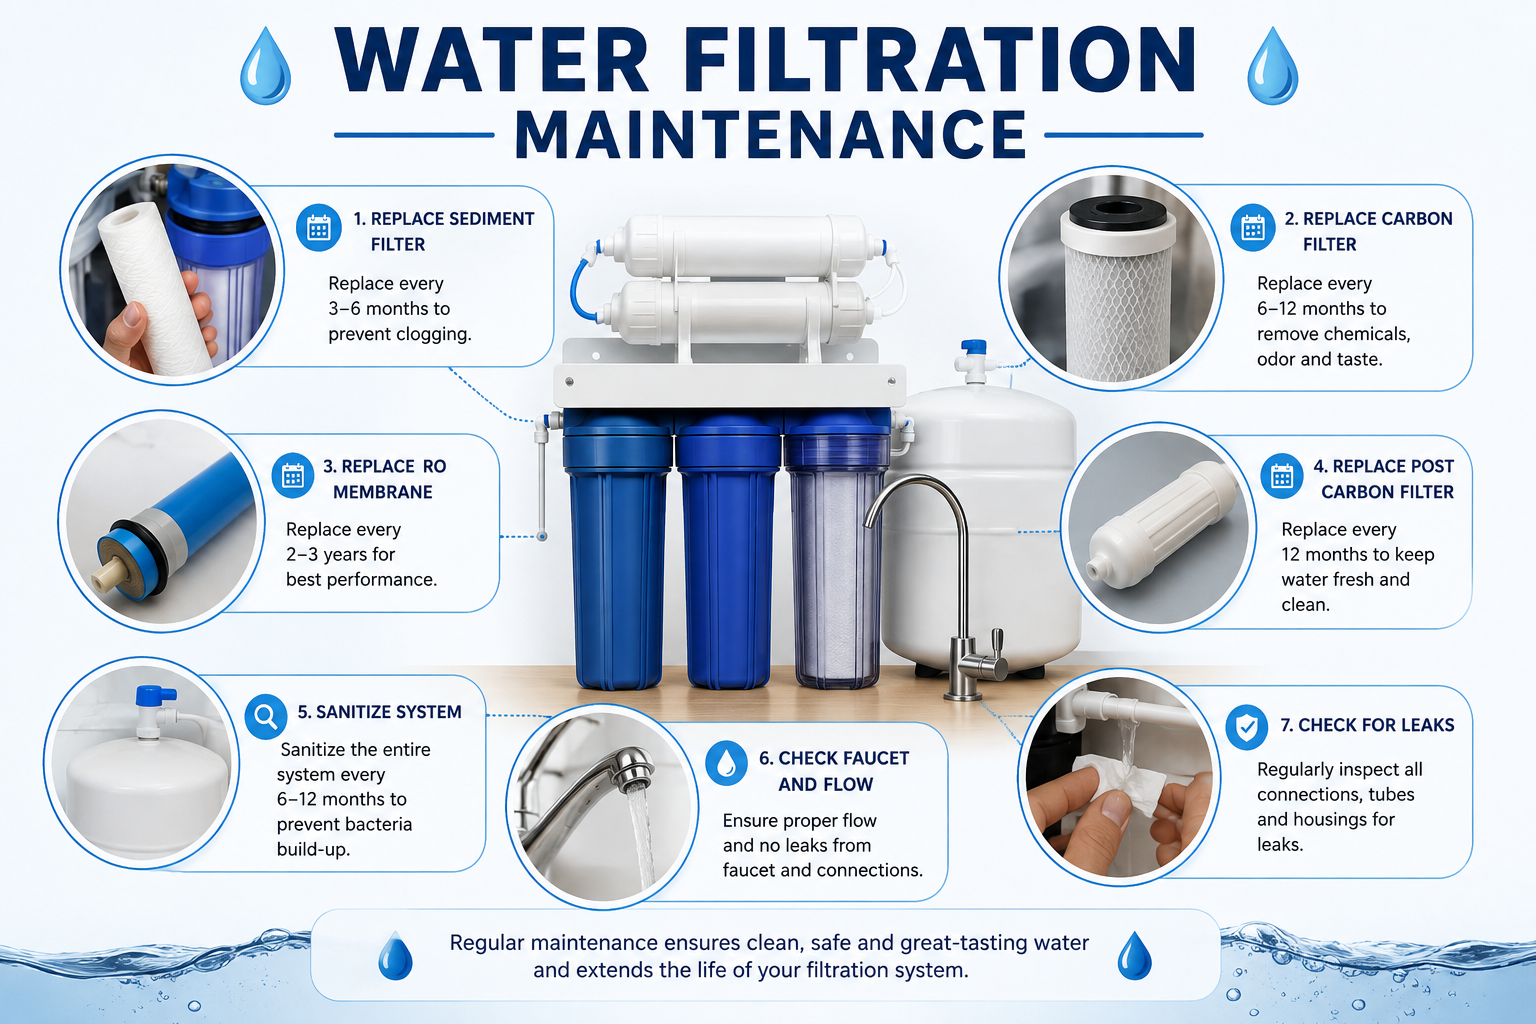
- Every 3 to 6 months: Replace most standard filter cartridges including sediment, carbon block, and inline filters depending on manufacturer guidelines and water quality.
- Every 6 to 12 months: Complete full system maintenance including housing cleaning, O-ring inspection, sanitization, and flow rate testing.
- Every 2 to 3 years: Replace reverse osmosis membranes under average residential use conditions.
- Annually: Test water quality with a home test kit or professional laboratory analysis to verify system performance.
Water quality varies enormously by location. Homes on well water or in areas with high sediment, iron, or hardness levels will require more frequent filter changes than the manufacturer’s baseline recommendation suggests. Tracking your specific system’s performance over time gives you the most accurate maintenance intervals for your household conditions.
Water Filtration System Maintenance Checklist
Turn Off the Water Supply
Before any filter work begins, shut off the water supply to the filtration system. For under-sink systems, this means closing the dedicated supply valve beneath the sink. For whole-house systems, close the main supply valve upstream of the filter unit.
Open the filtered water faucet to relieve pressure in the lines before removing any housings or cartridges. Skipping this step turns a routine filter change into a soaking experience and risks damaging fittings under sudden pressure release.
Inspect the Filter Housing
With pressure relieved, visually examine the housing before opening it. Look for hairline cracks in plastic housings, calcium deposits at the top or bottom of the housing where it threads together, and any discoloration suggesting sediment bypassing the filter.
Note the color and condition of the water inside the housing when you open it. Dark, heavily loaded water with significant sediment accumulation confirms the filter was working and tells you about the demand your local water supply places on the system.
Replace Water Filters
Remove the spent cartridge and compare it to the new replacement to confirm the correct size and specification. Never install a replacement cartridge that does not match the system’s required micron rating and filter type for each stage.
Insert the new cartridge according to the manufacturer’s orientation marking. Many cartridges are directional. Installing a cartridge backward prevents proper water flow through the filter media and dramatically reduces effectiveness.
Clean the Filter Housing
Before installing the new cartridge, clean the housing interior thoroughly. Use a soft brush with a mild, food-safe cleaning solution to scrub the interior walls, threads, and cap area where sediment accumulates. Rinse completely with clean water.
Never use bleach, harsh chemical cleaners, or abrasive scrubbing pads on filter housings unless your specific system’s manufacturer explicitly recommends them. Residues from incompatible cleaners can contaminate your filtered water or damage housing seals.
Sanitize the System
Annual sanitization of the complete filtration system prevents bacterial growth and biofilm development inside housings and water lines. Follow the system manufacturer’s specific sanitization procedure, which typically involves a food-safe sanitizing solution circulated through the system before a thorough flush.
For whole-house systems or reverse osmosis systems, sanitization is particularly important because the internal volume of piping and storage components provides more surface area for microbial development than point-of-use filters.
Check O-Rings and Seals
O-rings are the rubber seals that prevent leaks at housing cap connections, fitting interfaces, and cartridge seats. They deteriorate through compression, age, chemical exposure, and temperature cycling. Inspect every O-ring during each maintenance session.
Healthy O-rings are pliable, uniform in color, and free of cracking, flattening, or surface damage. Replace any O-ring showing these signs of deterioration. Apply a thin coat of food-grade silicone grease to new O-rings before installation to extend their service life and improve their sealing performance.
Inspect Water Lines
Examine every visible water line connected to the filtration system. Look for kinking in flexible tubing that restricts flow, discoloration indicating mineral buildup inside clear lines, and any signs of cracking or brittleness in plastic fittings.
Push-fit connections should be firmly seated with no movement when gently tested. Any fitting that shows movement, dripping, or visible gap needs to be reseated or replaced before the system is returned to service.
Flush the System
After reassembly, restore the water supply slowly and flush the complete system according to the manufacturer’s required procedure. New filter cartridges, particularly carbon block filters, release carbon fines during their initial use that appear as dark gray or black water at the faucet.
Run filtered water to the drain or an outdoor faucet until the water runs completely clear. RO systems typically require twenty to thirty minutes of flushing after membrane replacement. Whole-house systems should be flushed at the nearest filtered outlet until flow stabilizes and water clears completely.
Test Water Quality
After flushing, confirm the system is performing as intended by testing water quality. Basic home test kits check for chlorine, pH, hardness, and common contaminants at a fraction of the cost of laboratory analysis. They take minutes to complete and provide immediate confirmation that the replaced filters are working.
For more comprehensive verification, particularly after replacing an RO membrane or following any system issue, a laboratory water quality test provides detailed analysis. The Centers for Disease Control and Prevention recommends periodic water quality testing for all households regardless of water source, as treatment effectiveness and source conditions change over time.
Record the Maintenance Date
Document every maintenance session with the date, tasks performed, cartridge types and brands used, any observations about system condition, and planned next service date. This log is invaluable for tracking actual performance intervals versus manufacturer recommendations.
It also creates a maintenance history that supports warranty claims, informs service technicians, and provides documentation that adds value during a home sale. Adding water filtration maintenance records to your broader home maintenance log alongside other systems keeps everything organized in one accessible place.
Common Water Filtration System Problems
Understanding the problems that filtration systems commonly develop helps you recognize them early and respond before minor issues become expensive repairs.
Gradual pressure loss across all filtered outlets almost always indicates a clogged sediment pre-filter. This is the most routine maintenance issue in any multi-stage system and the easiest to address.
RO system running slowly is typically caused by low water pressure at the system inlet, a clogged pre-filter restricting pressure to the membrane, or a membrane that has reached the end of its service life and is producing water too slowly to keep the storage tank filled.
Tank not filling in an RO system suggests a failed pressure tank, a stuck inlet valve, or a severely degraded membrane that can no longer produce water at a meaningful rate.
Bitter or metallic taste after filter change is usually carbon fines from a new filter that was not adequately flushed before use. Flush the system longer before consuming the water.
Housing will not seal after reassembly is almost always a misaligned or damaged O-ring. Remove the housing, inspect and reseat or replace the O-ring, apply silicone grease, and reassemble with careful alignment.
System dripping at connection fittings requires immediate attention. Most fitting leaks are caused by O-ring failure or a push-fit connection that was not fully seated. Address this before water damage develops in the cabinet below the system.
DIY vs Professional Water Filtration Maintenance
| Task | DIY Appropriate | Professional Recommended | Notes |
|---|---|---|---|
| Filter cartridge replacement | Yes | Optional | Most homeowners handle this independently |
| Housing cleaning and sanitization | Yes | Optional | Follow manufacturer guidelines carefully |
| O-ring inspection and replacement | Yes | Optional | Simple with correct O-ring size and grease |
| RO membrane replacement | Experienced DIY | Recommended for first-time | Requires proper fitting technique |
| Water quality testing (home kit) | Yes | Optional | Good for routine verification |
| Laboratory water quality analysis | N/A | Yes | Requires certified lab |
| Pressure regulator adjustment | No | Yes | Affects whole-house water pressure |
| System installation or major modification | No | Yes | Requires plumbing knowledge |
| Well water system service | Experienced only | Strongly recommended | Well systems have unique safety requirements |
| UV system lamp replacement | Yes (with guide) | Optional | Must confirm power is off before replacement |
| Water softener resin replacement | No | Yes | Complex process requiring calibration |
| Whole-house system valve replacement | No | Yes | Main line work requires plumbing expertise |
| Leak diagnosis at wall connections | No | Yes | May involve opening walls |
Water Filter Replacement Schedule
| Filter Type | Replacement Interval | Capacity (Gallons) | Signs It Needs Replacement |
|---|---|---|---|
| Sediment pre-filter (whole house) | 1 – 3 months | 15,000 – 50,000 | Reduced pressure, visible discoloration |
| Carbon block filter (under-sink) | 6 – 12 months | 500 – 1,000 | Taste or odor change, indicator light |
| Activated carbon (whole house) | 3 – 6 months | 100,000 – 150,000 | Chlorine taste, odor return |
| Reverse osmosis membrane | 2 – 3 years | 75,000 – 100,000 | Slow flow, elevated TDS reading |
| RO post-carbon polishing filter | 12 months | 500 – 1,000 | Taste change, maintenance schedule |
| Refrigerator filter | 6 months | 200 – 300 | Indicator light, taste change |
| Faucet-mount filter | 2 – 3 months | 100 – 200 | Reduced pressure, taste change |
| Countertop filter | 2 – 4 months | 150 – 500 | Flow reduction, taste change |
| UV disinfection lamp | 12 months | N/A (time-based) | Annual regardless of usage |
| Iron filter media | 3 – 5 years | Varies | Iron taste, orange staining |
| Water softener resin | 10 – 15 years | N/A | Hardness returning in treated water |
Essential Water Filtration Maintenance Tools
| Tool | Purpose | Recommended Use | Estimated Cost |
|---|---|---|---|
| Filter housing wrench | Removing stubborn filter housings | Every filter change | $5 – $20 |
| Food-grade silicone grease | Lubricating O-rings for proper seal | Every O-ring replacement | $5 – $15 |
| TDS meter | Testing total dissolved solids in filtered water | Monthly or after maintenance | $10 – $30 |
| Home water test kit | Basic multi-parameter water quality check | Seasonally | $15 – $50 |
| Bucket and towels | Catching water during housing changes | Every maintenance session | $5 – $15 |
| Soft-bristle brush | Cleaning interior of filter housings | Every maintenance session | $5 – $10 |
| Food-safe sanitizer | Sanitizing housings and water lines | Annually | $10 – $25 |
| Flashlight or headlamp | Inspecting under-sink system components | Every maintenance session | $15 – $60 |
| Needle-nose pliers | Handling tubing clips and small fittings | As needed | $10 – $25 |
| Thread seal tape | Sealing threaded fittings during reassembly | As needed | $2 – $8 |
| Replacement O-ring kit | Replacing deteriorated housing seals | Annually or as needed | $10 – $30 |
| Pressure gauge | Testing inlet water pressure to system | Annually | $10 – $30 |
Estimated Maintenance Costs
| Maintenance Task | DIY Annual Cost | Professional Annual Cost | Notes |
|---|---|---|---|
| Sediment filter replacement | $15 – $60 | $80 – $150 | Frequency varies by water quality |
| Carbon filter replacement | $20 – $80 | $80 – $200 | Per stage, per year |
| RO membrane replacement | $30 – $100 | $150 – $300 | Every 2 – 3 years |
| Full RO system service | $60 – $200 | $200 – $400 | All stages, annual |
| Refrigerator filter | $15 – $50 | N/A (DIY only) | Twice yearly |
| Water quality testing (home kit) | $15 – $50 | $50 – $300 (lab) | Seasonally |
| UV lamp replacement | $20 – $60 | $80 – $200 | Annual |
| O-ring replacement kit | $10 – $30 | Included in service | As needed |
| Whole-house system annual service | $80 – $250 | $200 – $600 | All filters plus inspection |
| Emergency leak repair | $20 – $60 | $100 – $350 | Depending on cause |
| Total Estimated Annual Cost | $100 – $400 | $400 – $1,500 | Varies by system complexity |
Common Water Filtration Maintenance Mistakes
Even motivated homeowners make maintenance errors that reduce system performance or create new problems.
Extending filter life beyond rated capacity. Filter manufacturers establish replacement intervals based on both contaminant capacity and time-based degradation. Using a filter beyond its rated capacity does not save money. It compromises water quality and risks the bacterial growth that occurs in saturated filter media.
Installing the wrong replacement cartridge. Not all filter cartridges are interchangeable. Using the wrong micron rating, wrong dimensions, or wrong filter media type for a given stage can allow unfiltered water to bypass the cartridge, damage the housing, or fail to address the specific contaminants the system was designed to remove.
Skipping the flush after cartridge replacement. Every new carbon filter contains carbon fines that must be flushed out before the system is used for drinking water. Skipping the flush results in black-tinted water and introduces fine carbon particles into food and beverages. Always flush new filters completely.
Ignoring the pre-filter in multi-stage systems. Many homeowners focus on the primary filter stage and overlook the sediment pre-filter that protects it. A clogged pre-filter not only restricts pressure but also allows sediment to reach and damage more expensive downstream stages including the RO membrane.
Forgetting the refrigerator filter. Refrigerator water filters are among the most neglected filtration components in residential homes. A filter that has been in place for two or three years is not filtering effectively and may be harboring bacterial growth in the saturated media.
Not testing water after maintenance. Completing maintenance without verifying system performance leaves you with no confirmation that the system is actually working. A simple TDS meter test after each maintenance session takes less than a minute and confirms effective filtration.
Tips to Extend the Life of Your Water Filtration System
Small habits and proactive practices significantly extend both the performance period and the physical lifespan of your filtration system.
- Install a dedicated sediment pre-filter ahead of any carbon or RO system to protect downstream stages from particle loading
- Monitor your local water utility’s annual water quality report and adjust filter replacement intervals based on seasonal changes in source water quality
- Keep a spare set of replacement cartridges on hand so filters are changed at the correct interval rather than when you get around to ordering them
- Store replacement cartridges in a cool, dry location and never use cartridges past their printed expiration date
- Avoid exposing plastic filter housings to direct sunlight, which accelerates material degradation
- Address minor leaks at connection fittings immediately. The water damage from even a slow drip accumulates quickly in an enclosed cabinet space
- Install a pressure regulator if your home water pressure exceeds 80 psi. Excessively high pressure accelerates wear on fittings, O-rings, and membranes
- Use a food-grade silicone grease on O-rings at every service to reduce compression set and extend seal life
Incorporating water filtration maintenance into your broader home care routine ensures it receives the attention it deserves.
The Home Maintenance Checklist by Month provides a practical framework for scheduling filter checks alongside your other monthly home maintenance tasks so nothing gets overlooked.
Expert Recommendations
After working with residential water treatment systems across a wide range of household conditions and water quality profiles, several recommendations consistently produce the best long-term outcomes for homeowners.
Match your maintenance intervals to your actual water quality, not just the manufacturer’s baseline. The replacement intervals printed on filter packaging are based on average municipal water quality. If you have well water, high sediment, high hardness, or elevated iron content, your filters will exhaust faster. Track your own experience and adjust accordingly.
Test your water quality annually regardless of how new your system is. Water source quality changes with seasons, infrastructure maintenance, and regional environmental factors. A test that showed excellent results two years ago does not confirm current conditions. Annual testing with a home kit and periodic laboratory analysis provides the actual data you need to make informed maintenance decisions.
Do not underestimate the importance of pre-filtration. The sediment pre-filter in any multi-stage system is your entire system’s first line of defense. It protects every downstream component from physical damage and loading. Treating it as a minor auxiliary component rather than a critical protective stage is a mistake that leads to premature RO membrane failure and reduced overall system lifespan.
Keep a written maintenance log from day one. The date you installed the system, the date of every filter change, every observation about water quality or system performance, and every component replaced. This record is the single most useful tool for managing your filtration system intelligently over its lifespan.
Budget for professional service every two to three years. Even confident DIY homeowners benefit from periodic professional evaluation of their water treatment system. A certified water treatment professional can assess system performance with specialized testing equipment, identify components approaching end of service life, and verify that the system configuration is appropriately matched to your current water quality conditions.
Connecting water filtration maintenance to your complete home care routine is the most reliable way to ensure it gets done consistently.
The Ultimate Home Maintenance Checklist for Every Season and the Annual Home Maintenance Checklist both provide comprehensive frameworks for integrating water system care into your full-home maintenance program.
Frequently Asked Questions
How do I know which replacement filter cartridge to buy for my system?
The most reliable source is your system’s owner’s manual, which specifies the exact cartridge model number and specifications for each stage. Most manufacturers also list compatible replacement cartridges on their website by system model. If you no longer have the manual, photograph the existing cartridge before removing it, including any model numbers or specification labels printed on the cartridge body. Generic compatible cartridges are often less expensive than name-brand replacements and work well in many systems, but confirm they match the micron rating, media type, and physical dimensions exactly before purchasing.
Can I skip filter replacement if my water still tastes good?
Taste improvement is only one function of a water filter. Many contaminants that filters are designed to remove, including heavy metals, nitrates, certain pesticides, and dissolved solids, have no taste or odor at levels that remain harmful over time. A filter that no longer improves taste may still appear to be working while it is no longer removing these tasteless contaminants. Replacement intervals exist to ensure the filter is replaced before its media is exhausted across all its functions, not just taste improvement. Relying on taste alone to determine filter life is an unreliable indicator that creates a false sense of security about water quality.
How do I sanitize an under-sink water filtration system?
Begin by removing all filter cartridges from their housings. Mix a food-safe sanitizing solution according to the manufacturer’s recommendations, commonly a dilute hydrogen peroxide solution. Fill each housing with the sanitizing solution, reinstall the housing caps without cartridges, and allow the solution to circulate through the lines by briefly opening the filtered water faucet. Let the solution sit in the system for the manufacturer’s recommended contact time, typically 30 minutes to one hour. Then flush the system thoroughly with clean water until no trace of the sanitizer remains before installing fresh cartridges. Annual sanitization is recommended for most under-sink systems.
What is a TDS meter and should I use one?
TDS stands for total dissolved solids. A TDS meter is an inexpensive electronic device that measures the concentration of dissolved minerals and compounds in water, expressed in parts per million. It provides an immediate, quantitative indication of whether your filtration system, particularly an RO system, is effectively reducing dissolved contaminants. A reading significantly higher than your post-filter baseline suggests the membrane is degrading and may need replacement. TDS meters do not test for specific contaminants and cannot replace comprehensive water quality testing, but they are an excellent low-cost tool for routine performance monitoring between full laboratory analyses.
My RO system produces very little water. What is wrong?
Slow RO water production has several common causes. First, check the inlet water pressure. RO systems require at least 40 to 60 psi of incoming pressure to function efficiently. Below this range, membrane performance drops dramatically. Second, inspect the sediment and carbon pre-filters. Clogged pre-filters reduce pressure to the membrane, directly reducing output. Third, check the storage tank pressure. An RO tank with insufficient air pressure in its bladder will not fill or empty properly. The tank should have approximately 6 to 8 psi of air pressure when empty. Finally, if all other factors check out, the membrane itself may be at end of life and require replacement.
How often should I test my well water if I have a filtration system?
Well water sources should be tested at least once annually for a comprehensive panel of contaminants including bacteria, nitrates, pH, hardness, iron, and any contaminants specific to your region’s geology or land use patterns. Unlike municipal water, which is continuously monitored by the utility, well water quality is your responsibility to assess. Test after any significant flooding event, after nearby land use changes, after any system repair or modification, or if anyone in the household develops unexplained gastrointestinal illness. Your filtration system should be matched to the specific contaminants found in your well water, and annual testing confirms whether those conditions have changed in ways that require system adjustments.
Is it safe to drink the first water from a new filter?
The first water from a newly installed filter cartridge, particularly carbon block filters, typically contains carbon fines released from the fresh media. This water appears dark gray or black and should not be consumed. Carbon fines are not toxic, but they are unpleasant and unnecessary to consume. Always flush a new filter completely according to the manufacturer’s specification before using filtered water for drinking or cooking. The required flush volume ranges from approximately two to five gallons for standard under-sink cartridges to twenty to thirty minutes of continuous flow for reverse osmosis systems with new membranes. When the water runs completely clear, it is ready to use.
Do water filtration systems need maintenance in winter differently than summer?
Seasonal conditions do affect certain aspects of filtration system maintenance. In cold climates, any filtration equipment installed in unheated spaces such as garages, crawl spaces, or outdoor locations must be protected from freezing. Frozen water in filter housings and lines can crack plastic components and damage membranes. Insulate exposed plumbing and filter housings in unheated areas before winter arrives. In summer, warmer water temperatures can promote faster bacterial growth in filter media and housings, making it worth checking the system more frequently during peak heat periods. Water source quality also changes seasonally in many regions, with spring runoff typically increasing sediment loads that accelerate pre-filter consumption.
How long does a whole house water filter last before it needs complete replacement?
The filter cartridges in a whole-house system require regular replacement according to the schedule appropriate for each stage and your local water quality. However, the system housing and major components have a much longer service life. High-quality stainless steel or high-grade plastic filter housings typically last fifteen to twenty years or more with proper maintenance. The fittings, bypass valves, and mounting hardware may need replacement over that period. What ultimately limits the system’s total lifespan is the availability of replacement cartridges for your specific system model. This is an important consideration when choosing a system, as proprietary cartridge designs from companies that may discontinue support create long-term replacement challenges.
When should I call a professional water filtration technician?
Several situations call for professional expertise rather than DIY maintenance. If your system involves complex plumbing modifications, main line connections, or pressure regulation work, these require plumbing knowledge and in many jurisdictions a plumbing license. If water quality testing reveals contaminants that your current system was not designed to address, a certified water treatment professional can recommend appropriate system upgrades. If an RO system is underperforming and basic troubleshooting has not identified the cause, professional diagnostics with calibrated testing equipment will find issues that homeowners cannot detect. Any situation involving well system components, submersible pump systems, or pressure tank work should involve a professional with specific well system expertise.
Conclusion
A water filtration system is only as good as the maintenance behind it. The technology exists to remove an impressive range of contaminants from your household water supply. But that technology depends entirely on a filter medium that remains effective, a housing that remains clean and sealed, and a system that is checked, serviced, and documented consistently.
The homeowners who get the most from their water filtration investment are the ones who treat maintenance as a non-negotiable routine rather than an occasional inconvenience. They know when their filters were last replaced. They test their water quality. They keep a log. And they address small issues before those issues become failures.
The water your family drinks, cooks with, and relies on daily deserves that level of care. Clean water is not something to assume. It is something to verify, maintain, and protect through consistent action.
Use the checklist, follow the replacement schedule, and build filtration maintenance into your broader home care routine. Your system will perform better, last longer, and deliver the clean water quality your household depends on, season after season.
For homeowners building a complete home maintenance system that integrates water filtration alongside all other critical household systems, the DIY Home Inspection Checklist provides the comprehensive framework for keeping every part of your home performing at its best throughout the year.