Roof Inspection Checklist: A Complete Guide for Homeowners

Introduction
Your roof is the single most important protective element of your home. It keeps rain, wind, snow, heat, and cold from reaching everything and everyone inside. Yet most homeowners go years without giving it a second look.
That oversight is expensive. Roof problems rarely appear suddenly. They develop gradually from small, addressable issues into serious structural damage. A missing shingle becomes a water infiltration point. A cracked sealant joint around a pipe boot allows slow dripping into the attic. Moss lifting shingle edges creates pathways for wind-driven rain. Each of these problems starts small and grows silently until the damage becomes visible on interior ceilings or, worse, until the cost of repair is dramatically higher than it needed to be.
Regular roof inspections break that cycle. They give you the information you need to act early, when repairs are minor and inexpensive, before damage compounds into major structural or interior work.
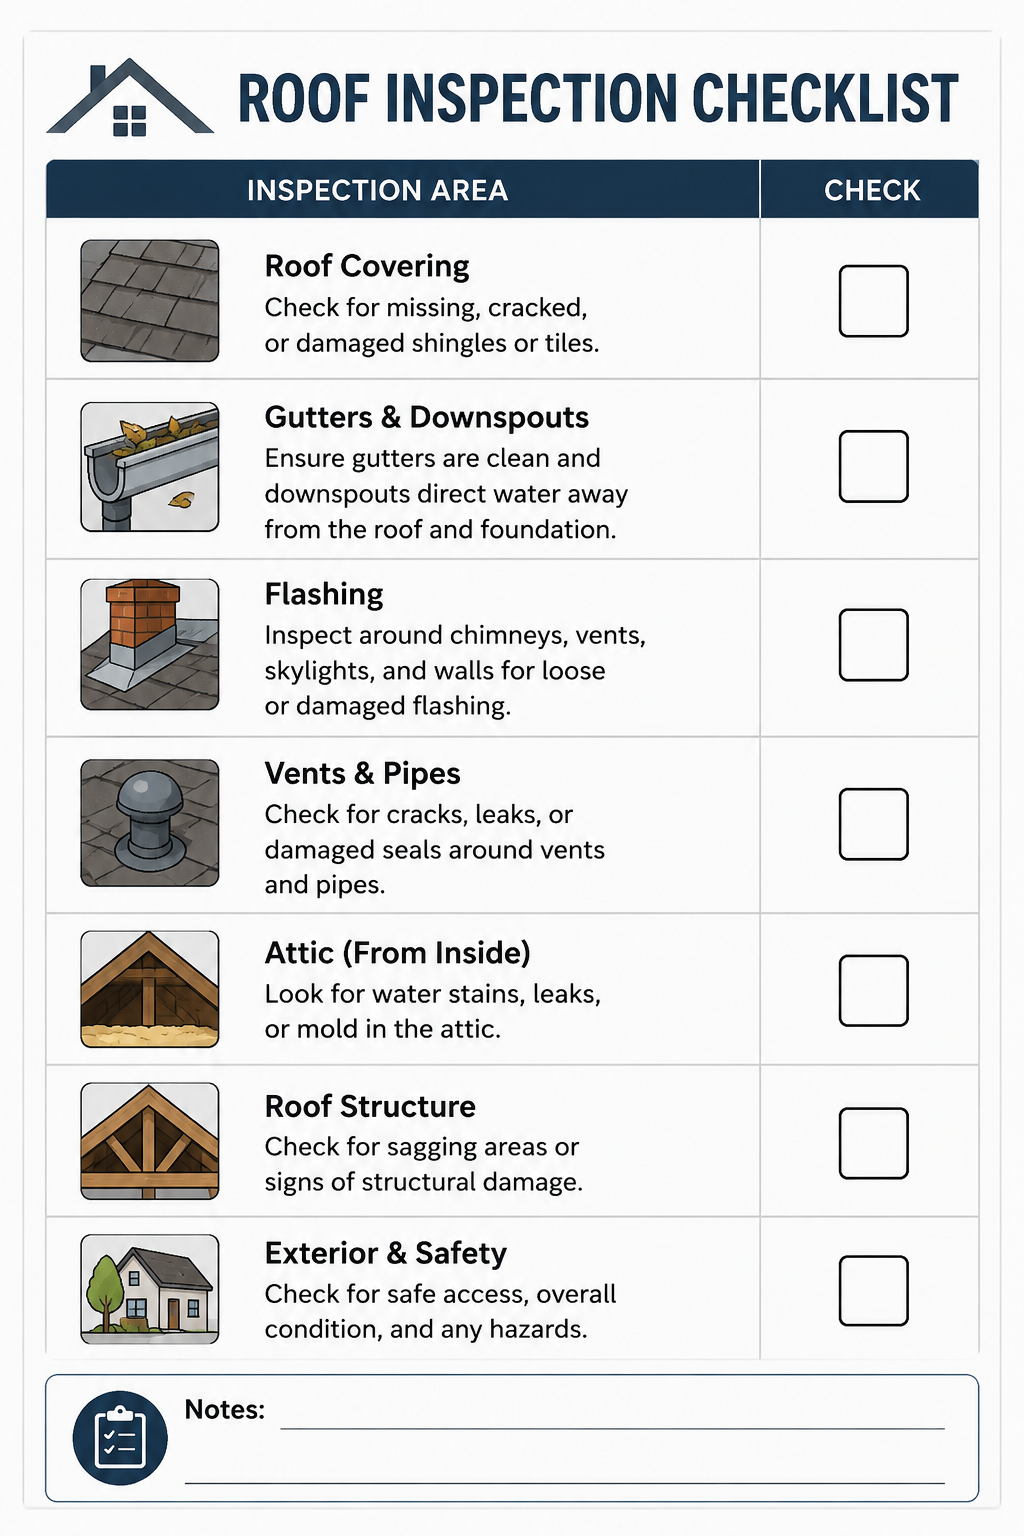
This guide provides a complete roof inspection checklist covering every element of your roof system, from shingles and flashing to gutters, attic, and interior indicators. It is written for homeowners who want to perform responsible, safe visual assessments and understand what they are looking at.
One important safety principle runs throughout this entire guide: homeowners can perform meaningful, valuable inspections from the ground, from safe ladder positions at gutters, and from inside the attic. Climbing onto the roof surface itself carries significant fall risk and is unnecessary for most basic inspections. Any inspection task that requires walking on the roof, assessing steep slopes, or approaching structurally compromised areas should be performed by a licensed roofing professional with proper safety equipment.
What Is a Roof Inspection?
A roof inspection is a systematic visual evaluation of every component of your roofing system to assess its current condition, identify existing damage, and detect developing vulnerabilities before they cause more serious problems.
A complete inspection covers the exterior roof surface, all flashings, penetrations, drainage components, and the interior attic space. It is not a single glance at the roof from the driveway. It is a methodical, component-by-component assessment using the right tools and a clear understanding of what healthy versus damaged conditions look like.
There are two primary types of roof inspection: owner-performed visual assessments conducted from safe ground-level and attic-level positions, and professional inspections performed by licensed roofing contractors or certified home inspectors who access the full roof surface with appropriate safety equipment.
Both have value. Owner inspections provide ongoing monitoring between professional visits. Professional inspections deliver the comprehensive assessment required for real estate transactions, insurance claims, and significant maintenance decisions.
Why Regular Roof Inspections Are Important
The case for regular roof inspection is both practical and financial.
Roofing problems that are caught early are almost always less expensive to address. A single lifted shingle sealed back in place costs minutes and a few dollars in roofing sealant. The same shingle left in place through a winter allows ice damming, water infiltration, and potential interior damage that can run into thousands of dollars.
The Insurance Institute for Business & Home Safety notes that proper roof maintenance and timely repair is one of the most effective ways homeowners can reduce the risk of weather-related property damage. Regular inspection is the foundation of that maintenance.
Beyond financial protection, roof inspections are about knowing the condition of your most critical protective system. A homeowner who inspects their roof twice yearly knows whether shingles are aging uniformly, whether moss is gaining a foothold on the north slope, and whether the chimney flashing is still sealed. That knowledge converts roof maintenance from reactive emergency management into informed, planned preventive care.
How Often Should You Inspect Your Roof?
Industry professionals recommend a formal roof inspection at least twice per year. Spring and fall are the optimal timing for most climates.
Spring inspection assesses whatever winter delivered: ice dam damage, wind-displaced shingles, lifted flashing, and debris accumulation in gutters and valleys. Fall inspection prepares the roof for winter: confirming drainage is clear, all seals are intact, and the roof system is ready for snow loads and freezing temperatures.
Beyond these two scheduled inspections, check your roof visually after any significant weather event, including high winds, hail storms, heavy snowfall, and ice storms. These events can cause immediate damage that should not wait for the next scheduled inspection window.
Best Time to Inspect a Roof
Timing within each inspection session also matters. Inspect under dry conditions with the sun at an angle that illuminates the roof surface rather than washing it out. Morning or late afternoon light creates shadows that make surface irregularities, lifted shingles, and sagging sections much easier to identify than midday direct overhead sun.
Never inspect from a ladder or attempt roof surface access on wet, icy, or frost-covered surfaces. The fall risk on a wet roof is severe, and even experienced professionals use additional safety measures under these conditions.
In very hot weather, asphalt shingles become soft and can be permanently damaged by foot traffic. If professional roof access is needed during summer months, early morning is the safest time for both the inspector and the roofing material.
Roof Inspection Safety Tips
Safety is not an optional consideration in roof inspection. Falls from roofs and ladders consistently rank among the most serious causes of home accident fatalities and serious injuries in the United States.
Follow these principles without exception:
- Perform ground-level inspection first. Binoculars and a smartphone camera with zoom cover the vast majority of what a homeowner needs to assess.
- Never access a roof that is wet, icy, frost-covered, or mossy. These surfaces are extremely slippery.
- Never walk on a roof with visible structural damage, soft sections, or areas of significant deterioration.
- Use a quality extension ladder with a stabilizer for gutter-level access. Have a spotter hold the base at all times.
- Keep three points of contact on the ladder at all times.
- Never lean past the sides of the ladder to extend your reach.
- Wear non-slip rubber-soled shoes whenever on a ladder.
- If your roof has a steep pitch, is two or more stories, or shows signs of structural compromise, do not attempt roof surface access. Hire a licensed professional.
- For attic inspections, wear a respirator, eye protection, and long sleeves to protect against insulation fibers and potential mold spores.
Essential Roof Inspection Tools
| Tool | Purpose | Recommended Use | Estimated Cost |
|---|---|---|---|
| Binoculars | Ground-level roof surface assessment | Every inspection | $20 – $100 |
| Extension Ladder | Safe access to gutter level and eaves | Seasonally | $80 – $300+ |
| Ladder Stabilizer | Secure ladder positioning at fascia | Every ladder use | $30 – $80 |
| Flashlight or Headlamp | Attic and dark interior inspection | Every attic inspection | $15 – $60 |
| Moisture Meter | Detecting hidden moisture in wood and drywall | Seasonally | $20 – $80 |
| Smartphone with Zoom Camera | Photographing roof details from ground | Every inspection | Existing device |
| Drone (optional) | Aerial roof surface photography | As desired | $150 – $500+ |
| Screwdriver | Probing wood surfaces for rot | During attic/fascia inspection | $5 – $20 |
| Safety Glasses | Eye protection during attic inspection | Every attic inspection | $5 – $20 |
| N95 Respirator | Protection from insulation fibers and mold | Every attic inspection | $5 – $15 |
| Safety Harness | Fall protection if roof surface access is needed | Professional or experienced DIY | $50 – $200 |
| Notebook or Inspection App | Recording findings systematically | Every inspection | $0 – $30 |
Complete Roof Inspection Checklist
Inspect the Roof From the Ground
Start every roof inspection from a safe ground-level position. Walk the complete perimeter of your home, stopping at multiple positions to view each roof slope with binoculars. Use your smartphone’s zoom camera to capture photographs of areas that look irregular.
From the ground, you can assess the overall condition of the shingle surface, identify obvious missing or damaged areas, spot moss or algae growth, observe the condition of the ridge line and rake edges, and check the general alignment and slope of the roof plane for any visible sagging.
This ground-level assessment catches the majority of significant issues visible on the exterior roof surface without any ladder risk.
Check for Missing or Damaged Shingles
Missing shingles are among the most urgent findings in any roof inspection. Each missing shingle exposes the roof underlayment and decking below to direct rainfall. Underlayment is a secondary moisture barrier, not a primary weatherproofing layer. It is not designed for sustained exposure to rain.
Look for bare patches or areas where the color pattern of the shingles is interrupted. Also look for shingles that have shifted sideways out of their correct position, exposing the shingle below and creating an unprotected joint.
Look for Curling or Buckling Shingles
Curling and buckling are signs of aging, inadequate attic ventilation, or installation over an existing layer of old shingles. Cupped shingles have edges that turn upward. Curling shingles have edges that turn downward or the center pushes upward. Buckled shingles have a visible wavy distortion running vertically up the slope.
All three conditions compromise the shingle’s ability to shed water effectively and increase vulnerability to wind damage. Widespread curling across a roof section indicates the shingles are approaching the end of their service life.
Check for Cracked Shingles
Cracked shingles result from temperature-related brittleness, physical impact, or simple age. A crack breaks the waterproofing integrity of the shingle surface and allows water infiltration directly at the crack location.
From the ground with binoculars, look for shingles with visible lines or splits across their surface. Individual cracked shingles can sometimes be sealed with roofing sealant if the shingle is otherwise in position and not severely deteriorated. Widespread cracking indicates systemic aging that warrants a professional evaluation for potential roof replacement planning.
Inspect Roof Granules
The granule coating on asphalt shingles serves multiple purposes. It provides UV protection for the asphalt below, adds fire resistance, and contributes to the shingle’s overall weather resistance. Granule loss accelerates shingle aging significantly by exposing the underlying asphalt to direct UV radiation.
Check your gutters for granule accumulation during every inspection. Some granule shedding is normal for newer shingles in their first year and for older shingles as they age. Significant granule accumulation in gutters, or bare patches visible on the shingle surface from the ground, indicates advanced deterioration.
Check Roof Flashing
Flashing inspection is one of the most important elements of any roof inspection because flashing failure is the leading cause of interior roof leaks in residential construction.
From the ground, inspect flashing at all visible locations: along the chimney base on all sides, at skylight perimeters, where the roof meets vertical walls at dormers and additions, and at the drip edge along all eaves and rake edges. Look for lifted sections, visible gaps, rust or corrosion, and areas where the flashing appears to have separated from the adjacent roofing material.
Inspect Roof Valleys
Roof valleys channel concentrated water flow from two converging slopes. They carry more water than any other section of the roof surface and experience significant wear over time.
From the ground with binoculars, examine valley areas for open metal flashing that shows rust or lifted edges, closed-cut valley shingles that appear cracked or worn along the valley line, and any debris accumulation that might be backing up water. Valleys should appear as a smooth, continuous transition between the two slopes with no visible gaps, cracks, or obstructions.
Check Roof Vents
Roof vents are critical components of the attic ventilation system. They must be intact, unobstructed, and properly sealed at their base to function correctly. From the ground, look for vents with damaged covers, missing flashing at the base, or obviously deteriorated rubber boot seals on plumbing vent pipes.
Vent pipe rubber boots are one of the most common sources of roof leaks and one of the easiest to address. A cracked boot around a plumbing vent allows water to run down the pipe and into the attic. These are visible from the ground as deteriorated or missing rubber seals around the pipe base.
Inspect Chimney Flashing
The chimney requires particularly careful attention because it involves multiple flashing components working together: base flashing on all four sides, step flashing up the sides, and counter or cap flashing anchored into the chimney masonry.
From the ground with binoculars, look for visible gaps between the counter flashing and the chimney masonry, areas where mortar joints appear open or missing around the flashing embedment, and rust or physical damage to any flashing component. Chimney flashing failure often begins at the mortar joints and may require both a roofer and a masonry contractor to repair completely.
Check Skylights
Skylights combine the roof surface with a framed glass or polycarbonate unit in a way that creates multiple potential failure points. Inspect the perimeter flashing around every skylight from the ground. Look for visible gaps, lifted edges, and areas where the flashing appears to have separated from the surrounding shingles.
Also note whether any skylights appear fogged between panes, which indicates the insulated glass seal has failed. While not a leak source, a failed skylight seal reduces its insulating performance and may indicate the unit is aging toward more significant seal failure.
Inspect Roof Penetrations
Every pipe, cable, conduit, and exhaust vent that penetrates the roof surface is a potential leak point. Beyond the plumbing vent boots, look for HVAC exhaust vents, kitchen and bathroom exhaust fan terminations, attic fan housings, and any electrical or communication conduits passing through the roof.
Each penetration should have intact flashing or a properly sealed boot with no visible gaps, rust, or cracking. Any penetration where the seal appears compromised should be addressed before rain season.
Look for Moss, Algae, and Lichen
Biological growth on roof surfaces is both a symptom and a cause of roofing problems. Moss grows in shaded, moist areas and physically lifts shingle edges with its root structure, creating pathways for water infiltration. Algae causes surface staining and accelerates shingle degradation. Lichen bonds chemically to shingle granules and causes surface damage when removed.
From the ground, identify any green, dark gray, or black growth on the roof surface. Moss appears as raised fuzzy patches, particularly on north-facing shaded slopes. Algae appears as dark streaking typically running down the slope.
Check for Sagging Areas
A roof surface that shows visible depression, waves, or downward bowing between rafters indicates structural problems that require immediate professional evaluation. Sagging can result from long-term moisture damage to roof decking, overloaded roof structure, or rafter and truss damage.
This is one condition where ground-level observation is particularly valuable because the overall roof plane geometry is easiest to assess from a distance. Stand far enough back to see the entire roof slope as a unified surface. Any section that appears to deviate from the otherwise straight plane of the slope needs professional assessment without delay.
Inspect Gutters and Downspouts
Gutters are part of the roof drainage system and must be assessed as part of every roof inspection. Check for debris accumulation, sagging sections, separation from the fascia, rust or holes in the gutter channel, and proper slope toward downspouts.
Downspouts must be firmly attached, unobstructed, and directing water away from the foundation. A complete guide to gutter inspection and safe cleaning technique is covered in How to Clean Gutters Safely, which walks through every aspect of this inspection and maintenance task.
Check Fascia and Soffits
The fascia board is the vertical board running along the roof edge to which gutters attach. The soffits are the horizontal panels forming the underside of the roof overhang. Both are vulnerable to moisture damage from overflowing or poorly attached gutters.
Inspect fascia boards for paint peeling, soft spots (probe with a screwdriver), and areas where gutters have pulled away from the board. Check soffits for discoloration, holes, and sagging sections. Signs of moisture damage to fascia and soffits often indicate drainage problems that have been ongoing long enough to cause wood deterioration.
Inspect the Attic
The attic is your most valuable diagnostic resource for assessing roof condition from the interior. What the roof is experiencing on the outside often leaves evidence on the underside of the decking before it reaches interior ceilings.
With a bright flashlight and proper protective equipment, inspect the attic following the complete guidance in the DIY Home Inspection Checklist. Work systematically from the entry point toward all corners and peaks, checking every area of the roof deck and framing.
Look for Water Stains
Water stains on rafters, roof decking, or the attic floor are evidence of past or current water infiltration. Fresh stains show active infiltration. Old dry stains indicate past leaks that may or may not still be active.
Trace stains to their likely origin point, keeping in mind that water travels along framing members and can appear far from where it actually entered. Use your moisture meter to check stained areas for elevated moisture content that indicates an active rather than historical problem.
Check Attic Ventilation
Proper attic ventilation is essential for roof longevity. Without adequate intake at the soffit eaves and exhaust at the ridge, heat and moisture accumulate in the attic space. In summer, excessive heat accelerates shingle aging from below. In winter, warm moist air from the living space condenses on cold decking, causing moisture damage identical to a roof leak.
Confirm intake vents in the soffit areas are clear and unobstructed. Confirm ridge vents or exhaust vents near the peak are clear and functioning. The ventilation system should create a continuous flow of outside air through the attic that prevents temperature and moisture extremes.
Inspect Roof Insulation
Attic insulation condition directly relates to both energy efficiency and roof performance. Check insulation for compression, wet or damp areas, and displacement away from exterior wall areas where it must reach the eave line to be effective.
Wet insulation has lost virtually all of its insulating value and must be replaced. It also indicates active moisture infiltration that needs to be traced to its source and corrected before new insulation is installed.
Check for Signs of Moisture or Mold
Beyond water stains, look for active mold growth on roof decking, rafters, and the backs of fascia boards visible from the attic. Mold appears as black, gray, green, or white fuzzy patches on wood surfaces.
Any mold growth in the attic indicates a moisture problem, whether from a roof leak, condensation from inadequate ventilation, or a combination of both. Small areas of mold can sometimes be addressed by a capable DIYer with appropriate protective equipment and approved mold-killing treatments. Larger areas of mold growth require professional remediation.
Inspect the Ceiling for Roof Damage
Before climbing any ladder or entering the attic, walk through every room of the home and look carefully at all ceiling surfaces. Water stains appear as yellowish or brownish rings or diffuse discoloration. Pay particular attention to ceilings directly below the roof, near exterior walls, and around any ceiling-mounted light fixtures or fans.
Note the location and approximate size of any stain and photograph it. Stains near electrical fixtures or in locations with multiple simultaneous appearances warrant urgent professional attention.
Check Exterior Walls for Water Damage
Roof water infiltration does not always travel straight down to ceiling surfaces. Water entering at the roof perimeter or through wall-roof transitions can travel down inside exterior walls and appear as staining, bubbling paint, or efflorescence on exterior masonry at ground level.
Walk the exterior perimeter looking for these patterns, particularly on walls below roof valleys, below chimney locations, and below any roof-to-wall flashing transitions.
Inspect Around Windows and Doors
Water staining on walls or window sills near the tops of windows and doors on upper floors can indicate roof drainage problems or failed flashing at roof-to-wall transitions nearby. Include these areas in your exterior inspection tour.
Roof Inspection After Heavy Rain or Storms
Within 24 hours of any significant storm involving high wind, hail, or heavy rainfall, perform a post-storm inspection. This does not require ladder access or roof surface evaluation. It requires a systematic visual check from the ground and a brief interior walk-through.
From the ground, look for:
- Shingles or shingle fragments on the ground around the home
- Granule accumulation in gutters following the storm
- Displaced or bent flashing visible from the ground
- Gutter sections pulled away from the fascia by wind or debris
- Tree branches or large debris resting on the roof surface
From inside, check:
- Attic for any new daylight, dripping, or wet spots within 24 hours of the storm
- All ceiling surfaces for new or enlarged staining
- Walls near roof transitions for new moisture
Document everything with photographs. If hail accompanied the storm, this documentation is critical for insurance claim purposes. The Roof Maintenance for Rainy Season article provides additional guidance specifically on protecting and assessing your roof during wet weather periods.
Roof Inspection Before the Rainy Season
Pre-rain season inspection focuses on ensuring every drainage pathway and weatherproofing element is ready for sustained rainfall. Timing this inspection four to six weeks before your region’s primary rainy period gives you time to schedule any needed repairs before contractor demand peaks.
Priority items for pre-rain inspection:
- All flashing sealants and joints for cracks or separation
- All vent pipe rubber boots for cracking or deterioration
- Gutters and downspouts for clear, unrestricted flow
- Valley areas for debris accumulation that will impede drainage
- Any known previous problem areas for recurrence
Roof Inspection Before Winter
Pre-winter roof inspection prioritizes the conditions that winter weather exploits. Ice dams, heavy snow loads, and freeze-thaw cycles all stress specific elements of the roof system.
Priority items for pre-winter inspection:
- Attic insulation adequacy and continuity to prevent heat loss that creates ice dams
- Attic ventilation to ensure cold air flow that keeps the roof deck temperature consistent
- Gutter clearing to allow complete drainage before freezing temperatures arrive
- All flashings sealed to prevent water infiltration during freeze-thaw cycles
- Any existing damage that winter conditions will worsen
The Winter Home Maintenance Checklist provides a comprehensive framework for pre-winter preparation that integrates roof inspection with all other cold-weather home preparation tasks.
Signs Your Roof Needs Immediate Repair
Certain findings during any inspection indicate problems that should not wait for the next scheduled maintenance window.
| Warning Sign | Urgency Level | Action Required |
|---|---|---|
| Active interior dripping during rain | Emergency | Professional repair immediately |
| Sagging ceiling section | Emergency | Professional evaluation immediately |
| Visible daylight through attic decking | Urgent | Professional repair within days |
| Multiple missing shingles | Urgent | Professional repair before next rain |
| Large sections of lifted flashing | Urgent | Professional repair before next rain |
| Extensive mold in attic | Urgent | Professional assessment within days |
| Structural sagging visible from ground | Emergency | Professional evaluation immediately |
| Significant granule loss across large area | High | Professional evaluation within weeks |
| Widespread curling or buckling shingles | High | Professional evaluation within weeks |
| Tree limb resting on roof | Urgent | Remove and inspect within days |
DIY Roof Inspection vs Professional Roof Inspection
| Factor | DIY Roof Inspection | Professional Roof Inspection |
|---|---|---|
| Cost | Minimal (tools only) | $150 – $600+ depending on roof size and complexity |
| Frequency | Twice yearly plus after storms | Every 2 to 3 years or as needed |
| Scope | Ground level, gutter level, attic | Full roof surface, all components, all angles |
| Tools Required | Binoculars, flashlight, ladder, moisture meter | Infrared camera, moisture meters, safety equipment, manifold tools |
| Safety Risk | Low if ground-level approach followed | Low (trained professionals with proper equipment) |
| Documentation | Personal notes and photos | Written formal report with photographs |
| Damage Detection Depth | Visible surface conditions and interior indicators | Complete assessment including hidden moisture and structural issues |
| Code Knowledge | General homeowner awareness | Current building code and manufacturer specification knowledge |
| Appropriate For | Ongoing monitoring, early warning detection | Insurance claims, real estate transactions, major repair decisions |
| Liability | Personal responsibility | Professional liability coverage |
| Attic Inspection | Yes (accessible areas) | Comprehensive including hard-to-reach areas |
Common Roof Problems Found During Inspections
Roof Leaks
Roof leaks are the consequence most homeowners fear most, and for good reason. They introduce moisture into the home’s structure where it damages insulation, framing, and interior finishes while promoting mold growth. Most leaks originate not at the shingle field but at flashings, penetrations, and transitions where different roofing components meet.
Missing Shingles
Wind is the primary cause of missing shingles. Shingles that have lost their self-sealing adhesive strip or that have aged to the point of brittleness are most vulnerable. Even a single missing shingle should be addressed promptly to prevent water infiltration at the exposed area.
Damaged Flashing
Flashing fails through corrosion, physical damage, thermal expansion cycling, and sealant deterioration at joints. Because flashing protects every roof penetration and transition point, its failure directly creates leak pathways at the most vulnerable areas of the roof system.
Poor Roof Ventilation
Inadequate attic ventilation is a systemic problem that affects the entire roof. In summer, trapped heat accelerates shingle aging from below and increases cooling costs. In winter, warm moist air condensing on cold decking creates moisture damage indistinguishable from a roof leak. Ventilation problems require assessment of both intake and exhaust points in the attic system.
Water Pooling
Flat or low-slope roofs are most susceptible to water pooling when drains are blocked or the roof develops depressions from structural settling. Even slight ponding water exerts continuous pressure on roofing membranes and accelerates deterioration at those locations.
Moss and Algae Growth
Biological growth on roof surfaces is a progressive problem. It begins as a cosmetic issue and develops into a structural one as moss roots physically lift shingles and algae degrades surface granules. Addressing growth before it becomes extensive is dramatically easier and less expensive than removing established colonies.
Gutter Problems
Gutters that are clogged, sagging, or separated from the fascia affect the entire roof drainage system. Water backed up in gutters can infiltrate under eave shingles by capillary action, cause fascia rot that allows gutter systems to fail entirely, and allow overflow that saturates soil around the foundation.
Structural Sagging
Sagging represents the most serious finding in any roof inspection because it indicates structural failure rather than surface-level roofing problems. The cause may be long-term moisture damage to the roof decking or framing, overloaded structure from accumulated roofing layers, or original design deficiencies. Professional structural evaluation is essential before any other repairs can be planned.
Roof Maintenance After an Inspection
A completed inspection is valuable only if findings lead to action. After each inspection, categorize your findings into three groups.
Immediate attention: Any condition creating an active or imminent water infiltration risk, structural concern, or safety hazard.
Schedule within the season: Conditions that are developing but not yet causing active damage, such as beginning moss growth, minor sealant cracking, or single damaged shingles.
Monitor and address next inspection: Conditions that are worth noting but currently pose no immediate risk, such as minor granule shedding in gutters consistent with shingle age, or small areas of algae staining.
Connecting your roof inspection findings to your broader home maintenance planning ensures repairs are scheduled and tracked systematically. The Home Maintenance Checklist by Month provides a practical framework for scheduling roof-related follow-up tasks alongside all other home maintenance priorities.
Estimated Roof Inspection and Repair Costs
| Service or Repair | Estimated Cost Range | Notes |
|---|---|---|
| DIY owner inspection | $0 – $50 (tools) | Binoculars, flashlight, basic tools |
| Professional roof inspection | $150 – $400 | Varies by roof size and complexity |
| Individual shingle replacement | $150 – $400 | Small areas, professional installed |
| Flashing repair (sealant) | $10 – $30 DIY | Accessible locations only |
| Flashing replacement | $200 – $600+ | Professional installation |
| Vent pipe boot replacement | $100 – $250 professional | High-impact, relatively low-cost repair |
| Moss treatment and removal | $200 – $500 professional | Depends on coverage extent |
| Gutter cleaning | $100 – $300 professional | Twice yearly |
| Condensate drain clearing | $0 – $20 DIY | Monthly vinegar flush |
| Emergency tarping | $200 – $600 | Temporary damage protection |
| Partial roof replacement | $1,500 – $5,000+ | Depends on area size and material |
| Full roof replacement | $8,000 – $25,000+ | Highly variable by size and material type |
Costs vary significantly based on roof type, pitch, size, location, contractor, and material selected. These ranges are estimates intended for planning purposes. Always obtain multiple written quotes from licensed contractors for any significant repair or replacement project.
Common Roof Inspection Mistakes
Even motivated homeowners make inspection errors that reduce the value of their assessment or create unnecessary risk.
Relying only on interior ceiling checks. Waiting for a ceiling stain to appear means the damage has already progressed through the roof deck, insulation, and interior framing. Ground-level and attic inspection catches most problems before they reach interior ceilings.
Inspecting only after a visible problem appears. By definition, a reactive inspection reveals a problem that has been developing undetected for some time. The value of scheduled preventive inspection is finding problems before they produce symptoms.
Focusing only on the shingle field. Most residential roof leaks originate at flashings and penetrations rather than the shingle field. A homeowner who inspects only for missing or visibly damaged shingles misses the most common failure points.
Attempting roof surface access on unsafe conditions. Wet, icy, steep, or structurally compromised roofs should never be accessed by a homeowner. The information gained does not justify the risk. Ground-level and attic-based assessment provides sufficient information for most homeowner decisions.
Not photographing findings. An inspection without photographic documentation leaves you with no objective record of what conditions looked like at a specific point in time. Photographs enable comparison between inspection cycles, support insurance claims, and inform contractor discussions.
Skipping the attic. The attic provides more diagnostic information than any external ground-level assessment for most active leak situations. Skipping it misses the interior evidence that often reveals the true severity and source of roofing problems.
How to Prepare for a Professional Roof Inspection
Getting the most from a professional roof inspection requires preparation on the homeowner’s part.
Before the inspector arrives:
- Clear access to the attic hatch and ensure the attic is physically accessible
- Remove any vehicles or obstacles from the driveway to give the inspector clear access to all sides of the home
- Document any specific areas of concern you have identified during your own inspections
- Gather your records of past repairs, previous inspection reports, and any warranty documentation for your roofing material
- Note any interior symptoms you have observed, including their location, when they appeared, and whether they correlate with specific weather events
During the inspection, accompany the inspector if possible and ask questions about every finding. A qualified inspector should be able to explain what they found, why it matters, and what the available repair options are.
When to Call a Roofing Professional
The boundary between appropriate homeowner inspection and necessary professional involvement is determined primarily by safety and diagnostic capability.
Call a professional roofing contractor when:
- You observe structural sagging anywhere on the roof
- Multiple shingles are missing or severely damaged
- You suspect a refrigerant leak, active interior dripping, or water staining that appeared after a storm
- The roof has not been professionally inspected in more than three years
- You are buying or selling a home and need a formal inspection report
- Your own inspection identified concerns that you cannot safely access for closer evaluation
- An insurance company requests a roof inspection for a claim
- You are planning any significant repair or replacement work and need accurate assessment and pricing
The National Roofing Contractors Association recommends that homeowners have their roofs professionally inspected by a qualified contractor at minimum every two to three years as part of a comprehensive preventive maintenance program.
Expert Recommendations
After years of performing and reviewing roof inspections across a wide range of climates, construction types, and maintenance histories, certain practices consistently produce the best outcomes.
Build roof inspection into your seasonal maintenance calendar without exception. Spring and fall inspections, scheduled in advance and performed consistently, catch the problems that cause expensive damage before they have the opportunity to develop. The Fall Home Maintenance Checklist and the Spring Home Maintenance Checklist both provide comprehensive seasonal frameworks that include roof inspection alongside all other critical home preparation tasks.
Document every inspection with organized photographs. Create a dedicated folder for each inspection year and photograph every slope of the roof from multiple ground positions, every gutter section, and all visible attic areas during interior inspection. Year-over-year comparison of photographs reveals developing trends that a single inspection snapshot cannot detect.
Take post-storm inspection seriously even when you see nothing obvious from the ground. Hail damage, in particular, may not be visible without close examination of shingle surfaces. If a significant hail storm passed through your area, a professional inspection with close-up assessment of shingle surfaces is worth the investment before filing or choosing not to file an insurance claim.
Treat flashing as the most critical inspection focus. Shingles get the attention because they are the most visible element, but flashing failures cause the majority of residential roof leaks. Every inspection should give flashing at all chimneys, skylights, valleys, and penetrations at least equal attention to the shingle field.
Build your complete home inspection and maintenance knowledge base. Roof inspection is one component of comprehensive home care. The Ultimate Home Maintenance Checklist for Every Season provides the full-year framework that integrates roof inspection with every other system your home depends on.
Frequently Asked Questions
Can I inspect my own roof without climbing on it?
Yes, and in most cases, a ground-level inspection combined with an attic inspection provides the information most homeowners need to assess their roof’s condition and make informed maintenance decisions. Using quality binoculars, a smartphone with a zoom camera, and a bright flashlight in the attic, you can identify the majority of significant roof problems without setting foot on the roof surface. The attic reveals water infiltration evidence, ventilation issues, and structural conditions. Ground-level inspection shows the overall shingle condition, flashing status, and drainage components. For close-up assessment of specific findings or for comprehensive formal inspection, hire a licensed professional.
How long does a professional roof inspection take?
A thorough professional inspection of a standard single-story residential home typically takes between one and two hours. Larger homes, multi-story structures, complex roof geometries with multiple peaks and valleys, or homes with known problem areas may take longer. During that time, the inspector walks the full roof surface, inspects all flashings and penetrations up close, evaluates the attic, and documents all findings with photographs. After the on-site inspection, the inspector compiles a formal written report that may take additional time to deliver. Budget a half-day for the visit and report review.
What is the difference between a roof inspection and a roof assessment?
The terms are often used interchangeably, but some contractors distinguish between a basic visual inspection and a more detailed formal assessment. A visual inspection covers observable surface conditions and accessible interior indicators. A formal assessment may include infrared thermal imaging to detect trapped moisture invisible to the naked eye, drone photography for comprehensive aerial documentation, and structured testing of ventilation performance. Insurance-focused assessments typically include close-up hail and wind damage evaluation at the shingle surface. For routine preventive maintenance, a standard professional inspection is appropriate. For insurance claims or major repair decisions, a formal comprehensive assessment provides more detailed documentation.
How much does it cost to have a roof professionally inspected?
Professional roof inspection costs vary based on roof size, complexity, pitch, access difficulty, and the scope of the inspection. Basic visual inspections by roofing contractors often range from $150 to $400 for standard residential properties. More comprehensive inspections involving thermal imaging, drone photography, or detailed insurance documentation typically cost more. Many roofing contractors offer free inspections as part of a service relationship, though these should be understood as sales opportunities as well as inspections. Independent certified home inspectors who specialize in roofing provide objective assessments without a product-sale motivation. Always clarify what is included in any quoted inspection price.
What should I look for in my gutters to assess roof health?
Gutters collect evidence of roof condition with every rain event. The most diagnostic finding is granule accumulation: the mineral-coated particles that protect asphalt shingles from UV radiation. Some granule shedding is normal, particularly for newer shingles in their first year of service and for older shingles as they age. However, significant granule deposits forming thick layers in gutters indicate advanced shingle deterioration that warrants a professional assessment for replacement planning. Also check gutters for shingle fragments, pieces of flashing, and debris patterns that indicate specific problem areas by noting which sections of gutter show the heaviest accumulation.
Does a new roof still need inspection?
Yes, new roofs still benefit from periodic inspection, though the concerns are different from older roofs. In the first year after installation, inspect for any signs of improper installation: lifted shingles indicating inadequate adhesive sealing, exposed nail heads in the field, improper flashing at any penetration, or inadequate attic ventilation that will accelerate aging. New roofs should also be inspected after any significant storm during their first few years of service. Manufacturer warranties on roofing materials often require documented maintenance and inspection to remain valid. Building an inspection habit from the day a new roof is installed sets the foundation for effective long-term roof management.
What does a hail-damaged roof look like from the ground?
Hail damage can be subtle from the ground, which is why professional close-up inspection is important after any confirmed hail event. From the ground with binoculars, look for dark impact marks scattered randomly across the shingle surface, which distinguishes hail damage from the regular wear pattern of aging. Severe hail damage may produce visible depressions or bare granule-stripped patches visible from the ground. Check metal components visible from the ground such as gutter edges, downspouts, chimney caps, and any metal flashing for fresh dings and dents, which confirm hail size and impact force and support the case for shingle damage at the surface.
How does attic ventilation affect roof lifespan?
Attic ventilation has a direct and significant impact on how long a roof lasts. In summer, a poorly ventilated attic can reach temperatures well above 150 degrees Fahrenheit. This extreme heat ages asphalt shingles from below, accelerating the loss of the volatile oils that keep the asphalt flexible and weather-resistant. Shingles on poorly ventilated roofs typically fail years before their rated service life. In winter, warm moist air from the living space that escapes into an inadequately ventilated attic condenses on the cold roof decking, creating wet conditions that cause wood rot and mold growth identical in effect to a roof leak. Proper ventilation, balanced between soffit intake and ridge exhaust, is essential for achieving the full intended lifespan of any roofing material.
Can moss actually damage my roof or is it just cosmetic?
Moss causes genuine structural damage over time and should not be dismissed as a cosmetic issue. Moss anchors itself to shingle surfaces and sends root-like structures between shingle layers. These roots physically lift shingle edges, breaking the seal between them and creating exposed joints that allow wind-driven rain to enter. Lifted shingles are also significantly more vulnerable to wind damage, since they can catch wind that would otherwise pass smoothly over a flat shingle surface. Moss also retains moisture against the shingle surface, which accelerates the degradation of the asphalt and granule layer. Treat moss promptly when first identified. An established moss colony is far harder and more expensive to remove than early-stage growth.
What questions should I ask during a professional roof inspection?
Asking the right questions turns a professional inspection from a passive review into an active education about your specific roof’s condition and needs. Ask the inspector to explain every finding in plain language and describe what it means for your roof’s performance and lifespan. Ask how urgently each issue needs to be addressed and what happens if it is deferred. Ask whether the problems found are isolated failures or signs of systemic aging across the roof system. Ask about the remaining useful life of the current roofing material in its current condition. Ask for a written report with photographs. And ask whether the contractor has a financial interest in recommending repair or replacement, so you can weigh the recommendation with that context in mind.
Conclusion
A roof inspection is not a complicated task. It is a disciplined habit.
The homeowners who get the most from their roofs are not necessarily those with the most expensive roofing materials or the most recent installations. They are the ones who pay attention consistently, who inspect twice a year and after every major storm, who check the attic when something seems off, and who act on what they find before small problems grow into large ones.
The checklist in this guide gives you the structure to do exactly that. Work through it systematically from the ground and through the attic. Photograph everything. Record your findings. Prioritize what you find and address it in order of urgency.
Know the boundaries of what you can safely assess yourself, and respect them without hesitation. A licensed professional with proper safety equipment and diagnostic tools is the right resource for roof surface access, comprehensive formal inspection, and any repair work beyond minor sealant application.
Your roof protects everything in your home. Giving it regular, informed attention is one of the most straightforward and highest-return maintenance practices available to any homeowner.