How to Install a Towel Bar: Easy DIY Guide

How to Install a Towel Bar
Installing a towel bar is one of the most practical bathroom upgrades you can make. It keeps towels organized, makes them easy to grab after a shower, and gives your bathroom a cleaner, more finished look. Best of all, most homeowners can complete this project in under an hour with basic tools.
That said, a towel bar that pulls out of the wall is more than just frustrating. It can damage drywall, crack tile, and leave an unsightly hole that costs more to repair than the original installation was worth. Doing it right the first time saves you time, money, and headaches later.
The correct installation method depends on your wall material, the towel bar design, the mounting hardware included, and how much weight the bar will regularly support. A towel bar going into tile requires a completely different approach than one going into drywall. Understanding these differences before you start drilling is the key to a secure, lasting result.
This guide walks you through every stage of the process, from choosing the right location to tightening the final screw.
What Is a Towel Bar?
A towel bar is a horizontal rod mounted to the wall, typically in a bathroom, that holds one or more towels. Most towel bars consist of a straight bar supported at both ends by mounting brackets that screw into the wall.
They are available in a wide range of lengths, materials, and finishes to match virtually any bathroom style. Common lengths range from 18 inches to 30 inches, though longer bars exist for larger bathrooms. Standard materials include chrome-plated steel, stainless steel, brushed nickel, oil-rubbed bronze, and brass.
Towel bars are most commonly installed in bathrooms, but they also work well in laundry rooms, mudrooms, or anywhere towels and linens need a convenient hanging spot.
Why Proper Towel Bar Installation Matters
A poorly installed towel bar is a common bathroom problem that most people underestimate until it fails. When a towel bar is mounted into the wrong type of anchor, or when screws are not fully tightened, the bar gradually loosens every time someone grabs a towel.
Over time, this pulling motion damages the wall behind the bracket. Drywall crumbles, anchors spin freely, and eventually the whole bar comes off the wall, sometimes taking a chunk of drywall with it.
Proper installation protects your wall, keeps your bathroom organized, and ensures the towel bar looks as good years from now as it does on the day you install it. Choosing the right anchors, using a level, and following the manufacturer’s instructions are not optional steps. They are what separate a secure installation from one that fails in six months.
Where Should You Install a Towel Bar?
Placement is more important than many people realize. A towel bar should be positioned where it is genuinely convenient to use, not simply where it is easiest to install.
Common placement locations include the wall next to the shower or bathtub, the wall beside the bathroom vanity, or the wall opposite the toilet. In a guest bathroom, the towel bar is often placed near the sink for hand towels and near the shower for bath towels.
The bar should be positioned so that towels hang freely without touching the floor, the toilet, nearby cabinetry, or any other fixture. Towels that bunch up or drag on the floor do not dry properly and can become musty quickly.
Also consider regular bathroom traffic. A towel bar placed behind a door that swings open frequently will get bumped constantly, which adds stress to the mounting hardware over time.
How High Should a Towel Bar Be Installed?
There is no single height that works for every bathroom or every household. General installation guidelines typically suggest a range between 44 and 54 inches from the floor to the center of the bar, but this is a starting point rather than a firm rule.
If your household includes young children, a lower installation height makes more sense. If the bar is primarily for adult use in a tall household, mounting it closer to 52 or 54 inches may feel more natural.
Consider the length of your bath towels as well. A standard bath towel is roughly 27 by 52 inches. When folded over a bar, both ends should clear the floor with room to spare. Hold a folded towel up to the wall before marking anything, and you will immediately get a sense of the right height for your space.
Accessibility is another factor. For a bathroom designed to meet accessibility needs, guidelines from the Americans with Disabilities Act may apply, and those specific requirements should be reviewed separately.
What Type of Wall Do You Have?
Identifying your wall material before you drill is essential. Using the wrong anchor in the wrong wall type is one of the most common reasons towel bars fail.
Drywall is the most common wall material in modern homes. It is relatively soft and requires anchors when you cannot mount directly into a wall stud.
Plaster is found in older homes and is harder and more brittle than drywall. It requires a different approach to drilling and anchor selection.
Tile is common in shower and tub surrounds. Drilling through tile without the right bit and technique will crack the tile or cause the drill to wander.
Wood paneling or solid wood can accept screws directly in many cases, but check whether the wood is thick enough to hold the screw securely.
Concrete or masonry walls require masonry drill bits and specific masonry anchors. Standard drywall anchors will not work in concrete.
Knowing your wall type before you choose your hardware is not just good practice. It is the difference between a bar that holds and one that fails.
Towel Bar Mounting Options
| Mounting Method | Best For | Advantage | Limitation |
|---|---|---|---|
| Into a wall stud | Drywall walls where studs align | Strongest possible hold | Studs may not align with desired location |
| Drywall anchors | Drywall without stud alignment | Flexible placement | Load capacity varies by anchor type |
| Tile anchors | Ceramic or porcelain tile walls | Secure in tile | Requires correct drill bit and technique |
| Masonry anchors | Concrete or brick walls | Very strong hold | Requires hammer drill and masonry bits |
| Adhesive mounting | Smooth, non-porous surfaces | No drilling required | Lower weight capacity, surface-dependent |
| Manufacturer hardware | All wall types | Designed for specific bar | Always follow product instructions |
Each method has its place. The right choice depends on your wall material, the anchor rating, and the expected load on the bar. Always read and follow the anchor manufacturer’s instructions before installation.
Tools and Materials You Need
| Tool or Material | Purpose | Recommended Use | Estimated Cost |
|---|---|---|---|
| Towel Bar | The hardware being installed | All installations | $15 – $150+ |
| Mounting Brackets | Attach bar to wall | All installations | Included with bar |
| Screws | Fasten brackets to wall or anchors | All installations | Included or $2 – $5 |
| Wall Anchors | Secure brackets when no stud is available | Drywall, tile, masonry | $3 – $15 |
| Tape Measure | Measure placement and spacing | All installations | $5 – $20 |
| Level | Ensure bar is horizontal | All installations | $5 – $30 |
| Pencil | Mark drilling points | All installations | Under $1 |
| Drill | Create pilot holes | All installations | $30 – $120 |
| Drill Bits | Match to wall material | Varies by wall type | $5 – $30 |
| Screwdriver | Tighten screws | All installations | $5 – $20 |
| Stud Finder | Locate wall studs | Drywall installations | $10 – $50 |
| Painter’s Tape | Protect tile, prevent drill wander | Tile installations | $3 – $8 |
| Safety Glasses | Eye protection | All drilling | $5 – $15 |
| Cleaning Cloth | Clean wall surface before mounting | All installations | Under $2 |
The correct drill bit depends entirely on your wall material. A standard twist bit works for wood and drywall. Tile requires a carbide-tipped or diamond-tipped bit. Concrete requires a masonry bit. Using the wrong bit damages your wall and your tools.
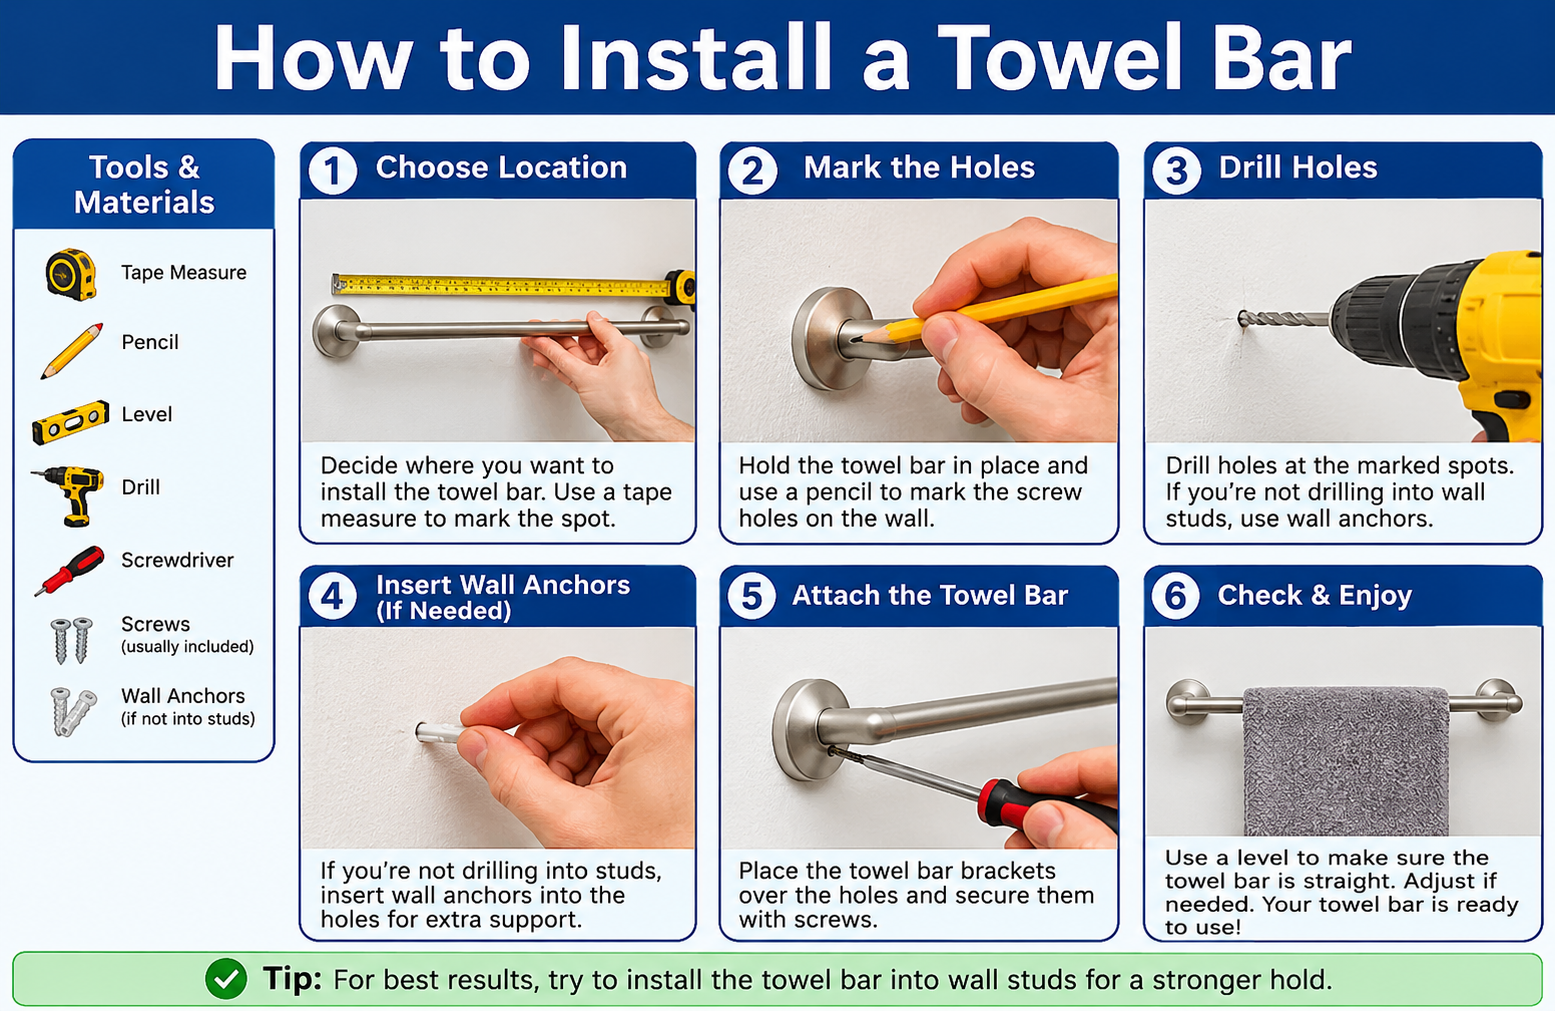
How to Install a Towel Bar Step by Step
Step 1: Choose the Right Towel Bar
Select a towel bar that fits your bathroom size, matches your existing hardware finish, and comes with mounting hardware rated for your wall type. Read the product instructions before purchasing to confirm it includes everything you need.
Step 2: Decide on the Installation Location
Stand in the bathroom and determine where the towel bar is most useful. Consider proximity to the shower, sink, and door swing. Mark a rough target area with a piece of painter’s tape so you have a visual reference while measuring.
Step 3: Measure the Mounting Distance
Read the instructions included with your towel bar. They will specify the exact distance between the centers of the two mounting brackets. Measure and mark this distance carefully on the wall. An error here means misaligned brackets that are difficult to correct once drilled.
Step 4: Mark the Mounting Points
Use a pencil to lightly mark the center point of each bracket location. These marks should be at the same height and the correct distance apart. Do not press hard enough to damage the wall surface.
Step 5: Check for Wall Studs
Use a stud finder to check whether a wall stud falls at either bracket location. If a stud aligns with your mark, you can drive a screw directly into it for maximum holding strength. If not, you will need appropriate wall anchors.
Step 6: Check for Hidden Wiring or Plumbing
Before drilling anything, use a stud finder that also detects electrical wiring, or consult a wiring diagram if you have one. Drilling into a hidden electrical wire or water pipe is a serious safety hazard. If you are uncertain about what is inside the wall, stop and consult a professional. The OSHA guidelines on construction safety emphasize that workers must be aware of hidden utilities before drilling or cutting into walls.
Step 7: Level the Mounting Brackets
Hold one bracket against the wall at your first mark. Use a level to confirm the bracket is sitting perfectly horizontal. Then measure from that bracket to your second mark to confirm both are at the same height. Adjust if necessary before marking the final screw holes.
Step 8: Drill the Pilot Holes
Select the correct drill bit for your wall material. Drill slowly and steadily at each marked point. For drywall, a standard bit works fine. For tile, use a carbide or diamond-tipped bit, start at a very slow speed, and let the bit do the work without forcing it. For concrete, use a masonry bit and a hammer drill setting if your drill has one.
Step 9: Install the Appropriate Anchors
If you are not drilling into a stud, insert the wall anchors into the pilot holes. Follow the anchor manufacturer’s instructions exactly. Different anchors have different installation methods. Some tap in with a hammer, some require a drill to expand them, and some require a specialized setting tool. Never use a drywall anchor in tile or concrete.
Step 10: Attach the Mounting Brackets
Align each bracket over the installed anchors or stud locations. Drive the screws through the bracket holes and into the anchors or studs. Tighten them firmly but do not overtighten, as this can strip the anchor or crack the wall surface, particularly with tile.
Step 11: Attach the Towel Bar
Slide or clip the towel bar into the mounted brackets according to the manufacturer’s instructions. Most towel bars either slide into end caps or are secured with a small set screw at the base of each bracket.
Step 12: Tighten the Hardware
If your towel bar uses set screws, tighten them with the appropriate hex key or Allen wrench. These screws keep the bar from sliding out of the brackets. Do not skip this step, as a loose set screw is one of the most common reasons towel bars feel wobbly.
Step 13: Check the Alignment
Step back and visually inspect the bar. Confirm it is level, centered in the intended location, and that both brackets sit flush against the wall. Use your level one final time to verify.
Step 14: Test the Towel Bar
Apply firm, downward pressure to the center of the bar and pull outward slightly. This simulates how a towel bar is used during normal daily activity. If anything shifts, identify the problem immediately and correct it before considering the job complete.
How to Install a Towel Bar on Drywall
Drywall installation is straightforward when a wall stud is available at the right location. A screw driven into a solid stud provides excellent holding power without any additional anchors.
When studs do not align with your desired mounting location, wall anchors are necessary. Choose anchors rated for the expected load and follow the manufacturer’s instructions for the correct pilot hole size. Using a hole that is too small or too large will compromise the anchor’s performance.
Drywall alone, without a stud or anchor, cannot hold a towel bar securely. The soft core of drywall will crumble under repeated lateral loads. Do not skip the anchor step, even if the screws feel tight when you first install them.
If you experience drywall damage during installation, our guide on how to patch holes in drywall can help you repair the surface before remounting.
How to Install a Towel Bar Without Studs
Installing a towel bar without studs is very common, and it is completely manageable when you use the right anchors for your wall material. The key is matching the anchor type and weight rating to both the wall and the expected load.
For standard drywall, toggle bolts, self-drilling anchors, and snap toggles are popular options, each with different installation methods and weight ratings. Read the packaging carefully to confirm the anchor is rated for the load you expect.
Do not assume that any anchor will work in any situation. An anchor suitable for a lightweight mirror may not be appropriate for a towel bar in a busy household bathroom. When in doubt, choose an anchor with a higher weight rating than you think you need.
How to Install a Towel Bar on Tile
Tile installation requires patience, the right tools, and a careful approach. Rushing or applying too much force can crack the tile, which is a much bigger problem than a misaligned bracket.
Start by measuring precisely and marking your drill points. Apply a small piece of painter’s tape over each mark. The tape prevents the drill bit from wandering across the slick tile surface when you first start drilling.
Use a carbide-tipped or diamond-tipped drill bit designed specifically for ceramic or porcelain tile. Start at a slow speed with light pressure. Let the bit cut through the glaze before increasing speed slightly. Keep the drill cool with occasional water or by drilling in short intervals.
Once through the tile, switch to a bit appropriate for the underlying wall material to complete the hole depth. Insert tile-appropriate anchors and follow the manufacturer’s instructions. Tighten the bracket screws firmly but carefully. Over-tightening on tile can crack the surrounding glaze.
How to Install a Towel Bar on a Stud
Mounting directly into a wall stud is the strongest option for drywall walls. A stud gives the screws solid wood to grip, which can handle far more load than most drywall anchors.
Use a stud finder to locate the stud and confirm its center position. Mark the center carefully, because mounting too close to the edge of a stud reduces holding strength. Drive screws directly through the bracket and into the stud without needing a separate anchor.
If your bracket spacing does not align with stud spacing, you can use a stud for one bracket and an appropriate anchor for the other, as long as both are correctly installed.
How to Install a Towel Bar on a Concrete Wall
Concrete installation requires a hammer drill, masonry drill bits, and masonry anchors. Standard drill bits and drywall anchors will not work in concrete and should never be used for this application.
Mark your points, then drill with a masonry bit at the correct diameter for your chosen anchors. Masonry anchors such as sleeve anchors, wedge anchors, or plastic masonry plugs all have different installation requirements. Follow the anchor manufacturer’s instructions precisely.
Remove dust from the holes before inserting anchors. Mount the brackets, drive the screws into the anchors, and confirm everything is tight before attaching the bar.
How to Install a Towel Bar Without Drilling
Adhesive mounting systems allow towel bar installation without drilling. These systems typically use high-strength double-sided adhesive pads or adhesive compounds to bond the mounting brackets directly to the wall surface.
Adhesive mounting works best on smooth, clean, non-porous surfaces. The wall surface must be thoroughly cleaned and completely dry before application. Many adhesive systems require a curing period of 24 to 48 hours before any load is applied.
These systems have specific weight limitations that vary by product. They are generally more suitable for lightweight use than for a heavily used household bathroom. Adhesive mounting is not a substitute for mechanical fastening in situations that require maximum security.
If you live in a rental and need to organize more than just your bathroom, our guide on how to make a DIY entryway organizer covers additional no-drill storage ideas.
How to Install a Towel Bar on a Small Bathroom Wall
Small bathrooms present real placement challenges, but a towel bar can still be installed effectively with careful planning.
Look for unused wall space beside the vanity, between the door frame and a cabinet edge, or on the back of the bathroom door if the door is solid and the design allows for it.
In very narrow spaces, a shorter towel bar may work better than a standard length. A 12 or 18-inch bar can hold hand towels or face cloths effectively without requiring the wall space a 24 or 30-inch bar demands.
Measure clearances carefully before drilling. The bar should not interfere with cabinet doors, the toilet tank, or the vanity when towels are hanging.
Common Towel Bar Installation Mistakes
Installing It Too High
A towel bar mounted too high is inconvenient for most users and may cause young children or shorter adults to struggle to reach it. Always consider the full range of users in the household before finalizing the height.
Installing It Too Low
Too low means towels drag on the floor or touch nearby fixtures. This creates hygiene issues and puts more stress on the mounting hardware as towels pool and add unexpected weight.
Not Using a Level
Even a slight tilt is immediately visible once the bar is installed. Skipping the level step is one of the easiest mistakes to avoid and one of the most visually obvious when it happens.
Using the Wrong Anchors
This is the most structurally dangerous mistake. The wrong anchor in the wrong wall will fail, often pulling a significant section of wall surface with it when it goes.
Overloading the Towel Bar
A towel bar has a rated load capacity. Using it to hang robes, multiple heavy towels, or wet bath mats may exceed that rating and cause the mounting system to fail.
Ignoring Wall Material
Treating all walls as interchangeable leads directly to failed installations. Identify your wall material first and choose hardware accordingly.
Drilling Into Tile Incorrectly
Using the wrong bit, drilling too fast, or applying excessive pressure cracks tile. This is expensive and difficult to repair without replacing the damaged tile.
Failing to Check for Hidden Utilities
Drilling into a water pipe or electrical wire causes immediate damage and potential serious injury. Always check before drilling.
Leaving Loose Screws
A towel bar with undertightened screws will start wobbling almost immediately and worsen rapidly with daily use.
Skipping the Final Test
A physical load test before declaring the job complete reveals installation problems before they become wall damage problems.
How to Make a Towel Bar More Secure
The most secure towel bar installation combines stud mounting where possible, correctly rated anchors where studs are unavailable, properly tightened hardware, and periodic inspection.
Check the screws and brackets every few months, especially in a high-use bathroom. A quick tighten with a screwdriver takes seconds and prevents the kind of gradual loosening that eventually damages walls.
Do not hang items on the towel bar that exceed its rated load. Match the bar and mounting system to the actual demands of the space.
How Much Weight Can a Towel Bar Hold?
Weight capacity varies significantly based on the towel bar itself, the mounting method, the wall material, the anchors used, and the quality of the installation. There is no universal number that applies to every product or situation.
Always check the manufacturer’s stated load rating for both the towel bar and the wall anchors. If you cannot find a specific rating, contact the manufacturer before installation. Installing a bar without knowing its load capacity is a gamble that often ends with wall damage.
How to Fix a Loose Towel Bar
A loose towel bar usually has one of a few causes. The most common are stripped screws, failed or spinning anchors, loose set screws in the bracket, or drywall damage around the original anchor hole.
Start by tightening the set screws at the base of each bracket. If the bar still wobbles, remove the brackets and inspect the condition of the anchors and holes. A spinning anchor has lost its grip and needs to be replaced.
If the drywall around the hole is crumbled or soft, the damaged area must be repaired before reinstalling. Our step-by-step article on how to repair small drywall holes covers this process in detail.
How to Repair Drywall After Removing a Towel Bar
When a towel bar is removed, it often leaves behind anchor holes, stripped screw holes, or small craters in the drywall. These need to be properly filled and finished before you can install a new bar in the same location or paint over the area.
Lightweight spackling compound works well for small holes. Larger damage may require drywall mesh tape, joint compound, and light sanding. For a complete walkthrough, our guide on how to patch holes in drywall covers every repair method from minor touch-ups to larger patches.
Towel Bar vs Towel Ring vs Towel Hook
| Feature | Towel Bar | Towel Ring | Towel Hook |
|---|---|---|---|
| Best Use | Bath towels, drying space | Hand towels near sink | Robes, quick-hang towels |
| Space Required | More wall space needed | Compact, fits small areas | Minimal footprint |
| Towel Capacity | One to two towels at once | Typically one hand towel | One item per hook |
| Installation | Two mounting points required | One or two mounting points | One mounting point |
Each option suits different bathroom needs. A towel bar is ideal for bath towels that need space to air dry. A towel ring works well beside a bathroom sink for hand towels. Hooks are convenient for robes or quick-grab items but do not allow towels to dry as efficiently.
DIY vs Professional Installation
| Factor | DIY | Professional |
|---|---|---|
| Cost | Low (tools and hardware only) | Higher (labor plus materials) |
| Time | 30 minutes to 2 hours | Usually under 1 hour |
| Skill Level | Beginner to intermediate | Any wall type or condition |
| Tools Required | Basic drill, level, tape measure | Full professional kit |
| Best For | Standard drywall and most tile | Masonry, damaged walls, uncertainty |
Most basic towel bar installations are well within reach for a homeowner with minimal DIY experience. The situations where professional help makes more sense include tile installations in unfamiliar materials, concrete or masonry walls, walls with suspected hidden plumbing or wiring, or walls that have existing damage that needs assessment first.
If you are working through a larger bathroom update, a DIY home inspection checklist can help you identify other areas that may need attention before or after installation.
Estimated Towel Bar Installation Cost
| Item | Estimated Cost Range |
|---|---|
| Basic Towel Bar | $15 – $40 |
| Premium Towel Bar | $60 – $150+ |
| Drywall Anchors | $3 – $12 |
| Tile Installation Hardware | $8 – $20 |
| Concrete Masonry Anchors | $5 – $15 |
| DIY Installation (labor) | $0 (your time only) |
| Professional Installation (labor) | $50 – $150 depending on location |
These are general estimates. Actual costs vary based on product quality, wall material, geographic location, and local labor rates. Shopping mid-range brands often delivers good durability without the premium price of designer hardware.
How to Maintain a Towel Bar
Maintenance is simple and only takes a few minutes a few times a year. Wipe the bar regularly with a damp cloth to prevent soap residue and mineral deposits from building up, especially on chrome and brushed nickel finishes.
Check the brackets and screws every few months. Give each screw a quarter turn with a screwdriver to confirm it is still tight. Check for any sign of rust, especially at the wall contact points where moisture can accumulate in humid bathrooms.
Look at the wall surface around each bracket. Any cracking, soft spots, or discoloration can indicate moisture intrusion or anchor movement. Catching these early prevents more significant damage later.
Including towel bar inspection as part of your regular home care routine is easy when you follow a structured home maintenance checklist by month.
How to Choose the Best Towel Bar
Start with size. Measure the available wall space and choose a bar length that fits comfortably with clearance on both sides. A bar that is too long for the wall looks awkward and may create interference with adjacent fixtures.
Material and finish matter both aesthetically and functionally. Stainless steel and solid brass offer the best corrosion resistance in humid bathroom environments. Chrome is popular and affordable but can show water spots. Match the finish to your other bathroom hardware, such as faucets, cabinet pulls, and light fixtures, for a cohesive look.
Check the mounting system before you buy. Some bars use visible screws, while others use concealed set screws for a cleaner appearance. Confirm the mounting hardware is appropriate for your wall type.
Durability and ease of cleaning should also factor into the decision. Bars with intricate detailing or rough textures can be harder to clean and may harbor mildew in a damp bathroom.
Bathroom Safety Tips During Installation
Wear safety glasses any time you are drilling. Flying debris, tile chips, and dust can cause serious eye injury.
Keep all power tools away from water. Never drill near a running sink, standing water, or a wet floor. Dry the bathroom floor and work area thoroughly before beginning.
Confirm there are no hidden electrical wires or plumbing pipes in the wall before drilling. The U.S. Consumer Product Safety Commission consistently highlights the importance of identifying hidden hazards before performing any home drilling or cutting work.
Follow the manufacturer’s instructions for every product you use, including the towel bar, the anchors, and any adhesive systems. Instructions exist for a reason, and skipping them is how installations fail.
Keep your work area clear and organized so you are not reaching over tools or stepping on loose hardware during installation.
When to Call a Professional
Most towel bar installations are straightforward DIY projects. But there are situations where professional help is the smarter choice.
If you are uncertain about hidden plumbing or electrical wiring inside the wall, stop and consult a professional before drilling. If your wall shows signs of previous water damage, soft spots, or unusual materials, a professional can assess the wall condition before you commit to a mounting location.
Concrete and masonry installations can be challenging without the right tools and experience. Tile work in expensive or delicate materials such as natural stone or glass tile carries significant risk of damage without proper technique.
If the original installation failed repeatedly or if the wall has sustained significant damage from previous hardware, a professional can repair the wall structure properly before remounting.
Expert Tips for a Professional-Looking Towel Bar Installation
Measure twice and mark once. Accurate measurements before any drilling eliminate the need for corrections later.
Use a torpedo level or a small bubble level for every bracket. Even a slight misalignment is immediately visible on a finished installation.
When drilling into tile, replace the tape often if it tears during drilling. A fresh piece of tape gives the drill bit a better surface to start on.
Match your new towel bar finish to your existing bathroom fixtures as closely as possible. Mixing finishes is a common design mistake that makes a bathroom feel disjointed.
After completing the installation, do a final walkthrough of the bathroom looking at the bar from different angles and distances. Small alignment issues are easier to spot from across the room than when you are standing directly in front of the wall.
If you are renovating more than just the towel bar, reviewing a complete home improvement tips guide can help you plan the full project sequence efficiently.
Frequently Asked Questions
How high should a towel bar be installed in a bathroom?
Most installation guidelines suggest somewhere between 44 and 54 inches from the floor to the center of the bar, but this range is flexible. The right height depends on who uses the bathroom, how tall the household members are, and the length of the towels being hung. A practical way to find the best height is to hold a folded bath towel against the wall at different heights and choose the position where it hangs comfortably above the floor without requiring you to reach uncomfortably. Always adapt the standard guideline to your actual bathroom and household needs.
Can you install a towel bar without finding a stud?
Yes, and this is actually the more common situation in many bathrooms. Wall studs are spaced at standard intervals, and they rarely align perfectly with the ideal towel bar placement. Using the correct wall anchor for your specific wall material is a reliable alternative. The key is choosing an anchor that is rated for the expected load and following the anchor manufacturer’s installation instructions. Not every anchor works in every wall type, so match the anchor to the wall material rather than using whatever happens to be available.
What type of anchors should I use for a towel bar?
Anchor selection depends entirely on your wall material. For standard drywall without a stud, toggle anchors, self-drilling anchors, or snap toggles are commonly used options, each with different load ratings and installation methods. For tile, use anchors specifically designed for hard surface installation. For concrete or masonry, use masonry anchors with the appropriate masonry drill bit. Always check the anchor’s stated weight capacity and confirm it exceeds the expected load before purchasing. The anchor manufacturer’s instructions should be followed precisely for the installation to perform as rated.
Can a towel bar be installed directly on tile?
Yes, but it requires the right drill bit and a careful drilling technique. A carbide-tipped or diamond-tipped drill bit designed for ceramic or porcelain tile is essential. Standard twist bits will damage the tile surface. Applying painter’s tape over the drill point prevents the bit from wandering on the slick tile surface. Drill slowly, use light pressure, and let the bit work rather than forcing it. Once through the tile, use anchors appropriate for the wall material beneath. Rushing this process or skipping the right tools risks cracking the tile, which is costly to repair.
Why does my towel bar keep coming loose?
A repeatedly loose towel bar usually points to one of a few issues. The most common cause is anchors that were not rated for the load or were installed incorrectly and have lost their grip inside the wall. Loose set screws at the bracket base are another frequent culprit, as these hold the bar to the bracket and loosen with daily use. In some cases, the drywall around the original anchor holes has been damaged by repeated pulling and can no longer hold an anchor properly. Each of these problems has a specific solution, so identify the actual cause before attempting a repair.
Can a towel bar be mounted directly into a stud?
Yes, and this is generally the strongest mounting method available for drywall walls. A screw driven into a solid wood stud provides more holding strength than most wall anchors. The challenge is that wall studs are spaced at fixed intervals, typically 16 or 24 inches apart, and they may not align with your ideal towel bar placement. Using a reliable stud finder helps locate the stud accurately. If only one bracket aligns with a stud, use the stud for that bracket and an appropriate anchor for the other bracket location.
How far should a towel bar be from the shower or bathtub?
There is no universal required distance, but the bar should be close enough to be convenient after stepping out of the shower while being far enough away to stay reasonably dry during use. A towel bar positioned directly inside the spray zone of a showerhead will be constantly wet, which promotes rust and mildew on both the bar and the wall behind it. Positioning the bar on an adjacent wall or at least outside the immediate splash zone keeps it accessible and extends its lifespan. The specific distance depends on your bathroom layout and shower configuration.
Should a towel bar always be perfectly level?
Yes. A towel bar that is even slightly off-level is immediately noticeable once towels are hanging on it. The visual difference between a level bar and one that is slightly tilted is surprisingly obvious from across the room. Beyond appearance, an unlevel bar places uneven stress on the two mounting brackets, which can cause one side to loosen faster than the other over time. Using a level during installation costs less than a minute and completely eliminates this problem. Even a small pocket level is sufficient for this task.
What is the best way to avoid damaging drywall during towel bar installation?
The most effective way to protect drywall is to use the correct anchor for the expected load and to drill pilot holes at the proper diameter for the anchor. Pilot holes that are too small force the anchor to push drywall apart during insertion, which creates crumbling around the hole. Using anchors that exceed the rated load causes anchor failure, which pulls damaged drywall out with it. Tightening screws gradually and evenly rather than forcing them prevents the bracket from crushing into soft drywall. Taking your time during each step protects the wall far better than rushing through installation.
How do I know if my towel bar installation is strong enough?
After completing the installation, apply firm downward pressure to the center of the bar and then try a slight outward pull. This test mimics the forces that occur during normal daily use. The bar should feel completely solid with no movement in the brackets, no flex in the bar itself, and no give at the wall surface. If anything shifts or feels loose during this test, identify the specific problem before declaring the installation complete. A bar that moves slightly during a manual test will get progressively worse with daily use and will eventually pull out of the wall.
Conclusion
Installing a towel bar is a project that most homeowners can complete confidently with the right preparation and the correct tools. The most important decisions happen before you pick up the drill: identifying your wall material, choosing appropriate anchors, confirming the mounting location is free of hidden utilities, and reading the manufacturer’s instructions for both the towel bar and the mounting hardware.
A properly installed towel bar is level, firmly mounted, and rated for the load it will carry. It stays secure for years without wobbling, wall damage, or repeat repairs. Taking an extra few minutes to measure carefully, use a level, and select the right anchors is what separates a lasting installation from one that fails within months.
Maintain your towel bar with periodic screw checks and regular cleaning, and it will serve your bathroom reliably for a long time. When situations arise that go beyond standard drywall installation, such as masonry walls, damaged surfaces, or uncertainty about what is inside the wall, professional help is a practical and worthwhile choice.