How to Build a Simple Storage Bench: DIY Guide

How to Build a Simple Storage Bench
A storage bench is one of the most practical pieces of furniture you can add to a home. It gives you a place to sit and a place to store things at the same time, which makes it especially useful in spaces where every square foot matters.
Whether you need somewhere to sit while putting on shoes in the entryway, a way to tuck away extra blankets in the bedroom, or a spot to keep bags and sports gear in the mudroom, a well-built storage bench handles all of it without taking up more room than necessary.
Building your own DIY storage bench lets you control the size, the storage layout, the finish, and the cost. You are not limited to whatever dimensions or colors happen to be available at a furniture store. You can build exactly what your space needs.
This guide covers everything from planning and material selection to cutting, assembly, finishing, and final inspection. Whether you have built furniture before or this is your first woodworking project, the instructions here are designed to help you build a bench that is sturdy, useful, and built to last.
What Is a Storage Bench?
A storage bench is a piece of furniture that combines a seating surface with built-in storage space below or inside the seat. The storage area can take many forms, including open shelves, basket compartments, lift-top hidden storage, or a combination of these.
Most storage benches are rectangular and low enough to sit on comfortably, with the seat height typically falling somewhere between 17 and 20 inches from the floor. The storage compartment sits beneath the seat and uses the full depth and width of the bench frame.
Storage benches are built from a variety of materials, including plywood, solid pine, oak, MDF, or combinations of these. The right material depends on the intended use, the design style, and the budget.
Benefits of Building a DIY Storage Bench
Building your own storage bench offers advantages that store-bought furniture simply cannot match.
The most obvious benefit is storage. A storage bench adds meaningful hidden or accessible storage in areas that are often underused, such as the space along an entryway wall or the foot of a bed.
Beyond storage, a DIY bench gives you complete control over the dimensions. You can build it to fit a specific wall, a specific niche, or a specific height that suits your household. You choose the finish, the wood species, the hardware style, and the storage configuration.
Cost is another major advantage. A well-designed DIY storage bench can be built for a fraction of what comparable furniture costs in retail stores, especially when the design is kept clean and simple.
Finally, a bench you build yourself is made to your standards. You know exactly what went into it, how it was assembled, and how to repair or modify it later if your needs change.
Where Can You Use a Storage Bench?
Entryway
The entryway is the most popular location for a storage bench. It gives family members and guests a place to sit while removing shoes and provides immediate storage for footwear, bags, and everyday essentials. A bench with open compartments or baskets below works especially well here.
Mudroom
In a mudroom, a storage bench needs to handle heavier daily use. Mudroom benches benefit from easy-to-clean surfaces, basket compartments that hold sports gear and outdoor accessories, and durable finishes that can stand up to moisture and dirt.
Bedroom
A bedroom storage bench placed at the foot of the bed provides a convenient spot to sit while getting dressed and a discreet storage space for extra pillows, blankets, or seasonal clothing. A lift-top design works particularly well in the bedroom.
Living Room
In a living room, a storage bench can double as extra seating for guests and provide a place to store remote controls, magazines, throws, and other items that tend to accumulate. A cushioned top makes it significantly more comfortable for sitting.
Home Office
In a home office, a storage bench along a wall can hold supplies, files, and equipment while also serving as additional seating when colleagues or family members visit the space.
Window Seat Area
A storage bench built into a window seat area adds charm and function simultaneously. The seat tucks neatly under the window while the storage compartment below handles books, cushions, and other items. This design typically requires more careful measuring but delivers excellent results.
Types of DIY Storage Benches
| Type | Storage Style | Difficulty | Best For | Estimated Cost |
|---|---|---|---|---|
| Open Shelf Storage Bench | Exposed shelves below seat | Beginner | Living rooms, entryways | $40 – $90 |
| Bench With Baskets | Open cubbies for removable baskets | Beginner | Entryways, mudrooms | $50 – $120 |
| Lift-Top Storage Bench | Hidden storage under hinged lid | Intermediate | Bedrooms, living rooms | $60 – $140 |
| Cubby Storage Bench | Divided compartments below | Beginner to Intermediate | Mudrooms, children’s rooms | $60 – $130 |
| Entryway Storage Bench | Combines seating, shoe, and bag storage | Intermediate | Entryways, mudrooms | $70 – $160 |
| Simple Wooden Storage Bench | Basic frame with enclosed storage | Beginner | Any room | $40 – $100 |
Each design has real advantages. Open shelf and basket designs are the easiest to build and provide the most accessible storage. Lift-top designs hide clutter completely but require correct hinge selection and installation. Cubby designs are highly organized but involve more interior framing work.
How to Choose the Right Storage Bench Design
Start with the space you have available. Measure the wall length, the floor depth, and the clearance around the area. A bench that is too large for the space will block walkways and feel uncomfortable. A bench that is too small will not provide meaningful storage.
Think about what you plan to store. Shoes, sports gear, and frequently accessed items work best in open or basket compartments. Seasonal items, blankets, and things you access less often are good candidates for a lift-top design.
Consider the room style. A clean, simple design with a painted finish suits most modern homes. A stained wood finish with visible grain works better in a more traditional or rustic setting.
Budget matters too. Plywood and pine are affordable and easy to work with. Hardwoods cost more but deliver greater durability and a more premium look. Choose materials that fit your budget without compromising the structural integrity of the bench.
How to Measure for a Storage Bench
Accurate measurements before you start building are what separate a bench that fits perfectly from one that needs to be rebuilt or modified.
Measure the length of the wall or the space where the bench will sit. This determines the maximum bench length. Leave a few inches of clearance on each side to prevent the bench from looking cramped.
Measure the depth from the wall outward. Most storage benches are between 12 and 18 inches deep. This provides adequate storage without making the bench so deep that it intrudes too far into the room.
Measure the height. Standard bench seat height falls between 17 and 20 inches from the floor. Consider whether you need the bench to sit at a specific height to align with windows, wainscoting, or adjacent furniture.
Finally, measure the storage compartment dimensions separately. Confirm that the interior depth and width will accommodate the baskets, bins, or items you plan to store. It is always better to measure the actual baskets or containers before cutting any wood.
Materials You Need
| Material | Purpose | Recommended Use | Estimated Cost |
|---|---|---|---|
| Plywood (3/4 inch) | Main frame, sides, bottom, top | All bench designs | $30 – $60 per sheet |
| Pine Boards | Frame, face trim, shelving | Simple and open designs | $15 – $40 |
| MDF | Smooth painted surfaces | Interior panels, flat tops | $20 – $45 per sheet |
| Wood Screws | Joining panels and frame | All construction | $5 – $12 |
| Wood Glue | Strengthening joints | All construction | $5 – $10 |
| Wood Filler | Filling screw holes and gaps | All finishing | $5 – $10 |
| Sandpaper (80–220 grit) | Smoothing surfaces | All finishing stages | $5 – $10 |
| Hinges | Lift-top lid installation | Lift-top designs | $8 – $20 |
| Storage Baskets | Removable storage in cubbies | Basket and cubby designs | $10 – $40 |
| Furniture Feet or Base | Raising bench off floor | All designs | $5 – $20 |
| Paint | Decorative and protective surface | Painted finishes | $15 – $30 |
| Wood Stain | Highlighting natural wood grain | Stained finishes | $10 – $25 |
| Protective Finish | Sealing and protecting surface | All finished benches | $10 – $25 |
Plywood is the most common choice for storage bench construction because it is strong, stable, and cost-effective. Solid pine is a good option for visible face frames and trim. MDF produces a very smooth painted surface but is heavier than plywood and does not hold screws as well near its edges, so it works better for interior panels than for structural components.
Tools You Need
| Tool | Purpose | Recommended Use | Estimated Cost |
|---|---|---|---|
| Tape Measure | All measurements | Every step | $5 – $20 |
| Pencil | Marking cut lines and positions | Every step | Under $1 |
| Level | Checking alignment and levelness | Assembly and installation | $5 – $30 |
| Drill | Driving screws, drilling pilot holes | All construction | $30 – $120 |
| Screwdriver | Hand-tightening screws | All construction | $5 – $20 |
| Circular Saw | Cutting plywood and boards to size | Cutting stage | $50 – $150 |
| Jigsaw | Curved cuts when needed | Optional curved designs | $30 – $100 |
| Clamps | Holding pieces during assembly | Assembly stage | $10 – $40 |
| Sanding Block | Even surface sanding | Finishing stage | $3 – $10 |
| Stud Finder | Finding studs when wall-mounting | Wall-mounted designs | $10 – $50 |
| Safety Glasses | Eye protection during cutting | All cutting stages | $5 – $15 |
| Hearing Protection | Protection during power tool use | All cutting stages | $5 – $20 |
Always wear safety glasses when cutting wood. Sawdust, wood chips, and small splinters can cause serious eye injury. The Occupational Safety and Health Administration recommends appropriate personal protective equipment whenever power tools are in use, including eye and hearing protection during cutting and drilling operations.
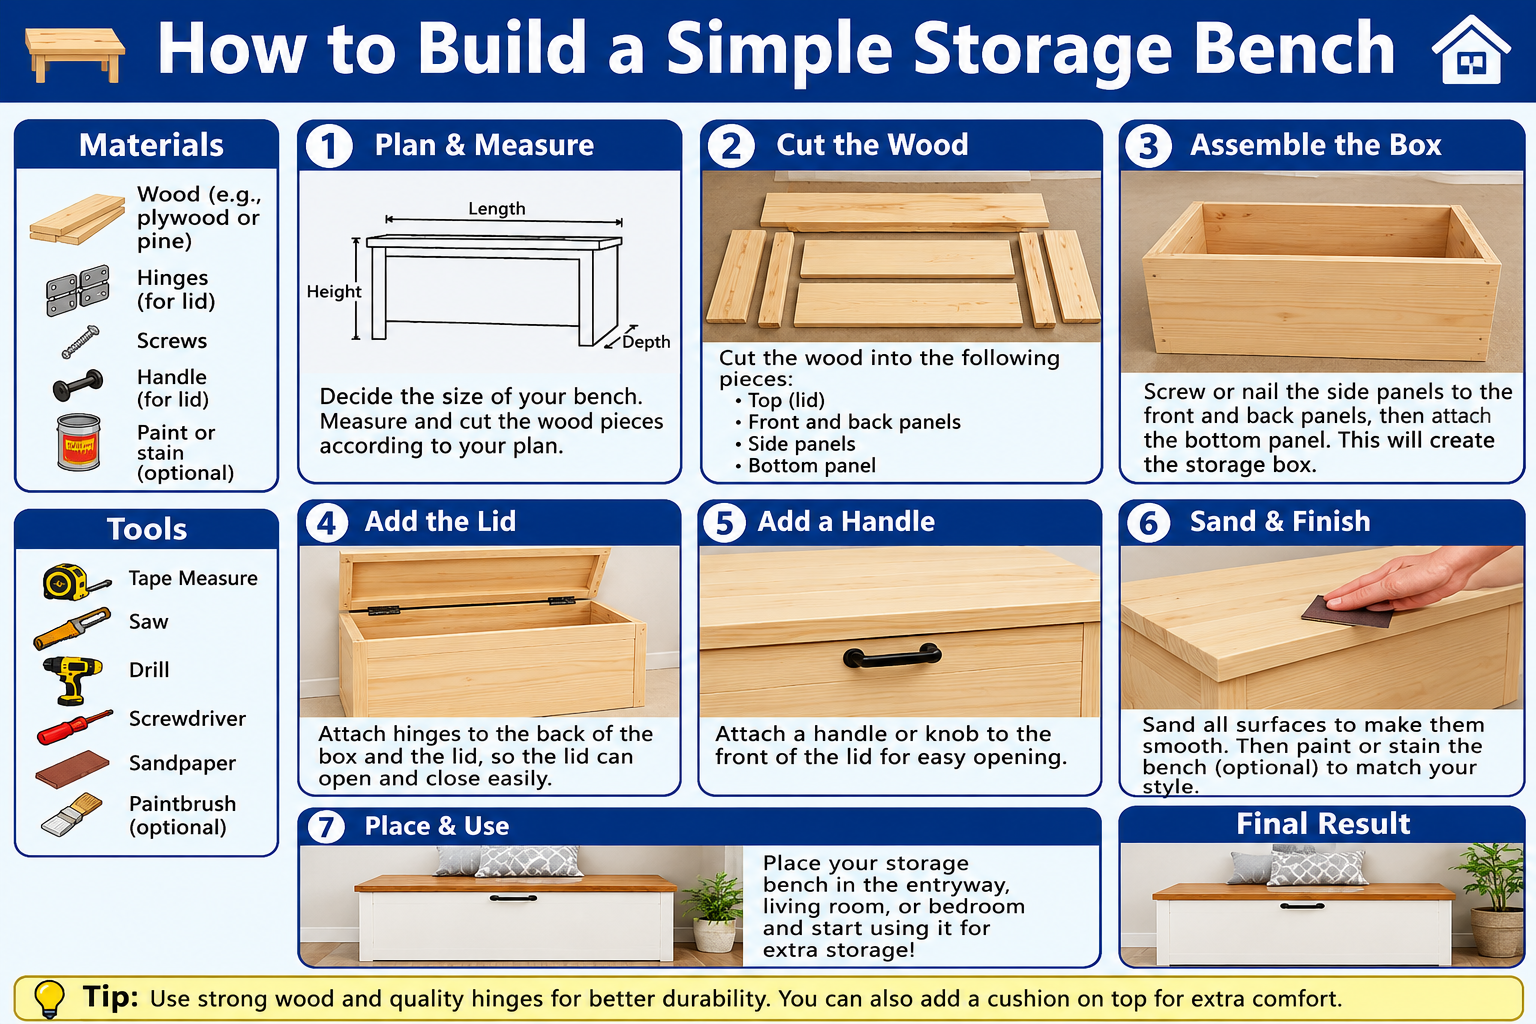
How to Build a Simple Storage Bench Step by Step
Step 1: Measure the Available Space
Before touching any wood, return to the room with a tape measure. Confirm the bench length, depth, and height measurements. Write them down clearly. This is the step where many beginners make mistakes that cost them time and materials later.
Step 2: Choose the Bench Dimensions
Based on your space measurements, decide on the final dimensions of the bench. A typical simple storage bench might be 48 inches long, 16 inches deep, and 18 inches tall. Adjust these numbers to suit your specific room and storage needs.
Step 3: Create a Simple Design
Sketch a basic layout on paper. You do not need technical drawing skills. A simple rectangle showing the side panels, back panel, bottom panel, and top panel is enough. Add the storage compartment dividers if applicable. Label each piece with its dimensions.
Step 4: Prepare the Materials
Purchase your wood and hardware based on the cut list from your sketch. Allow a small amount of extra material for mistakes. Cut material costs can vary significantly by region and supplier, so compare prices at your local lumber yard or home improvement store.
Step 5: Measure and Mark the Wood
Lay the wood flat on a stable work surface. Use a tape measure and pencil to mark every cut line clearly. Double-check each measurement before marking. A marking mistake discovered before cutting costs you nothing. A mistake discovered after cutting may cost you a full sheet of wood.
Step 6: Cut the Pieces
Cut each piece carefully along the marked lines. Use a circular saw for straight cuts through plywood or boards. Take your time and follow the cut line steadily. If you have not used a circular saw before, practice on scrap material first. Always clamp the workpiece securely before cutting to prevent movement.
Step 7: Sand the Edges
After cutting, all edges will be rough. Sand them smooth starting with 80-grit sandpaper and finishing with 120 or 150-grit. Smooth edges are safer to handle and accept paint or stain more evenly. Pay particular attention to the edges of the bench top, as these will be touched frequently.
Step 8: Build the Main Frame
Start with the two side panels, the back panel, and the bottom panel. Apply wood glue to the joining edges, press them together, and drive screws through the panels to create a solid rectangular frame. Pre-drill pilot holes before driving screws to prevent the wood from splitting. Clamp the pieces while the glue sets for added strength.
Step 9: Add the Storage Compartments
If your design includes interior dividers for cubbies or basket compartments, cut and install them now. Each divider panel should be measured to fit snugly between the bottom and the underside of the bench top. Glue and screw each divider in place. Confirm that the compartment openings are sized to accept your chosen baskets or bins with enough clearance for easy removal.
Step 10: Attach the Bench Top
Cut the bench top panel to size if you have not already done so. For an enclosed storage design, the top will be a fixed lid. For a lift-top design, leave this panel loose for the moment while you install the hinges. Glue and screw the fixed top to the frame, making sure it sits flush and level across the entire length.
Step 11: Install Hinges or Storage Baskets
For a lift-top bench, position the lid panel on top of the frame and attach the hinges according to the manufacturer’s instructions. Use two or three hinges evenly spaced across the back edge of the lid. Piano hinges work well for longer benches because they distribute the load across the full length of the lid. Test the lid opening and closing before proceeding. For a basket-style bench, simply slide in your baskets to confirm the fit.
Step 12: Reinforce the Structure
Check every joint and every screw location. Add corner blocks inside the frame if any joints feel less than completely rigid. Corner blocks are small squares of wood glued and screwed into the interior corners of the frame. They significantly increase the rigidity of the structure without adding much material cost.
Step 13: Fill Screw Holes and Smooth the Surface
Use wood filler to fill all visible screw holes and any small gaps at joints. Allow the filler to dry completely according to the product instructions. Sand the filled areas smooth once dry, blending them into the surrounding surface. Wipe the entire bench down with a slightly damp cloth to remove sanding dust before finishing.
Step 14: Paint or Stain the Bench
Apply a coat of primer if you are painting the bench. Primer seals the wood and helps the topcoat adhere evenly. Allow the primer to dry fully, then lightly sand with 220-grit sandpaper before applying the topcoat. Apply two coats of paint for full coverage, sanding lightly between coats.
If you are staining the bench, apply the stain with a brush or cloth in the direction of the wood grain. Wipe away any excess stain before it dries. The number of coats depends on the darkness of finish you want. For a complete guide to surface preparation and painting techniques, our article on how to paint a room for beginners covers primer, topcoat, and finishing fundamentals that apply equally to furniture projects.
Step 15: Add the Final Protective Finish
Once the paint or stain is fully dry, apply a protective topcoat. Polyurethane, polycrylic, and wax finishes are all common options. A protective finish prevents moisture penetration, resists scratches, and makes the bench easier to clean. Apply at least two coats, following the manufacturer’s instructions for drying time between coats.
Step 16: Inspect and Test the Finished Bench
Before placing the bench in its final location, conduct a full inspection. Check every screw, every joint, and every hinge. Sit on the bench to test the seat strength. Open and close the lid if applicable. Confirm the bench sits level on the floor. If the floor is uneven, adjustable furniture feet can compensate for small differences.
How to Build a Storage Bench With Baskets
A bench with baskets is one of the most practical designs for high-traffic areas. The open cubbies allow instant access to frequently used items, and the removable baskets make cleaning and reorganizing easy.
Before building, purchase the baskets first. Measure each basket’s width, depth, and height precisely. Then design the cubby compartments around those dimensions rather than the other way around. Each cubby opening should be slightly wider and taller than the basket to allow smooth insertion and removal.
Space the dividers evenly across the bench length and confirm that the total weight of filled baskets is distributed evenly across the bottom panel. A well-built bench with baskets can serve beautifully in both entryways and mudrooms.
How to Build a Lift-Top Storage Bench
A lift-top design conceals storage completely and keeps the bench looking clean and uncluttered. The top is attached to the frame with hinges along the back edge and opens upward to reveal the full interior compartment.
Hinge selection matters significantly for this design. Piano hinges work well for longer lids because they span the full length and prevent the lid from twisting or sagging. Standard butt hinges work for shorter lids. Choose hinges rated for the weight of the lid material.
Consider adding soft-close lid supports on each side. These hardware pieces control the speed at which the lid opens and closes, preventing it from slamming shut unexpectedly. This is especially important in a household with children. Follow the hardware manufacturer’s installation instructions to ensure the supports are positioned correctly for your lid dimensions.
How to Build a Storage Bench for an Entryway
An entryway storage bench should handle real daily use. People will sit on it, load it with shoes, lean bags against it, and interact with it multiple times every day.
Design the bench to include open lower compartments for shoes, side space for bags, and possibly a row of hooks above if the design extends to include a back panel or wall mounting. The seat itself should be sturdy enough to support an adult sitting and putting on or removing footwear.
Keep the bench proportional to the entryway. A bench that blocks the door swing or narrows the walkway too much creates problems rather than solving them. Leave adequate clearance for the door to open fully and for people to move past the bench comfortably.
For a full entryway organization system that complements your storage bench, our guide on how to make a DIY entryway organizer covers wall-mounted hooks, shelves, and storage solutions that work alongside a bench to create a complete, organized entryway.
How to Build a Small Storage Bench for a Small Space
A small storage bench can be just as functional as a larger one when the design is planned carefully around the available space.
In a narrow hallway or compact apartment entryway, consider a bench that is 24 to 36 inches long and no more than 14 inches deep. Open compartments below work better in tight spaces than lift-top designs, which require clearance above the lid to open fully.
Choose slimmer baskets designed for compact storage. Vertical stacking shelves inside the compartment can double the usable storage without adding to the bench’s footprint. Furniture feet that raise the bench slightly off the floor can also make a small space feel less crowded.
How to Choose the Right Wood for a Storage Bench
Plywood is the most practical choice for most DIY storage bench projects. It is dimensionally stable, resists warping, holds screws well across the face, and is available in large sheets that minimize the number of joints needed. Three-quarter-inch plywood provides solid structural performance for both frames and shelving.
Pine is affordable, easy to cut, and widely available. It is suitable for face frames, decorative trim, and smaller structural components. Pine is softer than hardwoods and may dent more easily in high-traffic areas.
Oak is a hardwood that offers excellent durability and a beautiful natural grain. It costs more than pine and requires sharper tools, but it produces a premium result that holds up well over many years.
Poplar is a mid-range hardwood that paints extremely well. It is harder than pine but less expensive than oak, making it a practical choice for a painted storage bench that needs to handle regular use.
MDF produces very smooth painted surfaces and is easy to cut cleanly. However, it is heavy, does not hold screws well near its edges, and is susceptible to moisture damage. MDF works best for interior panels in dry locations rather than for the structural frame.
No single wood is the best choice for every project. Match the material to your design, your budget, and the conditions in the room where the bench will live.
How to Paint or Stain a Storage Bench
Start with thorough sanding. Work through progressively finer grits, starting around 80 or 100 and finishing at 150 or 180. Sand in the direction of the wood grain to avoid visible scratches across the final finish.
Wipe the entire surface clean and allow it to dry completely before applying any finish product. Dust and moisture trapped under paint or stain will cause adhesion problems.
If painting, apply a wood primer first. Primer seals the surface, prevents bleed-through from knots, and gives the topcoat something solid to grip. Sand lightly with 220-grit between coats. Apply two coats of paint for even, durable coverage.
If staining, test the stain color on a scrap piece of the same wood before applying it to the bench. Wood species absorb stain differently, and the final color on the bench may look different from the swatch on the can. Apply the stain evenly, following the grain, and wipe away excess before it dries.
Always finish with a protective topcoat. Follow the manufacturer’s instructions for application, drying time, and the number of recommended coats.
How to Make a Storage Bench Strong and Stable
The strength of a storage bench comes from the quality of its frame, the integrity of its joints, and the hardware used to hold everything together.
Use three-quarter-inch plywood or solid boards for the main structural components. Thinner material flexes under load and produces a bench that feels unstable. Pre-drill pilot holes before driving screws to prevent splitting, especially near the edges of plywood panels.
Apply wood glue to every joint before driving screws. Glue and mechanical fasteners together create a bond far stronger than either one alone. Clamp glued joints while they dry for the best result.
Add interior corner blocks at the four bottom corners of the frame. These small reinforcements dramatically increase rigidity and prevent the frame from racking or twisting over time.
Confirm that the bench sits level on the floor. An uneven base creates stress on the joints every time someone sits on it. Adjustable furniture feet are a simple solution when the floor is not perfectly level.
The actual load capacity of your finished bench depends on the materials, dimensions, joint quality, and hardware you use. Do not attempt to apply a universal weight limit to every design. If your bench will need to support significant weight regularly, build the frame heavier and use more robust fasteners from the start.
How to Add a Cushion to a Storage Bench
A cushion transforms a storage bench from purely functional to genuinely comfortable. Even a simple foam pad covered with fabric makes a significant difference in everyday usability.
Measure the bench top precisely. Cut a piece of upholstery foam to match. Standard foam thickness for a bench seat is between 2 and 4 inches, depending on the desired comfort level. Higher-density foam holds its shape better over time.
Choose a durable, cleanable fabric. In an entryway or mudroom, a fabric with some stain resistance is practical. In a bedroom or living room, you have more flexibility with softer, more decorative materials.
Wrap the foam in the fabric, pulling it tight on all sides, and secure it underneath with a staple gun. For a removable cushion, you can add a zipper or tie-downs that attach to the bench frame. A removable cushion is much easier to clean when needed.
Common DIY Storage Bench Mistakes
Poor Measurements
Measuring only once and cutting immediately is the most common beginner mistake. Incorrect measurements compound through every stage of the build and often result in panels that do not fit together properly.
Using Weak Materials
Thin plywood or low-quality boards flex, sag, and fail under regular use. The material savings are not worth the structural compromise, especially for the seat panel and the main frame components.
Incorrect Screw Placement
Driving screws too close to the edge of a panel splits the wood. Always pre-drill pilot holes and keep screws at least three-quarters of an inch from any edge.
Weak Joints
Relying on screws alone without wood glue produces joints that loosen over time. Glue adds significant strength to every connection in the frame.
Skipping Reinforcement
A frame without corner blocks or interior reinforcement will flex and eventually fail at the joints under normal daily use.
Uneven Legs or Base
A bench that rocks or sits unlevel is uncomfortable and puts stress on the joints. Check for level during assembly and again after the bench is placed in its final location.
Poor Sanding
Insufficient sanding before finishing creates a rough surface that accepts paint and stain unevenly. Take the time to sand properly through each grit progression.
Applying Finish Without Proper Preparation
Painting over dusty, wet, or unprimed wood leads to peeling, uneven coverage, and poor adhesion. Surface preparation is as important as the finish product itself.
Making the Bench Too Large for the Space
A bench that fits the room on paper may still feel overwhelming once it is built and installed. Confirm the clearances carefully before committing to the final dimensions.
Overloading the Storage Compartments
Every bench has a practical limit based on its construction. Overloading the storage compartments puts excessive stress on the bottom panel, the frame joints, and the fasteners. Match the storage load to the strength of the build.
How Much Does It Cost to Build a Storage Bench?
| Item | Estimated Cost Range |
|---|---|
| Plywood or Pine Boards | $30 – $70 |
| Wood Screws and Hardware | $5 – $15 |
| Hinges (if applicable) | $8 – $25 |
| Storage Baskets | $10 – $45 |
| Paint or Stain | $10 – $30 |
| Cushion Materials | $15 – $50 |
| Finishing Materials | $10 – $25 |
| Estimated DIY Total | $88 – $260 |
These figures represent general estimates and will vary based on the size of the bench, the quality of materials chosen, regional lumber prices, and whether you already own the tools needed. A simple painted bench using basic plywood and pine can cost well under $100 in materials. A larger bench with premium wood, quality hinges, and a cushioned top will cost more.
DIY Storage Bench vs Store-Bought Bench
| Factor | DIY Bench | Store-Bought Bench |
|---|---|---|
| Cost | Lower material cost | Higher for comparable quality |
| Customization | Fully customizable | Limited to available options |
| Materials | You choose quality and type | Often MDF or particleboard |
| Design Options | Unlimited | Limited to retail catalog |
| Installation | Self-assembled | May still require assembly |
| Time | Several hours to a full day | Ready relatively quickly |
| Skill Level | Beginner to intermediate | None required |
| Best For | Specific sizes, custom looks, budget | Convenience, no tools available |
The case for building your own bench is strongest when you need a specific size, want to match existing room finishes, or want to use higher-quality materials than what is typically available at retail price points. Keeping up with a home maintenance checklist by month can also remind you to inspect and maintain your DIY furniture regularly alongside other home care tasks.
How to Maintain a DIY Storage Bench
Maintenance keeps your bench looking good and performing well for years.
Wipe the bench surface regularly with a damp cloth to remove dust and debris. Avoid harsh chemical cleaners that can damage the finish. For painted surfaces, a mild soap and water solution works well.
Check every visible screw a few times each year. Drive a screwdriver into any that have loosened slightly. A loose screw that is ignored will eventually strip its hole and require repair.
Inspect the joints for any signs of movement or separation. A small amount of wood glue and a clamp can often repair a loose joint before it becomes a structural problem.
Check the hinges on any lift-top design. Hinges that are starting to work loose should be re-tightened or replaced before the lid becomes difficult to operate safely.
Look at the finish surface periodically. Touch up any chips or scratches with matching paint or stain before moisture finds its way into exposed wood. If the protective topcoat is wearing thin, a fresh coat keeps the surface protected without needing to refinish the entire bench.
Storage Bench Safety Tips
Build the frame sturdy enough to support the maximum expected load. A bench that tips, collapses, or loses structural integrity under normal use is a safety hazard.
Sand all edges thoroughly, especially the edges of the bench top and any corners that will be touched regularly. Sharp wood edges can cause splinters and cuts.
In households with young children, avoid lift-top designs where the lid could close unexpectedly. Soft-close lid supports are a straightforward solution that significantly reduces this risk. The U.S. Consumer Product Safety Commission provides guidance on furniture tip-over hazards and recommends that furniture be designed and secured appropriately for homes with children.
Do not overload the storage compartments beyond what the construction is designed to handle. Excessive weight in the base can cause the frame to rack or the bottom panel to sag.
If the bench will be placed on a smooth floor, add non-slip pads to the furniture feet. This prevents the bench from sliding when someone sits down or stands up quickly.
Inspect the bench periodically as part of your regular home care routine. Catching small problems early keeps the bench safe and extends its useful life.
When to Call a Professional
Most simple storage benches are perfectly manageable as DIY projects. But certain situations call for professional assistance.
If your design involves building the bench into the wall structure, cutting into existing cabinetry, or integrating with plumbing or electrical systems, those elements require professional assessment before proceeding.
Wall-mounted bench designs that require anchoring into structural elements need careful evaluation. If you are uncertain about what is inside the wall or whether the structure can support the design, consulting a professional carpenter or contractor is the safer choice. Our DIY home inspection checklist can help you identify potential wall and structural concerns before starting a project.
Large custom built-in benches, particularly those designed as permanent architectural features, involve more complexity than a freestanding furniture build. A professional carpenter can ensure that a built-in bench is properly integrated with the room’s structure and finished to a high standard.
Expert Tips for Building a Better Storage Bench
Invest in your cut list before buying materials. A detailed cut list tells you exactly how many pieces you need and at what dimensions. It also helps you plan how to get the maximum number of pieces from each sheet of plywood, which reduces waste and saves money.
Buy one extra board or a small piece of scrap from the same material as your bench. Use it for testing drill bits, stain colors, and screw placements before working on the actual bench panels.
Clamp everything before driving a single screw. Dry-fitting the entire bench before any glue or fasteners go in lets you catch measurement errors and alignment problems before they become permanent.
For a cleaner painted finish, use a small foam roller on flat panel surfaces rather than a brush. A foam roller leaves fewer brush marks and produces a smoother, more even coat.
Match your hardware finish to any other hardware in the room. Hinges, furniture feet, and basket handles in a mismatched finish can make an otherwise well-built bench look unfinished. This same principle applies to bathroom hardware. If you are coordinating a full home update, our guide on how to install a towel bar covers hardware selection and finish matching for bathroom spaces.
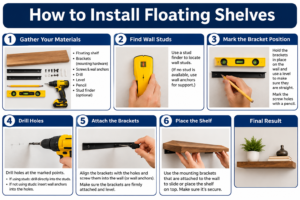
Install floating shelves above the bench to extend the storage system vertically. A bench combined with wall shelving above it creates a complete storage wall. Our guide on how to install floating shelves covers the process from wall preparation to final leveling.
Label the back of each panel with a pencil before assembly. Labeling each piece eliminates confusion when you are working quickly during the assembly stage.
Frequently Asked Questions
Is building a storage bench difficult for a complete beginner?
Building a simple storage bench is one of the more accessible DIY woodworking projects available to a beginner. The basic version involves cutting rectangular panels, assembling them with screws and glue, and applying a finish. None of these steps require advanced woodworking skills. What matters most is accurate measuring, careful cutting, and taking enough time at each stage rather than rushing. A beginner who prepares a clear cut list, works methodically, and uses appropriate safety equipment can successfully complete a basic storage bench on a single weekend with common power tools.
What is the most practical wood choice for a beginner building a storage bench?
Three-quarter-inch plywood is the most practical choice for a beginner. It comes in large sheets that reduce the number of individual joints needed, it holds screws reliably across the face, and it resists warping better than solid boards of comparable thickness. It is also widely available and reasonably priced. Pine boards work well for visible trim and face frame elements where the natural grain adds to the finished look. Beginners should avoid MDF for structural frame components, as it does not hold screws well near its edges and adds significant weight to the finished piece.
How much should I realistically budget for a basic DIY storage bench?
A straightforward storage bench using basic plywood, pine boards, and a painted finish can realistically be built for between $90 and $150 in materials, depending on the size and regional lumber prices. Adding baskets, a cushion, or premium hardware will increase the cost. A larger bench with hardwood, quality hinges, and a stained finish can run $200 or more in materials. These estimates do not include tool costs if you need to purchase tools specifically for the project. Comparing lumber prices at multiple suppliers before purchasing can produce meaningful savings on material costs.
How deep should a storage bench be to hold baskets comfortably?
The ideal depth depends entirely on the baskets you plan to use, which is why purchasing baskets before finalizing the bench dimensions is strongly recommended. Most standard storage baskets are between 11 and 16 inches deep. The bench interior depth should match the basket depth as closely as possible, with a half-inch to one inch of extra clearance on each side for easy insertion and removal. A bench that is too shallow forces you to compromise on basket size. One that is unnecessarily deep wastes space and can make the bench feel bulky relative to the room.
How do you make sure a storage bench does not wobble or feel unstable?
Stability comes from a combination of accurate construction, quality joints, and level installation. The frame panels must be cut to consistent dimensions so that all connections are square. Wood glue applied to every joint before fastening adds considerably more rigidity than screws alone. Corner blocks glued and screwed into the interior corners of the frame reinforce the structure significantly. Finally, check that the bench sits level on the floor in its final location. If the floor is not perfectly flat, adjustable furniture feet allow you to compensate without shimming or modifying the frame.
Can MDF be used to build a storage bench?
MDF can be used for certain parts of a storage bench, but it has real limitations that make it unsuitable for every component. It produces an exceptionally smooth surface for painted finishes and cuts cleanly with a fine-toothed blade. However, MDF is heavy, does not hold screws well near its edges without special fasteners, and is sensitive to moisture. In a mudroom or any space where humidity or occasional water exposure is possible, MDF interior panels can swell and degrade over time. Use MDF where its smooth surface is the priority and where structural demands are low. Rely on plywood for the main frame.
What type of hinges work best for a lift-top storage bench?
The best hinge type depends on the length and weight of the lid. For shorter lids up to about 36 inches, two or three standard butt hinges spaced evenly along the back edge work well. For longer lids, a piano hinge that spans the full back edge distributes the load more evenly and prevents the lid from sagging or twisting over time. Adding soft-close lid support hardware on each side of the interior is strongly recommended. These supports control how the lid opens and closes, preventing it from falling shut unexpectedly and reducing stress on the hinges during normal daily use.
How do you finish a DIY storage bench so it looks professional?
A professional-looking finish starts with thorough surface preparation. Sand through at least three grit progressions, wipe the surface completely clean, and allow it to dry before applying any product. For a painted finish, use a quality primer before the topcoat and sand lightly between coats with 220-grit paper. Two topcoats of paint applied with a foam roller produce a smoother result than a single heavy coat applied with a brush. Finish with a protective clear coat for durability. Fill all screw holes with wood filler before sanding and priming. Small details like clean edges, tight joints, and matching hardware make the difference between a homemade look and a polished result.
How do you handle uneven floors when installing a storage bench?
Uneven floors are common in older homes and can cause a well-built bench to rock or sit with a visible tilt. The simplest solution is to use adjustable furniture feet, which screw into threaded inserts on the underside of the bench frame and can be turned to raise or lower each corner independently. Level the bench after placing it in its final location, adjusting each foot until the seat surface reads level in both directions. Avoid using folded cardboard or other improvised shims under fixed furniture feet, as these compress over time and allow the bench to settle unevenly again.
Should a storage bench be attached to the wall?
Most freestanding storage benches do not need to be anchored to the wall when they are built at a stable, low height with a properly weighted base. However, in homes with young children, wall anchoring adds an important safety measure by preventing the bench from tipping if a child attempts to climb on it or hang from the edge. Anti-tip furniture straps are a simple and inexpensive solution that attaches the bench to a wall stud with minimal effort. If you choose to wall-anchor the bench, use a stud finder to locate solid mounting points and choose anchor hardware appropriate for the wall material.
How long does it take to build a storage bench from start to finish?
The total time depends on the complexity of the design, your tool access, and your experience level. A beginner building a simple enclosed or basket-style bench can typically complete the cutting and assembly in four to six hours. Finishing adds additional time because paint, stain, and protective coatings each require drying time between coats. A realistic total timeline for a simple painted bench, including finish drying time, is two days. More complex designs with custom compartments, lift-top lids, or premium stained finishes may take a full weekend from start to final inspection. Planning ahead and having all materials ready before starting saves significant time during the build.
Conclusion
Building a simple storage bench is a rewarding home improvement project that delivers real, practical value in almost any room of the house. With careful planning, the right materials, and methodical assembly, a beginner can build a bench that is sturdy, attractive, and custom-fitted to the space where it will live.
The most important decisions happen before any cutting starts. Measuring the space accurately, choosing the right wood and hardware for the design, and understanding which storage configuration best suits the intended use will determine how well the finished bench performs.
Build the frame with quality materials, reinforce every joint with both glue and mechanical fasteners, and finish the surface properly to protect it from daily wear and moisture. Inspect the bench regularly, keep the hardware tight, and touch up the finish when needed to keep it performing well for years.
Whether you are adding shoe storage to an entryway, creating hidden storage at the foot of a bed, or building an organized mudroom solution, a well-built DIY storage bench is a project worth the effort.