How to Install Weather Stripping: Complete DIY Guide

Introduction
If you have ever felt a cold draft sneaking in around your front door in the middle of winter, or noticed dust collecting around a window frame despite keeping everything closed, your home likely has air leakage problems. Gaps around doors and windows are more common than most homeowners realize, and they quietly affect your comfort every single day.
Uncontrolled air leakage allows outdoor air, dust, moisture, insects, and noise to enter your home. In cold weather, it forces your heating system to work harder. In summer, it lets hot air and humidity push inside despite your air conditioning running full time. Neither situation is good for your comfort or your energy bill.
The good news is that weather stripping is one of the most affordable and beginner-friendly home improvement projects available. With basic tools, an afternoon, and the right materials, you can seal gaps around doors and windows and make a real, noticeable difference in how your home feels. This guide covers everything you need to know, from choosing the right materials to installing them correctly and testing the finished seal.
What Is Weather Stripping?
Weather stripping is a flexible sealing material applied around the edges of doors and windows to close the gaps between moving parts and their frames. It creates a barrier that reduces the uncontrolled movement of air, moisture, dust, and sound between the inside and outside of your home.
Weather stripping is designed to compress or flex when a door closes or a window shuts, creating a tight seal without blocking normal operation. It comes in many materials, shapes, and sizes to suit different applications and gap sizes.
Most types are available at hardware stores and home improvement centers. Some products use self-adhesive backing for easy installation, while others require nails, screws, or a track system. The right choice depends on the specific door or window, the size of the gap, and the level of weather exposure the area receives.
Why Is Weather Stripping Important?
Weather stripping does more than block the occasional draft. Properly sealed doors and windows help maintain a consistent indoor temperature, reduce the workload on your heating and cooling system, and keep moisture from working its way into the door frame or window sill.
According to the U.S. Department of Energy, air leakage through gaps around doors and windows is a significant contributor to energy waste in residential homes. Addressing these leaks through weather stripping and other sealing methods is one of the most cost-effective improvements a homeowner can make.
Beyond energy efficiency, weather stripping also helps protect door frames and window sills from repeated moisture exposure, which can lead to wood rot and structural damage over time. A small investment in sealing materials now can help you avoid much larger repair costs later.
Signs Your Home Needs New Weather Stripping
Weather stripping does not last forever. Here are the most common signs that yours needs attention.
Drafts Around Doors
If you can feel moving air around the edges of a closed door, the weather stripping is no longer sealing properly. This is the most obvious and immediate sign that replacement is needed.
Cold or Hot Air Around Windows
Running your hand slowly around the perimeter of a closed window can reveal gaps where outdoor air is entering. If the temperature near the window frame changes noticeably, the seal has likely deteriorated.
Visible Gaps
Open your door, look along the frame, and check whether you can see daylight coming through around the edges. Daylight where there should be none means the seal is no longer working.
Damaged or Cracked Seals
Old weather stripping often cracks, shrinks, compresses permanently, or peels away from the frame. Any of these conditions means the material is no longer doing its job and needs to be replaced.
Higher Heating or Cooling Costs
A sudden increase in heating or cooling costs without a change in usage habits can sometimes point to air leakage. While weather stripping is not always the sole cause, it is worth checking all your door and window seals when energy costs rise unexpectedly.
Water or Moisture Around Openings
Moisture appearing around door frames or window sills after rain may indicate that the seal has failed. Weather stripping is not a waterproofing solution on its own, but a deteriorated seal can allow water to reach areas it should not.
Types of Weather Stripping
Different materials and designs work better in different situations. Understanding your options helps you choose the right product the first time.
Foam Tape
Foam tape uses an open-cell or closed-cell foam material with a peel-and-stick adhesive backing. It is inexpensive, easy to apply, and available in many sizes. It works best in low-traffic areas and situations where the gap size is consistent. Foam tape compresses over time and may need more frequent replacement than other options.
V-Strip
V-strip, also called tension seal, is a folded plastic or metal strip shaped like the letter V. When installed along the sides of a door or window channel, it springs open slightly to press against both surfaces and create a seal. It is durable, handles well in high-traffic locations, and is a good choice for sliding windows and the sides of doors.
Felt Weather Stripping
Felt is one of the oldest weather stripping materials. It is inexpensive and easy to install but not particularly durable or moisture-resistant. It works best in dry interior applications and lower-traffic areas. Felt is not a good choice for exterior doors exposed to rain or heavy use.
Rubber Weather Stripping
Rubber weather stripping is durable, flexible, and handles temperature changes well. It is a popular choice for exterior doors and areas that receive significant weather exposure. It tends to last longer than foam or felt options and maintains its shape better under repeated compression.
Vinyl Weather Stripping
Vinyl is similar to rubber in many ways and offers good durability for a moderate price. It is commonly used on door frames, door bottoms, and window channels. Vinyl holds up reasonably well to moisture but may become brittle in very cold climates over time.
Door Sweep
A door sweep attaches to the bottom of a door and seals the gap between the door bottom and the threshold. It prevents drafts, insects, and dust from entering under the door. Door sweeps come in several styles, including adhesive-backed, screw-mounted, and automatic versions.
Tubular Weather Stripping
Tubular weather stripping is a hollow, flexible tube made from rubber or vinyl. It is typically stapled or nailed into a wood backing or slipped into a groove. It provides an excellent seal when compressed and is commonly used on door stops and the sides of door frames.
Weather Stripping Type Comparison Table
| Type | Best For | Durability | Installation Difficulty | Typical Use | Estimated Cost |
|---|---|---|---|---|---|
| Foam Tape | Small, uniform gaps | Low to Medium | Very Easy | Interior doors, window frames | $3 – $15 |
| V-Strip | Sides of doors, sliding windows | High | Easy to Moderate | Door sides, window channels | $5 – $20 |
| Felt | Low-traffic interior areas | Low | Very Easy | Interior closet doors, cabinets | $3 – $10 |
| Rubber | Exterior doors, high exposure areas | High | Moderate | Exterior door frames | $8 – $30 |
| Vinyl | Door frames, window channels | Medium to High | Easy to Moderate | Exterior and interior doors | $5 – $25 |
| Door Sweep | Door bottom gaps | Medium to High | Easy to Moderate | Exterior and interior doors | $10 – $40 |
| Tubular | Door stops, door frame sides | High | Moderate | Exterior door perimeters | $8 – $25 |
How to Choose the Right Weather Stripping
Choosing the right material before you start saves time and avoids having to redo the job.
Consider these factors:
- Door or window type: Exterior doors need more durable, weather-resistant materials than interior doors. Sliding windows need flexible materials that allow movement.
- Gap size: Measure the gap you need to fill. Larger gaps need thicker materials. Small, consistent gaps work well with foam tape or V-strip.
- Weather exposure: Areas exposed to direct rain, sun, or temperature extremes need durable materials like rubber or quality vinyl.
- Durability: High-traffic doors need weather stripping that can withstand repeated compression without flattening permanently.
- Ease of installation: Self-adhesive options are the most beginner-friendly. Nail-on and screw-mounted types require a bit more experience but often last longer.
- Budget: Foam tape and felt are the least expensive. Rubber and tubular options cost more but offer better longevity.
- Manufacturer recommendations: Always read the product specifications and installation instructions before purchasing. Not every product works on every surface or in every temperature range.
Tools and Materials You Need
| Tool or Material | Purpose | Recommended Use | Estimated Cost |
|---|---|---|---|
| Weather Stripping | Seal gaps around doors and windows | All installations | $3 – $40 |
| Tape Measure | Measure door and window perimeters | Before cutting any material | $8 – $20 |
| Utility Knife | Cut foam, rubber, or vinyl strips | All material types | $8 – $20 |
| Scissors | Cut lighter materials like felt or thin foam | Foam tape, felt | $5 – $12 |
| Screwdriver | Install door sweeps and screw-mounted strips | Door sweeps, V-strip | $5 – $15 |
| Drill | Drive screws for mounted hardware | Door sweeps, tubular strips | $30 – $80 |
| Cleaning Cloth | Wipe down surfaces before installation | All installations | $2 – $8 |
| Mild Cleaner | Remove grease, dirt, and residue | Before adhesive installation | $3 – $10 |
| Pencil | Mark cut lines and positions | All installations | $1 – $3 |
| Caulk or Sealant | Fill structural gaps where weather stripping alone is not sufficient | Fixed gaps around frames | $5 – $15 |
Having the right tools ready before you start makes the process much smoother. For a broader overview of what to keep on hand for home maintenance projects, the home maintenance tools every homeowner needs guide is a practical starting point.
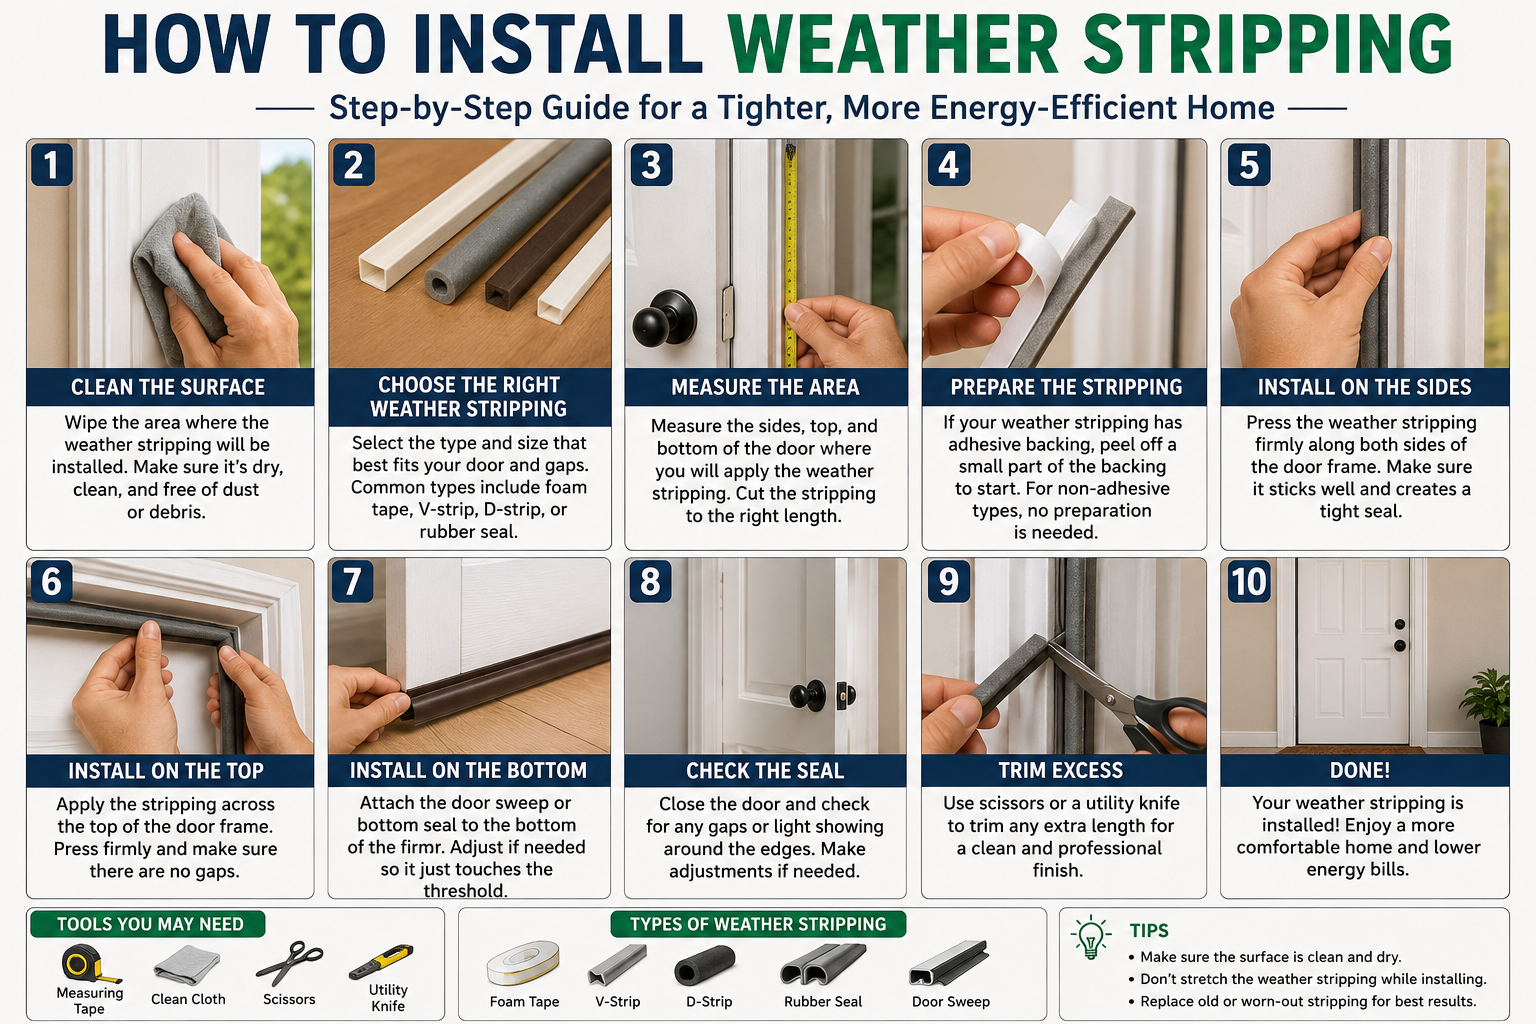
How to Install Weather Stripping Around a Door
Follow these steps for a clean, effective installation on a standard interior or exterior door.
Step 1: Inspect the Door and Frame
Close the door and examine the entire perimeter. Look for visible gaps, damaged old weather stripping, areas where the door does not contact the frame evenly, and any signs of water damage or rot. Identify exactly where the gaps are and how large they are. A damaged frame needs to be repaired before weather stripping is applied.
Step 2: Measure the Door
Measure the full height of both side jambs and the full width of the top jamb. Add a small amount to each measurement to allow for trimming to the exact length. Write down your measurements before moving on.
Step 3: Remove Old Weather Stripping
Pull away any existing weather stripping carefully. Some types are nailed on, some are stapled, and self-adhesive types peel away from the surface. Use a flathead screwdriver or utility knife to lift stubborn sections. Remove staples or nails left behind with pliers. Take your time and avoid gouging the door frame.
Step 4: Clean the Surface
Wipe down the entire area where the new material will be applied. Use a mild cleaner to remove grease, dust, old adhesive residue, and dirt. A clean surface is essential for adhesive-backed weather stripping to bond correctly. Allow the surface to dry completely before moving forward. Installing on a damp or oily surface is one of the most common reasons weather stripping fails prematurely.
Step 5: Measure and Cut the New Material
Using your door measurements as a guide, measure and mark each strip of weather stripping with a pencil. Cut carefully with a utility knife or scissors. For corners where two strips meet, cut at a 45-degree angle for a clean fit. Do not stretch the material while cutting or positioning it.
Step 6: Install the Weather Stripping
Peel the backing from self-adhesive material and press it firmly into place along the door stop, which is the thin strip of wood that the door contacts when closed. Start at one end and work steadily to avoid bubbles or misalignment. For nail-on or staple-on types, position the strip first, then secure it from one end to the other.
Apply the top piece first, then the two sides. Work slowly and press firmly for at least a few seconds at each point to ensure good contact.
Step 7: Check the Door Seal
Close the door and examine the contact between the door and the weather stripping on all sides. The material should compress slightly and make even contact across the full length of each strip. There should be no visible gaps, and the door should close without excessive resistance.
Step 8: Adjust the Installation
If a section is not contacting the door evenly, reposition it while the adhesive is still fresh. If a strip is slightly too long, trim it with a utility knife. Make small adjustments rather than large ones to avoid disturbing the rest of the installation.
Step 9: Test for Drafts
On a windy day or a day with a noticeable temperature difference between inside and outside, slowly run your hand around the perimeter of the closed door about an inch away from the surface. Moving air against your hand indicates a remaining gap. You can also hold a thin piece of paper against the seal and close the door. If the paper pulls out with no resistance, the seal needs adjustment.
Never use an open flame to test for drafts. Use only hand-based or paper-based methods.
How to Install Weather Stripping Around Windows
Installing weather stripping around windows requires a slightly different approach depending on the window type. There is no single method that suits every situation.
Double-hung windows have two sashes that slide up and down. V-strip works well in the channels on either side of the sashes. Foam tape or felt can seal the meeting rail where the two sashes overlap. Replace any deteriorated sash seals before adding new material.
Sliding windows move horizontally and benefit from V-strip along the channels. The material needs to allow smooth sliding without creating excessive friction. Test the window operation after installation to confirm it still slides easily.
Casement windows swing outward on hinges. They typically use compressible foam or tubular weather stripping around the frame. The material should compress when the window is latched but not prevent the window from closing fully.
Older windows often have uneven gaps and worn frames. Measure each section individually rather than assuming uniform dimensions. Older window frames may also benefit from caulking around fixed areas in addition to weather stripping on moving parts.
Modern windows usually come with factory-installed seals. If those seals fail, check with the window manufacturer for the recommended replacement type and size before purchasing a generic alternative.
For all window types, clean the surface thoroughly before applying any material, and test the window operation after installation to confirm nothing is binding or dragging.
How to Install a Door Sweep
A door sweep seals the gap between the bottom of the door and the threshold. This gap is often larger than the gaps at the sides or top and can allow significant air, dust, and insect intrusion.
Measure the full width of the door at the bottom. Purchase a door sweep that is the same length or slightly longer, as most can be trimmed to fit.
For screw-mounted door sweeps, open the door and position the sweep against the bottom edge of the door on the interior side. The sweep’s rubber or vinyl blade should just touch the threshold when the door is closed. Mark the screw hole positions with a pencil, drill pilot holes if needed, and secure the sweep with the provided screws.
For adhesive-backed sweeps, clean the door bottom thoroughly, peel the backing, and press the sweep firmly into place. Allow the adhesive to cure for the time recommended by the manufacturer before using the door repeatedly.
Close the door after installation and confirm the sweep makes consistent contact with the threshold without dragging heavily. A sweep that drags too hard will wear out quickly and make the door difficult to open and close.
How to Install Self-Adhesive Weather Stripping
Self-adhesive weather stripping is the most beginner-friendly option available. The key to a successful installation is surface preparation.
Clean the surface with a mild cleaner and allow it to dry completely. Even a thin layer of grease or dust can prevent the adhesive from bonding properly. In cold weather, warm the surface slightly if possible, as most adhesives bond better at moderate temperatures. Check the product packaging for the recommended installation temperature range.
Measure and cut each piece before removing the backing. Lay the strip against the surface dry first to confirm fit and alignment. Then peel the backing and press firmly from one end to the other, holding each section down for several seconds to encourage adhesion.
Allow the adhesive to cure for the time listed in the product instructions before closing the door or window repeatedly. Premature use can shift the strip before the bond sets fully.
How to Install Foam Weather Stripping
Foam tape is one of the simplest materials to install, but it works best in specific situations. It is most effective on surfaces that are clean, flat, and free of major damage. It is not well-suited for surfaces with rough textures, large gaps, or areas that experience heavy impact.
Apply foam tape to the door stop or window frame, not to the door itself. Press it firmly into place and confirm even contact across the entire length. Foam tape works best on gaps that are consistent in size. Highly variable gaps will compress the foam unevenly and reduce the seal quality.
Common mistakes with foam tape include applying it over old adhesive residue, installing it on damp surfaces, and using a thickness that is too large for the gap. If the foam is so thick that the door requires significant force to close, trim the material or choose a thinner product.
How to Install V-Strip Weather Stripping
V-strip is a durable and effective option for the sides of doors and sliding windows. It works by using the natural spring in the folded strip to create pressure against two surfaces simultaneously.
Cut each piece to length using scissors or a utility knife. For doors, install V-strip along the interior side of the door stop channel, with the open end of the V facing outward toward the gap. Nail or staple the flat side of the strip to the wood, then allow the V to spring open naturally.
For sliding windows, insert the V-strip into the window channel, cut to length, and secure as directed by the product instructions. The strip should allow the window to slide without binding while still pressing gently against the sash to reduce air movement.
How to Weatherproof an Exterior Door
Weatherproofing an exterior door means addressing every potential gap, not just the obvious ones. Work through each area systematically.
Door frame sides and top: Install foam, rubber, or tubular weather stripping along the full perimeter of the door stop.
Door bottom: Install a door sweep to close the gap between the door and the threshold.
Threshold: Check the threshold condition. If it is cracked, warped, or no longer sitting level, it may need adjustment or replacement before the sweep will seal correctly.
Corners: Where the top piece and side pieces of weather stripping meet, ensure clean 45-degree joints with no gaps. Corner gaps are a common source of air leakage.
Door hardware: Check around the door handle and lock hardware. Sometimes small gaps exist around the backset hole or strike plate area. For hardware concerns, the guide on how to replace a door handle covers how to assess and address door hardware fit.
Hinge side: The hinge side of a door is often overlooked. Check whether the door sits flush against the stop on the hinge side when closed. If not, the door may be sagging, which is a separate issue from weather stripping.
How to Tell if Weather Stripping Is Installed Correctly
Use this checklist after every installation to confirm the job is done right:
- Weather stripping makes even, consistent contact across the full length of each strip
- No visible gaps remain between the door or window and the frame
- The door closes completely without excessive force
- The window slides or opens and closes normally without binding
- The weather stripping does not show signs of immediate adhesive failure or lifting
- No visible sections are buckled, folded, or misaligned
- The material compresses when the door or window is closed but returns to shape when opened
- The door sweep makes consistent contact with the threshold without dragging excessively
If any of these conditions are not met, address the issue before considering the installation complete.
Common Weather Stripping Installation Mistakes
Even straightforward projects have common pitfalls. Knowing these in advance helps you avoid them.
Measuring Incorrectly
Cutting strips too short leaves gaps at the corners. Always measure twice and add a small amount to trim to fit.
Installing on a Dirty Surface
Adhesive weather stripping applied to a dirty, oily, or damp surface will not bond properly. Thorough cleaning is not optional.
Using the Wrong Material
Foam tape in a high-traffic, high-impact location will flatten and fail quickly. Match the material to the demands of the specific location.
Applying Too Much Compression
Weather stripping that is too thick for the gap will prevent the door or window from closing properly. This causes damage to the material and to the hardware over time.
Blocking Door Movement
Weather stripping should never prevent normal door or window operation. If the door requires unusual force to close, the material is either too thick or mispositioned.
Ignoring the Door Sweep
Sealing the top and sides of a door while ignoring the bottom gap leaves a significant opening. Always address all four sides of a door, including the bottom.
Installing Over Damaged Surfaces
Weather stripping applied over cracked, rotten, or uneven wood will not seal correctly. Repair the surface before installing new material.
Using Adhesive in Unsuitable Conditions
Most adhesives perform poorly below 50 degrees Fahrenheit or in high humidity. Check the product’s recommended installation conditions before starting.
Failing to Test the Seal
Always test after installation. A quick draft check confirms whether the job is complete or whether adjustments are needed.
How to Test for Drafts After Installation
Testing your work is an important final step. Here are practical, safe methods to use:
Hand test: Hold your hand about an inch from the door or window perimeter on a day when there is a noticeable temperature difference between inside and outside. Moving air against your skin identifies remaining gaps.
Paper test: Slide a piece of paper between the door and the frame, then close the door. Try to pull the paper out. If it slides out easily with no resistance, the seal in that area needs improvement. Repeat along the full perimeter.
Visual light check: In a darkened room, have someone shine a flashlight along the exterior perimeter of the closed door or window while you watch from inside. Any points of visible light indicate gaps.
Never use candles, matches, or lighters to detect drafts. These are fire hazards and should never be used for this purpose.
How to Maintain Weather Stripping
Regular maintenance extends the life of your weather stripping and keeps it performing effectively.
Wipe down weather stripping with a damp cloth two to four times per year to remove dirt, dust, and debris. For rubber and vinyl types, a small amount of mild cleaner is fine. Avoid harsh solvents that can degrade the material.
Inspect all weather stripping seasonally. Look for cracks, flattening, separation from the surface, or sections that no longer make full contact. Catching deterioration early means replacing a short section rather than the entire installation.
Check door sweeps at least twice a year. Sweeps that have worn down or shifted out of position should be repositioned or replaced promptly.
If a section of adhesive-backed material begins to lift, clean the area, allow it to dry, and press it back firmly. Persistent lifting may indicate that the surface chemistry is not compatible with the adhesive, and a different product or fastener-based installation may serve better.
Adding a weather stripping inspection to your seasonal home care plan is a smart habit. The ultimate home maintenance checklist for every season includes this and other routine checks that keep your home in good condition year-round.
DIY vs Professional Weatherproofing
| Factor | DIY | Professional |
|---|---|---|
| Cost | $10 – $100+ (materials only) | $150 – $500+ (labor and materials) |
| Time | 1 – 4 hours per door or window | 1 – 2 hours per opening |
| Skill Level | Beginner-friendly | No experience needed |
| Best For | Standard doors and windows with accessible gaps | Damaged frames, complex systems, persistent problems |
Estimated Weather Stripping Cost
| Item | Estimated Cost Range |
|---|---|
| Foam Tape (per roll) | $3 – $15 |
| Rubber Weather Stripping (per door kit) | $8 – $30 |
| V-Strip (per pack) | $5 – $20 |
| Door Sweep | $10 – $40 |
| Window Weather Stripping (per window) | $5 – $25 |
| DIY Installation (materials only) | $15 – $100+ per opening |
| Professional Installation (labor and materials) | $150 – $500+ per opening |
Actual costs vary based on material type, door and window size, product quality, your geographic location, and current labor rates. High-performance materials for exterior doors cost more than basic interior options, and professional labor rates differ significantly by region.
Energy Efficiency Benefits of Weather Stripping
Reducing uncontrolled air leakage through gaps around doors and windows can meaningfully improve indoor comfort and reduce the demand on your heating and cooling system. When your home maintains temperature more consistently, your HVAC system runs more efficiently and less frequently.
The U.S. Department of Energy recognizes air sealing, including weather stripping, as one of the most impactful low-cost home improvements available to homeowners. ENERGY STAR also recommends addressing air leakage as a foundational step before upgrading insulation or mechanical systems.
It is important to note that weather stripping addresses gaps around moving parts. Fixed gaps in walls, foundations, and around utility penetrations require caulking or other sealing methods. Combining weather stripping with appropriate caulking around fixed surfaces provides a more comprehensive approach to reducing air leakage.
Avoid anyone who promises a specific percentage of energy savings from weather stripping alone. Results vary based on climate, home size, existing insulation, HVAC efficiency, and the severity of the gaps being addressed.
Weather Stripping vs Caulking
| Consideration | Weather Stripping | Caulking |
|---|---|---|
| Best Application | Moving parts: doors, operable windows | Fixed joints: window frames, door frames, wall penetrations |
| Flexibility | Designed for repeated compression and movement | Designed for stationary joints |
| Replaceability | Easy to remove and replace | Requires scraping and surface preparation to replace |
| Typical Location | Door stops, window channels, door bottoms | Around fixed window frames, door frame to wall joints |
| DIY Difficulty | Easy to moderate | Easy to moderate |
| Cost | Low to moderate | Low |
Use weather stripping wherever parts move. Use caulking wherever surfaces are fixed and stationary. Many weatherproofing projects benefit from using both in the appropriate locations.
Common Weatherproofing Problems That Weather Stripping Cannot Fix
Weather stripping is not a solution for every air or moisture problem in a home. Understanding its limitations helps you direct your efforts appropriately.
Damaged frames: A cracked, rotted, or warped door frame cannot be sealed effectively with weather stripping. The frame itself needs repair first.
Rotten wood: Soft or deteriorated wood around a door or window frame means the structural integrity of the opening is compromised. Weather stripping applied over rotten wood will not hold and will not seal correctly.
Structural gaps: Large gaps caused by foundation settling, framing movement, or structural issues require professional assessment and repair, not weather stripping.
Broken or poorly fitted doors: A door that no longer hangs squarely in its frame will not seal properly regardless of how much weather stripping is applied. The door alignment issue must be addressed first. If your door has hinge problems, squeaking, or alignment issues, the guide on how to fix a squeaky door covers diagnosis and repair steps that may help.
Roof leaks and major water intrusion: Water coming in through the roof or walls cannot be addressed with door or window weather stripping. These require roofing, flashing, or structural repairs.
Foundation problems: Air and moisture entering through the foundation or basement require insulation, waterproofing, or structural solutions.
Weather stripping works best when the doors and windows themselves are in good condition and simply need a better seal around their perimeters.
When to Replace Weather Stripping
Replace weather stripping when:
- It is visibly cracked, torn, or flattened
- It no longer makes full contact with the door or window surface
- Drafts are detectable even after the door is fully closed
- The adhesive has failed and the material cannot be repositioned
- The material has hardened and lost its flexibility
- Moisture or insects are entering around a previously sealed area
Most foam and felt products last two to five years under regular use. Rubber and vinyl products often last longer under comparable conditions. Exterior applications generally require more frequent inspection and replacement than interior ones due to weather exposure.
When to Call a Professional
Most weather stripping projects are excellent DIY tasks. But some situations genuinely benefit from professional help.
Consider calling a licensed contractor or weatherproofing specialist when:
- The door frame is cracked, rotten, or structurally compromised
- The window frame shows signs of water damage or wood rot
- Drafts persist despite multiple installation attempts
- The source of the air leakage cannot be identified
- The door no longer fits squarely in the frame due to structural movement
- Complex window systems require specialized sealing solutions
- Major water intrusion is occurring alongside air leakage
- You are unsure whether the problem is a sealing issue or a structural one
Being thorough in your seasonal home inspections helps catch these issues before they become serious. Tracking all your home maintenance tasks and inspections using a DIY home inspection checklist makes it easier to identify recurring problems and plan appropriate responses.
Expert Tips for Better Weatherproofing
After years of working on homes of all ages and conditions, here are the practical insights that consistently make the biggest difference:
- Do not try to seal everything with one type of material. Use the right product for each specific gap and location.
- Buy slightly more material than your measurements suggest. Having a few extra inches allows for adjustments and mistakes without a second trip to the store.
- On older homes, measure each side of each door and window individually. Older construction is often less uniform than modern framing.
- Address the door sweep every time you address the door sides and top. The bottom gap is frequently the largest single source of air leakage on an exterior door.
- In very cold climates, check the product’s temperature rating before purchasing adhesive-backed options. Some materials become brittle or lose adhesion in extreme cold.
- After a major weather event such as a severe storm or significant freeze-thaw cycle, do a quick check of all your exterior door and window seals. Extreme conditions can accelerate weatherstripping deterioration.
- Do not overlook garage doors, attic hatches, and basement access points. These are common sources of air leakage that homeowners often miss.
- Keep a spare roll of foam tape and a replacement door sweep on hand. When you notice a problem, being able to fix it immediately prevents a small issue from becoming a larger one.
Frequently Asked Questions
How long does weather stripping last before it needs to be replaced?
The lifespan of weather stripping depends on the material type, location, and level of use. Foam and felt products typically last two to five years under regular use before they compress permanently or deteriorate. Rubber and quality vinyl options often last longer, sometimes six to ten years, particularly in protected locations. Exterior applications degrade faster due to sun, rain, and temperature cycling. Inspect all weather stripping at least once per year, especially before heating and cooling seasons begin, and replace any sections showing visible wear, cracking, or loss of flexibility.
Can I install weather stripping over the existing old material?
Installing new weather stripping over old material is not recommended. Old material may be compressed, misaligned, or partially adhesive-failed, which means the new material will not seat correctly against the door or window surface. The combined thickness of two layers can also prevent the door from closing properly and may damage both the hardware and the new material. Always remove the old weather stripping completely, clean the surface thoroughly, and install the new material on a clean, flat substrate for the best result.
What type of weather stripping works best on exterior doors?
Rubber and vinyl weather stripping tend to perform well on exterior doors because they handle temperature changes and moisture exposure better than foam or felt. Tubular weather stripping is also a strong choice for the door stop perimeter on exterior doors. For the door bottom, a quality screw-mounted door sweep with a rubber or vinyl blade offers good durability. The best choice for your specific door depends on the gap size, the door design, and the level of weather exposure in your area. Always check the product specifications before purchasing.
Does weather stripping prevent water from coming in under a door?
A well-fitted door sweep and threshold combination can reduce the amount of windblown rain that enters under a door, but weather stripping is not a waterproofing system. Significant water intrusion under a door during heavy rain may indicate that the threshold is poorly fitted, damaged, or improperly sloped, or that water is pooling outside the entry due to grading or drainage issues. Address those underlying causes along with the door sweep for the most effective result. Weather stripping alone cannot compensate for structural drainage problems.
How do I know what thickness of foam tape to buy?
Measure the gap between the door stop and the door surface when the door is closed. The foam tape thickness should approximately match that gap. When the door closes, the foam should compress slightly, which creates the seal. If the tape is too thin, it will not contact the door surface fully. If it is too thick, the door will not close properly without excessive force. Most foam tape products are available in a range of thicknesses, commonly from 1/8 inch to 1/2 inch, so having your gap measurement ready before purchasing makes selection straightforward.
Can weather stripping help reduce noise from outside?
Weather stripping does provide some acoustic benefit by closing gaps that allow sound to travel between interior and exterior spaces. It is not a substitute for acoustic insulation or soundproofing materials, but sealing air gaps also reduces the most direct path for sound transmission. Tubular and rubber weather stripping tend to provide better acoustic performance than thin foam tape due to their greater mass and compression properties. If noise reduction is a primary goal, combine weather stripping with solid-core doors and other acoustic measures for a more meaningful result.
Is self-adhesive weather stripping as effective as screw-mounted or nail-on types?
Self-adhesive weather stripping can be highly effective when applied correctly to a clean, compatible surface. Its primary limitation is that the adhesive bond can weaken over time, particularly in high-temperature areas or when exposed to moisture. Screw-mounted and nail-on types tend to stay in position longer and are not dependent on adhesive performance. For low-traffic interior locations, self-adhesive products are usually adequate. For exterior doors and high-use locations, screw-mounted or nail-on options often provide longer-lasting results with fewer maintenance issues.
Should I weatherproof my windows at the same time as my doors?
Weatherproofing doors and windows together is an efficient approach. Since you already have the tools and materials out, addressing windows at the same time reduces the total project time compared to doing them separately. It also gives you a clearer picture of your home’s overall air sealing condition. A comprehensive approach to the home’s envelope, including both doors and windows, produces better overall comfort improvement than addressing only one type of opening. Scheduling this as part of a broader seasonal home maintenance plan helps ensure nothing is overlooked.
Can I use caulk instead of weather stripping around a door?
Caulk is appropriate for fixed, stationary joints, not for areas that move when a door opens and closes. Applying caulk to a door stop or door frame edge where the door contacts the frame will result in the caulk cracking and failing quickly due to repeated movement. Use weather stripping for any surface that moves and reserve caulk for fixed gaps around the exterior door frame where it meets the wall cladding or interior trim. Using both in their appropriate locations gives you the most complete seal.
My door closes fine but I still feel a draft. What should I check?
If the door closes fully and the weather stripping appears intact, check the following areas: the gap at the bottom of the door under the threshold, any gaps around the door handle hardware and lock backset, the corners where the top and side strips of weather stripping meet, and the hinge side of the door, which is often less well-sealed than the lock side. Also check whether the door frame itself has any gaps where it meets the surrounding wall. Caulking around the exterior door casing may be needed in addition to the door’s weather stripping.
Conclusion
Installing weather stripping is one of the most practical, affordable, and impactful home improvement projects a homeowner can take on. It does not require specialized skills, a large budget, or an entire weekend. In most cases, a few hours of focused work on a door or window can produce an immediate, noticeable improvement in comfort and air quality inside your home.
The keys to a successful installation are preparation, measurement, and using the right material for the specific application. Clean the surface properly, choose a product suited to the gap size and exposure level, follow the manufacturer’s instructions, and always test the seal before considering the job done.
Weather stripping is most effective when used as part of a broader approach to home maintenance. Checking and replacing worn seals seasonally, addressing door and window alignment issues as they arise, and combining weather stripping with appropriate caulking on fixed surfaces all contribute to a better-sealed, more comfortable home.
If a project turns out to be more complex than expected, calling a professional is a smart decision. Knowing your limits and acting on them is just as valuable as the ability to handle things independently. For every project that falls within the DIY range, taking the time to do it correctly the first time is always the right approach.
Staying on top of these small but meaningful maintenance tasks protects your home, prevents costly repairs, and keeps your living environment comfortable through every season. Adding a weather stripping inspection to your regular home care schedule is a small habit that pays consistent dividends year after year.