How to Repair Small Drywall Holes: A Complete Beginner’s Guide

Introduction
Small holes in drywall are one of the most common types of home damage you will ever deal with. Every picture you hang leaves a mark behind. Every shelf bracket, curtain rod, and wall-mounted TV creates holes that need attention when you redecorate or move out. Minor impacts from furniture, door handles, and everyday household life add even more.
The good news is that most small drywall holes are genuinely easy to fix. You do not need professional training or expensive equipment. A basic set of tools, the right materials, and a clear process are all it takes to repair most small holes so well that nobody can tell they were ever there.
Fixing small damage early also keeps your walls looking their best and prevents holes from collecting dirt or developing edges that crack and grow over time. If you are planning to repaint a room, repairing every hole before you pick up a brush is essential for a clean, professional finish.
This guide walks you through every type of small drywall hole repair from start to finish, with practical, beginner-friendly instructions for each step of the process.
What Causes Small Holes in Drywall?
Nail Holes
Nail holes are the most common type of small drywall damage found in any occupied home. Every framed picture, canvas, or mirror leaves at least one behind when it comes down. These holes are typically very small, often just a few millimeters in diameter, and are among the easiest repairs you can make.
Screw Holes
Screw holes are slightly larger than nail holes but follow the same repair process. They appear when screws are removed from wall-mounted shelves, TV brackets, towel bars, and similar fixtures. Because screws displace a small amount of drywall material when driven in, the hole may have slightly raised edges that need to be addressed before filling.
Wall Anchor Holes
Wall anchors support heavier items that nails cannot hold securely. Plastic expansion anchors, toggle bolts, and molly bolts all leave holes that are larger than standard nail or screw holes when removed. The size and shape of the hole depends on the anchor type. Some anchor holes require a bit more filling compound than a simple nail hole, but they are still well within beginner repair territory.
Small Dents
Dents are surface depressions that do not puncture all the way through the drywall. They happen when a corner of furniture catches a wall, when something is dropped against the surface, or from minor impact during moving. Dents compress the paper face and gypsum but leave the wall structurally intact. They repair easily with a thin application of compound.
Minor Impact Damage
General everyday impacts, from door edges catching a wall, from bags and boxes being carried through tight spaces, or from children’s toys, create small irregularities in the wall surface. These vary in shape and depth but are almost always straightforward repairs.
Can You Repair Small Drywall Holes Yourself?
For small holes, the answer is almost always yes. Nail holes, screw holes, small anchor holes, dents, and minor surface damage are genuinely beginner-level repairs. No special training is required. The materials are inexpensive and available at any hardware store. The techniques are simple enough to learn from a guide like this one.
The exception is when the damage is more than it appears. If a small hole reveals soft, crumbling drywall inside, that can indicate moisture damage. If you see dark staining or mold inside or around the hole, that is a problem requiring professional assessment before any cosmetic repair is attempted.
For any wall damage involving water, mold, structural cracking, or nearby electrical and plumbing components, stop and consult a professional. For a comprehensive framework for assessing your home’s condition, the DIY Home Inspection Checklist provides a systematic approach to identifying what needs attention across all areas of your home.
Tools and Materials You Need
| Tool or Material | Purpose | Recommended Use | Estimated Cost |
|---|---|---|---|
| Lightweight spackle | Filling small nail holes, screw holes, minor dents | All small repairs | $5 – $12 per container |
| All-purpose joint compound | Filling larger small holes, anchor holes, multiple-coat repairs | Anchor holes and dents | $10 – $18 per bucket |
| Putty knife (3 to 4 inch) | Applying and smoothing compound | All repair sizes | $5 – $15 |
| Sandpaper (120 grit) | Leveling dried compound | All repairs | $5 – $10 |
| Sandpaper (220 grit) | Final smoothing before primer | All repairs | $5 – $10 |
| Sanding sponge | Sanding in tight areas and curved surfaces | All repairs | $4 – $8 |
| Drywall primer or PVA primer | Sealing repaired area before paint | All repairs | $10 – $30 per quart |
| Matching paint | Restoring wall appearance over repaired area | After every repair | $10 – $50 per quart |
| Paint brush | Applying primer and paint to small areas | After every repair | $5 – $15 |
| Paint roller (small) | Applying paint to slightly larger repaired areas | After medium repairs | $8 – $15 |
| Utility knife | Trimming loose paper edges around holes | As needed | $8 – $15 |
| Clean cloth | Wiping dust from repaired area before painting | Every repair session | $2 – $5 |
How to Repair Small Drywall Holes Step by Step
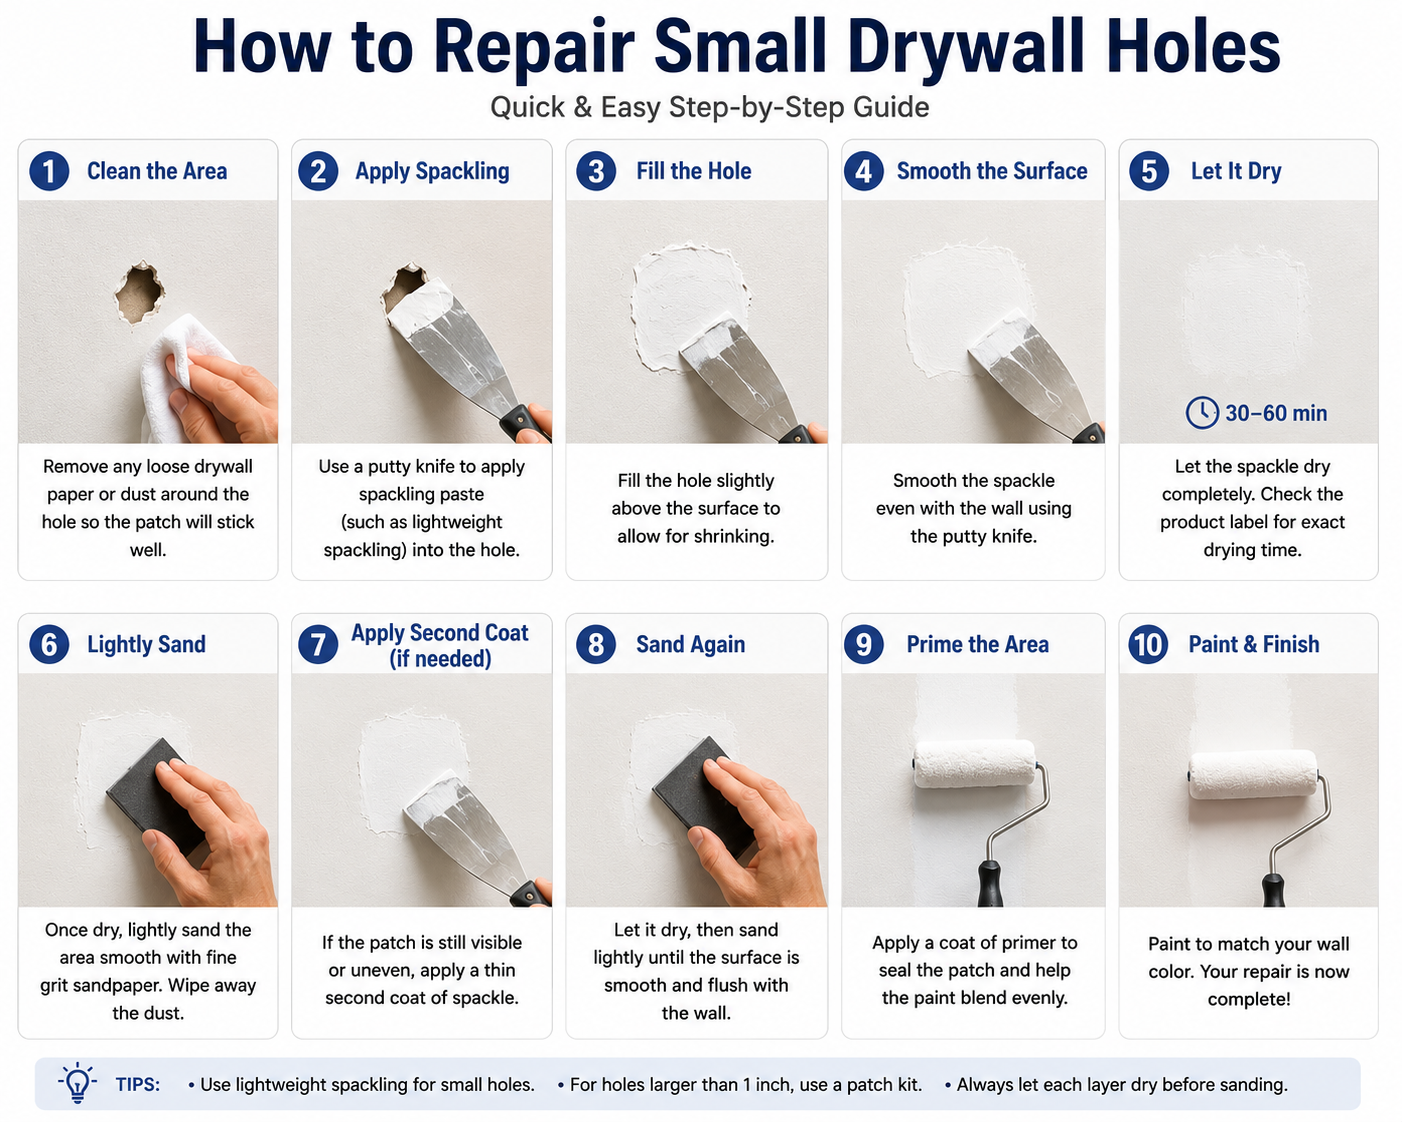
Step 1: Inspect the Damaged Area
Before applying anything, look closely at the hole. Is the paper face around the hole intact, or is it lifting and ragged? Is the gypsum inside the hole solid and dry, or soft and crumbly? Is there any staining, darkening, or unusual odor that might suggest moisture damage?
Most small holes pass this inspection quickly. Clean, dry edges and solid gypsum inside tell you the repair is straightforward. Anything soft, wet, or discolored needs further investigation before proceeding.
Step 2: Clean the Hole
Wipe the wall surface around the hole with a clean, slightly damp cloth to remove dust, grease, and any residue. Compound does not bond well to dirty or greasy surfaces, so this step matters more than beginners typically expect.
Allow the surface to dry completely before moving to the next step.
Step 3: Remove Loose Drywall Material
Use a utility knife or putty knife to carefully remove any loose paper edges, crumbling gypsum, or raised material around the hole. The goal is a clean, stable perimeter that compound can bond to consistently.
For screw holes with raised edges from the screw entry, use the flat face of a putty knife to gently press the raised edges down flush. Do not try to force them completely flat. The compound will cover what remains.
Step 4: Apply Spackle or Joint Compound
Load a small amount of lightweight spackle or all-purpose joint compound onto the flat face of your putty knife. Less is more for the first application. Press the compound firmly into the hole using a diagonal sweeping motion, working the material into the void before leveling.
For tiny nail holes, a single application the size of a small pea is often more than enough. For slightly larger holes and anchor holes, use just enough to fill the void without building a significant mound above the wall surface.
Step 5: Smooth the Surface
Immediately after filling, hold your putty knife flat against the wall at a low angle and draw it across the repair with firm, even pressure. This levels the compound and removes excess material in a single smooth stroke.
Try to achieve this in one or two passes rather than repeatedly going back over the same spot. Over-working the compound while it is wet drags material away from the hole and creates an uneven surface.
Step 6: Allow the Repair to Dry
Set the repair aside and allow it to dry completely before touching it. Do not rush this step. Compound that is still wet inside will crack or shrink unevenly if sanded or recoated too soon.
Drying time depends on the specific product you used, the thickness of the application, room temperature, humidity, and airflow. Lightweight spackle on a tiny nail hole in a warm room may dry within an hour. A fuller application of joint compound in a cooler or more humid space may need several hours or overnight.
Always check the manufacturer’s instructions on the specific product you are using for recommended drying times. When in doubt, give it more time rather than less.
Step 7: Sand the Area
Once the compound is fully dry and has changed from a darker, wet appearance to a consistent lighter color, sand the repaired area smooth.
Begin with 120-grit sandpaper to level any slight raised areas or surface texture from the application. Follow with 220-grit for the final smoothing pass. The repaired area should feel completely flush and smooth when you run your fingertips across it.
Wear a dust mask rated for fine particles and eye protection during sanding. Drywall compound creates fine airborne dust that is an irritant to the lungs and eyes. Keep the work area ventilated by opening a window or door while sanding.
After sanding, wipe the area with a clean dry cloth to remove all dust before applying primer.
Step 8: Apply a Second Coat if Needed
Examine the repair under raking light, which means holding a flashlight close and at a very low angle to the wall surface to reveal any depressions or uneven areas. If the repair shrank below the surrounding wall surface due to compound shrinkage, apply a thin second coat.
Feather the second coat slightly beyond the edges of the first to create a smooth, gradual transition. Allow it to dry completely and sand again with 220-grit paper.
Step 9: Prime the Repaired Area
Apply a coat of drywall primer or all-purpose primer to the repaired area and a couple of inches of the surrounding wall surface. This step is not optional. Unpainted compound absorbs paint at a different rate than the surrounding wall, creating a visible dull patch even through multiple coats of paint.
Apply the primer with a small brush or a mini roller. Allow it to dry fully according to the product label before applying paint.
Step 10: Paint the Repair
Apply matching paint over the primed repair using the same application method as the surrounding wall. If the wall was originally rolled, roll the paint. If it was brushed, brush it.
Feather the paint edges out from the repair area gradually. Applying paint with hard edges creates a visible patch even when the color matches perfectly. For guidance on achieving seamless paint results on finished walls, the How to Paint a Room: Beginner’s Guide covers the full painting process from preparation to final coat.
How to Repair Nail Holes in Drywall
Nail holes are the simplest repair in drywall work. Use your fingertip to press a tiny amount of lightweight spackle into the hole and smooth it flush with the wall in a single pass.
If a nail was set deeply, the hole may have a small dimple surrounded by slightly raised paper edges. Gently press the raised edges down with a putty knife before filling. Apply a small amount of spackle, smooth flush, and allow to dry. Sand lightly with 220-grit paper, prime, and paint.
Most nail holes require only a single thin coat. The entire process from application to final sanding typically takes less than fifteen minutes of active work, plus drying time.
How to Repair Screw Holes in Drywall
Screw holes follow the same basic process as nail holes but often require one extra step. When a screw is driven into drywall without a pilot hole, it pushes drywall material outward slightly, creating raised edges around the entry point.
Before filling, use the face of your putty knife to gently push these raised edges down flush. Then fill with a small amount of lightweight spackle using the same technique as for nail holes. Allow to dry, sand smooth with 220-grit paper, prime, and paint.
How to Repair Drywall Anchor Holes
Wall anchor holes are larger than nail or screw holes and typically require more compound to fill properly.
First, address the anchor itself. Plastic expansion anchors can often be pulled out with pliers or pushed through the wall entirely using a hammer and a nail or small screwdriver. Toggle bolts and molly bolts should be unscrewed and removed if possible. If they cannot be removed cleanly, collapse them against the back of the drywall.
Fill the hole in thin layers rather than one thick application. A single thick fill will crack as the compound shrinks during drying. Apply a first layer, allow it to dry completely, assess whether the fill is level, and apply a second coat if needed. Sand smooth, prime, and paint.
For a broader guide to repairing holes of various sizes including larger anchor damage, the How to Patch Holes in Drywall article covers medium and large hole repair methods in detail.
How to Repair Small Dents in Drywall
Dents that do not penetrate through the paper face are often the cleanest repairs because there is no actual hole to fill, just a depression to build up.
Apply a thin coat of lightweight joint compound over the dent and feather it out a few inches beyond the edges using your putty knife at a low angle. The compound fills the depression and blends into the surrounding surface.
Allow to dry fully. Check under raking light. Apply a second thin coat if any depression remains. Sand smooth with 220-grit paper, prime, and paint.
How to Make a Drywall Repair Blend Into the Wall
Getting a repair to truly disappear into the surrounding wall requires attention to a few specific techniques.
Feathering: Each coat of compound should be applied slightly wider and thinner than the last, tapering gradually into the surrounding wall rather than ending with a distinct edge. This gradual transition is what makes repairs invisible after painting.
Sanding: Always finish with 220-grit sandpaper for the smoothest possible surface. Coarser sandpaper leaves fine scratches that show through paint. Use raking light to check for any irregularity before priming.
Priming: This step is non-negotiable. Primer seals the compound so paint absorbs evenly across the repair and the surrounding wall. Without primer, even a perfect repair remains visible as a dull patch.
Paint matching: Use the same paint used on the original wall if you kept it stored in a sealed can. If you no longer have the original paint, bring a small paint chip cut from a hidden area to your paint store for color matching.
Texture matching: If your walls have texture, the repaired area must be textured before priming and painting. Smooth repairs on textured walls stand out clearly. Aerosol texture spray cans available at hardware stores reproduce common textures like orange peel and knockdown on small areas. Practice on cardboard first to calibrate the spray pattern before applying to the wall.
How Long Does Small Drywall Repair Take?
There is no single answer because drying time varies based on several factors: the specific product you used, how thickly the compound was applied, the room temperature, humidity levels, and ventilation.
Lightweight spackle for a tiny nail hole in a warm, dry room with good airflow may surface-dry within thirty minutes to an hour. A fuller application of all-purpose joint compound may need four hours or more and sometimes overnight to dry completely.
Do not rely on surface feel alone to judge readiness. Compound that feels dry on the surface can still be wet and soft inside, particularly with thicker applications. Completely dry compound changes uniformly from a darker, wet tone to a lighter, more consistent color throughout the repair area.
Always follow the manufacturer’s drying time instructions for the specific product you are using. These recommendations are based on the product’s chemistry and are the most reliable guide to when the repair is ready for the next step.
Common Small Drywall Repair Mistakes
Using Too Much Spackle
The most common beginner error. A thick mound of compound shrinks significantly as it dries and often develops cracks through the center. Apply thin, controlled amounts and build up in layers if needed.
Skipping Surface Preparation
Compound applied over dusty or greasy walls does not adhere properly and can crack or pop off over time. Always clean the area and remove loose material before applying anything.
Not Allowing the Compound to Dry
Sanding wet compound tears the surface and creates gouges that require starting over. Wait until the repair is completely dry before touching it.
Over-Sanding
Aggressive sanding cuts through the paper face of the surrounding drywall, creating a fuzzy texture that absorbs paint differently and reveals the repair. Use light, controlled pressure with fine-grit paper.
Skipping Primer
Painting directly over compound always creates a visible dull spot. Prime every repair without exception.
Using the Wrong Paint
Applying a different sheen level than the surrounding wall creates a visible patch even when the color matches perfectly. Use the same finish type as the existing wall paint.
Applying Paint Too Thickly
Heavy paint application over a small repair creates texture buildup that makes the repaired area visible under certain lighting. Apply thin, feathered coats and blend into the surrounding wall.
How to Paint Over a Small Drywall Repair
Paint applied over a primed repair should be applied the same way as the surrounding wall. Do not dab paint directly onto the repair area and stop. Feather the paint two to four inches beyond the repair edge in every direction.
For very small repairs on a wall that is otherwise in good condition, spot painting with a small brush or mini roller often blends adequately if you feather the edges carefully and the paint sheen matches exactly.
For larger small repairs, or when the surrounding paint is faded or aged, painting the full wall section from corner to corner produces a more consistent result. Building interior wall repainting into your overall home care calendar helps keep your walls looking consistently fresh. The Home Maintenance Checklist by Month provides a practical scheduling framework for home improvement and maintenance tasks throughout the year.
DIY vs Professional Drywall Repair
| Factor | DIY | Professional |
|---|---|---|
| Cost | $10 – $40 (materials) | $75 – $250+ (labor and materials) |
| Time | 1 to 2 hours active time, plus drying | 30 minutes to 2 hours per visit |
| Skill Level | Beginner | Trained professional |
| Best For | Nail holes, screw holes, small dents, anchor holes | Water damage, mold, large damage, texture matching |
| Quality | Excellent with proper technique | Consistently high |
| Convenience | Work at your own pace | One scheduled appointment |
| Texture Matching | Achievable with spray products | Seamless professional results |
Estimated Small Drywall Repair Cost
| Item | DIY Cost | Professional Cost |
|---|---|---|
| Spackle or joint compound | $5 – $18 | Included in service |
| Sandpaper (multiple grits) | $5 – $12 | Included in service |
| Primer (quart) | $10 – $25 | Included or additional |
| Paint (quart) | $15 – $50 | Additional if required |
| Total DIY material cost | $15 – $50 per repair session | N/A |
| Professional repair (per visit) | N/A | $75 – $200+ |
All costs are approximate and intended for planning purposes. Actual costs vary based on your geographic location, the materials you select, wall condition, texture complexity, and current labor rates in your area. Always obtain written estimates before hiring a professional.
Small Drywall Repair Safety Tips
Drywall repair involves a few safety considerations that are worth taking seriously from the start.
Sanding dust: Fine drywall dust is a respiratory irritant. The Occupational Safety and Health Administration recommends wearing appropriate respiratory protection when generating airborne dust during sanding work. Use an N95 dust mask at minimum whenever sanding.
Eye protection: Wear safety glasses during sanding and when trimming damaged edges with a utility knife. Particles and debris can reach your eyes unexpectedly.
Ventilation: Open windows and doors when applying primer and paint in enclosed rooms. Fresh airflow reduces fume buildup and improves comfort throughout the job.
Utility knife safety: Always cut away from your body. Retract the blade when you are not actively cutting. Keep fingers clear of the cutting path at all times. Utility knife blades are extremely sharp.
Electrical and plumbing hazards: For truly small surface repairs like nail and screw holes, there is no cutting involved and no risk of reaching hidden wires or pipes. However, if you are ever tempted to deepen a hole or make a wider opening to assess the damage, stop and use a stud finder with wire detection capability first. Cutting into a wall near electrical wires or plumbing without knowing their locations is a serious safety risk.
When to Call a Professional
Most small drywall holes are safely within DIY territory. But certain conditions mean you should stop and call a professional instead.
Call a professional when:
- The drywall around the hole is soft, crumbling, or wet, which indicates moisture damage
- There is visible mold growth, dark staining, or a musty odor in or around the damaged area
- Cracks are growing, spreading, or recurring after previous repairs, which can indicate structural movement
- The damaged area is near electrical boxes, outlets, or plumbing fixtures
- The damage is more extensive than it first appeared
- Multiple walls or large ceiling areas are involved
- You are not confident about what is behind the wall
Water-damaged drywall must have the moisture source identified and corrected before any cosmetic repair is attempted. Patching over active moisture damage simply creates the same problem again in a short time. The U.S. Environmental Protection Agency notes that mold can begin growing on wet building materials within 24 to 48 hours, making prompt professional assessment essential when moisture is involved.
Building awareness of these conditions is part of responsible home maintenance. The Ultimate Home Maintenance Checklist for Every Season provides a comprehensive framework for monitoring and maintaining every area of your home throughout the year, helping you catch developing issues early before they require expensive intervention.
Expert Tips for Better Drywall Repairs
These practical tips come from years of hands-on repair work and consistently produce better results for every skill level.
- Apply compound in a single smooth pass rather than repeatedly going back over the same spot. Over-working wet compound creates ridges and uneven texture.
- Use raking light at every stage of the process: before applying compound, before priming, and before painting. This low-angle lighting reveals surface irregularities that are invisible under normal room light.
- Store any leftover paint from previous wall projects in a tightly sealed can, labeled with the room name. It is the guaranteed color match for every future touch-up repair.
- If your walls have any texture at all, always address the texture before priming. A smooth patch on a textured wall is always visible, regardless of how well it is otherwise finished.
- For a collection of nail holes across an entire room, fix all of them in one session. Apply compound to every hole, let everything dry together, sand all at once, and prime the entire room before painting. This is far more efficient than repairing one hole at a time.
- When evaluating the success of a repair, judge it under multiple lighting conditions. A repair that looks perfect under bright overhead light may reveal a slight shadow or irregularity under lamp light from the side. If it passes both tests, it is genuinely invisible.
For homeowners who are new to home improvement projects and building their foundational DIY knowledge, the Home Maintenance Tips for First-Time Homeowners and the Home Maintenance Tools Every Homeowner Needs both provide excellent starting points for understanding the basics of home care and the tools that make everyday repairs more manageable.
Frequently Asked Questions
What is the best product for filling nail holes in drywall?
Lightweight spackle is the most practical choice for filling nail holes and other very small drywall holes. It comes pre-mixed, dries quickly, sands easily, and provides a smooth base for primer and paint. Most lightweight spackle formulas are available in containers ranging from a small tub to a quart-size container, making them easy to store for future touch-ups. All-purpose joint compound also works well but takes longer to dry and is better suited for slightly larger holes or multi-coat repairs. For a simple nail hole, lightweight spackle gets the job done efficiently and with minimal material waste.
How do I get a perfectly smooth surface after patching drywall?
Smooth results come from a combination of thin applications, proper drying time, and careful sanding. Apply compound in the thinnest coat that still fills the hole. Allow it to dry completely. Sand with 120-grit first to level any high spots, then finish with 220-grit for a genuinely smooth surface. After sanding, check the repair under raking light by holding a flashlight close to the wall at a very low angle. If any depression or ridge is visible, apply a thin skim coat, allow it to dry, and sand again. Primer applied over a properly sanded surface seals the texture and creates the smooth base that paint requires.
Do I need to prime over spackle before painting?
Yes, priming is necessary for a good result. Unprimed spackle and joint compound absorb paint at a significantly faster rate than the surrounding painted wall surface. This differential absorption creates a dull, flat-looking area called flashing that remains visible through multiple coats of paint regardless of how good the color match is. Applying a coat of drywall primer or all-purpose primer before painting seals the compound and equalizes the surface porosity so paint absorbs uniformly. This one step is the difference between a repair that disappears completely and one that remains slightly visible indefinitely.
Why does my spackle crack after it dries?
Cracking after drying is almost always caused by applying too much compound in a single coat. As joint compound and spackle dry, they shrink as the water in the mixture evaporates. A thin coat shrinks slightly and remains stable. A thick coat shrinks significantly and develops tension across the surface that produces cracks. The solution is to fill in thin layers, allowing each layer to dry completely before applying the next. Building up the repair gradually produces a stable, crack-free surface that lasts as long as the surrounding wall.
How do I fix a hole that is bigger than a nail hole but smaller than a golf ball?
Holes in this size range, roughly a quarter inch to about an inch and a half in diameter, can usually be filled with joint compound alone applied in two or three thin coats. Clean and trim any loose material around the edges. Apply the first coat of all-purpose joint compound, pressing it into the hole and smoothing it flush with the surrounding surface. Allow it to dry fully. If the compound shrank below the wall surface, apply a second thin coat slightly wider than the first. Allow to dry again, sand smooth with 220-grit paper, prime, and paint. No patch kit or backing material is needed for this size range.
How long should I wait before painting over a patched drywall area?
Do not paint until the compound is completely dry and the repair has been primed and that primer is also fully dry. Compound that is still curing can soften under paint, causing an uneven surface or poor adhesion. Most lightweight spackle for small nail holes dries within one to two hours under warm, dry conditions. Heavier applications of joint compound may need four to eight hours or overnight. Always follow the manufacturer’s recommended drying time for the specific product you used. After priming, allow the primer to dry for the time specified on the label before applying paint, which is typically one to two hours for most water-based primers.
Can I use toothpaste or other household products to fill nail holes?
Some homeowners use toothpaste or white bar soap to fill tiny nail holes as a quick temporary fix, and in some cases it works acceptably for a very short-term patch. However, these materials are not designed for this purpose and will not provide a lasting repair. They do not bond well to drywall, they shrink and crack unevenly, they absorb paint differently than the surrounding wall, and they can be affected by humidity over time. For a repair that actually lasts and looks good after painting, proper spackle or lightweight joint compound is the right material. It is inexpensive, easy to use, and available at every hardware store.
What is the difference between repairing a nail hole and a wall anchor hole?
The process is essentially the same for both, but wall anchor holes require more material and typically more patience. Nail holes are small enough to fill in a single application of a pea-sized amount of spackle. Anchor holes are larger and deeper, and they need to be filled in thin layers rather than one thick application to prevent cracking from shrinkage. The anchor itself must also be dealt with before filling. Plastic expansion anchors should be removed entirely or driven through the wall. Metal anchors should be unscrewed and removed if possible. Once the anchor is addressed and the hole is clean, the layered filling process produces an equally clean final result.
Should I repair drywall holes before or after painting a room?
Always repair drywall holes before painting. Applying paint over unfilled holes or compound repairs that have not been properly primed creates visible problems that are difficult to fix after the fact. The correct sequence is to repair all holes first, allow them to dry and sand them smooth, apply primer over all repairs, allow the primer to dry, and then paint the full wall. This sequence ensures your paint goes on over a smooth, evenly sealed surface and the repairs are completely invisible in the finished result. Skipping repairs and trying to hide them with paint never works and always results in more work to correct later.
How do I repair drywall without leaving a visible patch?
The key to an invisible repair is feathering, priming, and precise texture and sheen matching. Feather the compound by applying each coat progressively wider and thinner than the previous one, tapering into the surrounding wall gradually rather than ending with a distinct edge. Prime the repair before painting to seal the compound and equalize surface porosity. Match the paint sheen exactly to the surrounding wall. If the surrounding wall has texture, replicate that texture before priming. Evaluate the finished repair under raking light from multiple angles before calling it complete. A repair that passes the raking light test from several directions is genuinely invisible in normal living conditions.
Conclusion
Small drywall holes are one of the most manageable DIY repairs any homeowner can tackle. The materials cost very little, the tools are simple, and the process is straightforward once you understand why each step matters.
The fundamentals apply whether you are filling a tiny nail hole or a slightly larger anchor hole. Prepare the surface. Apply compound in thin coats. Allow it to dry completely. Sand it smooth. Prime it without fail. Then paint with a matching finish.
Taking the time to do each step properly produces repairs that are genuinely invisible after painting. Rushing any step, particularly drying time and priming, is what creates patches that remain visible no matter how many coats of paint you apply.
For more extensive damage beyond small holes, the How to Patch Holes in Drywall guide covers medium and large hole repair methods with the same level of detail you found here. And knowing when to call a professional, particularly for any damage involving moisture or mold, is just as important as knowing how to handle repairs yourself.
Small repairs done consistently over time keep your walls looking their best and maintain the overall condition of your home. Including interior wall inspection and touch-up repairs in your seasonal home care routine, alongside the full schedule of home maintenance tasks in the Home Maintenance Checklist by Month, ensures nothing gets overlooked between larger renovation projects.