Garage Door Maintenance: A Complete Guide for Homeowners

Introduction
Your garage door is one of the most frequently used mechanical systems in your home. The average household operates their garage door eight to ten times per day. Over the course of a year, that adds up to thousands of open and close cycles, each placing stress on springs, cables, rollers, tracks, and the opener mechanism.
Most people never think about their garage door until it stops working. That is a costly approach. A door that squeals, hesitates, or shows visible wear is communicating that something needs attention. Ignore those signals long enough and a minor maintenance item becomes a major repair.
Regular garage door maintenance keeps the door operating smoothly, quietly, and safely. It extends the life of expensive components like the opener and torsion springs. It protects your home’s security and energy efficiency through intact weatherstripping and seals. And it prevents the inconvenient, expensive breakdowns that always seem to happen at the worst possible time.
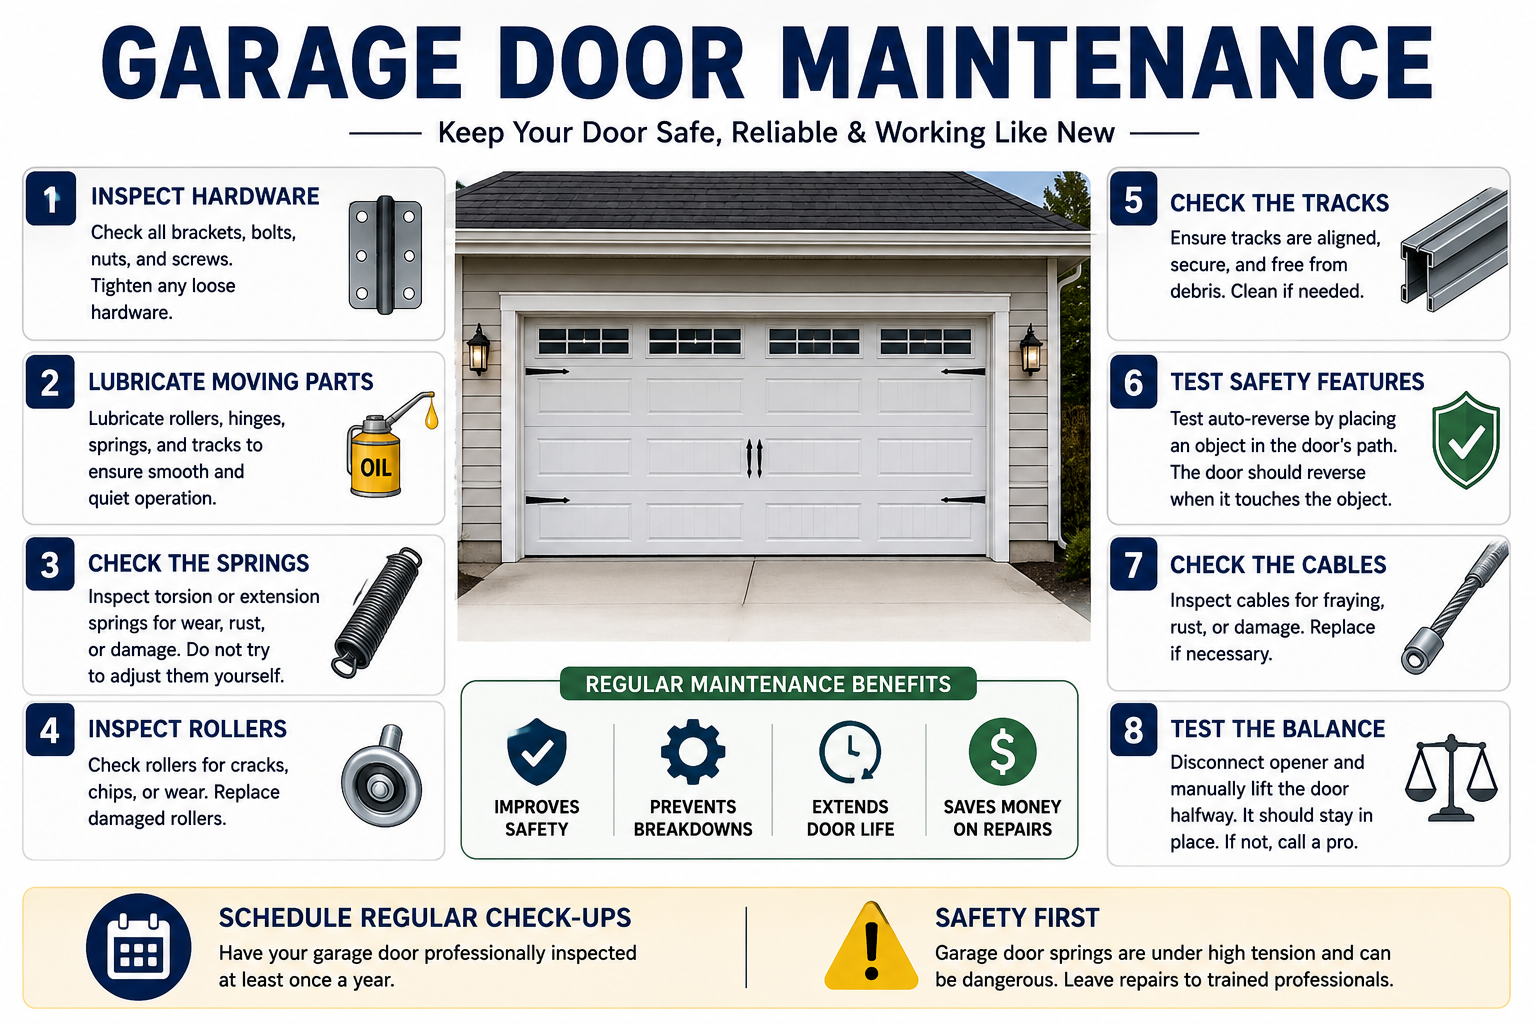
There is an important safety principle that runs through every page of this guide. Many garage door maintenance tasks are genuinely within homeowner capability: lubricating moving parts, cleaning tracks, testing safety features, and inspecting visible components. But garage door springs and cables are a different category entirely. These components operate under extreme tension and can cause serious injury or death if handled incorrectly. Any task involving springs, cables, or major mechanical components must be handled by a qualified garage door professional.
This guide gives you everything you need to maintain your garage door effectively and safely throughout the year.
What Is Garage Door Maintenance?
Garage door maintenance is the systematic inspection, cleaning, lubrication, and testing of every component in your garage door system to keep it operating safely, efficiently, and reliably.
A complete garage door system includes the door panels themselves, the metal tracks that guide the door, the rollers that run in those tracks, the hinges connecting the door sections, the springs that counterbalance the door’s weight, the cables that work with the springs, the opener unit, the drive system, the safety sensors, and all the weatherstripping and seals that protect the garage interior.
Maintenance addresses all of these components through a combination of owner-performed visual inspection and basic care, and professional service that covers the technical and high-tension elements beyond homeowner access.
Why Garage Door Maintenance Is Important
The mechanical complexity of a garage door system means that problems do not occur in isolation. A single neglected component creates stress that transfers to adjacent parts. A roller that has worn to a rough surface damages the track. A track that has developed a bend strains the rollers and stresses the springs as the door struggles to move smoothly. A spring working overtime because the door is unbalanced fails earlier than its rated cycle count.
Regular maintenance interrupts this chain reaction at the earliest point. It catches worn rollers before they damage tracks. It catches misalignment before it strains springs. It catches weatherstripping gaps before energy bills climb and moisture enters the garage.
The U.S. Consumer Product Safety Commission notes that garage doors and garage door openers are involved in thousands of injury incidents annually in the United States. The vast majority of these incidents involve improper spring handling, inadequate safety feature maintenance, and doors that have been allowed to deteriorate without proper care. Regular inspection and maintenance significantly reduces these risks.
Benefits of Regular Garage Door Maintenance
Consistent garage door maintenance delivers practical benefits that compound over the system’s entire service life.
- Extends the operational life of springs, rollers, cables, and the opener unit
- Keeps the door operating quietly without grinding, squealing, or banging
- Maintains consistent smooth operation without hesitation, vibration, or sticking
- Ensures safety features including auto-reverse and photo-eye sensors function correctly
- Protects garage interior from weather, pests, and moisture through intact seals
- Reduces the risk of sudden component failures that compromise home security
- Prevents expensive emergency service calls by catching developing problems early
- Supports manufacturer warranty compliance when applicable
- Maintains the door’s appearance through regular panel and hardware inspection
How Often Should You Maintain a Garage Door?
Most garage door manufacturers and service professionals recommend a thorough inspection and lubrication at least twice per year. Spring and fall are the natural windows for this comprehensive service.
Beyond these biannual sessions, certain tasks warrant more frequent attention. Safety feature testing should happen monthly. Visual inspection of the door and opener should be part of a general awareness throughout the year. After any significant weather event involving extreme temperature swings, high winds, or hail, a basic check of the door’s condition and alignment is worthwhile.
Building garage door maintenance into your broader home care schedule ensures it receives consistent attention. The Home Maintenance Checklist by Month provides a practical framework for scheduling garage door tasks alongside all other monthly and seasonal home maintenance priorities.
Garage Door Maintenance Checklist
Inspect the Garage Door Panels
Start every maintenance session with a visual inspection of all door panels from both the interior and exterior. Look for dents, cracks, warping, or corrosion that affects the structural integrity or weathertight seal of the door.
On wood doors, check for rot, swelling, or paint failure that indicates moisture infiltration. On steel doors, look for rust forming at panel edges, seams, or hardware attachment points. On fiberglass or composite doors, check for cracking or delamination.
Minor surface damage can often be repaired or touched up. Significant panel damage that affects the door’s structural integrity or sealing performance warrants panel replacement or professional evaluation.
Check the Door Tracks
The vertical and horizontal tracks guide the door through its complete travel. Any deviation from their proper alignment creates friction that strains every moving component in the system.
With the door closed, visually inspect both tracks from bottom to top. They should be perfectly vertical on the vertical sections and curve smoothly into the horizontal sections without sharp bends or kinks. Look for loose mounting brackets that allow the tracks to flex during operation.
Minor track adjustments involving loosening and repositioning horizontal sections are within careful homeowner capability. Significant track bending or damage, or any adjustment to the tracks where the vertical sections attach to the door frame, should be handled by a professional. Do not attempt to straighten severely bent tracks by force, as this can worsen alignment problems and create additional stress on the system.
Clean the Garage Door Tracks
Dirt, old lubricant, and debris accumulate in tracks over time and create friction that slows operation and accelerates roller wear. Clean the track interior using a damp cloth or a mild household cleaner applied with a cloth.
After cleaning, wipe the tracks completely dry. Tracks should be clean but not lubricated. This is a point that surprises many homeowners. Lubricant in the tracks attracts and holds dirt, creating an abrasive paste that wears rollers and track surfaces faster than clean dry tracks would.
Inspect Rollers
Rollers are the small wheeled components that ride inside the tracks as the door opens and closes. Standard rollers use either plastic or steel wheels. Higher-quality rollers use nylon wheels with sealed ball bearings.
With the door in the closed position, inspect each roller for cracked wheels, worn wheel edges, damaged stems, and rollers that wobble or appear loose in their hinges. Rollers with visible wear or damage should be replaced. Nylon rollers with sealed bearings last considerably longer than basic plastic or steel wheel rollers and are worth the upgrade if replacement is needed.
Roller replacement involves removing the roller and stem from the hinge bracket. This is a manageable DIY task for rollers on the lower sections of the door. Rollers in the bottom brackets, however, are directly connected to the bottom cable brackets and spring cable system. Leave those to a professional.
Check Hinges
Hinges connect each door section and flex as the door moves through the curved track section. Inspect every hinge for cracks, fatigue, or looseness at the mounting points.
Tighten any loose hinge bolts using an appropriate wrench or socket. If a bolt hole has stripped and will not hold the fastener, the hinge position may need reinforcement with a larger bolt or a backing plate. Replace any hinge showing cracks or metal fatigue. These are generally inexpensive parts available at hardware stores and are straightforward to swap out with basic hand tools.
Lubricate Moving Parts
Lubrication is the single most impactful routine maintenance task for garage door longevity and quiet operation. Use a dedicated garage door lubricant, a lithium-based grease spray, or a silicone-based lubricant. Do not use WD-40 as your primary lubricant. WD-40 is a solvent and moisture displacer. It does not provide lasting lubrication and can damage certain components over time.
Apply lubricant to:
- All roller stems and the roller-to-hinge contact point (not the wheel surface)
- All hinge pivot points
- The torsion spring or extension spring assembly (surface application only, never attempt to adjust springs)
- The top and bottom of both tracks where rollers contact the track surface during travel
- Armbar and pulley bearings if present
- The opener drive chain or screw rail (a small amount, following the manufacturer’s recommendation)
After application, operate the door through several complete cycles to distribute the lubricant evenly and wipe away any excess that drips onto the door panels or floor.
Inspect Garage Door Springs
Garage door springs are the most critical and the most dangerous components in the entire system. They store enormous amounts of mechanical energy to counterbalance the door’s weight and must be treated with absolute respect.
There are two types of residential garage door springs. Torsion springs mount horizontally above the door opening on a metal shaft. Extension springs run parallel to the horizontal tracks on either side of the door. Both types can cause serious or fatal injury if they fail suddenly or are handled improperly.
Your role in spring inspection is limited to visual observation from a safe distance with the door fully closed. Look for:
- Visible gaps in the spring coils indicating a break
- Corrosion along the spring body
- Uneven coil spacing suggesting stretching or deformation
- A door that does not stay in position when stopped manually at midpoint
Never attempt to adjust spring tension, repair a broken spring, or replace springs yourself. This work requires specialized tools, training, and knowledge of proper spring sizing for the specific door weight. Even a single mistake during spring work can result in violent spring release with catastrophic consequences. Call a garage door professional for any spring concern without exception.
Check Garage Door Cables
Cables work in conjunction with springs to lift and lower the door evenly. They run from the bottom corners of the door, over pulleys, and connect to the spring system above.
Inspect cables visually from the floor level with the door closed. Look for fraying, kinking, slack, or cables that have jumped off their drum or pulley. Any cable showing wear, damage, or improper seating requires immediate professional service.
Like springs, cables are under significant tension and can cause serious injury if they snap or release unexpectedly. Do not attempt to reconnect, repair, or adjust cables. This is professional-only work without exception.
Test the Garage Door Balance
A properly balanced garage door stays in place when stopped at midpoint during manual operation. Testing balance is one of the most revealing diagnostic tasks in garage door maintenance.
Disconnect the opener by pulling the emergency release cord (the red cord hanging from the trolley). Manually lift the door to approximately hip height and release it. A balanced door remains in position or moves only slightly. A door that drops rapidly is heavy-side unbalanced with insufficient spring tension. A door that shoots upward is light-side unbalanced with excessive spring tension.
Either imbalance must be corrected by a professional through spring adjustment. An unbalanced door places enormous stress on the opener motor, rollers, and cables. Operating a known unbalanced door accelerates wear across the entire system and risks premature opener failure.
Test the Auto-Reverse Safety Feature
The auto-reverse mechanism reverses the door when it encounters resistance during closing. This feature exists to prevent the door from closing on a person, pet, or object in its path.
Test it monthly. Place a flat two-by-four board flat on the ground directly in the door’s path. Close the door with the remote. When the bottom seal contacts the board, the door must reverse automatically within two seconds. If it does not reverse, or if it reverses slowly and with significant force before doing so, the sensitivity adjustment on the opener needs professional recalibration.
This test costs you nothing and takes thirty seconds. Skipping it means you may not know the safety system has failed until the door closes on something it should not.
Check the Photo-Eye Sensors
Photo-eye sensors are the two small units mounted near the floor on either side of the door opening, typically about four to six inches above the floor. They project an invisible beam across the door opening. If anything breaks the beam while the door is closing, the door must stop and reverse.
Clean the sensor lenses monthly with a soft dry cloth to remove dust and debris. Check that both sensors are properly aligned by confirming the indicator lights on each unit are solid and not blinking. A blinking or absent indicator light means the sensors are misaligned or blocked.
Adjust sensor alignment by gently repositioning the sensor heads in their mounting brackets until both indicator lights show solid. If sensors appear physically damaged, have them replaced by a professional.
Inspect Weatherstripping
Weatherstripping runs along the sides and top of the garage door opening and seals the gap between the door and the door frame when the door is closed. Inspect it for cracking, compression damage, missing sections, and areas where it no longer makes full contact with the door surface.
Damaged weatherstripping allows wind, moisture, pests, and cold air into the garage. It also reduces the thermal performance of the garage space, which matters if you have living space above the garage or if the garage is attached to the home and shares a thermal boundary.
Weatherstripping replacement is a straightforward DIY task. The old material peels or pries away from the door stop and the new material attaches with finishing nails or the same adhesive system. Match the profile of the replacement weatherstripping to the original for proper fit.
Check the Bottom Seal
The bottom seal, also called the door sweep, is the rubber or vinyl seal along the bottom edge of the door. It creates a barrier against water, drafts, and pests when the door is fully closed.
Inspect the bottom seal for cracking, flattening, tearing, or sections that are missing entirely. A seal that no longer provides full contact with the floor when the door is closed needs replacement.
Bottom seal replacement involves removing the old seal from its retaining channel in the door’s bottom bracket and sliding the new seal into place. Several seal profiles exist, so purchase a replacement that matches your existing channel type.
Inspect the Garage Door Opener
With the door closed and the opener powered, listen for the opener during several complete cycles. It should operate with a consistent, smooth sound without grinding, clicking, or straining.
Check the opener body for any visible damage, loose mounting hardware, or connections that appear compromised. Confirm the light socket is working if the opener has one. Check that the unit is mounted securely to the ceiling or wall without vibration that could loosen connections over time.
The opener’s internal electronic components, motor, and drive mechanism are not homeowner-serviceable beyond external cleaning and basic visual inspection. Any internal mechanical or electrical concern should go to a professional.
Test the Remote Control
Test every remote control and keypad associated with the opener. Confirm they operate the door reliably from the expected range. Replace batteries in remotes and keypads annually or sooner if range or reliability decreases.
If a remote stops working after a battery change, it may need reprogramming to the opener. Consult the opener manufacturer’s instructions for the reprogramming procedure, which typically involves holding a learn button on the opener unit while pressing the remote button.
Check the Emergency Release
The emergency release allows you to operate the door manually if the opener fails or during a power outage. Pull the red emergency release cord while the door is in the closed position and confirm it disengages the trolley from the drive carriage, allowing you to lift the door manually.
Verify that you can lift the door smoothly after disengagement. If the door is difficult to lift or will not stay open when released by hand, the spring balance issue discussed earlier may be the cause.
Practice re-engaging the trolley after the test by pulling the release cord forward (toward the door) while manually positioning the door near the open position, or by operating the opener which will automatically re-engage on most units.
Inspect the Drive System
The drive system connects the opener motor to the trolley that moves the door. The three common residential drive types are chain drive, belt drive, and screw drive.
Chain drives use a roller chain similar to a bicycle chain and require periodic lubrication with a light oil or chain lubricant. Belt drives use a rubber or reinforced belt that requires very little maintenance beyond visual inspection for cracking or fraying. Screw drives use a threaded steel rod and benefit from light lubrication according to the manufacturer’s specification.
Check the drive for proper tension. A chain or belt that sags excessively will create noise and can jump the drive sprocket. Adjustment procedures vary by opener model. Consult your opener’s manual for the specific adjustment method.
Check Garage Door Hardware
Walk the entire perimeter of the door and inspect every bolt, nut, and piece of hardware with fresh eyes. Look for fasteners that are visibly loose, missing, or corroded. The vibration of thousands of open and close cycles gradually loosens hardware that was properly tightened at installation.
Tighten any loose hardware with the appropriate socket or wrench. Do not overtighten into stripped holes. If a mounting hole has stripped, the hardware needs repair before that fastener can provide proper structural support.
Listen for Unusual Noises
Operate the door through several complete cycles and listen carefully from multiple positions. A well-maintained garage door runs with a smooth, predictable sound. New noises are diagnostic signals that something has changed.
Grinding suggests metal-on-metal contact from dry rollers, a dry chain, or debris in the tracks. Squealing suggests dry hinges or a rubbing component. Banging or rattling suggests loose hardware, a worn roller jumping in the track, or a drive component with excess play. Popping sounds during the door’s arc through the curved track section often indicate springs or rollers that need lubrication or replacement.
Document any new sounds, note where in the door’s travel they occur, and share this information with a technician if the noise persists after basic lubrication.
Garage Door Maintenance Schedule
| Task | Monthly | Seasonally | Annually |
|---|---|---|---|
| Test auto-reverse safety feature | Required | Required | Required |
| Clean photo-eye sensor lenses | Required | Required | Required |
| Test remote controls and keypads | Optional | Required | Required |
| Visual inspection of door panels | Optional | Required | Required |
| Inspect and clean door tracks | Optional | Required | Required |
| Inspect rollers visually | Optional | Required | Required |
| Check and tighten hardware | Optional | Required | Required |
| Lubricate all moving parts | Optional | Required | Required |
| Inspect weatherstripping | Optional | Required | Required |
| Check bottom seal condition | Optional | Required | Required |
| Test door balance | Optional | Required | Required |
| Inspect springs visually | Optional | Required | Required |
| Inspect cables visually | Optional | Required | Required |
| Check opener operation and mounting | Optional | Required | Required |
| Inspect drive system and tension | Optional | Required | Required |
| Test emergency release | Optional | Required | Required |
| Replace remote and keypad batteries | As needed | Recommended | Required |
| Professional service inspection | N/A | N/A | Recommended |
Garage Door Safety Tips
Safety must be the foundation of every garage door maintenance session and every interaction with the door system.
- Never allow children to play with or operate garage door controls
- Keep the remote control away from children
- Test the auto-reverse and photo-eye features monthly without exception
- Never leave a garage door partially open for extended periods, which places continuous tension on the spring system in a potentially compromised position
- Do not attempt to force a door that is resisting movement. Forcing a door with a mechanical problem can cause sudden cable or spring failure
- Never work under a door that is not fully open and secured
- Stand clear of the door’s path during operation
- Do not disconnect the opener and manually operate the door without first confirming the springs are intact. A door with a broken spring can be extremely heavy and dangerous to lift
- If a spring breaks, do not attempt to use the door at all until the spring is professionally replaced
- Store all garage door tools and lubricants away from children
DIY Garage Door Maintenance vs Professional Service
| Task | DIY Appropriate | Professional Required | Notes |
|---|---|---|---|
| Panel visual inspection | Yes | No | No tools required |
| Track cleaning | Yes | No | Mild cleaner and cloth |
| Track alignment (minor) | Careful DIY | Yes for significant issues | Loosen and reposition only |
| Roller inspection | Yes | No | Visual assessment |
| Roller replacement (mid-door sections) | Experienced DIY | Recommended | Avoid bottom bracket rollers |
| Hinge inspection | Yes | No | Visual and tightening |
| Hinge replacement | Yes | No | Basic hand tools |
| Hardware tightening | Yes | No | Socket wrench or screwdriver |
| Lubrication | Yes | No | Proper lubricant required |
| Spring visual inspection | Yes (observation only) | Yes for any adjustment | Never touch or adjust springs |
| Spring replacement | No | Yes | Strictly professional only |
| Cable visual inspection | Yes (observation only) | Yes for any adjustment | Never touch or adjust cables |
| Cable replacement | No | Yes | Strictly professional only |
| Balance testing | Yes | Yes for adjustment | DIY test, professional correction |
| Auto-reverse testing | Yes | No | Monthly safety task |
| Photo-eye cleaning and alignment | Yes | No | Cloth cleaning and bracket adjustment |
| Weatherstripping replacement | Yes | No | Peel and nail |
| Bottom seal replacement | Yes | No | Slide-in replacement |
| Opener visual inspection | Yes | No | Exterior observation only |
| Opener internal repair | No | Yes | Motor and electronics |
| Remote programming | Yes | No | Follow manufacturer instructions |
| Drive system lubrication | Yes | No | Correct lubricant by drive type |
| Drive tension adjustment | Careful DIY | Recommended | Follow manual precisely |
| Emergency release testing | Yes | No | Monthly safety task |
Essential Garage Door Maintenance Tools
| Tool | Purpose | Recommended Use | Estimated Cost |
|---|---|---|---|
| Garage door lubricant spray | Lubricating hinges, rollers, springs, and drive | Biannually or as needed | $8 – $20 |
| Silicone spray lubricant | Lubricating weatherstripping and seals | Biannually | $5 – $15 |
| Socket wrench set | Tightening bolts and nuts on hardware | Every maintenance session | $20 – $60 |
| Screwdriver set | Adjusting and tightening hinge and track screws | Every maintenance session | $10 – $30 |
| Level | Checking track vertical alignment | Seasonally | $15 – $40 |
| Pliers | General hardware adjustment | As needed | $10 – $25 |
| Ladder (step ladder) | Accessing upper track sections and opener | Every maintenance session | $50 – $150 |
| Clean cloths and rags | Track cleaning, lubricant wipe-down | Every maintenance session | $5 – $15 |
| Mild household cleaner | Cleaning tracks and door panels | Every maintenance session | $3 – $10 |
| Measuring tape | Checking sensor height and door alignment | As needed | $10 – $25 |
| Flashlight | Inspecting dark track sections and opener housing | Every maintenance session | $15 – $60 |
| Two-by-four board | Testing auto-reverse safety feature | Monthly | Existing material |
| Replacement batteries | Remote controls and keypads | Annually | $5 – $15 |
For a comprehensive guide to building a complete home maintenance tool collection, the Home Maintenance Tools Every Homeowner Needs article covers everything from basic hand tools to specialty maintenance equipment.
Common Garage Door Problems
| Problem | Common Causes | DIY or Professional | Action Required |
|---|---|---|---|
| Door won’t open | Dead remote battery, opener unplugged, broken spring | DIY (battery/power check) | Professional for spring issues |
| Door won’t close | Photo-eye obstruction, sensor misalignment, limit switch | DIY (clean sensors) | Professional for limit switch |
| Noisy operation | Dry components, worn rollers, loose hardware | DIY (lubrication, tightening) | Professional if persists |
| Slow operation | Low temperature, worn drive, opener strain | DIY (lubrication) | Professional for drive issues |
| Uneven door | Broken cable, spring imbalance | Professional | Immediate professional service |
| Auto-reverse activates | Obstruction, dirty sensors, sensitivity setting | DIY (clean sensors) | Professional for sensitivity |
| Door gets stuck | Track obstruction, bent track, roller failure | DIY (clear obstruction) | Professional for track/roller |
| Shaking during operation | Loose hardware, misaligned tracks, worn rollers | DIY (tighten hardware) | Professional if misaligned |
| Broken spring | Spring failure, overuse, improper weight | Professional only | Immediate professional service |
| Damaged cable | Cable wear, spring failure, improper operation | Professional only | Immediate professional service |
Garage Door Won’t Open
When the door fails to open, begin with the simplest checks before assuming a mechanical failure. Confirm the opener is plugged in and the circuit has power. Replace the remote batteries. Check that the emergency release was not inadvertently pulled, leaving the trolley disengaged.
If the door still won’t move after these checks, and especially if you can hear the opener motor running but the door is not moving, there may be a broken spring causing the door to be too heavy for the opener to lift. Do not force the door. Call a professional.
Garage Door Won’t Close
A door that opens normally but refuses to close is usually a sensor issue. Check that nothing is blocking the photo-eye beam path. Clean both sensor lenses. Confirm both indicator lights are showing solid. Adjust sensor alignment if needed.
If the sensors are functioning correctly and the door still won’t close, the close limit switch setting on the opener may need adjustment. This is typically accessible as a dial or slide adjustment on the opener unit. Consult your manual before making any adjustment.
Noisy Garage Door
A noisy garage door is almost always the first signal that maintenance is overdue. In most cases, thorough lubrication of all moving parts resolves or significantly reduces the noise. Apply lubricant to rollers, hinges, springs, and the drive system and operate the door through several cycles.
If noise persists after lubrication, investigate worn rollers, loose hardware, or track misalignment. Each of these produces a characteristic sound: grinding from dry or worn rollers, rattling from loose hardware, squealing from a rubbing hinge or bearing.
Slow Garage Door
Slowed operation can result from dry components causing friction, low ambient temperatures that thicken lubricant and stiffen seals, or a drive system that needs attention. In winter, slow operation often resolves with lubrication and a brief warm-up period.
If the door has become progressively slower over time regardless of season, the opener motor may be straining against a balance issue or a worn drive component. Have a professional assess whether opener service or replacement is warranted.
Uneven Garage Door
A door that closes unevenly, lower on one side than the other, almost always indicates a cable or spring problem. This is not a DIY repair situation under any circumstances. A broken cable or spring causing uneven lift is a safety issue that can lead to sudden door failure.
Stop using the door immediately and call a professional.
Garage Door Reverses Automatically
If the door begins closing and then automatically reverses without any visible obstruction, check the photo-eye sensors first. Clean both lenses and confirm solid indicator lights on both units. If sensors are functioning, the auto-reverse pressure sensitivity may be set too high, causing the opener to interpret normal door resistance as an obstruction.
Sensitivity adjustment is typically a dial or slide on the opener housing. Make small adjustments and test after each change. If adjustment does not resolve the issue, have a technician evaluate the opener.
Garage Door Gets Stuck
A door that stops mid-travel indicates either an obstruction in the track, a bent or damaged track section, a roller that has jumped out of the track, or an opener limit issue. Clear any visible debris from the track. If the door appears physically jammed without an obvious cause, do not force it. Call a professional to evaluate before the problem worsens.
Garage Door Shakes During Operation
Vibration during operation points to loose hardware, misaligned tracks, or worn rollers that are no longer running smoothly. Tighten all visible hardware and inspect rollers for wear. If vibration persists after hardware attention, track alignment should be evaluated professionally.
Broken Garage Door Spring
A broken torsion spring is often announced by a loud bang from the garage followed by a door that is suddenly very heavy or completely immovable. A broken extension spring may produce a similar sound with cables hanging loose.
Do not attempt to use the door. Do not attempt to replace the spring. Contact a qualified garage door technician immediately. Spring replacement is strictly professional work.
Damaged Garage Door Cable
Frayed, broken, or displaced cables produce visible signs: the door sits unevenly, one cable appears slack while the other is taut, or you can see frayed wire strands on the cable body. Like springs, cables require immediate professional service. A cable that fails suddenly can cause the door to drop rapidly, posing serious injury risk.
Common Garage Door Maintenance Mistakes
Even motivated homeowners make maintenance errors that reduce effectiveness or create unintended safety risks.
Using WD-40 as the primary lubricant. WD-40 is not a garage door lubricant. It displaces moisture and loosens rust but evaporates quickly and leaves no lasting lubrication film. Use a dedicated lithium grease spray or silicone lubricant instead.
Lubricating the inside of the tracks. Tracks should be clean and dry. Lubricant in the tracks collects dirt and creates an abrasive compound that accelerates roller and track wear. Lubricate rollers and hinges, not the track interior.
Ignoring the balance test. Many homeowners skip balance testing because the door appears to be working. An unbalanced door works the opener motor significantly harder than designed, shortening its life dramatically. Test balance every six months.
Skipping the auto-reverse test. This is a safety feature that exists specifically to prevent injury. If it is not working, you need to know immediately, not after an incident.
Forcing a door that is resisting movement. A door that is hard to move manually or straining the opener has a mechanical problem that forcing will worsen. Stop and investigate.
Attempting spring or cable work. The consequences of improperly handled spring or cable work are severe and well-documented. There is no DIY justification for attempting this work.
How to Extend the Life of a Garage Door
Small consistent habits significantly extend the service life of every component in the garage door system.
- Lubricate all moving parts twice yearly without exception
- Test the auto-reverse and photo-eye features monthly
- Clean and dry the tracks seasonally to prevent debris accumulation
- Tighten all hardware annually to prevent vibration-induced loosening
- Keep the bottom seal and weatherstripping intact to prevent moisture damage
- Address unusual noises at the first occurrence rather than waiting
- Schedule professional service when balance testing indicates a spring adjustment is needed
- Replace rollers proactively when wear is visible rather than waiting for failure
- Maintain the door panel surface to prevent rust or moisture damage that compromises structural integrity
How to Keep a Garage Door Running Quietly
A quiet garage door is a well-maintained garage door. These specific practices minimize operational noise throughout the system’s life.
- Use high-quality nylon rollers with sealed ball bearings in place of basic steel or plastic rollers
- Apply garage door lubricant to all hinges, roller stems, and springs at least twice yearly
- Keep all hardware tight, as loose components vibrate and amplify noise during operation
- Consider a belt drive opener rather than a chain drive if noise is a priority. Belt drives are the quietest residential drive system available
- Add vibration isolation pads between the opener mounting bracket and the ceiling to reduce transmitted operational vibration
- Clean tracks thoroughly to eliminate grinding from debris
Garage Door Maintenance Costs
All cost estimates below are general ranges intended for planning purposes. Actual costs vary based on location, door type, component brand, labor rates, and the extent of the work required. Always obtain written quotes from licensed professionals before authorizing any significant repair.
| Service or Task | DIY Cost | Professional Cost | Notes |
|---|---|---|---|
| Lubrication service | $8 – $20 (lubricant) | $50 – $100 | Professional as part of tune-up |
| Roller replacement (per roller) | $5 – $20 (parts) | $100 – $200 (set) | Professional for full replacement |
| Hinge replacement | $5 – $15 (parts) | $75 – $150 | DIY accessible |
| Weatherstripping replacement | $15 – $40 (materials) | $75 – $200 | DIY accessible |
| Bottom seal replacement | $15 – $40 (materials) | $75 – $150 | DIY accessible |
| Photo-eye sensor replacement | N/A | $75 – $200 | Professional installation |
| Torsion spring replacement | N/A | $150 – $350 | Professional only, per spring |
| Extension spring replacement | N/A | $100 – $250 | Professional only, per spring |
| Cable replacement | N/A | $100 – $250 | Professional only, per cable |
| Opener motor replacement | N/A | $250 – $600 | Installed by professional |
| Full opener replacement | $150 – $400 (unit) | $300 – $700 (installed) | New unit installed |
| Track realignment | N/A | $100 – $200 | Professional service |
| Annual professional tune-up | N/A | $75 – $150 | Comprehensive inspection and service |
| Panel replacement | $100 – $400 (parts) | $200 – $700+ (installed) | Varies significantly by door type |
When to Call a Garage Door Professional
The boundary between homeowner maintenance and professional service is clear in most situations. Call a professional when:
- Any spring appears broken, gapped, deformed, or is producing unusual noise during operation
- Any cable appears frayed, kinked, disconnected, or slack on one side
- The door balance test reveals the door does not hold position at midpoint
- The door hangs visibly uneven when in the closed position
- The auto-reverse feature fails the board test and sensor adjustment does not resolve it
- Track damage is visible or the track requires more than minor bracket repositioning
- The opener motor is running but not moving the door
- The opener is producing grinding, burning, or electrical sounds
- The door drops rapidly when released manually
- Any component failure creates a safety concern
When in doubt, call. A professional service call is a fraction of the cost of emergency repair after a complete system failure, and far less than the cost of a preventable injury.
Expert Recommendations
After working with garage door systems across a wide range of ages, brands, configurations, and conditions, several practices consistently produce the best outcomes for homeowners.
Treat the balance test as non-negotiable. Of all the diagnostic tests available to a homeowner, the balance test provides the most direct information about the condition of the spring system. A door that fails the balance test is telling you that the springs need professional attention. Acting on that information promptly prevents accelerated wear across the entire system, including the opener motor.
Upgrade to nylon rollers at your next service opportunity. The difference between basic steel wheel rollers and quality nylon rollers with sealed bearings is significant in terms of noise reduction, smooth operation, and service life. If a professional is already working on your door for another repair, have them install nylon rollers at the same time.
Do not defer lubrication because the door seems fine. Lubrication is preventive, not reactive. A door that operates smoothly today will operate more smoothly tomorrow and for more years ahead with consistent lubrication. A door that operates smoothly today but is not lubricated is accumulating wear that will eventually produce noise, resistance, and component failure.
Schedule a professional inspection annually. Owner-performed maintenance covers a great deal of ground, but a qualified technician assesses spring tension, cable condition, opener performance, and component wear in ways that homeowner inspection cannot. Annual professional service is the safety net that catches what you cannot see or assess yourself.
Build garage door care into your complete home maintenance schedule. The Annual Home Maintenance Checklist and the Ultimate Home Maintenance Checklist for Every Season both provide comprehensive frameworks that connect garage door maintenance to every other system your home depends on, ensuring it receives consistent seasonal attention rather than being addressed only when something goes wrong.
Frequently Asked Questions
How do I know when my garage door springs need to be replaced?
The clearest sign of spring failure is a loud bang from the garage followed by a door that will not open or is extremely heavy when lifted manually. In the case of torsion springs, you may be able to see a visible gap in the spring coil from ground level when the door is closed. Extension springs with a safety cable threaded through them will show the broken sections sagging when the spring fails. Less obvious signs include the door becoming progressively harder to open manually over time, the opener straining noticeably, or a door that fails the balance test. Any spring concern requires professional evaluation immediately.
Is it safe to operate my garage door if a spring is broken?
No. A broken spring means the door has lost its counterbalance mechanism. Without functioning springs, the door may weigh several hundred pounds in its lifted configuration, and the cables carry this full load without spring assistance. Operating the door with a broken spring places extreme stress on cables, rollers, tracks, and the opener motor, and dramatically increases the risk of sudden component failure. Some openers have safety features that prevent operation when spring failure is detected. Whether the door will operate or not, do not use it. Call a professional before attempting to open or close the door for any reason.
How long do garage door springs typically last?
Garage door springs are rated by cycle count rather than years. A standard residential torsion spring is commonly rated for approximately ten thousand cycles. A cycle is one complete open-and-close operation. For a household that uses the garage door eight to ten times daily, ten thousand cycles represents roughly three to four years of operation. Higher-cycle springs rated at twenty thousand or more cycles are available and are worth considering when springs are being replaced. Actual lifespan depends on spring quality, proper sizing for the door weight, lubrication frequency, and operating conditions including temperature extremes that affect metal fatigue.
What type of lubricant should I use on my garage door?
Use a dedicated garage door lubricant, a white lithium grease spray, or a silicone-based lubricant. These products provide lasting lubrication film suitable for the metal-on-metal contact points throughout the door system. Apply to roller stems, hinge pivot points, spring coils, and drive systems as appropriate. Avoid WD-40 as a primary lubricant because it evaporates quickly without leaving a lasting protective film. Avoid heavy grease products that attract and hold dirt, accelerating wear. For rubber components like weatherstripping and bottom seals, use a silicone-only product that does not degrade rubber over time.
How do I know if my garage door opener needs to be replaced?
Several signs suggest the opener is approaching end of useful service life. The motor runs with increased effort or produces grinding sounds not present when the unit was newer. The door speed has slowed noticeably compared to its original operation. The unit is more than fifteen to twenty years old and lacks modern safety features including auto-reverse and photo-eye sensors that meet current safety standards. The unit uses a fixed-code radio frequency system that is considered a security vulnerability by modern standards. Increasing frequency of repairs may indicate replacement is more economical than continued service on an aging unit.
How often should I lubricate my garage door?
Most manufacturers and service professionals recommend full lubrication of all moving parts at least twice yearly, typically as part of spring and fall maintenance sessions. In climates with extreme temperature swings, or in environments with high dust, humidity, or salt air, more frequent application may be beneficial. Between scheduled lubrication sessions, if you notice increased noise, added resistance during operation, or visible dryness on hinge or roller contact points, apply lubricant at that time rather than waiting for the scheduled session. Consistent lubrication is far less expensive than the component replacement that results from operating a chronically dry door system.
Can I replace garage door panels myself?
Individual panel replacement depends on door design, panel availability, and your comfort with precise mechanical work. Most panel replacement involves disconnecting hinges, repositioning top and bottom fixtures, and carefully installing the replacement panel in alignment with adjacent panels. For single-panel replacement in the middle sections of the door, an experienced DIYer with appropriate tools can manage this work. For panels near the bottom of the door, where cables and bottom brackets are involved, or for panel replacement on specialty doors with complex hardware, professional service is the appropriate choice. Always confirm panel availability and compatibility with your specific door model before ordering replacement panels.
Why does my garage door reverse when it hits the floor?
A door that reverses just before or upon reaching the floor has a close limit setting that needs adjustment. The close limit tells the opener how far the door must travel before the motor stops. If the limit is set too conservatively, the opener detects the door touching the floor as excessive resistance and triggers auto-reverse. This adjustment is made through the limit adjustment controls on the opener housing, typically a dial or screw labeled with a down or close indicator. Consult your specific opener manual for the adjustment procedure. Make small adjustments and test the full travel after each change until the door closes fully and stops cleanly.
What is the recommended maintenance for a garage door during winter?
Winter maintenance focuses on the effects of cold temperatures and moisture on the door system. Lubricate all moving parts before the cold season begins, as cold temperatures reduce the flow properties of lubricants and increase friction in dry components. Check the bottom seal and weatherstripping for integrity before freezing temperatures arrive, as gaps allow cold air and moisture to enter and ice can form where water contacts the door bottom. If the door freezes to the floor, never force it open with the opener. Clear ice manually first. Inspect the door and hardware after any significant ice storm or heavy snowfall event.
Should I be concerned about garage door security as part of maintenance?
Security is a legitimate component of garage door maintenance. Test the auto-lock feature if your opener has one, which locks the trolley in place when the door is fully closed. Confirm the emergency release cannot be triggered from outside the door by a wire or hook inserted through the top gap. Consider upgrading to a rolling-code opener if your current unit uses a fixed-code system, which is more vulnerable to code-grabbing attacks. Keep remote controls secure and never leave them in vehicles that might be parked outside the garage. Change keypad access codes periodically and always after moving into a new home or after access has been given to someone who no longer requires it.
Conclusion
A garage door is not a set-it-and-forget-it appliance. It is a mechanical system that operates under significant load thousands of times per year, and it needs consistent attention to continue performing safely and reliably.
The good news is that most of what your garage door needs from you is simple: lubrication twice a year, monthly safety tests, seasonal visual inspection, and prompt attention to anything that sounds, feels, or looks different from normal. These tasks take a few hours per year and cost almost nothing compared to the repairs they prevent.
The equally important news is knowing where the line is. Springs and cables are not homeowner territory. They are professional work, full stop. Respecting that boundary is not a limitation. It is the decision that keeps you safe and keeps your door working reliably for years.
Build your garage door maintenance into your regular home care rhythm alongside the seasonal and monthly tasks covered in resources like the Fall Home Maintenance Checklist and the Spring Home Maintenance Checklist. Treat it as the mechanical system it is. Give it the attention it deserves. And call a professional whenever the work goes beyond what you can safely and confidently handle.