How to Install Wall Hooks: A Practical Step-by-Step Guide for Beginners

Wall hooks are one of the simplest ways to add storage and organization to almost any room in your home. A few hooks in the entryway keep coats and bags off the floor. A hook in the bathroom holds towels within reach. Hooks in the garage, laundry room, kitchen, or bedroom each solve a small but real daily problem.
The process of installing wall hooks is manageable for most homeowners and renters, but doing it correctly matters. A hook that pulls out of the wall is a nuisance at best and a safety hazard at worst — particularly if it was holding something heavy. The right installation method depends on two things above all else: the type of wall you are working with and the weight the hook needs to carry.
This guide walks you through every part of the process, from choosing the right hook and hardware to installing it securely on drywall, plaster, wood, brick, concrete, and tile.
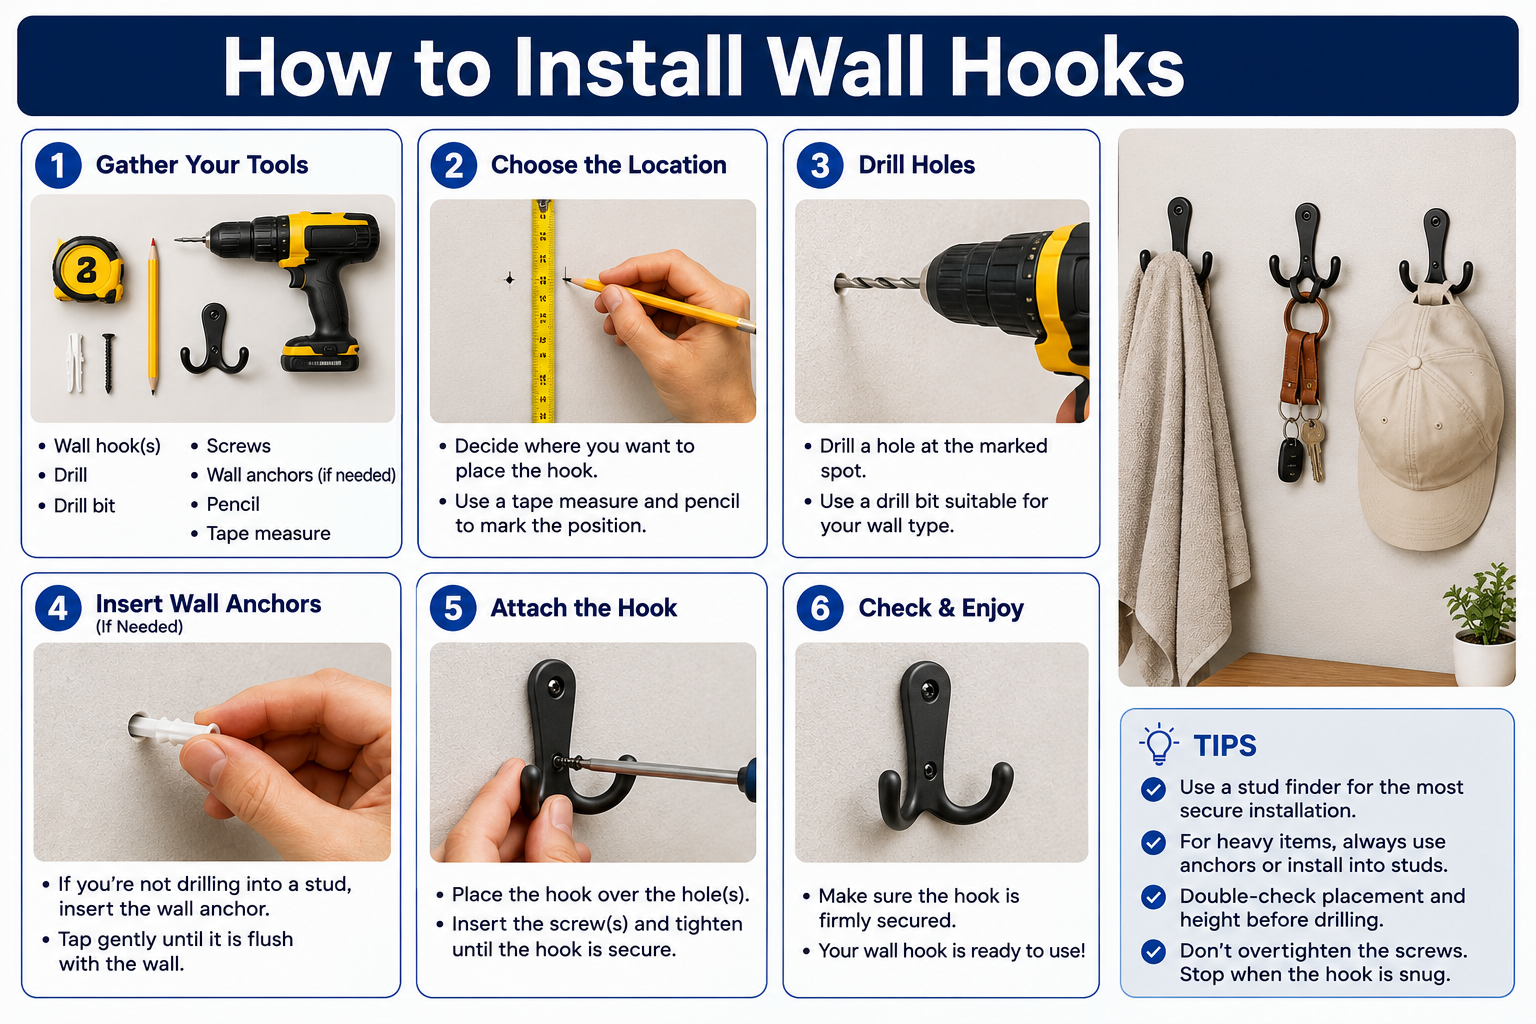
How do you install wall hooks? Choose a location, mark the position, check for studs or select the appropriate wall anchor, drill a pilot hole, insert the anchor if needed, and drive the mounting screw. Attach the hook, confirm it is straight, and test it gradually with weight before loading it fully.
Are Wall Hooks Easy to Install?
For most people, yes. Installing wall hooks is one of the more approachable home improvement tasks, and it is a great starting point for anyone new to DIY work.
The difficulty level varies depending on the type of hook and the wall material. A small adhesive hook on a clean, smooth surface requires no tools at all. A lightweight screw-in hook on a standard drywall wall takes only a few minutes with a drill and the right anchor. Mounting a heavy-duty hook into brick or concrete takes more preparation and the right equipment, but it is still well within reach for a careful beginner.
The most important thing is not rushing. Measuring carefully, choosing the correct hardware, and checking your work as you go will produce results that hold up for years.
What You Need to Install Wall Hooks
Having the right tools and materials on hand before you start avoids mid-project delays. Here is what you will typically need:
| Category | Item |
|---|---|
| Hardware | Wall hooks, screws, wall anchors suited to your wall type |
| Marking Tools | Pencil, measuring tape, level |
| Drilling Tools | Power drill, appropriate drill bits |
| Hand Tools | Screwdriver (flathead or Phillips depending on screw type) |
| Detection Tools | Stud finder with electrical detection capability |
| Safety Equipment | Safety glasses, dust mask (for masonry or tile drilling) |
| Optional | Painter’s tape (for tile drilling), rubber mallet (for anchor installation) |
The specific drill bits and anchors vary by wall type. Those are covered in detail later in this guide.
Choose the Right Wall Hook
Before you drill a single hole, make sure you have a hook that actually suits the job. Not all hooks are created equal, and a mismatch between the hook and its intended use is one of the most common causes of installation problems.
Consider the intended use. A hook for a heavy winter coat needs to be rated for that weight. A hook for a lightweight kitchen towel has far more flexibility. Think about the heaviest item that will regularly hang from the hook and choose hardware that handles that load comfortably.
Check the weight capacity. Every hook and anchor has a manufacturer-stated weight limit. This rating is not a suggestion — it is based on engineering and testing. Exceeding it risks a sudden failure. Always work within the stated limit, and if you are unsure what something weighs, err on the side of a stronger hook.
Match the hook material to the environment. For bathrooms and other humid spaces, choose stainless steel, brass, or coated metal hooks that resist corrosion. For garages and workshops, a heavier-duty steel hook is appropriate. For decorative indoor use, you have more flexibility.
Screw-mounted versus adhesive. Screw-mounted hooks provide a stronger, more permanent connection and are suitable for heavier loads. Adhesive hooks are convenient and damage-free on smooth surfaces, but they have weight limits that most screw-mounted hooks exceed. Choose based on your actual needs, not just convenience.
Hook size. A hook that is too small for what you are hanging will let items slip off easily. Make sure the opening is wide enough for the item — a coat on a thick hanger, for example, requires a wider hook opening than a lightweight bag strap.
Choose the Best Location for Your Wall Hooks
Where you put your hooks affects how useful they are every day. A hook in the wrong spot — too high, too close to a door swing, or positioned awkwardly near a fixture — creates frustration rather than solving it.
Entryways are the most popular location. Hooks near the front door give every family member a designated spot for coats, bags, and keys. They reduce clutter almost immediately.
Bedrooms benefit from hooks for robes, bags, and accessories. A hook on the back of the bedroom door is practical and out of the way.
Bathrooms are ideal for towel hooks. Position them close to the shower or bath for easy reach. Check out our guide on how to install a bathroom shelf if you are also planning to add shelf storage alongside your hooks.
Kitchens use hooks for dish towels, oven mitts, and small utensils near the cooking area.
Laundry rooms benefit from hooks for reusable bags, cleaning cloths, and items that need to air dry.
Garages are perfect for heavy-duty hooks holding extension cords, tools, hoses, and sporting equipment.
Home offices and closets use hooks for bags, headphones, and accessories that need a consistent home.
When choosing your location, check that the hook will not interfere with door swings, cabinet doors, or nearby furniture. Avoid placing hooks immediately above light switches, electrical outlets, or plumbing fixtures, as wiring and pipes often run in the wall near those areas. Marking your intended hook position before drilling — and scanning the area with a stud finder that has electrical detection — helps you avoid these hazards.
How to Install Wall Hooks Step by Step
Step 1: Decide Where to Install the Hook
Stand in the room and think practically. Where will the hook be most useful? Is it convenient to reach? Will it interfere with anything nearby? Once you have a general area in mind, scan the wall with your stud finder to understand what is behind the surface.
Mark your approximate target area with a light pencil dot so you have a reference point as you measure.
Step 2: Measure and Mark the Position
Use your measuring tape to find the exact height and horizontal position for the hook. Hold the hook against the wall at your intended location and mark through the mounting holes with a pencil. These marks will be your drill targets.
For multiple hooks in a row, measure the spacing between each one carefully. Use a level to draw a faint horizontal reference line so all hooks sit at the same height. Painter’s tape along this line can help you mark positions without leaving pencil lines across the wall.
Double-check every mark before you pick up the drill. Correcting a poorly placed hole is always harder than taking an extra minute to measure carefully.
Step 3: Check for Wall Studs
A wall stud is one of the vertical wooden framing members inside your wall. In most North American homes, studs are spaced 16 inches apart, though 24-inch spacing also exists in some construction.
Mounting a screw directly into a stud gives you a much stronger connection than any wall anchor alone. Run your stud finder slowly across the wall in the area where you plan to install the hook. Mark stud locations with painter’s tape.
If your hook position lands over a stud, drive your screw directly into it without needing an anchor. If it falls between studs — which is common — you will use an appropriate wall anchor instead.
Step 4: Select the Correct Hardware
The screw and anchor you use must match your wall type, the hook design, and the weight you expect the hook to hold.
A lightweight hook on drywall away from a stud might work fine with a standard expansion anchor. A heavy-duty hook for wet gear or tools needs a toggle bolt or, ideally, a stud-mounted screw. A hook going into brick requires a masonry anchor and a different installation process entirely.
Do not assume that one anchor type works for every situation. Read the packaging for the anchor’s rated load and wall compatibility. If your hook came with hardware, use it — but verify that it is appropriate for your specific wall before proceeding.
Step 5: Drill the Pilot Hole
Select a drill bit that matches the anchor or screw you are using. For drywall and wood, a standard twist bit is appropriate. For tile, use a carbide-tipped or diamond-coated tile bit. For masonry and brick, use a carbide-tipped masonry bit in a hammer drill.
Before drilling, confirm the area is clear of hidden utilities. Use a stud finder with AC detection to scan for electrical wiring. Remember that plumbing pipes often run vertically inside walls near bathroom and kitchen fixtures. If you have any doubt about what is inside the wall, stop and investigate further before drilling.
Drill to the depth your anchor requires. Apply steady, even pressure without forcing the bit. For tile, apply light pressure and let the bit work slowly — forcing it is how tiles crack.
Step 6: Install the Wall Anchor When Needed
If your hook is not landing on a stud, insert your chosen wall anchor into the pilot hole. Tap it gently with a rubber mallet or the handle of a screwdriver until it sits flush with the wall surface. It should be snug, not loose.
Follow the anchor manufacturer’s instructions. Different anchor designs — expansion anchors, toggle bolts, snap toggles, plastic expansion plugs — each have a specific installation method. Getting this step right is what determines how well the hook holds over time.
Step 7: Attach the Wall Hook
Hold the hook in position, aligning its mounting holes with the anchor or stud location. Insert the screw through the hook’s mounting hole and begin driving it in by hand to make sure it is properly aligned.
Tighten the screw until the hook sits firmly against the wall with no wobble. Snug is the goal — firm and secure. Do not overtighten, especially in drywall or plaster, as excessive torque can crush the wall material or strip the anchor, which weakens the connection rather than strengthening it.
Step 8: Check the Hook
Step back and look at the hook. Is it straight? Does it sit flush against the wall? Place a small level on a flat surface of the hook if it has one, or hold the level beside it.
Gently press and pull on the hook with your hand to feel for any movement at the wall. A well-installed hook should feel completely solid with no flex or looseness.
Step 9: Test the Weight Gradually
Before hanging your winter coat or heavy bag, test the hook with progressively increasing weight. Start with a lightweight item and leave it for a few minutes. Then try something a bit heavier. This approach lets you confirm that the anchor has fully engaged and that the installation is holding as expected.
Give freshly installed toggle bolts and similar anchors a brief settling period before loading them to their maximum capacity. Do not hang items that approach or exceed the hook’s rated weight limit.
How to Install Wall Hooks on Different Wall Types
Drywall
Drywall is the most common wall surface in modern homes and the most familiar for DIY projects. Standard twist bits work for drilling. If you land on a stud, a screw alone is all you need.
For hooks between studs, match the anchor to the expected load. A lightweight hook for a hand towel can use a basic plastic expansion anchor. Anything heavier — a coat, bag, or heavy tool — warrants a toggle bolt or rated snap-toggle anchor. Check the anchor’s weight rating against your intended load and stay comfortably within it.
Plaster Walls
Plaster is common in homes built before the 1950s and requires extra care. It is harder than drywall but more prone to cracking, especially if you drill too aggressively or apply too much pressure at the surface.
Use a sharp bit and drill at a moderate speed. Start slowly to avoid cracking the surface layer. Self-drilling anchors often do not work well in plaster because the material crumbles rather than gripping the anchor. Toggle bolts are generally a more reliable choice, as they expand behind the plaster surface and distribute the load effectively.
Wood
Solid wood surfaces — a wooden wall panel, a thick wooden beam, or exposed framing — provide an excellent base for hook installation. In many cases, you can drive a screw directly into solid wood without an anchor.
Make sure you are drilling into substantial wood, not just a thin trim piece or decorative panel. Use an appropriately sized screw for the hook’s mounting hole. Pre-drilling a pilot hole prevents the wood from splitting, especially near the edge of a board.
Brick and Concrete
Masonry walls require a hammer drill and carbide-tipped masonry bits. A standard drill will not penetrate brick or concrete effectively and may damage itself in the attempt.
Mark your positions carefully and drill at a consistent depth. Use masonry-specific anchors — plastic expansion anchors rated for masonry, sleeve anchors, or similar hardware designed for this wall type. Follow the anchor manufacturer’s guidance on hole diameter and depth.
Masonry installations, done correctly, are extremely strong. A hook properly anchored into brick can hold significant weight.
Tile
Tile walls are the trickiest surface for hook installation. The tile must be drilled without cracking, and the material behind it — which may be drywall, cement board, or masonry — determines which anchor to use.
Apply a small piece of painter’s tape over the drill point to prevent the bit from skating across the smooth tile surface. Use a carbide-tipped tile bit or a diamond-coated bit, and start at a slow speed with light pressure. Never use hammer drill mode while the bit is still in contact with tile — the impact will crack it. Once you have passed through the tile, you may be able to switch to hammer mode if you are drilling into masonry behind it.
Insert a plastic expansion anchor into the finished hole and drive your hook’s mounting screw into it. For a related installation challenge in a tiled bathroom, our guide on how to install a bathroom shelf covers tile drilling in more detail.
How to Install Adhesive Wall Hooks
Adhesive hooks are a popular choice for renters and anyone who wants a damage-free option. They work well for lightweight items but have real limitations that are worth understanding before you rely on them.
The general installation process:
- Clean the wall surface thoroughly with a mild cleaner. Remove any grease, dust, or residue.
- Allow the surface to dry completely.
- Mark the hook position lightly with a pencil.
- Peel the adhesive backing according to the manufacturer’s instructions.
- Press the hook firmly against the wall, applying steady pressure for the time specified in the instructions — typically 30 seconds or more.
- Wait for the full adhesive curing time before hanging anything. Most manufacturers recommend waiting 24 to 72 hours before loading the hook.
- Begin testing with lightweight items and increase gradually.
What affects adhesion:
Adhesive hooks work best on smooth, clean, non-porous surfaces. Textured walls, rough paint, fresh paint, high-humidity surfaces, and dusty or dirty walls all reduce adhesive bond strength. In damp areas like bathrooms, look for adhesive hooks specifically rated for humid environments.
Always check the manufacturer’s stated weight limit for adhesive hooks. They are well-suited for light items like hand towels, small bags, lightweight kitchen accessories, and similar everyday objects. For anything heavier, a screw-mounted hook is the more reliable choice.
How High Should Wall Hooks Be?
There is no single correct height for a wall hook. The right answer depends on several practical factors.
User height and reach. Hooks should be easy to reach without stretching uncomfortably. For most adults, a hook at 60 to 72 inches from the floor works well. For children’s rooms or low hook rails, 36 to 48 inches is more practical.
What is being hung. A coat hook needs to be high enough that the coat does not drag on the floor. A towel hook in the bathroom can be slightly lower for easy reach after showering. A garage hook for a bicycle or long tool needs enough clearance above and below.
Furniture and fixtures below. If there is a bench, shelf, or furniture piece below the hook, factor in that height so hanging items clear the surface without bunching up on it. Our DIY entryway organizer guide covers how to coordinate hooks with benches and shelves as part of a complete storage solution.
Door and cabinet clearance. Hooks on or near doors need to be placed so the hook does not catch on the door frame when the door swings, and items hanging from it do not jam against the frame.
The practical approach: hold the hook up on the wall at your intended position, then hang the item from it (or a similar item) and check whether the height feels right in daily use. Adjust before you drill.
How Far Apart Should Wall Hooks Be?
Hook spacing is partly functional and partly visual. Hooks that are too close together cause items to tangle. Hooks that are too far apart waste wall space and make the installation look sparse.
For coats and bags, a spacing of 6 to 12 inches between hooks is generally practical. This gives enough room for bulky coats to hang without pressing against each other.
For towel hooks in a bathroom, 8 to 12 inches apart is a common and comfortable range, depending on towel size.
For smaller items — keys, lightweight bags, kitchen towels — hooks can be placed closer together, around 4 to 6 inches apart.
When installing multiple hooks in a row, mark all positions before drilling any holes. Use a level to confirm they all sit at the same height. A straight, evenly spaced row of hooks looks intentional and professional. An uneven row is noticeable every day and difficult to fix once the holes are in the wall.
How Much Weight Can a Wall Hook Hold?
This depends on multiple factors working together, and there is no single answer that covers every situation.
Hook design. A robust cast-metal hook with a wide mounting plate distributes load better than a thin, single-screw hook.
Screw size. Longer and thicker screws hold more than short, narrow ones.
Anchor type and quality. A properly installed toggle bolt in drywall holds significantly more than a basic plastic expansion anchor.
Wall material. A screw driven into a solid wood stud holds more than the same screw driven into drywall with an anchor.
Installation quality. Even the strongest anchor performs below its rating if it is installed in an oversized hole, overtightened to the point of damage, or installed in a wall with hidden damage.
Load direction. Most hooks are rated for downward (vertical) load. A hook that is pulled outward from the wall — perpendicular to the mounting surface — places different stress on the fasteners.
The most reliable guidance is the manufacturer’s stated weight capacity for both the hook and the anchor. Follow those numbers. Do not assume that a hook “looks strong enough” without checking the rating.
Common Wall Hook Installation Mistakes
Choosing the wrong hook. A decorative hook with minimal hardware is not appropriate for hanging a heavy coat or bag. Match the hook to the actual load.
Ignoring weight capacity. The weight rating is not a maximum to aim for — it is a limit to stay well within. Regularly hanging items at or near the maximum strains the hardware over time.
Using the wrong wall anchor. A standard plastic expansion anchor is not appropriate for every wall type or every load. Research what works for your specific situation.
Skipping measurements. A hook installed without careful measuring often ends up at the wrong height, misaligned with other hooks, or poorly positioned relative to the items it will hold.
Not checking for studs. Missing an opportunity to mount into a stud when one is available means relying entirely on anchors for strength.
Drilling without considering hidden utilities. Electrical wiring and water pipes run inside walls, often in areas that seem clear. Always scan before drilling.
Overtightening screws. Tightening beyond snug compresses or strips the anchor, reducing its holding strength. Firm and stable is the target, not as tight as possible.
Installing on unsuitable surfaces. Adhesive hooks on fresh paint, textured walls, or damp surfaces often fail unexpectedly. Screw-mounted hooks in crumbling plaster or damaged drywall will not hold reliably.
Overloading the hook. Hanging items beyond the rated capacity is one of the most direct causes of hook failure.
Installing multiple hooks unevenly. Not using a level or measuring spacing carefully results in a crooked, visually disruptive installation that is difficult to fix cleanly.
Wall Hook Safety Tips
- Wear safety glasses whenever you are drilling. Drywall dust, plaster fragments, and tile chips can injure your eyes.
- Use a dust mask when drilling into tile, brick, concrete, or plaster, as the fine particles produced are harmful to inhale.
- Always scan the wall for electrical wiring and plumbing before drilling. Do not rely on guesswork about what is inside the wall.
- Use the drill bit appropriate for your wall material. Using the wrong bit is not just ineffective — it can damage the wall surface, break the bit, or cause the bit to skate across a smooth surface.
- Follow the hook and anchor manufacturer’s instructions. Both the hook and the anchor come with guidance based on testing. Deviating from those instructions changes the reliability of the installation.
- Do not exceed the rated weight capacity. This applies to both the hook and the anchor independently — the actual safe load is limited by whichever component has the lower rating.
- Stop drilling if you encounter unexpected resistance or hear sounds that suggest you may have hit something inside the wall. Withdraw the bit and investigate before continuing.
- Keep children away from the work area when drilling and handling screws, anchors, and sharp tools.
For broader guidance on staying safe during home projects, OSHA’s general industry safety resources and the U.S. Consumer Product Safety Commission both provide useful reference material for DIY homeowners.
How to Remove Wall Hooks
Screw-mounted hooks: Use a screwdriver or drill on reverse to remove the mounting screws. Once the screws are out, pull the hook away from the wall. If you installed an anchor, it may come out with the screw or remain in the wall. For anchors left in the wall, you can either tap them deeper into the wall cavity using a nail set and fill over them, or pull them out with pliers if accessible.
Adhesive hooks: Most adhesive hooks are designed to be removed by pulling a tab or strip downward slowly and steadily, parallel to the wall surface. Pull slowly — rushing tears the adhesive and can damage the paint. If there is no pull tab, slide dental floss or thin fishing line behind the hook base using a gentle sawing motion to separate the adhesive from the wall.
After removing any type of hook, clean the area gently to remove adhesive residue or pencil marks before repairing the wall surface.
How to Repair a Wall After Removing a Hook
Small screw holes left by a single mounting screw are straightforward to repair. Use a pre-mixed spackling compound or lightweight wall-repair paste. Apply a small amount with a putty knife or your finger, pressing it fully into the hole. Smooth it flush with the surrounding wall surface. Allow it to dry according to the product instructions, then lightly sand the area smooth with fine-grit sandpaper. Touch up with matching paint.
Larger holes left by toggle bolt installation or by accidental damage require slightly more work. A toggle bolt leaves a hole larger than a standard screw hole. Fill it with spackling compound, feathering the edges to blend with the surrounding wall. Sand when dry and repaint.
For significant wall damage — crumbling plaster, a large torn section of drywall, or repeated hole damage in the same area — more extensive repair work may be needed. If you encounter underlying moisture damage or structural issues in the wall, address those before patching the surface.
Best Places to Use Wall Hooks Around the Home
Entryway. Coats, bags, scarves, and keys are the classic entryway use. A row of hooks keeps the floor clear and gives every family member a designated spot. Pair the hooks with a bench or shelf for a complete entryway organization setup. For a broader look at building a functional entryway, our article on how to make a DIY entryway organizer is worth reading alongside this guide.
Bathroom. Towel hooks beside or across from the shower keep towels handy. A hook on the back of the bathroom door is a practical addition in a small bathroom.
Kitchen. A hook rail near the stove keeps oven mitts, dish towels, and small utensils within reach. Under-cabinet hooks can hold mugs, tools, or small items without taking up counter space.
Bedroom. Hooks on the back of the bedroom door or inside a closet are ideal for robes, bags, belts, and accessories. A hook beside the mirror keeps the next day’s outfit within reach.
Closet. Adding hooks inside the closet — on the wall or on the back of the closet door — multiplies storage without any structural changes. This works especially well in small or reach-in closets.
Garage. Heavy-duty wall hooks in the garage handle extension cords, garden hoses, bicycles, sports equipment, and power tools. Use hooks rated for the specific load and mounted into studs or masonry wherever possible.
Laundry room. Hooks near the washer and dryer hold reusable shopping bags, cleaning cloths, and delicate items that air dry.
Home office. A hook beside or behind the desk keeps bags, headphones, and cables off the work surface and off the floor.
When Should You Hire a Professional?
Most wall hook installations are straightforward DIY projects. However, certain situations call for professional involvement.
You are unsure about what is inside the wall. If your bathroom or kitchen wall has unexplained plumbing routing, or if the area near your installation point contains electrical components you cannot identify, get a plumber or electrician to confirm the wall contents before drilling.
The wall shows signs of damage. Soft spots, bulging surfaces, or visible moisture damage suggest that the wall structure may be compromised. A damaged wall cannot support hardware reliably, and installing into it without understanding the cause of the damage can make things worse.
You need to mount something very heavy. Specialized mounting for heavy items — bicycles, large tool panels, industrial storage systems — may require hardware beyond what standard anchors can provide. A professional installer or contractor can advise on the correct approach for your specific wall and load requirement.
The wall material is unfamiliar. Some older homes have unusual construction — thick masonry, specialty plaster systems, or unconventional framing. If you are not sure how to approach the wall safely, it is worth asking someone who does.
You are not confident about the process. There is no penalty for deciding that a project is outside your current comfort level. A basic hook installation is low-risk, but if you feel uncertain at any point — especially before drilling into an unfamiliar wall — getting professional input is a reasonable choice.
Frequently Asked Questions
Can I install wall hooks without studs?
Yes. Wall anchors are designed specifically for this situation. The right anchor for your wall type and expected load can provide a reliable connection between studs. Toggle bolts are among the strongest options for drywall when a stud is not available. Always check the anchor’s weight rating before relying on it for a heavier hook.
What anchors should I use for wall hooks?
It depends on your wall type. For drywall, use expansion anchors or toggle bolts based on the load. For plaster, use toggle bolts that expand behind the wall surface. For masonry and brick, use masonry-rated expansion anchors. For tile, use plastic expansion anchors inserted after carefully drilling through the tile. Never use a single anchor type for every wall — the wrong anchor for a given wall is a common reason hooks fail.
Can I put wall hooks on drywall?
Yes, drywall is one of the most common surfaces for hook installation. If you can mount into a stud, that is ideal. When mounting between studs, use an anchor rated for your expected load. For heavier hooks, a toggle bolt provides a significantly stronger hold than a basic plastic expansion anchor in drywall.
Can wall hooks be installed on tile?
Yes, but it requires care and the correct tools. Use a carbide-tipped or diamond-coated tile bit, drill slowly with light pressure, and never use hammer mode while drilling through the tile layer. Apply painter’s tape over the drill mark to prevent bit slippage. Once through the tile, use a plastic expansion anchor in the hole behind it.
How much weight can a wall hook hold?
There is no universal number — it depends on the hook design, the anchor type, the wall material, the screw size, and the quality of the installation. Always follow the manufacturer’s stated weight capacity for both the hook and the anchor. The actual safe load is limited by whichever component has the lower rating.
Are adhesive wall hooks safe for painted walls?
They can be, on smooth, clean, fully cured paint surfaces. Fresh paint — anything applied within the past few weeks — may not bond reliably, and the adhesive may pull the paint away when removed. Textured or rough paint surfaces also reduce adhesion. Always follow the specific adhesive hook manufacturer’s guidance on compatible surfaces and observe the required curing time before hanging anything.
How high should wall hooks be?
It depends on who is using them, what is being hung, and what is nearby. For most adults, 60 to 72 inches from the floor is a practical range for coat and bag hooks. In children’s spaces, 36 to 48 inches is more accessible. Hooks above furniture need to be high enough that hanging items clear the surface below them.
How far apart should wall hooks be?
For coats and bags, 6 to 12 inches between hooks prevents items from tangling. For towels, 8 to 12 inches is typically comfortable. For smaller, lighter items, hooks can be placed 4 to 6 inches apart. Mark and measure all positions before drilling any holes, and use a level to confirm that multiple hooks are aligned at the same height.
How do I prevent a wall hook from coming loose?
Use the correct anchor for your wall type and load, install it properly, and do not exceed the weight limit. Check your hooks periodically — every few months is reasonable — and tighten any screws that have worked loose over time. Avoid overloading the hook consistently, as repeated heavy loads accelerate wear on the anchor and wall connection.
Can I install wall hooks without drilling?
Yes, using adhesive hooks. These require no tools and no holes, making them popular for renters. They work well for lightweight items on smooth, clean surfaces. For anything heavier or in high-humidity areas, screw-mounted hooks with appropriate anchors provide a more reliable and durable solution.
Putting It All Together
Learning how to install wall hooks is a practical skill that pays off in every room of your home. With the right hook, the right hardware for your wall type, and a careful installation process, a wall hook becomes a reliable part of your daily routine — holding your things, keeping your space organized, and staying firmly in place for years.
The keys are consistent throughout this guide: measure before you mark, check before you drill, choose hardware matched to your wall and load, and test before you rely on the hook fully. Take your time with each step, and the result will be solid, straight, and genuinely useful.
Disclaimer
The information in this article is intended for general guidance and educational purposes only. Always follow the manufacturer’s instructions for the specific hooks, anchors, and hardware you are using. Installation requirements vary depending on wall construction, local building conditions, and the specific products involved. Before drilling into any wall, check for hidden electrical wiring, plumbing, and structural elements. If you are unsure about any aspect of the installation — including what is inside your wall, the structural condition of the wall surface, or the correct hardware for your situation — consult a licensed electrician, plumber, or qualified contractor before proceeding. The author and publisher accept no responsibility for damage, injury, or loss resulting from the application of information provided in this article.