How to Replace an HVAC Filter: Complete Guide

Introduction
Replacing your HVAC filter is one of the simplest home maintenance tasks you can do. It takes about five minutes, requires no special tools, and costs between five and thirty dollars depending on the filter type. Yet it is consistently one of the most neglected tasks on any homeowner’s maintenance list.
That neglect has real consequences. A clogged air filter forces your heating and cooling system to work significantly harder than it should. Your energy bills climb. Your indoor air quality drops. And the HVAC system that might have lasted twenty years starts showing wear years ahead of schedule.
The U.S. Department of Energy notes that a dirty air filter is one of the most common causes of HVAC system inefficiency in residential homes. Replacing filters regularly can reduce your system’s energy consumption by 5% to 15%, which translates to genuine savings on every monthly utility bill throughout the year.
This guide covers everything you need to know about HVAC filter replacement. You will learn what filters do, how to choose the right one, how to replace it correctly step by step, and how to build a consistent maintenance schedule that protects your system and your indoor air quality throughout every season.
What Is an HVAC Filter?
An HVAC filter is a replaceable or washable media component installed in your heating, ventilation, and air conditioning system that captures airborne particles before they enter the system’s internal components. Every cubic foot of air your system processes passes through this filter before it reaches the blower, heat exchanger, evaporator coil, and distribution ducts.
The filter serves two primary purposes. First, it protects the HVAC equipment itself by preventing dust, debris, and particles from coating the blower motor, heat exchanger surfaces, and evaporator coil. Second, it improves the quality of the air circulated throughout your living spaces by capturing dust, pollen, pet dander, mold spores, and other particles before they are redistributed into the rooms you breathe in every day.
Filters are typically installed at one of two locations. The most common is the return air register, which is the large grill typically found on a wall or ceiling where air is drawn back into the system. The second location is at the air handler or furnace itself, where a slot on the unit accepts the filter directly. Some systems use both locations simultaneously.
Why HVAC Filters Are Important
Your HVAC system moves large volumes of air continuously. In a typical home, the entire volume of indoor air passes through the HVAC system multiple times per day. Every particle in that air, dust, pet dander, pollen, mold spores, bacteria, and volatile compounds, has the opportunity to be captured by the filter during each pass.
When the filter is clean, it captures these particles effectively, protecting both the equipment and the people in the home. When the filter becomes clogged, two problems develop simultaneously. Airflow through the system is restricted, which stresses the blower motor and reduces system efficiency. And the filter’s surface becomes so saturated with captured material that it begins releasing previously captured particles back into the airstream rather than retaining them.
The Environmental Protection Agency identifies indoor air quality as one of the top five environmental risks to public health, noting that indoor air can be two to five times more polluted than outdoor air in many homes. Regular HVAC filter replacement is one of the most accessible and effective steps homeowners can take to improve the air their families breathe every day.
Benefits of Replacing an HVAC Filter Regularly
Consistent filter replacement delivers measurable benefits across several areas of home performance.
- Improves indoor air quality by continuously capturing dust, allergens, pollen, pet dander, and airborne particles before they circulate through living spaces
- Reduces energy costs by maintaining proper airflow that allows the HVAC system to operate at its designed efficiency level
- Extends HVAC system lifespan by preventing dust and debris from coating internal components that are expensive to clean or replace
- Prevents evaporator coil icing caused by restricted airflow that drops coil temperatures below the dew point
- Maintains consistent heating and cooling performance by ensuring that air volume and distribution remain within design specifications
- Reduces allergy and asthma symptoms in sensitive household members by limiting airborne trigger exposure
- Prevents expensive repairs caused by blower motor strain, clogged coils, and heat exchanger stress from restricted airflow
- Supports warranty compliance for many HVAC systems that require documented filter maintenance as a condition of warranty coverage
How Often Should You Replace an HVAC Filter?
The correct replacement interval depends on your filter type, your household conditions, and the demands placed on your system throughout the year.
As a general guideline:
- Standard fiberglass filters: Every 30 days
- Basic pleated filters: Every 60 to 90 days
- Premium pleated filters: Every 90 to 120 days
- Washable filters: Clean every 30 days, replace annually or as needed
These intervals apply to average households. Several factors shorten the recommended interval and require more frequent replacement.
Replace more frequently if your household includes:
- Pets, which shed dander and hair that clogs filters rapidly
- Multiple occupants, which increases the volume of particles generated
- Allergy or asthma sufferers who benefit from consistently high filtration
- Smokers, whose smoke residue saturates filters quickly
- A dusty environment or recent renovation work that generates construction dust
- An older home with higher baseline dust levels
Replace less frequently if:
- The home is a single-occupant household with no pets
- The system runs infrequently in a vacation or seasonal property
- The home is new construction with minimal settled dust
Building filter replacement into your monthly home maintenance routine ensures that the interval never extends beyond its effective limit.
Our Monthly Home Maintenance Checklist includes HVAC filter inspection as a standard monthly task that takes less than five minutes to complete.
Signs Your HVAC Filter Needs Replacing
Do not wait for the scheduled replacement date if your filter shows any of these indicators before the interval is complete.
- The filter surface is visibly gray, brown, or black rather than its original white or light color
- You can hold the filter up to a light source and no light passes through it
- Dust is accumulating more rapidly than usual on surfaces throughout the home
- Airflow from supply vents feels weaker than normal
- Your heating or cooling system is running longer cycles than it previously did to reach the thermostat set point
- Your energy bill has increased without a corresponding change in usage habits or rates
- Allergy or asthma symptoms have worsened for sensitive household members
- You can smell musty or dusty odors when the system runs
- The area around return air registers shows visible dust rings or dark staining on the wall
Any of these signs indicates that the filter is overdue for replacement. Address it the same day rather than waiting for the next scheduled check.
Types of HVAC Filters
Understanding the different filter types helps you choose the right option for your system and your household’s specific needs.
Fiberglass Filters
Fiberglass filters are the least expensive residential HVAC filter option, typically costing between three and ten dollars each. They consist of loosely woven glass fibers that capture large particles like dust, lint, and debris that would otherwise coat internal HVAC components.
Fiberglass filters offer minimal air resistance, which makes them easy on the blower motor. However, they capture only the largest particles and provide virtually no protection against fine dust, pollen, pet dander, mold spores, or other allergens. They are best understood as equipment protection filters rather than air quality filters, and they require replacement every 30 days without exception.
For most homeowners seeking genuine air quality improvement, fiberglass filters are a baseline option rather than the best choice for their household’s health and comfort.
Pleated Filters
Pleated filters are the most commonly recommended residential filter type and represent the best balance of filtration efficiency, airflow resistance, and cost for most households. They are made from polyester or cotton paper media folded into accordion pleats that dramatically increase the surface area available for particle capture without proportionally increasing airflow resistance.
Quality pleated filters capture dust, pollen, pet dander, mold spores, and fine particles that fiberglass filters miss entirely. They typically last 60 to 90 days in average households and cost between eight and thirty dollars depending on the MERV rating and brand.
For the majority of homeowners without specific air quality challenges, a mid-range MERV pleated filter is the optimal choice that balances effective filtration with system airflow requirements.
Electrostatic Filters
Electrostatic filters use self-generated static electricity to attract and capture charged particles as they pass through the filter media. Some electrostatic filters are disposable, while others are washable and reusable. The static charge is generated by airflow through specially designed media rather than requiring any external power source.
These filters perform well against fine particles and are particularly effective at capturing particles that carry a natural electrical charge, including many types of bacteria and mold spores. Washable electrostatic filters represent a long-term cost savings over disposable options, but they require monthly cleaning and must dry completely before reinstallation to prevent mold growth within the filter media.
HEPA Filters
HEPA filters, which stands for High Efficiency Particulate Air, represent the highest filtration standard available in residential applications. True HEPA filters capture 99.97% of particles 0.3 microns or larger, which includes virtually all dust, pollen, mold spores, pet dander, bacteria, and many virus-carrying particles.
However, standard residential HVAC systems are not designed for the high airflow resistance that true HEPA filters create. Installing a true HEPA filter in a system not specifically engineered for it restricts airflow so severely that it can damage the blower motor, freeze the evaporator coil, and significantly reduce system performance.
HEPA filtration for residential HVAC is best achieved through a dedicated whole-home air purification system designed for HEPA media, or through standalone room air purifiers with HEPA filtration, rather than by installing HEPA filters in a standard ducted HVAC system.
Washable HVAC Filters
Washable or reusable filters are constructed from aluminum mesh or synthetic fiber media that can be rinsed clean with water and returned to service after drying. Their primary appeal is the long-term cost savings from eliminating repeated filter purchases.
The trade-off is performance. Washable filters typically achieve MERV ratings of four to eight, which is effective for large particles but less comprehensive than quality disposable pleated filters at similar MERV ratings. They also require diligent monthly cleaning and must dry completely before reinstallation, as a damp filter installed back into the system creates conditions for mold growth inside the air handler.
For homeowners willing to maintain a consistent cleaning schedule, washable filters are a cost-effective and environmentally responsible option. For households with significant allergy or air quality concerns, a higher-MERV disposable pleated filter typically outperforms washable alternatives.
HVAC Filter Types Comparison
| Filter Type | MERV Range | Lifespan | Cost Per Filter | Best For |
|---|---|---|---|---|
| Fiberglass | 1–4 | 30 days | $3–$10 | Basic equipment protection |
| Pleated | 7–13 | 60–90 days | $8–$30 | Most households, balanced performance |
| Electrostatic (disposable) | 8–12 | 60–90 days | $15–$35 | Allergen reduction |
| Electrostatic (washable) | 4–8 | 1–3 years | $20–$60 | Cost-conscious, low-allergy households |
| HEPA-compatible | 14–16 | 6–12 months | $40–$100 | Systems designed for HEPA media |
| Washable (aluminum) | 4–8 | 3–5 years | $25–$80 | Long-term cost savings, low-allergen homes |
How to Choose the Right HVAC Filter
Understanding MERV Ratings
MERV stands for Minimum Efficiency Reporting Value, a standardized rating system developed by ASHRAE that measures how effectively a filter captures particles across a range of sizes. The scale runs from 1 to 20, with higher numbers indicating better filtration of smaller particles.
| MERV Rating | Particles Captured | Typical Application |
|---|---|---|
| 1–4 | Large dust, lint, pollen | Basic equipment protection |
| 5–8 | Mold spores, dust mites, pet dander | Standard residential use |
| 9–12 | Fine dust, auto emissions, welding fumes | Better residential, light commercial |
| 13–16 | Bacteria, tobacco smoke, fine particles | Superior residential, allergy sufferers |
| 17–20 | Viruses, sub-micron particles | Hospital and cleanroom applications |
For most residential HVAC systems, a filter in the MERV 8 to 11 range provides excellent filtration of common household particles without restricting airflow enough to strain the system. Filters above MERV 13 are appropriate only if your HVAC system is specifically designed or rated for higher-resistance media.
Never install a filter with a MERV rating higher than your system’s specifications without confirming compatibility with an HVAC professional. Excessive filtration resistance causes blower motor strain, reduced airflow, coil icing, and potentially significant system damage.
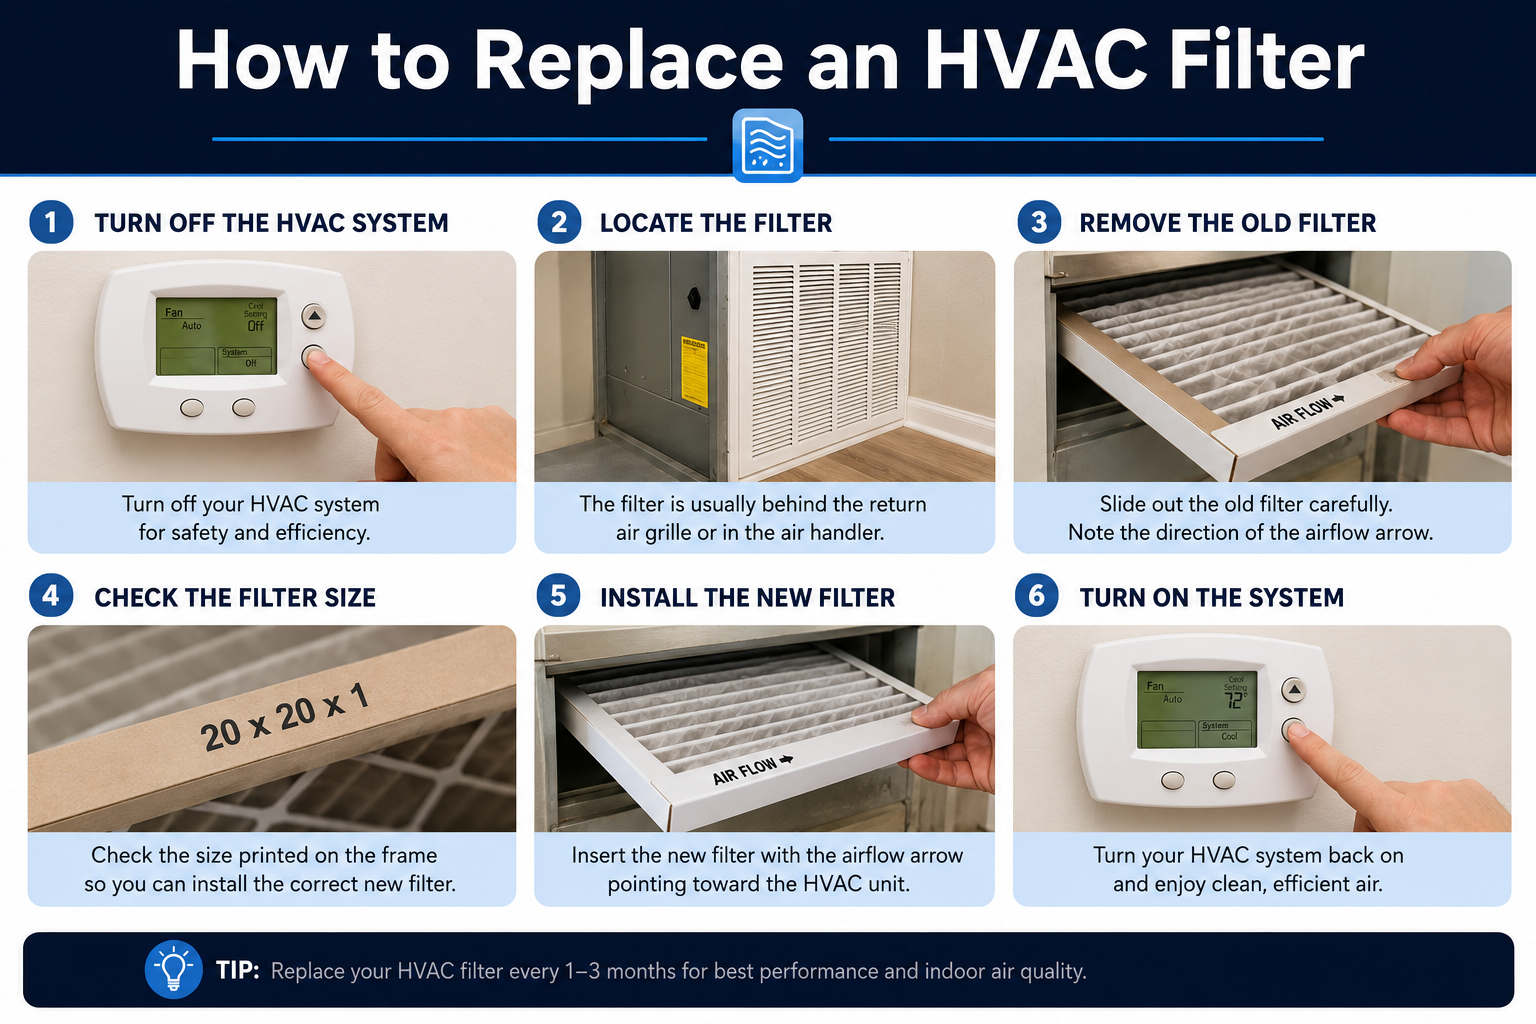
Filter Size
HVAC filters come in standardized sizes, and using the correct size is non-negotiable. A filter that is too small leaves gaps around the edges through which unfiltered air bypasses the media entirely. A filter that is too large simply will not fit the slot.
The size of your current filter is printed on its cardboard frame in three dimensions: length, width, and depth. Common dimensions include 16x20x1, 20x25x1, 16x25x4, and many others. The depth, typically one inch or four inches, affects how quickly the filter loads with particles and how often replacement is needed.
If you are unsure of the correct size, measure the filter slot opening rather than the old filter, which may have compressed slightly over time. Purchase the exact nominal size shown on the existing filter’s frame for a correct fit.
Airflow Requirements
Every HVAC system has a designed airflow rate measured in cubic feet per minute. The filter installed in your system must allow adequate airflow while providing the desired filtration level. When filter media resistance is too high for the system’s blower capacity, the blower works harder without moving the designed airflow volume.
In general, a four-inch deep filter of any given MERV rating provides less airflow resistance than a one-inch filter at the same MERV rating. If you want higher filtration without increasing airflow resistance, switching from a one-inch to a four-inch filter slot using an appropriate housing is often the most practical solution.
Allergy and Pet Considerations
Households with allergy or asthma sufferers benefit from filters at MERV 11 or higher, which effectively capture the fine particles that trigger the most significant respiratory responses. Pet owners should select filters specifically designed for pet dander and hair capture and plan for more frequent replacement, typically every 30 to 60 days rather than 90 days.
For severe allergy sufferers, supplementing a quality HVAC filter with standalone room air purifiers in sleeping areas provides an additional layer of protection that no single whole-home filter can match. The combination of a MERV 11 to 13 HVAC filter and a bedroom air purifier with HEPA capability represents the most effective approach for maximizing indoor air quality for sensitive household members.
Tools and Supplies You Need
Replacing an HVAC filter requires minimal equipment. Gather these items before beginning:
- A replacement filter in the correct size and your chosen MERV rating
- A flashlight for inspecting the filter slot and surrounding area
- A permanent marker or label for recording the replacement date
- A trash bag for immediate disposal of the old filter
- Optionally, a vacuum with a brush attachment for cleaning the filter slot area if accumulated dust is visible
- Household gloves if you prefer to handle a heavily loaded dirty filter without direct contact
That is the complete list. No tools or technical skills beyond what any homeowner possesses are required. The entire replacement process takes approximately five minutes from start to finish.
How to Replace an HVAC Filter Step by Step
Work through these steps in order for a complete and correct filter replacement.
Turn Off the HVAC System
Before touching your HVAC system, turn it off at the thermostat. Set the thermostat to the off position rather than simply to a lower temperature setting. This stops the system from starting a cycle while the filter slot is open.
Replacing a filter while the system is running pulls unfiltered air through the open slot, which allows particles to bypass the filtration point entirely and coat internal components. It also makes handling the old filter messier and more difficult as the airflow pulls debris toward you during removal.
For systems with the filter inside the air handler unit itself, locate the unit’s power switch as well if one is present. Some air handlers have a dedicated service switch on or near the unit.
Locate the Air Filter
The filter is located at one of two places. The most common is the return air register, which is the large grill installed on a wall, floor, or ceiling. This grill typically has a hinged door or a simple pull-out frame that allows filter access without tools.
The second location is directly on the air handler or furnace unit, where a slot or compartment is built into the unit housing. This slot may have a simple sliding cover or a hinged door secured with a single screw or clip.
If you are not certain where your filter is located, follow the large duct that returns air to the air handler and look for the grill or access point along its path. Your system’s owner’s manual also identifies the filter location specifically.
Remove the Old Filter
Open the filter access panel or register grill and carefully slide the old filter out. Move it slowly and straight outward along the slot direction rather than angling it, which can cause accumulated dust to dislodge and fall into the system or onto surrounding surfaces.
Hold the filter with the dirty face away from you as you remove it. Slide it directly into your trash bag immediately after removal. Sealing the old filter in the trash bag promptly prevents the captured particles from dispersing into the room air as you handle it.
Note the condition of the filter before disposal. The density and color of the captured material gives you useful information about how quickly your specific household conditions load a filter, which helps you calibrate your replacement schedule more accurately.
Inspect the Filter Slot
Before inserting the new filter, shine your flashlight into the filter slot and examine the surrounding area. Look for accumulated dust on the slot edges, any debris that may have entered the system, and the condition of the slot frame that holds the filter in position.
If visible dust has accumulated on the slot surfaces, use a vacuum with a brush attachment to clean the area before inserting the new filter. This prevents any loose debris from being drawn past the new filter during the first operating cycle.
Also check the slot edges for any damage, corrosion, or gaps that could allow air to bypass the filter around its perimeter. A slot with damaged or bent edges may need repair before a new filter will seal correctly.
Insert the New Filter Correctly
Remove the new filter from its packaging and orient it correctly before insertion. The airflow direction matters significantly. Installing a filter backwards reduces its filtration efficiency and can cause rapid clogging of the wrong filter face.
The airflow direction is indicated on the filter’s cardboard frame by an arrow printed along one edge. The arrow must point toward the air handler or furnace, in the direction that air flows through the system. Air flows from the return register through the filter and into the air handler, so the arrow points away from the return register and toward the system interior.
Slide the filter smoothly into the slot in the direction indicated by the arrow. The filter should fit snugly within the slot frame with no visible gaps around the perimeter. A filter that is the correct size will resist removal slightly once seated, indicating a proper seal.
Check the Airflow Direction
After inserting the new filter, verify once more that the airflow arrow on the frame is pointing in the correct direction toward the air handler. This is the single most common installation error homeowners make when replacing filters independently.
A filter installed backwards presents its dense, closely woven surface to the incoming airflow rather than the open face designed to receive air. This configuration loads the filter with particles much more rapidly, dramatically shortens its effective life, and increases airflow resistance immediately upon installation.
If you cannot determine the correct orientation from the slot layout, refer to your system’s owner’s manual or look for labeling on the slot frame that indicates the direction of airflow.
Restart the HVAC System
After confirming that the new filter is correctly installed and that the access panel or register grill is securely closed, return to the thermostat and restore your normal temperature setting. The system will begin operating on its next cycle as it normally would.
Listen to the system during its first operating cycle after filter replacement. Normal operation should resume without any unusual sounds. If you hear increased airflow noise, which is sometimes described as a whistling or increased rushing sound, the filter’s MERV rating may be creating more airflow resistance than the system is optimized for.
Test Proper Airflow
After the system has been running for ten to fifteen minutes, check the airflow from supply vents throughout the home. Supply vents are the smaller grills from which conditioned air blows into rooms, as opposed to the larger return grills that pull air back into the system.
Airflow from supply vents should feel strong and consistent. If airflow seems significantly weaker than before the filter change, recheck that the new filter is installed in the correct direction and that no gaps in the access panel are allowing air to bypass the filter. Reduced airflow with a new, clean filter installed correctly may indicate a filter MERV rating that is too high for your specific system’s blower capacity.
Record the Replacement Date
Write the replacement date on the new filter’s cardboard frame with a permanent marker before installation, or write it inside the filter access panel. This creates an immediate reference that tells you exactly when the filter was last replaced every time you check it during a monthly inspection.
Also record the date in your home maintenance log, your phone calendar, or whatever tracking system you use for home care tasks. Set a reminder for 30 days in the future as a prompt to visually inspect the filter’s condition, and for 60 to 90 days as a reminder to replace it regardless of visual condition if you are using a pleated filter.
Including HVAC filter replacement in your annual and seasonal maintenance records builds a complete maintenance history that supports HVAC warranty requirements and demonstrates consistent system care. Our Annual Home Maintenance Checklist provides a framework for tracking filter replacements alongside all other major home system maintenance throughout the year.
Common Mistakes to Avoid
Even a simple task like HVAC filter replacement has several common errors that undermine its effectiveness.
Installing the filter backwards. This is the most frequent error. Always confirm the arrow on the filter frame points toward the air handler before inserting the filter fully into the slot.
Using the wrong size filter. A filter that does not fill the slot completely allows unfiltered air to bypass the media through the gaps. Always verify the exact size marked on the existing filter before purchasing a replacement.
Selecting a MERV rating that is too high. The instinct to buy the highest MERV filter available is understandable but potentially damaging. Filters above MERV 13 restrict airflow in most residential systems significantly enough to cause blower motor strain and coil icing. Match the MERV rating to your system’s specifications.
Forgetting to turn the system off before replacing. Running the system with an open filter slot draws unfiltered air through the system and disperses the dust from the old filter as it is removed. Always turn the system off at the thermostat first.
Replacing filters only when they look dirty. Many particles that reduce air quality are not visible to the naked eye, and a filter that looks acceptable may still be approaching saturation. Follow a schedule-based replacement approach rather than an appearance-based one.
Not sealing the old filter immediately. Carrying an open, loaded filter through your home to the trash disperses its captured particles back into the air you are trying to clean. Seal it in a bag at the point of removal.
HVAC Filter Maintenance Tips
Building strong filter maintenance habits protects your system and your air quality consistently.
- Buy filters in multipacks for the same size and MERV rating to ensure you always have a replacement on hand when the scheduled date arrives
- Store replacement filters in their original packaging in a clean, dry location away from moisture and temperature extremes that can damage the filter media before use
- Check the filter visually during every monthly home inspection even if the scheduled replacement date has not arrived, since heavily loaded conditions can saturate a filter well ahead of the typical interval
- If anyone in the household has seasonal allergies, increase replacement frequency during peak pollen season in spring and fall to maintain peak filtration performance
- Clean the return air register grills with a damp cloth during each filter replacement to remove dust buildup that restricts return airflow
- Note the date on the filter frame at the time of installation so that the replacement date is always immediately visible without consulting a separate record
For a broader view of how HVAC filter maintenance fits into seasonal home care,
our Fall Home Maintenance Checklist and Winter Home Maintenance Checklist both identify HVAC filter replacement as a critical task at the start of each heating and cooling season.
DIY vs Professional HVAC Maintenance
| Task | DIY Appropriate | Professional Required | Reason |
|---|---|---|---|
| Filter replacement | Yes | No | No tools or technical skill required |
| Annual HVAC tune-up | No | Yes | Requires specialized tools and refrigerant certification |
| Evaporator coil cleaning | No | Yes | Requires system access and specific cleaning products |
| Condenser coil cleaning | Partial | Yes for full service | Light surface cleaning is DIY; internal service requires professional |
| Refrigerant check and charge | No | Yes | Requires EPA certification |
| Blower motor inspection | No | Yes | Requires electrical knowledge and system access |
| Duct cleaning | No | Yes | Requires specialized equipment |
| Thermostat calibration check | Yes | No | Basic function check is homeowner-appropriate |
| Belt and bearing inspection | No | Yes | Requires internal system access and expertise |
| Flue and heat exchanger check | No | Yes | Cracked heat exchangers require professional detection |
HVAC Filter Replacement Schedule
| Household Type | Recommended Filter | Replacement Frequency |
|---|---|---|
| Single occupant, no pets | MERV 8 pleated | Every 90 days |
| Average household, no pets | MERV 8–10 pleated | Every 60–90 days |
| Household with one pet | MERV 10–11 pleated | Every 30–60 days |
| Household with multiple pets | MERV 11–13 pleated | Every 30 days |
| Allergy or asthma sufferers | MERV 11–13 pleated | Every 30–45 days |
| Vacation or seasonal home | MERV 8 pleated | Every 6 months or at seasonal opening |
| High-dust environment or renovation | MERV 8–10 pleated | Every 20–30 days during active dust |
| Fiberglass filter, any household | Fiberglass | Every 30 days without exception |
Estimated HVAC Filter Costs
| Filter Type | MERV Rating | Single Filter Cost | Annual Cost (Monthly Replacement) | Annual Cost (Quarterly Replacement) |
|---|---|---|---|---|
| Fiberglass | 1–4 | $3–$10 | $36–$120 | N/A (requires monthly) |
| Basic pleated | 7–8 | $8–$15 | $96–$180 | $32–$60 |
| Mid-range pleated | 9–11 | $12–$25 | $144–$300 | $48–$100 |
| Premium pleated | 12–13 | $20–$35 | $240–$420 | $80–$140 |
| Washable (one-time) | 4–8 | $25–$80 | $25–$80 (initial only) | Same |
Common Questions About HVAC Filters
Homeowners consistently have a few questions about HVAC filter selection and replacement beyond the step-by-step process. Here are the most common ones addressed briefly before the full FAQ section.
Can I use a different brand than the original filter? Yes. HVAC filters are not proprietary to system manufacturers. Any filter of the correct dimensions and an appropriate MERV rating will function correctly in any residential system.
Should I use one-inch or four-inch filters? Four-inch depth filters offer lower airflow resistance at the same MERV rating compared to one-inch filters, and they typically last longer before requiring replacement. If your system has a four-inch filter slot or if you can install a four-inch filter housing, this is generally the superior option for most households.
Do more expensive filters always perform better? Not necessarily. Price correlates with MERV rating rather than with quality within a given MERV tier. A mid-priced pleated filter from a reputable manufacturer at MERV 10 outperforms an expensive brand’s MERV 4 fiberglass filter for air quality purposes.
Expert Recommendations
After years of working with HVAC systems in homes across a wide range of climates and household conditions, a few consistent recommendations stand out as universally applicable.
Buy your filters in six-month or annual supply quantities rather than one at a time. Purchasing in bulk reduces per-filter cost, ensures you always have the correct replacement on hand, and removes the friction of a hardware store trip as a barrier to timely replacement. Store them flat in a clean dry location.
Choose MERV 8 to 11 as your default range unless your system specifications or household conditions indicate otherwise. This range covers the vast majority of common household air quality concerns without imposing the airflow restrictions that higher MERV ratings create in standard residential systems.
Set a calendar reminder rather than relying on visual inspection alone. Particles that degrade air quality are largely invisible. A filter can look acceptably gray and still be approaching the saturation point where filtration efficiency drops and system strain increases. Schedule-based replacement is more reliable than appearance-based assessment.
Pair filter replacement with a quick inspection of your system’s outdoor condenser unit. Clear any vegetation, mulch, or debris from the two-foot clearance zone around the unit while you are already thinking about HVAC maintenance. This five-minute habit prevents airflow restriction at the condenser that compounds the effects of poor filter maintenance.
ENERGY STAR recommends replacing HVAC filters as one of the foundational steps in maintaining an energy efficient home. Their guidance on HVAC maintenance, available through the ENERGY STAR website at energystar.gov, includes additional recommendations for optimizing residential HVAC performance alongside regular filter replacement.
For a complete approach to year-round home system maintenance that places HVAC filter care in context alongside every other seasonal task,
our Ultimate Home Maintenance Checklist for Every Season provides the comprehensive framework that keeps every home system performing at its best.
Frequently Asked Questions
What happens if I never replace my HVAC filter?
A filter that is never replaced becomes increasingly saturated with captured particles until airflow through the system is severely restricted. At that point, the blower motor works at maximum capacity to move insufficient air volume, which increases energy consumption, accelerates motor wear, and generates excess heat within the system. The evaporator coil, deprived of adequate airflow, drops below the dew point and ices over, completely blocking airflow and potentially causing compressor damage. Meanwhile, the saturated filter begins releasing previously captured particles back into the airstream, degrading rather than improving indoor air quality. System failure from an ignored filter can result in repair costs of several hundred to several thousand dollars.
Can a high MERV filter damage my HVAC system?
Yes. Installing a filter with a MERV rating higher than your system is designed to accommodate restricts airflow significantly below the system’s designed operating range. This causes several cascading problems. The blower motor works harder without achieving adequate airflow, which increases energy consumption and accelerates motor wear. Restricted airflow over the evaporator coil reduces heat transfer efficiency and can cause the coil to ice over. Over time, sustained operation under these conditions stresses the compressor and can cause premature system failure. Always confirm your system’s maximum MERV compatibility in the owner’s manual before upgrading to a higher-rated filter.
Is there a difference between a furnace filter and an air conditioner filter?
In most residential forced-air systems, no. The filter is typically installed in the return air side of the system before the air handler, which serves both the furnace during heating cycles and the air conditioner during cooling cycles. The same filter handles both functions simultaneously, which is why it is more accurately called an HVAC filter rather than a furnace-only or AC-only component. Some homes with dedicated cooling equipment, window units, or ductless mini-split systems have separate filtration components for those systems, which require their own maintenance schedules independent of the central system filter.
How do I know which direction to install the filter?
The airflow direction arrow printed on the filter’s cardboard frame tells you exactly how to orient the filter. This arrow must point toward the air handler or furnace, in the direction that air travels through the system. Air flows from the living space through the return register, through the filter, and into the air handler where it is heated or cooled. So the arrow on the filter points away from the return register and toward the system interior. If you cannot identify the direction from the arrow alone, look for labeling on the filter slot itself, or consult your system’s owner’s manual for a diagram showing the correct filter orientation for your specific unit.
Why is my new filter already looking dirty after just a few weeks?
Rapid filter loading after a fresh installation usually has one of several causes. The household may have a higher-than-average particle generation rate from pets, multiple occupants, or recent renovation dust. The previous filter may have been installed so long that a backlog of particles entered the system, which are now being captured rapidly by the clean filter. The HVAC system may be running more frequently than typical, which processes more air volume through the filter per unit of time. Alternatively, the MERV rating may be appropriate but the filter depth is insufficient for the household’s conditions, suggesting a switch to a four-inch depth filter would extend the replacement interval.
Should I run my HVAC fan continuously or only when heating and cooling?
Running the fan continuously rather than only during heating and cooling cycles continuously circulates air through the filter, which provides more consistent filtration of indoor air throughout the day. This is particularly beneficial for allergy sufferers and pet owners who want maximum particle capture. The trade-off is increased filter loading rate, since more air volume passes through the filter per day, and higher energy consumption from continuous fan operation. As a compromise, many HVAC professionals recommend running the fan continuously only during high-pollen seasons or periods of elevated indoor air quality concern, and returning to on-demand fan operation at other times to balance filtration with energy efficiency.
Can I clean and reuse a disposable HVAC filter?
No. Disposable filters, including both fiberglass and pleated media types, are not designed for cleaning and reuse. Attempting to vacuum or wash a disposable filter damages the fiber structure of the media, creates gaps through which particles bypass filtration, and generally reduces the filter’s effectiveness below any useful level. Some homeowners try to vacuum the surface of a pleated filter to extend its life, but this approach damages the pleats and provides at best a modest and unreliable extension of filtration effectiveness. Only filters specifically manufactured and labeled as washable or reusable should be cleaned and reinstalled. All other filter types should be disposed of and replaced with new media.
What MERV rating is best for a home with pets?
For homes with one or two pets, a MERV 10 to 11 pleated filter provides effective capture of pet dander, hair, and the allergens associated with pet presence without imposing excessive airflow resistance on most residential systems. Homes with three or more pets or with occupants who have pet allergies benefit from MERV 11 to 13 filters with monthly replacement intervals. At this level, always confirm that your specific HVAC system’s specifications support the higher MERV rating before installation. Supplementing with a room-level HEPA air purifier in sleeping areas provides the most comprehensive protection for severely pet-allergic household members beyond what any whole-home HVAC filter can achieve alone.
Does replacing my HVAC filter really save energy?
Yes, and the savings are measurable. The U.S. Department of Energy and ENERGY STAR both identify dirty air filters as a leading cause of unnecessary energy consumption in residential HVAC systems. A clogged filter forces the blower motor to work at full capacity while moving less air volume than the system requires, which is the equivalent of driving a car with the parking brake partially engaged. Energy consumption increases while output decreases. Replacing a severely clogged filter with a clean one can reduce HVAC energy consumption by 5% to 15% immediately, with the exact savings depending on how restricted the previous filter had become and the overall efficiency of the system.
How do I find the correct filter size if the old filter has no markings?
If your old filter has no size printed on the frame, measure the filter opening directly rather than the filter itself. Measure the length, width, and depth of the filter slot opening to the nearest quarter inch. HVAC filters are sold in nominal sizes that may differ slightly from the actual measured dimensions. For example, a filter labeled as 20x25x1 may measure 19.75 by 24.75 by 0.75 inches in actual dimensions. Use the nominal size that most closely matches your measurement when purchasing replacements. If you are still uncertain, contact your HVAC system manufacturer with your model number, and they can identify the correct filter size and type for your specific unit.
Conclusion
Replacing your HVAC filter is one of the few home maintenance tasks where the investment of effort is genuinely minimal and the return is genuinely significant.
Five minutes of your time, a filter that costs anywhere from five to thirty dollars, and a consistent schedule are all that stand between your home’s HVAC system operating at peak efficiency and the gradual, cumulative damage that a neglected filter causes. Lower energy bills, better indoor air quality, fewer expensive repairs, and a longer-lasting system are the direct results of this simple habit maintained consistently.
Choose the right filter type and MERV rating for your household’s specific conditions. Install it correctly with the airflow arrow pointing toward the system. Replace it on schedule rather than waiting for visible signs of failure. Record the date and set a reminder for the next replacement. That is the complete practice.
Build this task into your monthly home inspection routine. Check the filter every 30 days. Replace it when it is due, or sooner if conditions in your home are loading it faster than expected. A home with consistently clean filters stays more comfortable, costs less to heat and cool, and places far less stress on the mechanical systems that keep your family comfortable through every season.