How to Make a DIY Entryway Organizer

Introduction
Your entryway takes a beating every single day.
Shoes pile up by the door. Coats get tossed on chairs. Keys disappear into the chaos. Bags, backpacks, mail, umbrellas, and dog leashes all compete for the same few square feet near your front door.
It happens fast. What should be a welcoming entrance into your home quickly becomes the most disorganized spot in the house.
The good news is you do not need an expensive renovation to fix it. A well-built DIY entryway organizer can completely transform that space. You get proper storage for shoes, a place to hang coats, hooks for bags and keys, and a shelf for everyday essentials — all without blowing your budget.
This guide walks you through everything. You will learn how to make a DIY entryway organizer from scratch, including design options, materials, tools, step-by-step construction, finishing, and safe wall mounting.
Whether you are a complete beginner or someone who has done a few small projects around the house, this guide has everything you need to get started.
What Is a DIY Entryway Organizer?
A DIY entryway organizer is a custom-built storage unit designed for the area near your front or back door.
It can be as simple as a wooden board with a few hooks, or as detailed as a full bench with shoe cubbies, a coat rack, and shelving. You build it yourself using basic materials and tools.
The main goal is to create a dedicated spot for the items your household uses every day. That means coats, bags, keys, shoes, mail, and anything else that tends to pile up near the door.
Because you build it yourself, you can size it perfectly for your space, choose materials that match your home’s style, and design it around exactly what you need to store.
Why Build a DIY Entryway Organizer?
Store-bought entryway furniture is often too large, too small, too expensive, or simply not designed for your specific space.
Building your own gives you full control. You choose the size, shape, storage features, materials, and finish. You can design it around a narrow hallway, an oddly shaped corner, or a very specific combination of storage needs.
The cost savings are real. A basic DIY entryway organizer can cost significantly less than a comparable store-bought unit. You also end up with something that fits your home better and lasts longer because you chose quality materials and fastened everything properly.
Benefits of a DIY Entryway Organizer
- Reduces clutter near the front door immediately
- Creates a designated place for shoes, coats, bags, and keys
- Improves the appearance and first impression of your home
- Saves money compared to most ready-made entryway furniture
- Allows full customization for your space and storage needs
- Can be built in a weekend with basic tools
- Makes it easier for the whole family to stay organized
- Adds practical storage without major renovation work
How to Choose the Right Entryway Organizer Design
Before you cut a single piece of wood, think through these factors carefully. Choosing the right design upfront saves time, money, and frustration.
Available Wall Space
Measure the wall space you have. Note any light switches, outlets, doors, or windows that might be in the way.
Entryway Size
A large mudroom can handle a full bench with overhead storage. A narrow apartment hallway needs something compact and vertical.
Storage Needs
Think about what you actually need to store. Shoes, coats, bags, keys, mail, sports gear, and pet accessories all have different storage requirements.
Number of Household Members
More people means more hooks, more shoe storage, and more shelf space. Plan storage capacity for everyone in the home.
Available Materials
Work with materials you can source locally and transport easily. Standard lumber sizes are widely available at most home improvement stores.
Budget
Set a realistic budget before you start. The design you choose should match what you are willing to spend on materials and hardware.
Style
Your entryway organizer should complement your home’s interior. Rustic wood, painted finishes, and modern clean lines all work — just choose what fits your existing decor.
Weight Requirements
Heavy winter coats, boots, and loaded bags add up quickly. Choose sturdy materials and proper mounting hardware that can handle the expected load.
DIY Entryway Organizer Ideas
Wall-Mounted Entryway Organizer
A wall-mounted entryway organizer attaches directly to the wall and keeps the floor clear. This is one of the most popular designs because it works in almost any size entryway.
It typically includes a wooden backboard, coat hooks, one or two shelves, and sometimes small baskets or bins. The floor stays open, which makes the space feel larger.
Best for: Small to medium entryways, apartments, hallways, and homes where floor space is limited.
Limitation: Weight capacity depends entirely on wall construction and mounting quality. Always mount into wall studs or use appropriate anchors.
Entryway Bench With Storage
An entryway storage bench gives you a place to sit while putting on shoes and provides storage underneath. Cubbies, baskets, or a hinged lid with interior storage are all common options.
This design works best in larger entryways or mudrooms where floor space is available.
Best for: Families, mudrooms, garages, and back entryways.
Limitation: Takes up floor space and may feel cramped in very small entryways.
Coat Rack Organizer
A DIY coat rack is one of the simplest builds on this list. It is a wooden board or panel mounted horizontally on the wall with several hooks attached.
You can add pegs, S-hooks, or decorative coat hooks depending on your style preference.
Best for: Homes that mainly need coat and bag storage without complex shelving.
Limitation: Does not provide shoe storage or surface space for keys and small items without modification.
Entryway Shelf With Hooks
This design combines a wall-mounted shelf with hooks installed below it. The shelf holds keys, mail, and small items. The hooks handle coats and bags.
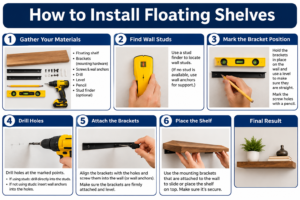
It is a versatile design that works in many entryway sizes and can be adapted easily. If you have already tackled a project like installing floating shelves, you will find this design very familiar.
Best for: Apartments, narrow entryways, and anyone who wants a clean and functional combination unit.
Limitation: Does not include shoe storage unless paired with a floor-level basket or shoe rack.
Shoe Storage Organizer
A dedicated shoe storage organizer uses shelves, cubbies, or open slots to keep footwear off the floor. It can be a standalone floor unit or built into the bottom of a larger entryway organizer.
Best for: Families with children, households with multiple pairs of shoes, and entryways where shoe clutter is the main problem.
Limitation: Can become disorganized quickly without a consistent habit of putting shoes away properly.
Small Entryway Organizer
Designed specifically for tight spaces, a small entryway organizer uses vertical space efficiently. It might include a narrow shelf, a few hooks, and a small basket or tray on the floor.
Floating shelves, a single wall-mounted hook rail, and a slim shoe rack can all work together without consuming much space.
Best for: Apartments, condos, small homes, and narrow hallways.
Limitation: Storage capacity is naturally limited by the compact size.
Entryway Mail and Key Organizer
A mail and key organizer is a smaller wall-mounted unit that focuses on the items most people lose near the front door. It usually includes small cubbies or slots for mail, a hook or two for keys, and sometimes a small tray for loose items.
Best for: Homeowners who struggle primarily with losing keys and managing incoming mail.
Limitation: Does not address shoe or coat storage needs.
Entryway Organizer Design Comparison
| Design | Best For | Floor Space Used | Difficulty Level | Estimated Build Time |
|---|---|---|---|---|
| Wall-Mounted Organizer | Small/medium entryways | None | Beginner | 4–8 hours |
| Bench With Storage | Mudrooms, families | Moderate | Intermediate | 6–12 hours |
| Coat Rack Organizer | Coat and bag storage | None | Beginner | 2–4 hours |
| Shelf With Hooks | Apartments, small spaces | None | Beginner | 3–6 hours |
| Shoe Storage Organizer | High shoe volume | Low to moderate | Beginner–Intermediate | 4–8 hours |
| Small Entryway Organizer | Apartments, narrow halls | Minimal | Beginner | 2–5 hours |
| Mail and Key Organizer | Keys and mail only | None | Beginner | 1–3 hours |
Materials You Need
| Material | Purpose | Recommended Use | Estimated Cost |
|---|---|---|---|
| Wood Boards (1×6, 1×8, 1×10) | Main structure and shelves | Most entryway organizer designs | $10–$40 per board |
| Plywood (3/4 inch) | Backboards, shelves, panels | Wall-mounted units and bench tops | $30–$60 per sheet |
| Wood Screws | Joining pieces and mounting | All wood assembly | $5–$15 per box |
| Wall Anchors | Secure mounting to drywall | When studs are not available | $5–$15 per pack |
| Hooks (coat, bag, key) | Hanging storage | All organizer types | $10–$40 per set |
| Shelf Brackets | Supporting shelves | Wall-mounted shelf designs | $10–$30 per set |
| Wood Glue | Strengthening joints | All wood assembly | $5–$12 |
| Sandpaper (80, 120, 220 grit) | Surface smoothing | All wood surfaces | $5–$15 |
| Wood Stain | Color and grain enhancement | Natural wood finishes | $10–$30 |
| Paint (latex or oil-based) | Color and protection | Painted organizers | $15–$40 |
| Clear Finish (polyurethane, etc.) | Protective top coat | All finished surfaces | $15–$35 |
Tools You Need
| Tool | Purpose | Recommended Use | Estimated Cost |
|---|---|---|---|
| Tape Measure | Measuring dimensions | All steps | $5–$20 |
| Pencil | Marking cut lines and layouts | All steps | Under $5 |
| Level | Ensuring straight installation | Shelf and wall mounting | $10–$30 |
| Drill | Driving screws, making holes | Assembly and mounting | $30–$120 |
| Screwdriver | Tightening screws manually | Assembly and hardware | $5–$20 |
| Saw (circular, hand, or miter) | Cutting wood to size | All cutting steps | $20–$150 |
| Sandpaper or Sanding Block | Smoothing surfaces | Pre-finish preparation | $5–$15 |
| Clamps | Holding pieces during assembly | Assembly steps | $10–$50 |
| Stud Finder | Locating wall studs | Mounting step | $15–$50 |
| Safety Glasses | Eye protection | All cutting and drilling | $5–$20 |
Always wear safety glasses when using saws, drills, and sanders. The Occupational Safety and Health Administration recommends appropriate eye and hand protection whenever working with power tools.
How to Make a DIY Entryway Organizer Step by Step
Step 1: Measure Your Entryway
Start by measuring the available wall space from side to side and from floor to ceiling. Write every measurement down. Note the location of electrical outlets, light switches, and any doors that swing near the wall. These measurements will drive every decision you make going forward.
Step 2: Decide What You Need to Store
Make a list of every item that currently clutters your entryway. Shoes, coats, bags, keys, mail, umbrellas — write it all down. Knowing exactly what you need to store helps you design an organizer that actually solves the problem.
Step 3: Choose the Design
Use the design comparison table above to match your needs, space, and skill level to the right organizer style. For most beginners, a wall-mounted shelf with hooks is the easiest starting point.
Step 4: Select the Materials
Choose wood and hardware that match your budget, the weight you plan to store, and the style of your home. Refer to the materials table above. If you are unsure about wood selection, the section on choosing the right wood later in this article will help.
Step 5: Measure and Mark the Pieces
Using your tape measure and pencil, mark the dimensions of each piece directly on the wood. Double-check every measurement before marking your cut line. A simple rule in woodworking: measure twice, cut once.
Step 6: Cut the Wood
Cut along your marked lines carefully. If you are using a circular saw, clamp the wood securely before cutting. A miter saw makes clean straight cuts and is worth renting if you do not own one. Always keep fingers well away from the blade and wear safety glasses.
Step 7: Sand the Surfaces
Sand all cut pieces starting with 80-grit sandpaper to remove roughness, then move to 120-grit for smoothing, and finish with 220-grit for a polished surface. Always sand in the direction of the wood grain. Sanding now is much easier than trying to sand after assembly.
Step 8: Assemble the Organizer
Lay out all your pieces on a flat surface. Apply wood glue to joints, then drive screws through pre-drilled pilot holes to secure the pieces. Pre-drilling prevents wood from splitting. Use clamps to hold pieces firmly while glue dries. Follow the glue manufacturer’s drying time instructions before moving to the next step.
Step 9: Add Hooks and Storage Features
Install your coat hooks, key hooks, and any other hardware while the unit is still on the workbench. This is much easier than trying to install hardware on a mounted piece. Space hooks evenly and mark each location with a pencil before drilling pilot holes for the screws.
Step 10: Paint or Stain the Organizer
Apply your chosen finish before mounting. Sand lightly between coats if recommended by the product manufacturer. A protective clear coat over paint or stain adds durability and makes the surface easier to clean. Allow full drying time as directed on the product label before mounting.
Step 11: Find the Wall Studs
Use a stud finder to locate the wall studs in your installation area. Mark each stud location clearly with a pencil. Mounting into studs provides the strongest and safest hold. If studs are not positioned where you need them, use heavy-duty wall anchors rated for the expected load.
Step 12: Mount the Organizer Securely
Hold the organizer against the wall at the desired height. Use a level to make sure it is perfectly straight. Mark the mounting hole locations. Drill pilot holes, then drive screws through the organizer and into the wall studs or anchors. Do not over-tighten screws or you risk splitting the wood.
Step 13: Test the Organizer
After mounting, gently push and pull the organizer from different angles. Check that it does not move or flex. Hang a coat or bag on a hook to test real-world load. If anything feels loose, reinforce the mounting before using the organizer regularly.
How to Build a Simple Wall-Mounted Entryway Organizer
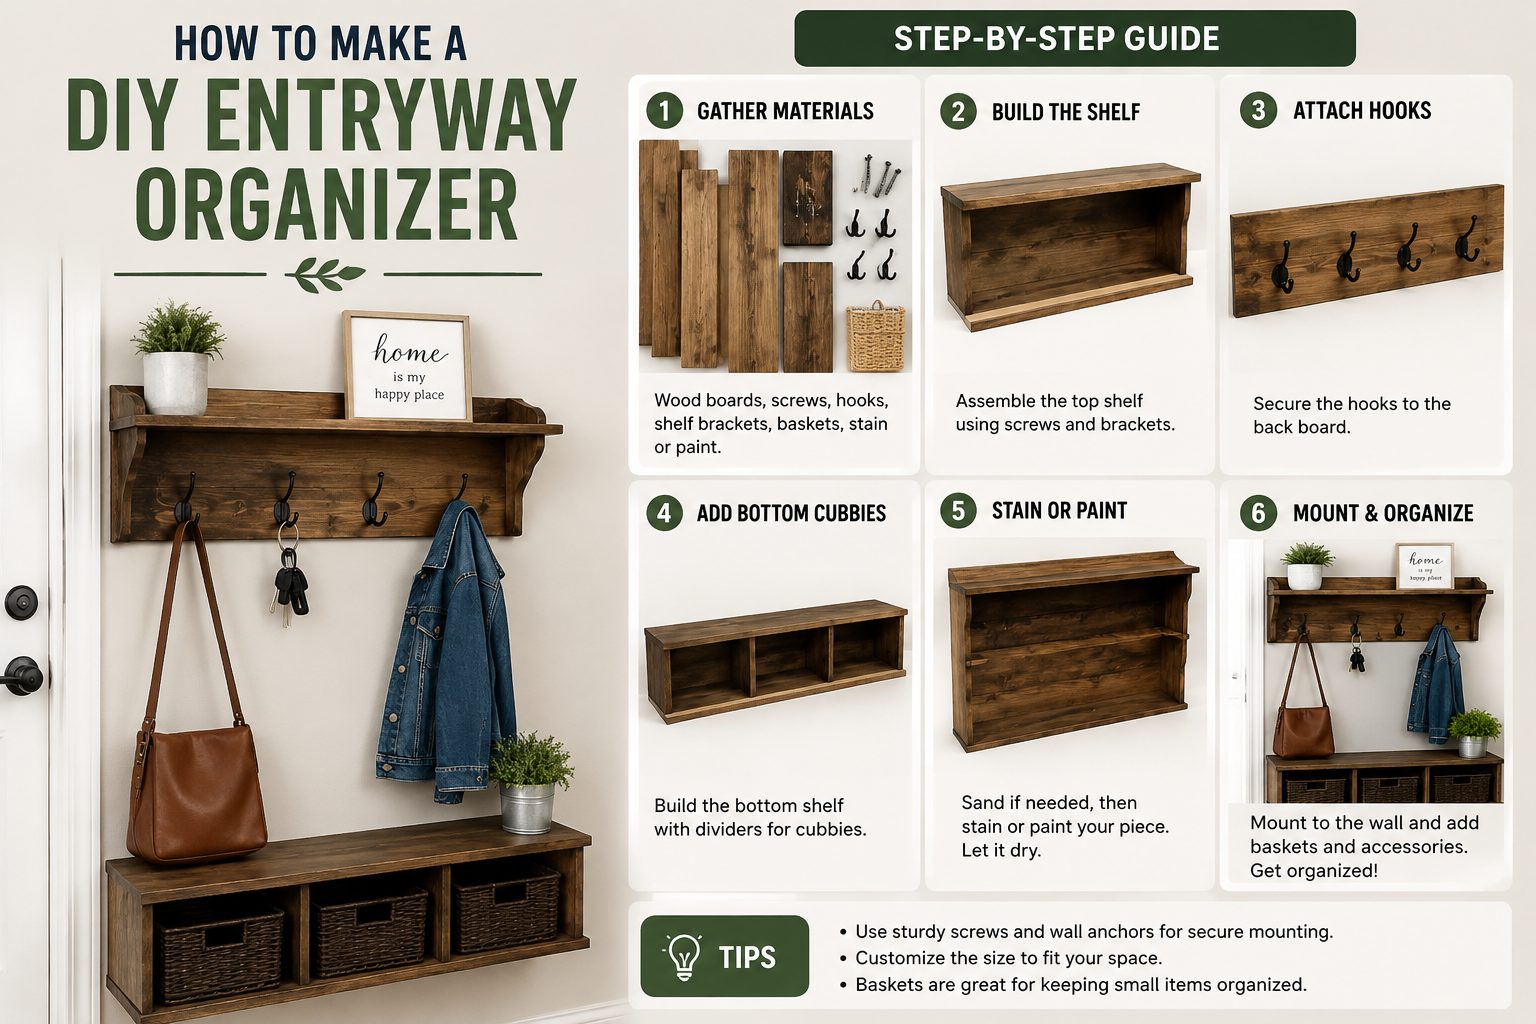
This beginner-friendly example uses a wooden backboard, a few coat hooks, and a small upper shelf. It is one of the most practical and easiest designs to build.
Basic Materials:
- One piece of 1×8 or 1×10 pine board for the backboard
- One shorter piece for the shelf
- Two shelf brackets
- Three to five coat hooks
- Wood screws, sandpaper, stain or paint, and wall mounting hardware
Basic Steps:
- Cut the backboard to your desired width — typically between 24 and 48 inches, depending on your wall space.
- Cut the shelf piece to the same width as the backboard or slightly narrower.
- Sand both pieces smooth.
- Attach the shelf to the top of the backboard using shelf brackets and screws.
- Mark and install coat hooks evenly across the backboard.
- Sand, stain or paint, and allow to dry fully.
- Mount the backboard to wall studs using appropriate screws.
Adjust dimensions based on your actual wall space and intended storage load. A longer board with more hooks works better for larger families, while a shorter version suits a single-person apartment entry.
How to Make a DIY Entryway Organizer for a Small Space
Small entryways require smarter use of vertical space. Instead of spreading storage horizontally, go up.
- Install hooks at multiple heights — one level for adults and a lower level for children.
- Use a narrow floating shelf above the hooks for keys and small items.
- Add a slim floor-level shoe rack or a small woven basket for shoes.
- Choose a wall-mounted design to keep the floor completely clear.
- Use the back of the door for additional hooks or an over-the-door organizer.
- Install a small pegboard section for flexible, adjustable hook placement.
In apartments and narrow hallways, every inch counts. Keep the organizer footprint as minimal as possible while still addressing your main storage needs.
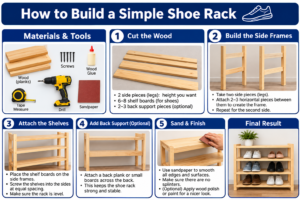
How to Add Shoe Storage to an Entryway Organizer
Shoe storage is often the biggest challenge in a busy entryway. Here are the main options:
Open Shelves: Simple horizontal shelves at floor level hold shoes flat and are easy to access. Build them into the base of a wall-mounted unit or add them below a bench.
Cubbies: Individual compartments keep pairs separated and make organization easier, especially in family homes.
Baskets or Bins: A woven basket or plastic bin at the base of your organizer works well for quick shoe drop-off and is easy to move for cleaning.
Bench With Storage: A hinged bench seat with interior storage below handles shoes neatly while providing seating.
Choose a shoe storage option that matches how your household actually behaves. If no one in your home will use cubbies consistently, a simple basket will be more effective in practice.
How to Add Hooks for Coats and Bags
Hooks are one of the most used features of any entryway organizer. Getting them right matters.
Spacing: Space hooks at least 8 to 10 inches apart so coats do not overlap and bunch together. In a family home with multiple coats, wider spacing is better.
Height: Standard adult coat hook height is roughly 60 to 68 inches from the floor. Add a lower row at 36 to 42 inches for children.
Hook Type: Choose hooks rated for the weight you expect to hang. Heavy winter coats and loaded backpacks are heavier than they look.
Secure Installation: Drive screws through the hook mounting plate into pre-drilled pilot holes. If mounting hooks into the backboard, make sure the board itself is securely attached to the wall. Loose hooks can pull free under load and cause damage or injury.
How to Add a Shelf for Keys and Small Items
A small shelf at roughly eye level near the front door is one of the most practical features you can add.
Place the shelf between 60 and 72 inches from the floor for comfortable adult access. This puts it within easy reach without requiring you to stretch.
Use the shelf for a small tray or bowl to catch keys, loose change, and sunglasses. Add a small hook below the shelf specifically for keys so they never get buried under mail or other items.
Keep the shelf depth shallow — around 4 to 6 inches is usually enough for keys and small items without the shelf sticking out too far into the entryway.
How to Choose the Right Wood
The wood you choose affects the look, durability, cost, and ease of construction of your organizer.
Plywood (3/4 inch)
Strong, stable, and available in large sheets. Great for backboards and shelves. Edges need to be filled or covered with edge banding for a clean appearance. Cost-effective for larger organizers.
Pine
Affordable, lightweight, and easy to work with. Widely available at home improvement stores in standard board sizes. Takes paint well and stains with a warm, natural look. Softer than hardwoods, so it can dent over time.
Poplar
Harder and smoother than pine, which makes it an excellent choice for painted finishes. Slightly more expensive than pine but produces very clean results.
Oak
A strong, beautiful hardwood with visible grain character. More expensive and heavier than pine or poplar, but produces a premium finished result. Works well for stained finishes. Harder to cut and requires sharp blades.
MDF (Medium-Density Fiberboard)
Smooth surface that takes paint beautifully. Does not have grain, which makes painting very even. Heavier than solid wood and does not hold screws as well at edges. Not ideal for areas exposed to moisture or humidity.
For most beginners building a DIY entryway organizer, pine or poplar boards offer the best balance of cost, workability, and finished appearance.
How to Paint or Stain a DIY Entryway Organizer
A good finish protects the wood and makes the organizer look professional.
Surface Preparation
Sand all surfaces thoroughly before finishing. Start with 120-grit and finish with 220-grit. Remove all dust with a tack cloth or slightly damp rag and allow the wood to dry completely.
Primer
For painted finishes, always apply a wood primer first. Primer seals the wood, reduces blotching, and helps paint adhere evenly. Allow primer to dry fully according to the manufacturer’s instructions.
Paint
Apply thin, even coats of latex or oil-based paint using a brush or small roller. Two coats usually provide full coverage. Sand lightly between coats with 220-grit sandpaper for the smoothest finish.
Stain
Apply wood stain with a brush or rag, working in the direction of the grain. Wipe off excess stain within the time recommended on the product label. Darker stains require less time before wiping; lighter stains can sit longer.
Protective Clear Coat
Apply a clear polyurethane or water-based topcoat over both paint and stain to protect the surface from daily wear, scuffs, and moisture. This is especially important for an entryway that sees heavy daily traffic.
Always follow the specific drying and recoat times listed on the product you are using. For a detailed painting walkthrough, this beginner’s guide to painting a room covers surface preparation and finish application thoroughly.
How to Mount an Entryway Organizer Safely
Mounting is the most critical step in the whole project. An improperly mounted organizer can pull away from the wall under load, which is both dangerous and damaging.
Finding Wall Studs
Use a stud finder and mark each stud with a pencil. Standard stud spacing in most homes is 16 inches on center, though older homes may vary. Always confirm stud location by drilling a small test hole before committing.
Using Appropriate Wall Anchors
When studs are not available in the exact mounting location, use wall anchors rated for the expected load. Toggle bolts and heavy-duty sleeve anchors provide much stronger holding power than standard plastic anchors for wall-mounted storage. If you discover unexpected wall damage while preparing your mounting area, check out how to patch holes in drywall before proceeding.
Choosing Suitable Screws
Use screws long enough to penetrate at least 1.5 inches into the wall stud beyond the drywall thickness. For a 1/2-inch drywall surface, that typically means 2.5-inch or 3-inch screws into studs.
Checking the Wall Surface
Confirm your wall is standard drywall on wood studs before mounting. Plaster walls, concrete, brick, and tile all require different mounting hardware and methods.
Distributing Weight
Spread mounting points across multiple studs whenever possible. This distributes the load more evenly and significantly increases the holding capacity of the installation.
Testing the Finished Installation
After mounting, apply gradual downward and outward pressure on the organizer before loading it with items. The U.S. Consumer Product Safety Commission recommends that wall-mounted furniture and storage be firmly secured to prevent tip-overs and falling hazards.
Common DIY Entryway Organizer Mistakes
Poor Measurements
Cutting wood based on rough estimates instead of accurate measurements leads to pieces that do not fit together cleanly. Always measure twice and mark carefully before cutting.
Choosing the Wrong Materials
Using thin or weak wood for a heavily loaded organizer creates a safety risk. Match your material thickness and type to the weight you expect the organizer to carry.
Ignoring Wall Studs
Mounting entirely into drywall without studs or rated anchors is one of the most common and dangerous mistakes in DIY projects. Always locate studs or use appropriate heavy-duty wall anchors.
Using Weak Hardware
Undersized screws and inexpensive hooks fail under regular load. Choose hardware rated for the weight you expect to hang.
Overloading Shelves
Even a well-built shelf has limits. Avoid piling heavy items onto a shelf not designed for that weight. Distribute storage across multiple hooks and shelf levels.
Installing Hooks Too Close Together
Hooks spaced too tightly make it impossible to hang coats without them overlapping and becoming difficult to access. Leave adequate spacing between every hook.
Skipping Sanding
Rough wood surfaces absorb finish unevenly and look unprofessional. Sanding properly before finishing is one of the most important steps for a quality result.
Applying Paint Without Proper Preparation
Painting over unsanded, dusty, or greasy wood results in peeling and poor adhesion. Proper surface preparation is not optional — it directly affects how long the finish lasts.
Ignoring Entryway Traffic Flow
An organizer that protrudes too far from the wall or blocks door swing creates a daily obstacle. Always account for how people move through the space before finalizing dimensions.
How to Make an Entryway Organizer Look Professional
- Choose a cohesive color or stain that matches your existing interior.
- Use consistent hardware throughout — matching hooks and brackets look intentional and polished.
- Keep all screw heads countersunk and fill them with wood filler before painting.
- Apply two or more thin coats of finish rather than one thick coat.
- Use a level at every stage of mounting for perfectly straight installation.
- Add a small decorative element such as a thin bead of trim along the shelf edge.
- Keep the design simple. Clean lines and functional storage look better than an overcrowded, complicated design.
DIY Entryway Organizer Cost
| Item | Estimated Cost |
|---|---|
| Wood (boards or plywood) | $20–$80 |
| Hooks (coat, key, bag) | $10–$40 |
| Shelf Brackets | $10–$30 |
| Screws and Wall Anchors | $5–$20 |
| Paint or Stain | $10–$40 |
| Finishing Materials (primer, clear coat) | $15–$35 |
| Tools (if purchasing new) | $30–$150 |
| Estimated Total DIY Cost | $100–$395 |
Actual costs vary depending on material quality, organizer size and design, your location, and which tools you already own. Many homeowners already have basic tools on hand, which significantly reduces the total investment. Choosing pine over oak, or paint over premium stain, also affects the final cost.
DIY vs Store-Bought Entryway Organizer
| Factor | DIY | Store-Bought |
|---|---|---|
| Cost | Lower with basic materials | Often higher for quality pieces |
| Customization | Fully customizable | Limited to available sizes and styles |
| Installation | Self-installed, requires tools | Often requires some assembly |
| Materials | You choose the quality | Varies, often particleboard or MDF |
| Design Options | Unlimited | Limited to what is available |
| Time | Hours to a weekend | Ready quickly after purchase |
| Best For | Custom spaces, budget-conscious builders, specific storage needs | Quick solutions, those without DIY experience |
How to Keep Your Entryway Organizer Organized
Shoes: Return shoes to their shelf or cubby immediately after removing them. Designate one spot per person.
Coats: Hang coats on the same hook every time. Assign each family member their own hook.
Bags: Keep only the bags you use regularly on hooks. Store seasonal or occasional bags elsewhere.
Keys: Use a dedicated key hook or tray every single time you come home. This is the most important habit you can build.
Mail: Process incoming mail daily. Recycle junk mail immediately and move important mail to a designated spot indoors.
Hats and Gloves: Use a small basket or bin on the shelf for seasonal accessories.
Umbrellas: Keep one compact umbrella on a hook. Store extras in a closet.
Pet Accessories: Designate one hook or basket specifically for leashes, collars, and pet items near the door.
Entryway Organization Tips for Families
- Assign a dedicated hook and storage zone to each family member.
- Label baskets or cubbies for younger children who are still learning organizational habits.
- Install a lower row of hooks at children’s height so they can hang their own items.
- Add a shoe limit rule — only the shoes worn most recently stay in the entryway.
- Use a communal tray for keys and daily essentials rather than individual spots that get confused.
- Do a weekly five-minute reset to clear anything that does not belong in the entryway.
Entryway Organization Tips for Small Homes
- Use every vertical inch of wall space, not just the obvious mid-level area.
- Choose hooks over bulky coat trees that eat up floor space.
- A slim woven basket for shoes takes up far less space than open floor piles.
- Keep the entryway intentionally minimal — only items used daily should live there.
- Rotate seasonal items. Store off-season coats and boots elsewhere rather than cramming everything near the door.
Entryway Organizer Safety Tips
Secure Wall Mounting: Never mount a storage unit that will carry significant weight to drywall alone without rated anchors or stud connections.
Weight Limits: Respect the load capacity of shelves and hooks. Overloading any component creates a falling hazard.
Sharp Edges: Sand all edges and corners smooth before finishing. Sharp wood edges cause cuts and snag clothing.
Loose Hooks: Check hooks periodically and tighten any that have loosened with use.
Children’s Safety: Keep heavy items on lower hooks and shelves to avoid tall units becoming top-heavy. Secure organizers firmly to prevent any potential tipping.
Trip Hazards: Make sure shoe storage is contained and does not allow shoes to spill out onto the walking path.
Proper Hardware: Use hardware designed for the intended load. Do not substitute lighter duty hardware to save money.
Regular Inspection: Check the wall mounting points every few months. Tighten any loose screws and address any signs of wall damage promptly. A regular DIY home inspection checklist can help you stay on top of these kinds of maintenance checks throughout your home.
When to Call a Professional
Most DIY entryway organizers are completely manageable as a beginner project. However, there are situations where calling a professional carpenter, handyman, or contractor makes more sense.
Uncertain Wall Structure: If you are unsure whether your walls contain structural elements, plumbing, or wiring behind the mounting area, a professional can assess the situation safely.
Heavy Built-In Storage: A full built-in mudroom with floor-to-ceiling cabinetry is a much more complex project than a wall-mounted organizer. Professional installation ensures structural integrity.
Complex Cabinetry: Custom cabinetry with doors, drawers, and built-in seating requires joinery skills and equipment beyond a basic DIY toolkit.
Electrical Wiring Near the Installation Area: Never mount anything near electrical wiring without first confirming the wiring location. An electrician should be consulted if there is any doubt.
Structural Modifications: If your project requires moving walls, cutting into the wall structure, or modifying load-bearing elements, professional guidance is essential.
Large Custom Installations: For very large or highly complex custom entryway installations, a professional carpenter will deliver a cleaner result more efficiently.
Expert Tips for a Better DIY Entryway Organizer
- Build for how your household actually behaves, not how you hope it will behave. If no one hangs up bags, build more hook capacity, not fewer.
- Account for seasonal changes. Your entryway needs look very different in winter than in summer. Build in extra capacity for bulky coats and boots.
- Use a coat of shellac-based primer over knotty pine boards before painting. It prevents knots from bleeding through the finish over time.
- When installing hooks, use two screws per hook rather than one. A single screw allows the hook to spin under load, which weakens the connection over time.
- If you are building for a rental property, choose a design that can be removed cleanly without significant wall damage.
- Before drilling any hole for mounting, confirm your location using a stud finder and verify there are no pipes or wires in the area. Being familiar with home maintenance tools that every homeowner needs will help you work more confidently on projects like this.
- Use furniture felt pads between the back of the organizer and the wall to prevent the wall finish from being scratched over time.
- Consider adding a small mirror to the design. A mirror near the front door is extremely practical and makes the space feel larger.
Frequently Asked Questions
How long does it take to build a DIY entryway organizer?
A simple wall-mounted coat rack with hooks can be built and mounted in two to four hours. A more involved design with shelves, a bench, and shoe storage typically takes a full weekend. Build time depends on your experience level, the complexity of the design, drying time for glue and finish, and how well prepared you are with materials and tools before you start. Gathering everything you need before beginning the project saves significant time.
Do I need advanced woodworking skills to build a DIY entryway organizer?
No. Most entryway organizer designs are beginner-friendly. You need basic skills like measuring, marking, cutting with a saw, and driving screws. If you can follow instructions carefully and work safely with basic tools, you can build a functional and attractive organizer. Starting with a simple wall-mounted board with hooks is the best entry point for anyone new to DIY woodworking projects.
What is the best wood for a DIY entryway organizer?
Pine is the most popular choice for beginners because it is affordable, widely available, and easy to cut and finish. Poplar is a good choice if you plan to paint the organizer, as it produces a very smooth, even surface. Oak is excellent for stained finishes and heavy-duty use but costs more and is harder to work with. Avoid MDF in areas with high humidity or moisture exposure, as it swells and deteriorates when wet.
How do I keep a wall-mounted entryway organizer from pulling away from the wall?
Always mount into wall studs whenever possible. Use a stud finder before drilling any mounting holes. When studs are not available in the right location, use heavy-duty wall anchors rated for more than the expected load. Spread mounting points across the width of the organizer rather than concentrating them in one spot. Check the mounting screws periodically for tightness and reinforce them if any loosening occurs.
Can I build a DIY entryway organizer without power tools?
Yes, with some limitations. You can cut wood using a hand saw, drive screws with a manual screwdriver, and sand by hand. However, a drill significantly speeds up the process and produces cleaner results, particularly for driving screws and making pilot holes. If you do not own a drill, many home improvement stores offer tool rentals, or you can borrow one from a neighbor or friend for a weekend project.
How much weight can a DIY entryway organizer hold?
Weight capacity depends on the wood thickness, joinery method, number of mounting points, and type of wall anchors or stud connections used. There is no single universal answer. A well-built organizer mounted into multiple wall studs with 3-inch screws will hold significantly more than one mounted with plastic anchors into drywall alone. Always select hardware rated for more weight than you plan to load, and do not overload any single hook or shelf.
How do I prevent my entryway organizer from damaging the wall?
Apply furniture felt pads to any point where the organizer contacts the wall. This prevents scratching and scuffing of the wall surface. For painted walls, this is especially important as the organizer can rub the paint over time. If you are renting and concerned about wall damage, choose removable mounting hardware rated for the load, though this does limit weight capacity significantly.
What is the best finish for a DIY entryway organizer?
A painted finish with a primer coat and a clear polyurethane topcoat holds up very well in a high-traffic entryway. Polyurethane provides a durable, scrubbable surface that resists daily wear. If you prefer a natural wood look, a penetrating oil stain followed by a clear waterborne polyurethane topcoat provides both visual appeal and durability. Always follow the product manufacturer’s instructions for application and drying time.
How do I add shoe storage if my entryway is very small?
In a very small entryway, a single row of shoe cubby shelves at floor level works well without taking up much space. A slim woven basket tucked beneath a wall-mounted organizer is even more compact. Alternatively, an over-the-door shoe organizer on the back of the front door eliminates the need for floor-level shoe storage entirely. Choose whatever solution keeps shoes contained and out of the walking path.
Can I customize a DIY entryway organizer for a renter apartment?
Yes. For rental apartments, focus on designs that use minimal wall damage and can be removed cleanly when you move out. Command strip hooks work for very light items. For heavier storage, use a freestanding coat rack or bench rather than wall-mounting. If you do mount anything, use the fewest number of holes possible and know how to repair small drywall holes before your lease ends to keep your security deposit intact.
Conclusion
A well-organized entryway makes daily life noticeably easier. It reduces the morning rush of hunting for keys, keeps coats off chairs, and creates a welcoming first impression every time you walk through the door.
Learning how to make a DIY entryway organizer is one of the most practical home improvement projects you can tackle. It does not require advanced skills, expensive tools, or a large budget. With careful planning, the right materials, and secure mounting, you can build a functional and attractive organizer that serves your household for years.
Start by measuring your space and identifying exactly what you need to store. Choose a design that matches your entryway size, household size, and storage goals. Select durable materials, finish them properly, and mount the organizer safely into wall studs or with appropriate heavy-duty anchors.
Follow the step-by-step instructions in this guide, avoid the common mistakes outlined above, and use the expert tips to elevate the finished result. Whether you are building a simple coat rack or a full mudroom bench with shoe storage, the process is the same — plan carefully, work safely, and build something that genuinely solves your organizational problems.
Your entryway is the first thing you and your guests see. Make it work for you.