How to Test Smoke Detectors: Complete Safety Guide

Introduction
A working smoke detector is one of the simplest and most powerful safety tools in any home. It costs almost nothing to maintain, requires only minutes of attention each month, and can be the single factor that determines whether your family escapes a house fire safely or does not.
Yet millions of American homes have smoke detectors that do not work. Dead batteries, expired sensors, and detectors coated in dust sit silently on ceilings throughout the country, giving homeowners a false sense of security that disappears the moment they are needed most.
The U.S. Fire Administration reports that three out of every five home fire deaths occur in properties with no smoke alarms or with alarms that failed to function. That is not a statistic about fires. It is a statistic about maintenance. Working smoke detectors give you the early warning that makes the difference between escape and tragedy.
Testing your smoke detectors regularly is one of the most important home safety tasks you can do. It takes less than ten minutes per month for an average home, requires no special tools, and provides a level of protection that no other single action can match.
This guide walks you through everything you need to know. You will learn how smoke detectors work, how to test them correctly and safely, how to maintain them, when to replace them, and how to ensure every detector in your home is positioned and functioning as it should be.
Why Smoke Detectors Are Important
House fires move faster than most people imagine. A fire can go from a small flame to a fully involved room in under three minutes. Within five minutes, conditions throughout a home can become unsurvivable. Early warning is not a convenience. It is the difference between having time to escape and not having that time at all.
A properly working smoke detector provides that early warning. It detects the presence of smoke long before visible flames spread, giving your household precious minutes to evacuate and call for help. That time window saves lives.
The National Fire Protection Association reports that the risk of dying in a home fire is 55% lower in homes with working smoke alarms compared to homes with no alarms or non-functioning alarms. That single statistic captures why smoke detector testing is non-negotiable for any homeowner or renter.
Beyond the immediate safety benefit, working smoke detectors also protect your property. Early detection gives fire departments more time to respond before a fire reaches its most destructive phase. The financial and structural damage caused by a fully involved house fire is orders of magnitude greater than the damage from a fire caught and suppressed early.
How Smoke Detectors Work
Understanding how your smoke detector works helps you test and maintain it more effectively. While all smoke detectors serve the same fundamental purpose, they use different technologies to detect smoke, and those differences affect how they should be tested and where they should be installed.
Most residential smoke detectors use one of two primary detection technologies. Ionization detectors use a small amount of radioactive material to ionize the air inside a sensing chamber. When smoke enters the chamber, it disrupts the ionized air current and triggers the alarm. Photoelectric detectors use a light beam and a sensor. When smoke particles enter the chamber, they scatter the light beam onto the sensor, which triggers the alarm.
Both technologies are effective, but they respond differently to different types of fires. Understanding this distinction helps you choose the right type of detector for each location in your home.
Types of Smoke Detectors
Ionization Smoke Detectors
Ionization smoke detectors respond faster to fast-flaming fires. These are fires that ignite quickly and produce relatively little smoke in their early stages, such as fires from paper, dry wood, or cooking accidents that escalate rapidly.
Ionization detectors are generally less expensive than photoelectric models and are the most commonly installed type in residential properties. They are sensitive to the tiny combustion particles produced by fast-burning fires, which makes them effective early warning devices when flames spread quickly.
However, ionization detectors also tend to trigger more frequent nuisance alarms near kitchens and bathrooms where steam and cooking smoke are present. This tendency causes some homeowners to remove batteries or disable detectors near cooking areas, which creates a significant safety risk.
Photoelectric Smoke Detectors
Photoelectric smoke detectors respond more effectively to slow, smoldering fires. These fires build gradually with substantial smoke production before open flames develop, which is the pattern seen in fires caused by cigarettes on upholstered furniture, electrical fires within walls, and overheated wiring.
Because smoldering fires often start during sleeping hours and produce smoke that fills a home slowly and silently, photoelectric detectors are particularly valuable in bedrooms and sleeping areas. They also produce fewer nuisance alarms from cooking and steam, making them a practical choice for installation near kitchens and bathrooms.
The NFPA and fire safety researchers have recommended that homes include both ionization and photoelectric protection to cover the full range of fire types that can develop in a residential setting.
Dual-Sensor Smoke Detectors
Dual-sensor smoke detectors combine both ionization and photoelectric technologies in a single unit. They offer comprehensive detection capability by responding effectively to both fast-flaming and slow-smoldering fires without requiring separate devices for each technology.
For homeowners who want maximum protection with minimum complexity, dual-sensor detectors are an excellent choice. A single detector installed in the correct location provides the coverage that previously required two separate units of different technologies.
The cost difference between dual-sensor models and single-technology detectors has narrowed significantly in recent years, making dual-sensor units a practical and cost-effective upgrade for most residential applications.
Smart Smoke Detectors
Smart smoke detectors connect to your home’s Wi-Fi network and send alerts directly to your smartphone when the alarm activates. This capability is particularly valuable for homeowners who travel frequently, vacation property owners, and parents who want to monitor their home while at work.
In addition to remote notification, smart detectors often include voice alerts that specify the location and nature of the detected threat, self-testing capabilities, integration with smart home systems, and maintenance reminders sent to your phone. Some models distinguish between smoke and carbon monoxide and communicate which threat has been detected.
Smart detectors require a power source that supports continuous Wi-Fi connectivity, typically hardwired installation with battery backup, and they depend on a functioning internet connection for remote notification features to work. They are more expensive than standard detectors but offer meaningfully enhanced monitoring capability.
Smoke Detector Types Comparison
| Type | Best For | Response to Fast Fires | Response to Slow Fires | Nuisance Alarms | Approximate Cost |
|---|---|---|---|---|---|
| Ionization | Fast-flaming fires | Excellent | Moderate | Higher near kitchens | $10–$25 |
| Photoelectric | Smoldering fires | Moderate | Excellent | Lower | $15–$40 |
| Dual-Sensor | All fire types | Excellent | Excellent | Moderate | $25–$60 |
| Smart Detector | Remote monitoring | Excellent | Excellent | Low to moderate | $80–$150+ |
How Often Should You Test Smoke Detectors?
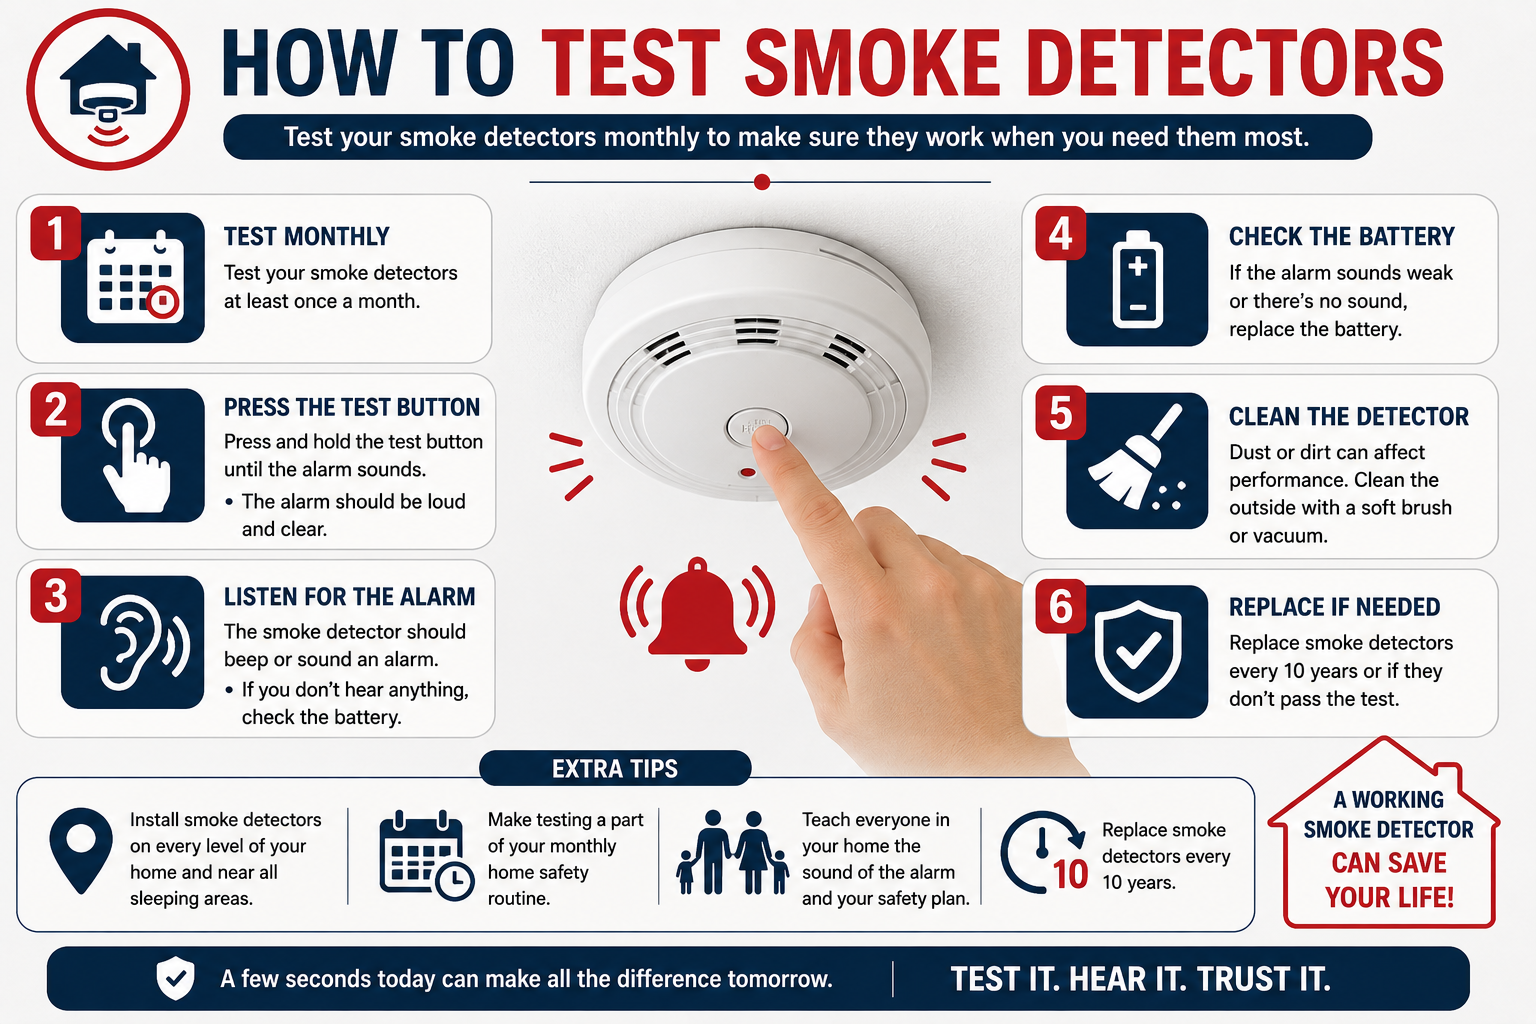
The National Fire Protection Association recommends testing every smoke alarm in the home at least once per month. Monthly testing confirms that the alarm circuit is functioning, the battery has sufficient power, and the alarm sound is at full volume. It takes approximately 30 seconds per detector and provides consistent assurance that your protection is in place.
Monthly smoke detector testing fits naturally into a broader home care routine. Our Monthly Home Maintenance Checklist includes smoke detector testing as a standard monthly task alongside other quick safety and system checks that keep your home running safely throughout the year.
Beyond monthly testing, a more thorough inspection should be completed annually. This deeper review includes checking the detector’s manufacturing date, cleaning the unit, verifying proper placement, and assessing whether replacement is approaching or necessary.
Many safety professionals also recommend testing smoke detectors after any significant event that could affect their function, including a power outage, a remodel that generated heavy dust, or a period when a battery was removed and reinstalled.
Signs Your Smoke Detector Needs Attention
Between regular monthly tests, certain signs indicate that a smoke detector needs immediate attention without waiting for the next scheduled check.
- The detector emits a brief chirping sound at regular intervals, typically every 30 to 60 seconds, which signals a low or failing battery
- The alarm activates for no apparent reason or in response to minor cooking steam that would not normally trigger it, suggesting a sensor may be malfunctioning or coated with debris
- The test button produces a delayed response, a weak sound, or no sound at all
- The device is physically damaged, discolored, or shows signs of moisture or pest intrusion
- The green power indicator light, if present, is not illuminated on a hardwired unit
- You cannot remember the last time you replaced the batteries or tested the unit
Any of these signs warrants immediate attention. Do not defer action on a smoke detector that shows signs of failure. Address the issue the same day you notice it.
Tools You May Need Before Testing
Testing a smoke detector requires very little equipment. For most monthly tests, the only tools you need are yourself and the ability to reach the detector safely.
Here is what to have available before you begin:
- A stepladder or step stool for reaching ceiling-mounted detectors safely
- Fresh replacement batteries in the correct size for your detectors, typically 9-volt or AA
- A soft brush or vacuum with a brush attachment for cleaning dust from the detector housing
- Canned smoke detector test spray for functional validation beyond the test button
- A permanent marker or sticker for recording the test date inside the battery compartment
- A flashlight for examining the detector interior and surrounding area
For most households, keeping a small dedicated home safety kit with these items allows you to complete monthly testing and maintenance quickly and consistently. Our guide on Home Maintenance Tools Every Homeowner Needs covers what to include in a complete home maintenance toolkit that supports safety checks like this one.
How to Test Smoke Detectors Safely
Work through the following steps each time you test your smoke detectors. This process applies to battery-powered, hardwired, and combination detector units.
Locate Every Smoke Detector
Before testing, confirm that you know the location of every smoke detector in your home. Walk through every room, hallway, stairwell, and sleeping area. Check basement and garage installations. Note the location of any detector you find that was not previously on your mental map.
Many homes have detectors that were installed by previous owners in locations that are no longer visible or accessible. Furniture rearrangement, renovation work, and suspended ceiling additions can all obscure detectors. Finding every unit before testing ensures nothing gets missed during your safety check.
Create a simple written or digital list of every detector location in your home. This list becomes the basis of your monthly testing routine and ensures you never inadvertently skip a unit.
Press the Test Button
Once you have located a detector, position your ladder safely and press and hold the test button on the face of the unit. Hold it for a full three to five seconds before releasing. A working detector will produce a loud alarm sound within a few seconds of pressing the button.
The test button directly activates the alarm circuit in the unit. It confirms that the battery has sufficient power, the siren is functional, and the alarm circuit is intact. Most test buttons are clearly marked and centrally located on the face of the detector. If your detector has a cover or decorative housing, you may need to remove it to access the test button.
Check the Alarm Sound
When the alarm activates in response to the test button, listen carefully to the sound quality. A properly functioning smoke detector produces a loud, consistent alarm at a volume audible throughout the home. The NFPA specifies that smoke alarms must produce a minimum of 85 decibels at 10 feet, which is approximately the volume of a lawnmower.
If the alarm sounds quieter than expected, delays before activating, produces a distorted or inconsistent tone, or fails to activate at all, the unit needs attention. Weak sound output most often indicates a dying battery, but can also signal a failing alarm circuit in an older unit that should be replaced.
Test Interconnected Smoke Alarms
Many modern homes use interconnected smoke alarm systems where all detectors are linked by wire or wireless signal so that when one alarm activates, every alarm in the home sounds simultaneously. This interconnection is one of the most important safety features available in residential fire detection because it ensures that an alarm triggered in the basement is heard by occupants sleeping on the second floor.
Test your interconnected system by activating one detector and confirming that every other detector in the system sounds simultaneously. Walk to the most distant location from the triggered detector and listen for the alarm. If any units fail to sound during interconnected testing, they may need to be re-paired to the system or replaced.
The National Fire Protection Association recommends interconnected smoke alarms in all new residential construction and strongly recommends that existing homes adopt interconnected systems when detectors are replaced.
Inspect the Battery
After completing the sound test, open the battery compartment and visually inspect the battery. Look for corrosion on the battery terminals, which appears as a white or greenish crystalline buildup. Corroded terminals prevent reliable power delivery even from a charged battery and must be cleaned or the battery compartment housing replaced.
Check whether the battery is seated correctly and making firm contact with both terminals. A battery that has shifted position can cause intermittent power delivery and unpredictable detector behavior. Reseat any battery that appears to be positioned incorrectly.
For hardwired detectors, confirm that the backup battery is present, that it is the correct type, and that it shows no signs of corrosion or damage. Hardwired detectors rely on their backup batteries during power outages, precisely the conditions when fire risk is often elevated due to candle use and alternative heating methods.
Replace the Battery if Needed
Replace the detector battery immediately if it is more than one year old, if the detector has been chirping to indicate low power, if the test produced weak sound output, or if visual inspection revealed any corrosion or damage. Do not wait to purchase replacement batteries. Keep a supply of the correct battery sizes on hand specifically for smoke detector maintenance.
When replacing batteries, install the new battery and immediately test the detector again to confirm that the replacement resolved any performance issue. Record the replacement date inside the battery compartment using a permanent marker so you know exactly when the next replacement is due.
Replace all smoke detector batteries in the home on the same annual schedule rather than replacing individual batteries only when they fail. Coordinated annual replacement, commonly aligned with daylight saving time changes in spring and fall, ensures no unit is overlooked and no battery is allowed to deplete to the point of silent failure.
Clean the Smoke Detector
Dust, grease, insects, and other debris accumulate inside smoke detector housings over time. In ionization detectors, this buildup can coat the sensing chamber and interfere with the ionization current. In photoelectric detectors, debris on the light chamber and sensor can block the light beam or scatter light in ways that produce false alarms or prevent detection.
Clean your smoke detector during each annual inspection by removing the unit from the ceiling mount and using a soft brush or vacuum with a brush attachment to gently clean the exterior vents and housing. Do not use water, cleaning sprays, or compressed air from canned aerosol products directly inside the sensing chamber. Follow the manufacturer’s specific cleaning guidelines if they differ from this general approach.
After cleaning, reinstall the unit, replace the battery, and test the alarm function before moving to the next detector.
Check the Expiration Date
Every smoke detector has a manufacturing date stamped inside the housing, typically on a sticker inside the battery compartment or on the back of the unit. Smoke detectors have a maximum service life of ten years from the date of manufacture, not the date of installation.
After ten years, the sensors inside the detector degrade to the point where detection reliability cannot be guaranteed. A detector that is eleven years old may still pass the test button check because the alarm circuit and battery are functioning, but the sensing elements may no longer respond adequately to actual smoke.
Check the manufacturing date on every detector during your annual inspection. Any unit that is ten years old or older should be replaced regardless of its apparent test performance. This is not a manufacturer recommendation designed to sell more products. It is a safety specification based on the documented degradation of sensor components over time.
Test Using Smoke Detector Test Spray
The test button verifies that the alarm circuit and battery are functional. It does not verify that the sensing elements are actually capable of detecting smoke. For a more complete functional test, use a product specifically designed for smoke detector sensor testing, commonly available as canned aerosol smoke detector test spray.
These products emit a simulated smoke aerosol that activates the detector’s sensing chamber without producing actual smoke or combustion byproducts. Spray a brief burst toward the detector’s sensing vents and confirm that the alarm activates within a few seconds.
Do not use actual smoke, open flame, or incense to test smoke detectors. These approaches introduce combustion products and heat that can damage sensor components and create unnecessary fire risk during what should be a routine safety check.
Record the Inspection Date
After completing the test and any maintenance for each detector, record the date of inspection. Write it inside the battery compartment with a permanent marker, add it to a home maintenance log, or update a tracking app on your phone.
A documented testing record serves multiple purposes. It confirms you are maintaining the monthly and annual schedule. It provides evidence of consistent maintenance for insurance purposes. It helps you track battery replacement intervals accurately. And it ensures that nothing is overlooked between inspections.
Including smoke detector testing in a broader home maintenance record alongside your other seasonal and annual checks builds a comprehensive safety and maintenance history for your home. Our Annual Home Maintenance Checklist provides a framework for exactly this kind of organized year-round documentation.
Common Mistakes When Testing Smoke Detectors
Even safety-conscious homeowners make avoidable errors when maintaining their smoke detectors. These are the most consequential ones to know.
Testing only one or two detectors. Every detector in the home must be tested every month. Testing a representative sample leaves gaps in your protection that you may not discover until it is too late.
Removing batteries to stop nuisance alarms. This is the single most dangerous smoke detector mistake. When a detector near the kitchen triggers during cooking, the correct response is to ventilate the area and consider relocating the detector, not to remove its battery. A detector without a battery is completely non-functional.
Relying on the test button alone for the annual check. The test button confirms electrical function. It does not verify sensor capability. Annual testing should include sensor spray testing and a check of the manufacturing date.
Forgetting hardwired detector backup batteries. Hardwired detectors require working backup batteries to function during power outages. Many homeowners replace batteries only in battery-powered units and overlook the backup batteries in hardwired models.
Skipping detectors that are difficult to reach. A detector installed in a high ceiling location that is inconvenient to access still requires monthly testing. Acquire the appropriate ladder rather than skipping the check.
Not testing after battery replacement. Always re-test a detector immediately after replacing its battery. This confirms the new battery was seated correctly and resolves any performance issue that the old battery was causing.
Smoke Detector Maintenance Tips
Consistent maintenance ensures your detectors remain functional and reliable between formal testing sessions.
- Replace all smoke detector batteries on the same annual schedule rather than individually when each one fails
- Keep replacement batteries in the correct sizes on hand at all times so you are never without a replacement when needed
- Clean detector housings gently with a soft brush during annual maintenance to prevent debris accumulation in sensing chambers
- Never paint over a smoke detector. Paint clogs venting and sensing chambers and can render the unit completely non-functional
- Keep smoke detectors away from steam, excessive humidity, and cooking fumes by maintaining the recommended clearance distances from these sources
- Test detectors after returning from any extended travel to confirm the home’s safety systems are fully operational
- Ensure that all household members, including children, can recognize the sound of a smoke alarm and know the household evacuation plan
When to Replace a Smoke Detector
| Replacement Trigger | Action Required | Timeframe |
|---|---|---|
| Detector is 10 years or older | Replace immediately | Do not delay |
| Alarm fails to sound during test | Replace immediately | Same day |
| Chirping persists after new battery | Replace unit | Same day |
| Physical damage or discoloration | Replace immediately | Same day |
| Detector experienced heavy smoke exposure | Replace unit | After the event |
| Alarm repeatedly triggers without cause | Replace or relocate | Within 1 week |
| Missing or unknown manufacturing date | Replace immediately | Same day |
Smoke Detector Placement Tips
Where a smoke detector is installed is as important as whether it is installed. A detector in the wrong location may not provide adequate warning before conditions in the primary threat areas become dangerous.
Follow these placement guidelines for maximum protection:
- Install a smoke detector on every level of the home, including the basement
- Install a detector inside every bedroom and outside every sleeping area
- Place detectors on the ceiling or high on the wall, since smoke rises
- Install ceiling-mounted detectors at least four inches from any wall
- Install wall-mounted detectors between four and twelve inches from the ceiling
- Keep detectors at least ten feet from cooking appliances to reduce nuisance alarms while maintaining coverage of the kitchen area
- Avoid installing detectors in garages where vehicle exhaust and fumes cause frequent false alarms
- Install detectors at both the top and bottom of every stairway connecting multiple floors
Proper placement works in conjunction with regular testing to create a genuinely comprehensive fire detection system throughout your home. When you review placement as part of your annual home safety inspection, consult our DIY Home Inspection Checklist for a complete room-by-room safety assessment framework.
Smoke Detector Maintenance Schedule
| Task | Frequency | Notes |
|---|---|---|
| Press test button on all detectors | Monthly | Confirm full-volume alarm sound |
| Replace all detector batteries | Annually | Do not wait for individual failure |
| Clean detector housing and vents | Annually | Soft brush or vacuum only |
| Test sensor function with test spray | Annually | Confirms sensing chamber function |
| Check manufacturing date | Annually | Replace any unit 10 years or older |
| Test interconnected system function | Monthly | Confirm all units sound simultaneously |
| Check for physical damage | Monthly | Inspect housing during test |
| Verify correct placement | Annually | Confirm recommended distances are maintained |
| Update maintenance log | Monthly | Record date and any findings |
Smoke Detector Safety Tips
Building good smoke detector habits as part of your overall home safety approach protects your family beyond the detector itself.
- Practice a home fire escape plan with all household members at least twice per year. Knowing what to do when the alarm sounds is as important as having a working alarm
- Designate a meeting point outside the home where all family members will gather after evacuation
- Never re-enter a burning home for any reason. Call the fire department from a safe outdoor location
- Test smoke detectors before hosting overnight guests so you can confirm the alarm is audible in every sleeping area
- Pair smoke detectors with carbon monoxide detectors in every sleeping area. CO is odorless and invisible and poses a serious risk alongside fire hazards, particularly during winter when heating equipment runs continuously
- Teach children to recognize the sound of the smoke alarm and understand that they should never hide during a fire, even if they are frightened
The U.S. Fire Administration provides free fire safety planning resources at usfa.fema.gov, including home fire escape plan templates and educational materials for families with children of all ages. Reviewing these resources alongside your regular smoke detector testing routine builds a more complete fire safety approach for your household.
DIY vs Professional Smoke Detector Inspection
| Task | DIY Friendly | Professional Recommended | Reason |
|---|---|---|---|
| Monthly test button check | Yes | No | Simple, requires no tools or training |
| Annual sensor spray test | Yes | No | Straightforward with correct spray product |
| Battery replacement | Yes | No | Simple task requiring only correct battery size |
| Detector cleaning | Yes | No | Gentle brush or vacuum, no special skill needed |
| Manufacturing date check | Yes | No | Read the label inside battery compartment |
| Interconnected system testing | Yes | Partial | Wiring issues may require electrician |
| Hardwired detector installation | No | Yes | Requires electrical knowledge and code compliance |
| Wireless interconnected system setup | Partial | Yes for complex systems | Pairing multiple units can require technical guidance |
| Commercial or multi-family system inspection | No | Yes | Requires licensed fire alarm technician |
| System replacement after fire or damage | No | Yes | Damaged wiring requires professional assessment |
Expert Recommendations
After years of working in home safety and maintenance, a few consistent patterns emerge among homeowners who maintain the most reliable fire detection systems in their homes.
The most effective approach is always to treat smoke detector testing as a fixed monthly habit rather than a task completed when remembered. Tying the monthly test to something you already do consistently, such as the first day of the month or the first Sunday of each month, removes the reliance on memory and ensures it happens without effort.
Annual battery replacement should be coordinated across all detectors in the home on the same date each year. Many homeowners align this with daylight saving time changes in spring or fall. This eliminates the piecemeal approach of replacing individual batteries only when they chirp, which leaves some units operating on old batteries longer than they should.
Fall home maintenance is a natural time to complete your most thorough annual smoke detector inspection. Our Fall Home Maintenance Checklist includes smoke detector and carbon monoxide detector testing as critical safety items to address before heating season increases fire and CO risks. The spring season offers an equally good opportunity, and our Spring Home Maintenance Checklist also includes this task as part of a complete seasonal safety review.
Do not overlook the manufacturing date. The test button check, which is all most homeowners ever do, tells you nothing about whether the detector’s sensors are still capable of detecting actual smoke. A ten-year-old detector that passes the test button check every month may still fail to detect a smoldering fire developing in a wall cavity. Replace on schedule without waiting for the detector to fail visibly.
Frequently Asked Questions
How do I test a smoke detector without pressing the test button?
The most reliable alternative to the test button is a purpose-made smoke detector test spray, available at hardware stores and online. These aerosol products emit a simulated smoke mist that activates the detector’s sensing chamber without creating real smoke or combustion risk. Spray a brief burst toward the sensing vents of the detector and the alarm should activate within a few seconds. This method tests the actual sensing elements rather than just the alarm circuit, providing more complete assurance that the unit will respond to real smoke. Always use products specifically designed for smoke detector testing rather than improvising with household sprays.
Why does my smoke detector keep chirping after I replace the battery?
Intermittent chirping after a new battery is installed usually has one of a few causes. The new battery may not be properly seated in the terminals, causing intermittent contact. The battery may be the wrong size or type for that specific detector model. The battery contacts inside the compartment may be corroded, preventing reliable power delivery even from a fresh battery. Finally, some detectors chirp to indicate that the unit has reached or exceeded its ten-year service life and needs replacement regardless of battery condition. Check the manufacturing date inside the battery compartment and replace the unit if it is ten or more years old.
Where should smoke detectors not be installed?
Certain locations produce conditions that cause frequent false alarms or reduce detector reliability. Avoid installing smoke detectors in bathrooms, where steam from showers triggers nuisance alarms. Do not install them in garages, where vehicle exhaust and chemical fumes interfere with sensing. Avoid placement near windows, doors, or air vents where air currents can dilute smoke before it reaches the detector. Keep detectors out of very humid areas and spaces with extreme temperature fluctuations. Attic spaces, unheated crawl spaces, and outdoor locations are also inappropriate for standard residential smoke detectors, as temperature extremes damage sensors and shorten service life significantly.
Can I test a smoke detector with a candle?
No. Using an open flame or candle near a smoke detector is not recommended and can be dangerous. The heat from an open flame can permanently damage the sensors inside the detector, particularly in photoelectric models. It also creates an unnecessary fire risk during what should be a simple safety check. Use a purpose-made smoke detector test spray for sensor function testing or simply press the test button for a monthly circuit check. Both approaches are safer, more reliable, and will not damage the detector. Purpose-built test sprays are inexpensive and widely available at hardware stores.
How many smoke detectors does a home need?
The minimum coverage recommended by the National Fire Protection Association includes one smoke detector on every level of the home, one inside every bedroom, and one outside every sleeping area. For a two-story home with three bedrooms, that means a minimum of five or six detectors positioned correctly. Many fire safety professionals recommend exceeding this minimum by adding detectors in hallways, living areas, and at the top and bottom of every stairway. The goal is to ensure that no matter where a fire starts, the alarm sound reaches every occupied area of the home with enough time for safe evacuation.
Do smoke detectors expire?
Yes. Smoke detectors have a finite service life of ten years from the date of manufacture. After this point, the sensing elements inside the unit degrade in ways that reduce detection reliability below acceptable safety standards. The device may still appear to function, and the test button may still trigger the alarm, but the sensor’s ability to detect actual smoke in its early stages is compromised. The manufacturing date is printed on a label inside the battery compartment or on the back of the unit. Any detector that has passed its ten-year mark should be replaced immediately regardless of its apparent operational condition.
What is the difference between a smoke detector and a smoke alarm?
These terms are often used interchangeably, but they refer to slightly different devices. A smoke detector is technically a sensing component that detects smoke and sends a signal to a separate alarm control panel, which then activates the alarm. This type of system is more common in commercial buildings and hardwired residential systems. A smoke alarm is a self-contained unit that both detects smoke and sounds the alarm within the same housing, which is the type most commonly found in residential homes. For practical home safety purposes, both terms describe devices that detect smoke and sound an alert, and the distinction rarely affects how homeowners test or maintain them.
Should smoke detectors and carbon monoxide detectors be installed together?
Yes. Smoke detectors and carbon monoxide detectors protect against two distinct but related threats. Smoke detectors respond to combustion particles from fire. Carbon monoxide detectors respond to the odorless, colorless gas produced by incomplete combustion in heating equipment, gas appliances, and idling vehicles. Neither device protects against the threat the other is designed to detect. Install carbon monoxide detectors on every level of the home and within 15 feet of every sleeping area. Combination units that detect both smoke and carbon monoxide are available and provide dual protection from a single device, which simplifies installation and reduces the total number of devices requiring maintenance.
What should I do if my smoke detector activates during cooking?
First, do not remove the battery or disable the detector. Instead, ventilate the kitchen by opening windows, turning on the exhaust fan, and fanning the area near the detector to disperse cooking smoke. If this is a recurring problem, the detector may be positioned too close to the cooking area. The NFPA recommends maintaining at least ten feet of distance between smoke detectors and cooking appliances to reduce nuisance activations while maintaining kitchen coverage. Relocating the detector to a hallway adjacent to the kitchen or switching to a photoelectric model, which is less sensitive to cooking-related particles, can reduce false alarms without compromising safety.
How do I know if my smoke detectors are interconnected?
The simplest test is to activate one detector and observe whether every other detector in the home sounds simultaneously. If they do, the system is interconnected. If only the triggered detector sounds, the units are operating independently. Interconnected systems are either hardwired, using electrical cable to link all units, or wireless, using radio frequency communication between units. Check your detector’s model documentation or manufacturer website to confirm its interconnection capability. Many modern smoke detectors include wireless interconnection capability that allows existing battery-operated units to be linked without running new wiring. Interconnected systems are strongly preferred because they ensure that an alarm in any location is heard throughout the entire home.
Conclusion
A working smoke detector is the most important piece of safety equipment in your home. It requires almost no money to maintain, takes less than ten minutes per month to test, and provides a level of protection that nothing else in your home can replicate.
The steps in this guide give you everything you need to test, maintain, and manage your smoke detectors with confidence. Test every detector monthly. Replace batteries annually on a coordinated schedule. Clean and inspect units once a year. Check manufacturing dates and replace any detector that has reached or exceeded ten years of age. Test sensor function with purpose-made test spray to verify that sensing chambers are working, not just the alarm circuit.
These are not complicated tasks. They require no special skill, minimal tools, and a small investment of time. What they provide in return is the assurance that if a fire starts anywhere in your home, your family will have the warning they need to get out safely.
Build smoke detector testing into your monthly home maintenance routine and your seasonal inspection schedule. Pair your smoke detectors with carbon monoxide detectors in every sleeping area. Practice your household evacuation plan. Know where every detector is located. And never, under any circumstances, remove a battery to silence an inconvenient alarm.
Your family’s safety depends on these devices working when they are needed. Make sure they will.